
Popular categories
Looking for a yarn?


Comments / Questions (5)
![]() Catherine wrote:
Catherine wrote:
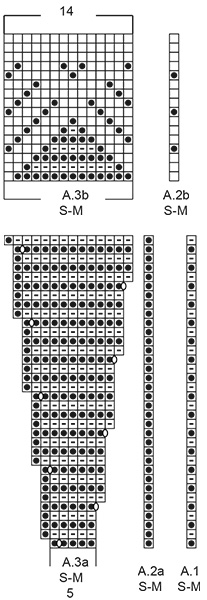
Comment faire le point jacquard en deux couleurs avec la partie au point mousse. Comment faire avec le fil ?
25.03.2024 - 18:12DROPS Design answered:
Bonjour Catherine, tricotez le jacquard ainsi: méthode anglaise/américaine ou bien ainsi: méthode continentale. Bon tricot!
02.04.2024 - 10:12
![]() Catherine wrote:
Catherine wrote:
Je ne comprends pas comment faire le motif jacquard sur la partie au point mousse.
25.03.2024 - 18:11DROPS Design answered:
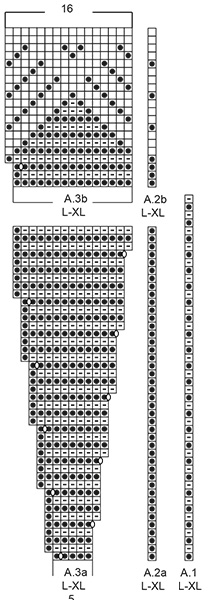
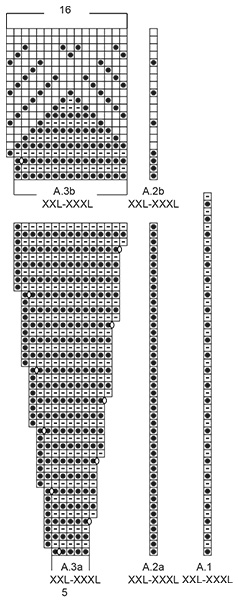
Bonjour Catherine, vous pensez au diagrammes A.2b/A.3b je suppose? Retrouvez la signification des symboles dans la légende pour savoir de quelle couleur tricoter les mailles en fonction des rangs sur l'endroit et sur l'envers. Bon tricot!
02.04.2024 - 10:11
![]() Sandra Chiodo wrote:
Sandra Chiodo wrote:
I am making the Pyramids jacket. It says to cast on 80 stitches. (« Including 5 band stitches in each side »). Does that mean I should cast on a total of 90 stitches. I just got the Nepal in the post and I am very excited to start, it is lovely yarn! Thank you
15.08.2020 - 02:04DROPS Design answered:
Hi Sandra, The band stitches are included in the 80 stitches - so you have 2 x 5 stitches for the bands and 70 stitches on the body. Happy knitting!
17.08.2020 - 07:09
![]() Nicole wrote:
Nicole wrote:
Hallo, ich komme mit Strickschrift A3 nicht klar. Normalerweise verkreuze ich in Hinreihen die beiden Fäden auf der Rückseite aller 3 Maschen, damit der nicht benötigte Faden nicht durchhängt. Bei dieser Strickschrift gibt es aber auch in den Rückreihen rechte Maschen. Weil es eine Rückreihe ist, muß ich vor der Arbeit verkreuzen, aber blöderweise sieht man dann auf der richtigen Seite den verkreuzten Faden durch. Haben Sie Tips, wie ich unsichtbar verkreuzen kann? Lieben Dank!
25.05.2020 - 17:05DROPS Design answered:
Liebe Nicole, ich würde also bei der erste/letzte Masche mit hellgrau verkreuzen, und dann der Faden Natur auf der Rückseite legen, und nur beachten, daß der Faden nicht zu fest gespannt ist, damit die Arbeit nicht zu fest wird. Viel Spaß beim stricken!
26.05.2020 - 08:24
![]() Anette wrote:
Anette wrote:
Str xxl: efter første udtagning 101 masker. 2×5 kantmasker. 1+5 m i mønster. Jeg skal nu ha 18 baner. Jeg har 15,1 bane ! Hvis jeg skal ha 18 baner, skal jeg vel bruge 119 masker ? Forstår ikke opskriften. Skal jeg strikke xxl med 101 eller 119 masker = 15/18 baner ?
15.03.2019 - 12:32DROPS Design answered:
Hei Anette. Du strikker 5 stolpemasker i A.1, så strikker du neste maske som A.2a. Videre gjentar du A.3a 18 ganger (altså over de neste 90 masker), og så avslutter du med 5 stolpemasker i A.1. Det er altså kun A.3a som gjentas, A.2a strikkes kun over den første masken etter stolpen (fra rettsiden).
25.03.2019 - 14:32
|
||||||||||||||||
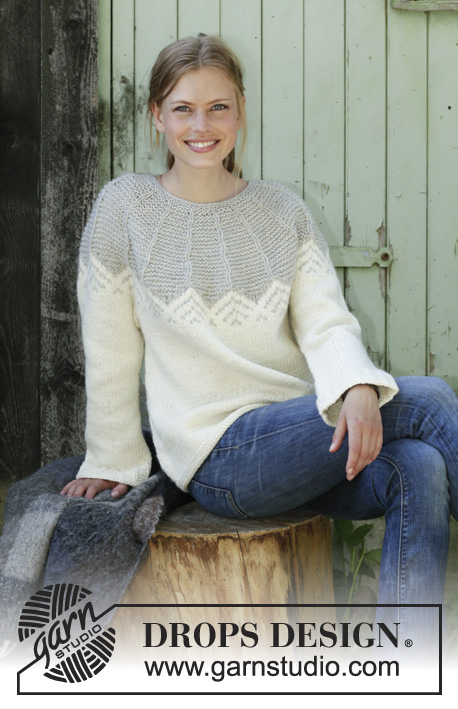
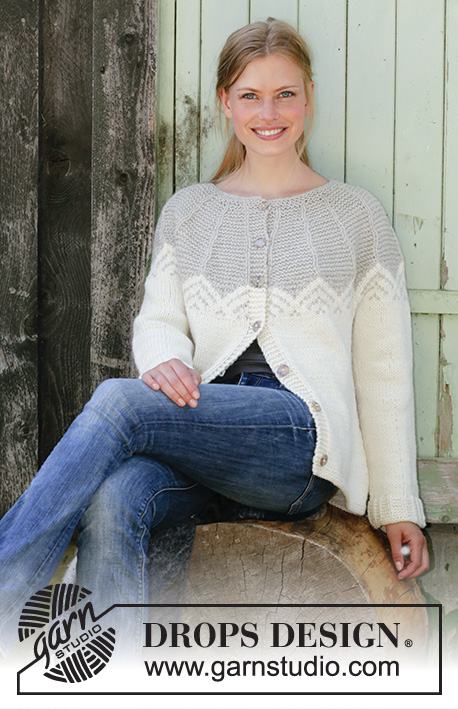
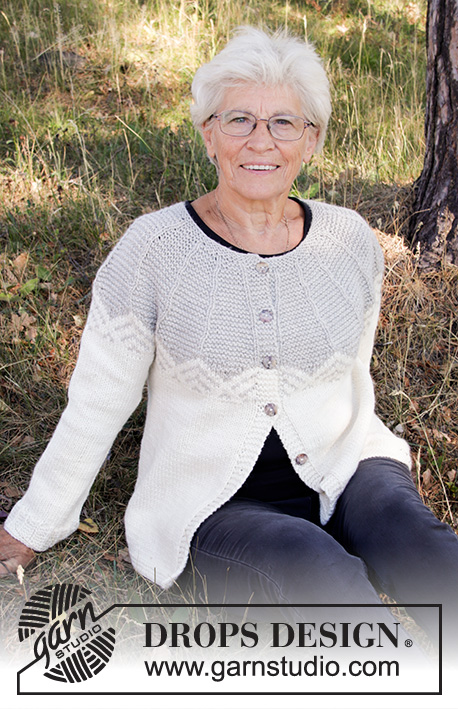
Pyramids Jacket#pyramidsjacket |
||||||||||||||||
 |
 |
|||||||||||||||
Knitted jacket with round yoke in DROPS Alaska or Nepal. Piece is knitted top down in garter stitch and Nordic pattern. Size: S - XXXL
DROPS 195-29 |
||||||||||||||||
|
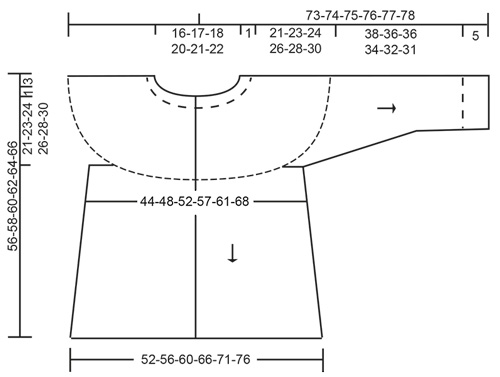
EXPLANATION FOR THE PATTERN: ---------------------------------------------------------- GARTER STITCH (back and forth): 1 ridge = knit 2 rows. GARTER STITCH (in the round) - applies to sleeves: 1 ridge = 2 rounds. Knit 1 round and purl 1 round. PATTERN: See diagrams A.1 to A.3. Choose diagram for your size. When there is more than 6 stitches between colour change in pattern, twine the strands together, to avoid long jumps on wrong side. INCREASE TIP-1 (evenly): To calculate how to increase evenly, use the total number of stitches on row (e.g. 80 stitches), minus bands (= 70 stitches) and divide the remaining stitches by number of increases to be done (e.g. 6) = 11.6. In this example increase by making 1 yarn over after alternately approx. every 11th and 12th stitch. Do not increase over band. On next row work yarn overs twisted to avoid holes. INCREASE TIP-2 (applies to sides of body): All increases are done from the right side! Work until 2 stitches remain before marker thread, 1 yarn over, knit 4 (marker thread is in the middle of these stitches), 1 yarn over. On next row work yarn over twisted to avoid holes Then work the new stitches in stocking stitch. DECREASE TIP (applies to sleeves): Decrease 1 stitch on each side of marker thread as follows: Work until 3 stitches remain before marker thread and knit 2 together, knit 2 (marker thread is between these stitches), slip 1 stitch knitwise, knit 1, pass slipped stitch over stitch worked. BUTTONHOLES: Decrease for buttonholes on right band (when garment is worn). Decrease from right side when 3 stitches remain on row as follows: Make 1 yarn over, knit the next 2 stitches together, knit last stitch. On next row knit yarn over to make holes. Decrease first buttonhole when piece measures approx. 1½-2 cm. Then decrease the next 6-6-7-7-8-8 buttonholes, approx. 8-8-7½-7½-7-7 cm between each. ---------------------------------------------------------- START THE PIECE HERE: ---------------------------------------------------------- JACKET - SHORT OVERVIEW OF THE GARMENT: Work yoke back and forth, top down. Divide the piece into sleeves and body. Work body back and forth. Work sleeves in the round on double pointed needles. YOKE: Cast on 80-84-86-94-96-100 stitches (including 5 band stitches in each side of piece) on circular needle size 4.5 mm with light grey. Work 2 ridges in GARTER STITCH - read explanation above. Switch to circular needle size 5.5 mm. Knit 1 row from right side and increase 6-12-5-2-5-11 stitches evenly - read INCREASE TIP-1 = 86-96-91-96-101-111 stitches. Decrease for BUTTONHOLES on right band - read explanation above. Knit 1 row from wrong side. Then work next row as follows from right side: Work 5 band stitches as A.1, A.2a (= 1 stitch in stocking stitch), work A.3a (= 5 stitches) until 5 stitches remain (= 15-17-16-17-18-20 times in width) and finish with 5 band stitches as A.1. Continue pattern like this. REMEMBER THE KNITTING TENSION! When A.2a and A.3a have been worked 1 time vertically, work A.2b and A.3b over A.2a and A.3a. When A.1 has been worked, work band in garter stitch with off white until finished measurements. When A.2b and A.3b have been worked 1 time vertically, there are 221-249-267-283-299-331 stitches on needle. Piece measures approx. 21-21-24-24-26-26 cm. Now work piece in off white and stocking stitch with 5 band stitches in garter stitch in each side of piece. When piece measures 22-24-25-27-29-31 cm, divide the piece sleeves and body as follows: Work 5 band stitches in garter stitch, 31-33-36-39-42-48 stitches in stocking stitch (= front piece), slip the next 44-52-56-58-60-64 stitches on a stitch holder for sleeve and cast on 8-8-10-12-12-12 stitches under sleeve, work 62-68-73-79-85-97 stitches in stocking stitch (= back piece), slip the next 44-52-56-58-60-64 stitches on a stitch holder for sleeve and cast on 8-8-10-12-12-12 stitches under sleeve, work 30-34-36-39-42-48 stitches in stocking stitch and finish with 5 band stitches in garter stitch (= front piece) = 149-161-175-191-203-227 stitches. BODY: Insert 1 marker thread in the middle of the 8-8-10-12-12-12 new stitches in each side of piece (= 70-76-83-91-97-109 stitches on back piece). Work in stocking stitch with 5 band stitches in garter stitch in each side of piece. When piece measures 2 cm from where body was divided from sleeves, increase 1 stitch on each side of every marker thread (= 4 stitches increased) - read INCREASE TIP-2. Increase like this every 3 cm 7-7-7-8-9-7 times in total = 177-189-203-223-239-255 stitches. When piece measures 29-29-30-30-30-30 cm from where body was divided from sleeves, switch to circular needle size 4.5 mm and work in garter stitch over all stitches until body measures 31-31-32-32-32-32 cm, from where it was divided from sleeves. Then loosely cast off by knitting. Piece measures approx. 56-58-60-62-64-66 cm in total from shoulder and down. SLEEVE: Slip the 44-52-56-58-60-64 stitches from stitch holder in one side of piece on double pointed needles size 5.5 mm and pick up 1 stitch in each of the 8-8-10-12-12-12 stitches under sleeve with off white = 52-60-66-70-72-76 stitches. Insert 1 marker thread in the middle of the 8-8-10-12-12-12 stitches under sleeve. Work stocking stitch in the round with off white. When sleeve measures 3 cm from where it was divided from body, decrease 1 stitch on each side of marker (= 2 stitches decreased) - read DECREASE TIP. Decrease like this every 6-2½-2-1½-1½-1½ cm 4-8-10-12-12-13 times in total = 44-44-46-46-48-50 stitches. When sleeve measures 38-36-36-34-32-31 cm from where it was divided from body, increase 0-0-2-2-0-2 stitches evenly = 44-44-48-48-48-52 stitches. Then switch to double pointed needles size 4.5 mm and * knit 1, 3 stitches in GARTER STITCH – read explanation above *, work from *-* over all stitches. Cast off by knitting when sleeve measures 43-41-41-39-37-36 cm from where it was divided from body. Work the other sleeve the same way. ASSEMBLY: Sew the buttons on to the left band. |
||||||||||||||||
Diagram explanations |
||||||||||||||||
|
||||||||||||||||
 |
||||||||||||||||
 |
||||||||||||||||
 |
||||||||||||||||
 |
||||||||||||||||
Have you finished this pattern?Tag your pictures with #dropspattern #pyramidsjacket or submit them to the #dropsfan gallery. Do you need help with this pattern?You'll find 30 tutorial videos, a Comments/Questions area and more by visiting the pattern on garnstudio.com. © 1982-2026 DROPS Design A/S. We reserve all rights. This document, including all its sub-sections, has copyrights. Read more about what you can do with our patterns at the bottom of each pattern on our site. |
||||||||||||||||


With over 40 years in knitting and crochet design, DROPS Design offers one of the most extensive collections of free patterns on the internet - translated to 17 languages. As of today we count 324 catalogues and 12290 patterns translated into English (UK/cm). 12290
We work hard to bring you the best knitting and crochet have to offer, inspiration and advice as well as great quality yarns at incredible prices! Would you like to use our patterns for other than personal use? You can read what you are allowed to do in the Copyright text at the bottom of all our patterns. Happy crafting!
Post a comment to pattern DROPS 195-29
We would love to hear what you have to say about this pattern!
If you want to leave a question, please make sure you select the correct category in the form below, to speed up the answering process. Required fields are marked *.