
Popular categories
Looking for a yarn?


Comments / Questions (51)
![]() Rebecca wrote:
Rebecca wrote:
Wo steht denn wieviel cm Brustumfang die jeweiligen Größen haben? In der Skizze sind ja nur die Maschenanzahl abgebildet.
06.11.2025 - 01:09DROPS Design answered:
Liebe Rebecca, die Skizze zeigt die cm-Angaben, nicht die Maschenzahlen. Viel Spaß beim Stricken!
07.11.2025 - 10:39
![]() Karen Townsend wrote:
Karen Townsend wrote:
Hi again I realize the pattern says S M L etc but it does not give me the measurements for each size. Some of your patterns I’ve knit in Med and others I’ve had to make a large. I really would appreciate knowing the measurements. Thank you
08.09.2025 - 17:19DROPS Design answered:
Hi Karen, There is a size chart at the bottom of the pattern with all the measurements for each size. Regards, Drops Team.
09.09.2025 - 06:47
![]() Karen Townsend wrote:
Karen Townsend wrote:
I would love to knit pattern red sky 197-23 but you don’t show the measurements. I measure 39 bust so I’m not sure if I should knit medium or large
07.09.2025 - 22:11DROPS Design answered:
Hi Karen, There is a size chart at the bottom of the pattern, with all the measurements for the different sizes. Regards, Drops Team.
08.09.2025 - 06:40
![]() Georgia Shirley wrote:
Georgia Shirley wrote:
Is this pattern in English? I can't seem to access on this site.
25.01.2025 - 04:39DROPS Design answered:
Dear Georgia, you can change the language of the pattern in the menu above the size selector, at the top of the pattern instructions. You can also check here the UK version and the US version of the pattern. Happy knitting!
26.01.2025 - 20:09
![]() May-Brit Hjelén Isaksen wrote:
May-Brit Hjelén Isaksen wrote:
Hei. Jeg lurer på; på bæresytykket, når jeg er ferdig med raglandsøkninger, skal jeg strikke videre til korrekt lengde uten å øke, men 'med hull', altså to rett sammen før/etter kastet, eller er det kun glattstrikk fra endt økning til deling av armer/bol?
07.02.2024 - 06:48DROPS Design answered:
Hei May-Britt, Ja, du strikker videre til riktig lengden på bærestykke. Det blir finest å fortsette hullene langs hver raglanlinje. God fornøyelse!
08.02.2024 - 07:16
![]() Eva wrote:
Eva wrote:
Working on yoke increases and did first row fine. 2 questions- do we follow these same instructions to get our 8 increases every other row? It seems like we are increasing 4 stitches in sleeve area front and back every increase row? And when we knit the next row do we knit all the YO so that we do have the hole? Thank you for your assistance
15.10.2023 - 00:28DROPS Design answered:
Dear Eva, you will increase 8 stitches on every increase round 22 times (+ the first one already worked = 23), just as explained for the first increase round. Since it's every other round you will increase on alternate rounds (1 round with increases, next one with no increases, next one with increases, e.t.c). You increase on each side of the marker thread as explained in RAGLAN. You increase 2 stitches in each sleeve section (=4 in total), 2 stitches in the back piece and 2 stitches in the front piece. As indicated in RAGLAN, the yarn overs are knitted so that holes are left. Happy knitting!
15.10.2023 - 23:54
![]() Eva wrote:
Eva wrote:
I am not going to do the elevation for for back of neck and went to yoke. If I place a marker at BOR The way pattern reads that does not place BOR at center back? Am I missing something?
11.10.2023 - 00:36DROPS Design answered:
Hi Eva, The beginning of the round is 3 stitches before the sleeve (so 3 stitches left on the back piece and the remaining back piece stitches are at the end of the round). Happy knitting!
11.10.2023 - 06:41
![]() Gigi wrote:
Gigi wrote:
What are the bust sizes for small, medium, in the patterns listed
13.04.2022 - 20:24DROPS Design answered:
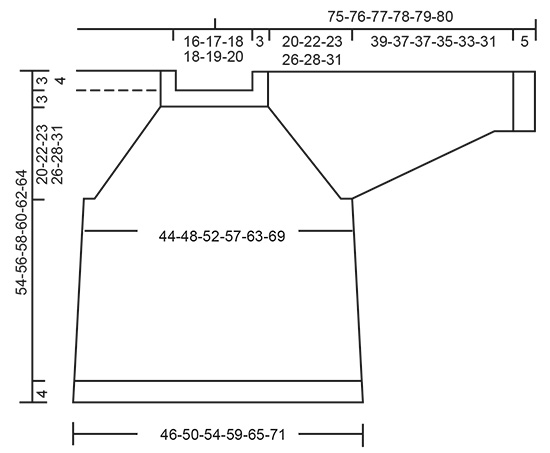
Dear Gig, you can see the measurements in cm corresponding to each size in the schematic of the garment after the pattern instructions. Happy knitting!
14.04.2022 - 17:45
![]() Anna wrote:
Anna wrote:
Ohjeen alussa luetellaan tarvittavat välineet, mm. DROPS SUKKAPUIKOT JA PYÖRÖPUIKKO NRO 3,5: Pituus 80 cm, joustinneuleeseen. 80 cm on aivan liian pitkä pääntien reunuksen 96 silmukalle, joista vielä osa kavennetaan. Tähän riittää 40 cm pitkä pyöröpuikko. Olisi hyvä mainita jo alkuun, ettei tule ostettua turhaan väärän kokoisia puikkoja.
11.02.2022 - 12:49
![]() Ana wrote:
Ana wrote:
Insertar 1 hilo marcador en el centro de los 8-8-10-10-12-12 puntos nuevos que fueron montados bajo la manga a cada lado. Comenzar la vuelta en uno de los hilos marcadores y mover los hilos marcadores a medida que se teje. Continuar en punto jersey. Cuando la pieza mida 8 cm a partir de la división, aumentar 1 punto a cada lado de los dos hilos marcadores .Cada cuantas vueltas se realizan estos aumentos?
07.05.2020 - 00:37DROPS Design answered:
Hola Ana, Dos veces: cuando la pieza mida 8 i 17 cm a partir de la división debes aumentar 1 punto a cada lado de los dos hilos marcadores. Buen trabajo!
20.11.2020 - 10:57
|
|
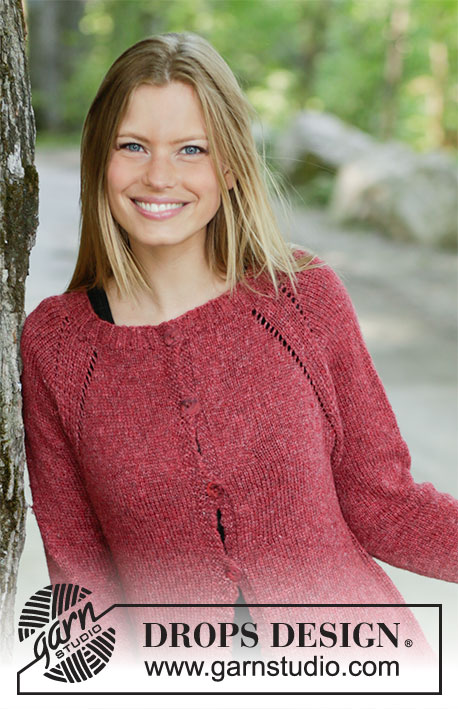
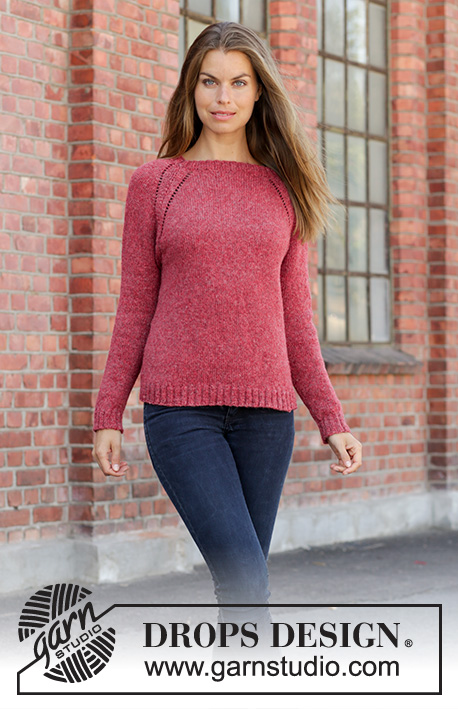
Red Sky#redskysweater |
|
 |
 |
Knitted jumper with raglan in DROPS Sky. Piece is knitted top down. Size: S - XXXL
DROPS 197-23 |
|
|
EXPLANATION FOR THE PATTERN: ---------------------------------------------------------- DECREASE/INCREASE TIP (evenly): To calculate how to decrease/increase evenly, use the total number of stitches to be decreased/increased over (e.g. 96 stitches) and divide stitches by number of decreases/increases to be done (e.g. 8) = 12. In this example decrease by knitting every 11th and 12th stitch together. When increasing evenly make 1 yarn over after every 12th stitch. On next round knit yarn over twisted to avoid holes. RAGLAN: Increase 2 stitches in every transition between body and sleeves as follows: Work until 3 stitches remain before marker thread, 1 yarn over, knit 6 (marker thread is in the middle of these stitches), 1 yarn over. On next round knit the yarn overs to make holes. Then work the new stitches in stocking stitch. INCREASE TIP (applies to sides of body): Work until 2 stitches remain before marker thread, 1 yarn over, knit 4 (marker thread is in the middle of these stitches), 1 yarn over. On next round knit yarn over twisted to avoid holes. Then work the new stitches in stocking stitch. DECREASE TIP (applies to sleeves): Decrease 1 stitch on each side of marker thread as follows: Work until 3 stitches remain before marker thread and knit 2 together, knit 2 (marker thread is between these stitches), slip 1 stitch knitwise, knit 1, pass slipped stitch over stitch worked. ---------------------------------------------------------- START THE PIECE HERE: ---------------------------------------------------------- JUMPER - SHORT OVERVIEW OF THE PIECE: Worked in the round on circular needle, top down. An elevation in the back of neck can be worked to get a better fit so that yoke is somewhat higher in the neck. This elevation can be skipped, to make the neck the same at the front and back - see explanation on elevation in pattern. After yoke work body in the round on circular needle. Work sleeves in the round on double pointed needles/a short circular needle. NECK EDGE: Cast on 96-100-104-112-120-124 stitches on circular needle size 3.5 mm with Sky. Knit 1 round. Then work rib (= knit 2/purl 2) for 3 cm. Knit 1 round while decreasing 8-8-8-12-12-12 stitches evenly - read DECREASE/INCREASE TIP = 88-92-96-100-108-112 stitches. Switch to circular needle size 4.5 mm. Now work elevation in the back of neck or start to work the yoke if you don’t want an elevation. ELEVATION IN BACK OF NECK: Skip this paragraph if you do not want an elevation. Insert 1 marker at beginning of round = mid back. Begin from right side and knit 6-6-7-7-8-8 stitches past marker, turn, tighten yarn and purl 12-12-14-14-16-16 stitches from wrong side, turn, tighten yarn and knit 18-18-21-21-24-24 stitches, turn, tighten yarn and purl 24-24-28-28-32-32 stitches, turn, tighten yarn and knit 30-30-35-35-40-40 stitches, turn, tighten yarn and purl 36-36-42-42-48-48 stitches, turn, tighten yarn and knit 42-42-49-49-56-56 stitches, turn, tighten yarn and purl 48-48-56-56-64-64 stitches, turn, tighten yarn and knit until mid back. Cut the yarn. Begin next round (i.e. yoke) after the first 13-14-14-15-16-17 stitches on round. YOKE: Insert 1 marker here - NOW MEASURE PIECE FROM HERE! Now insert 4 marker threads in the piece while working in stocking stitch in the round as follows: Knit 3 stitches (= 3 stitches on back piece), insert 1 marker thread here, knit the next 12-12-14-14-16-16 stitches (= sleeve), insert 1 marker thread here, knit the next 32-34-34-36-38-40 stitches (= front piece), insert 1 marker thread here, knit 12-12-14-14-16-16 stitches (= sleeve), insert 1 marker thread here, knit the last 29-31-31-33-35-37 stitches (= back piece) after last marker (3 stitches remain before first marker thread). Work next round as follows: Knit 6 (marker is in the middle of these 6 stitches), make 1 yarn over, knit 6-6-8-8-10-10 (= sleeve), make 1 yarn over, knit 6 (marker thread is in the middle of these 6 stitches), make 1 yarn over, knit 26-28-28-30-32-34 (= front piece), make 1 yarn over, knit 6 (marker is in the middle of these 6 stitches), make 1 yarn over, knit 6-6-8-8-10-10 (= sleeve), make 1 yarn over, knit 6 (marker thread is in the middle of these 6 stitches), make 1 yarn over, knit 26-28-28-30-32-34 (= back piece), make 1 yarn over. First increase for RAGLAN - read explanation above, is now done (= 8 stitches increased on round). Continue with stocking stitch and increase every other round 23-27-29-32-34-39 times in total (including first increase explained above). After last increase for raglan there are 272-308-328-356-380-424 stitches on needle. Continue in stocking stitch without increases until piece measures 20-22-23-26-28-31 cm from marker at the beginning of yoke. Work next round as follows: Work 4-3-4-5-7-7 stitches in stocking stitch (= on back piece), slip the next 56-66-70-74-76-86 stitches on 1 stitch holder for sleeve, cast on 8-8-10-10-12-12 new stitches on needle (= in the side under sleeve), work in stocking stitch over the next 80-88-94-104-114-126 stitches (= front piece), slip the next 56-66-70-74-76-86 stitches on 1 stitch holder for sleeve, cast on 8-8-10-10-12-12 new stitches on needle (= in the side under sleeve), work in stocking stitch over the last 76-85-90-99-107-119 stitches (= back piece). Finish body and sleeves separately. NOW MEASURE PIECE FROM HERE! BODY: = 176-192-208-228-252-276 stitches. Insert 1 marker thread in the middle of the 8-8-10-10-12-12 new stitches that were cast on under sleeve in each side. Begin round at one of the marker thread and move the marker threads when working. Continue in stocking stitch. When piece measures 8 cm from division, increase 1 stitch on each side of both marker threads - read INCREASE TIP (= 4 stitches increased). Repeat increase when piece measures 17 cm from division = 184-200-216-236-260-284 stitches. When piece measures 27-27-28-26-26-25 cm from division (approx. 50-52-54-56-58-60 cm from shoulder), knit 1 round while increasing 36-40-44-48-52-56 stitches evenly = 220-240-260-284-312-340 stitches. Switch to circular needle size 3.5 mm and work rib = knit 2/purl 2 for 4 cm. Cast off with knit over knit and purl over purl (to avoid a tight cast-off edge use needle size 4.5 mm). Jumper measures approx. 54-56-58-60-62-64 cm from shoulder. SLEEVE: Slip the 56-66-70-74-76-86 stitches from stitch holder in one side of piece on circular needle/double pointed needles size 4.5 mm and pick in addition up 1 stitch in each of the 8-8-10-10-12-12 new stitches cast on under sleeve = 64-74-80-84-88-98 stitches. Insert 1 marker thread in the middle of the 8-8-10-10-12-12 stitches under sleeve and begin round here. Work in stocking stitch in the round. When piece measures 2 cm from division, decrease 2 stitches mid under sleeve - read DECREASE TIP. Decrease like this every 7th-5th-4th-4th-3rd-3rd round 13-17-19-20-21-25 times in total = 38-40-42-44-46-48 stitches. Continue until sleeve measures 39-37-37-35-33-31 cm from division (shorter measurements in the larger sizes because of longer yoke). Knit 1 round while increasing 6-4-6-8-6-8 stitches evenly = 44-44-48-52-52-56 stitches. Switch to double pointed needles size 3.5 mm and work rib = knit 2/purl 2 for 5 cm. Sleeve measures approx. 44-42-42-40-38-36 cm from division. Cast off with knit over knit and purl over purl (to avoid a tight cast-off edge use needle size 4.5 mm). Work the other sleeve the same way. |
|
 |
|
Have you finished this pattern?Tag your pictures with #dropspattern #redskysweater or submit them to the #dropsfan gallery. Do you need help with this pattern?You'll find 29 tutorial videos, a Comments/Questions area and more by visiting the pattern on garnstudio.com. © 1982-2026 DROPS Design A/S. We reserve all rights. This document, including all its sub-sections, has copyrights. Read more about what you can do with our patterns at the bottom of each pattern on our site. |
|


With over 40 years in knitting and crochet design, DROPS Design offers one of the most extensive collections of free patterns on the internet - translated to 17 languages. As of today we count 324 catalogues and 12290 patterns translated into English (UK/cm). 12290
We work hard to bring you the best knitting and crochet have to offer, inspiration and advice as well as great quality yarns at incredible prices! Would you like to use our patterns for other than personal use? You can read what you are allowed to do in the Copyright text at the bottom of all our patterns. Happy crafting!
Post a comment to pattern DROPS 197-23
We would love to hear what you have to say about this pattern!
If you want to leave a question, please make sure you select the correct category in the form below, to speed up the answering process. Required fields are marked *.