
Popular categories
Looking for a yarn?


Comments / Questions (26)
![]() Lenie wrote:
Lenie wrote:
Ik ben bezig met het afkanten in het achterpand voor de armsgaten. Volgens mij klopt het aantal steken niet dat je overhoudt na het afkanten. Bij de grootste maat moet je voor het afkanten 62 steken hebben en na het afkanten 54. Volgens mij staat er dat je in totaal 18 steken af moet kanten. Ik kom dan uit op 44 steken. Wat doe ik fout?
10.08.2025 - 14:25DROPS Design answered:
Dag Lenie,
Je kant 1 keer 2 steken af en dan 2 keer 1 steek en dit doe je aan beide zijkanten. Hiermee heb je in totaal 8 steken afgekant. 62-8=54, dus dat zou moeten kloppen.
18.08.2025 - 20:46
![]() Ida wrote:
Ida wrote:
Hej Drops Kan jeg strikke opskriften i to tråde fra garngruppe A, fx Alpaca/Baby Merino og Kid-Silk - eller måske Brushed Alpaca Silk, som ser virkelig lækker ud? Jeg vil gerne have lidt meleret effekt og det lidt lodne samtidig med et fastere garn end Air.
28.01.2025 - 10:13DROPS Design answered:
Hej Ida. Ja du kan sticka denna opskrift enten med en tråd från ett garn i garngrupp C eller 2 trådar från ett garn i garngrupp A. Se bara till att du får den stickfasthet som uppges i opskriften. Mvh DROPS Design
28.01.2025 - 14:07
![]() Megan wrote:
Megan wrote:
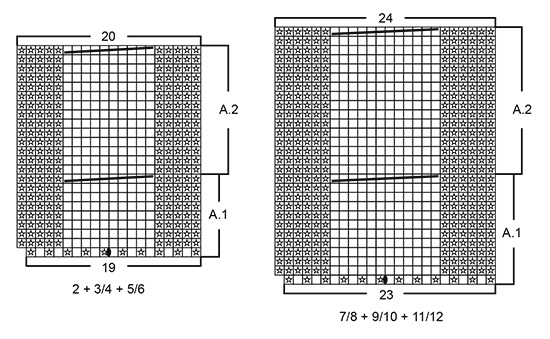
Hi, Is this a pattern that works from bottom up? And under the section Body, I don't understand what "work A.1 (choose diagram for your size = 19-19-19-23-23-23 stitches increased to 20-20-20-24-24-24 stitches on the first round) refers to." My understanding is this is the first round. Do you increase the extra stitch using the M1 technique? Or you simply work A.1 on 20 stitches instead of 19? Thank you.
30.07.2024 - 08:52DROPS Design answered:
Dear Megan, the pattern is worked from bottom up, read diagram also from bottom up, and on the first row in A.1 you will increase 1 stitch making 1 yarn over (see 3rd symbol under diagram text), so that you work 19 sts increasing 1 stitch to get 20 sts. Happy knitting!
31.07.2024 - 07:13
![]() Cecilia wrote:
Cecilia wrote:
Gentili buongiorno, Ho iniziato il vostro modello ISAK però quello che vedo dalla foto non sembrano coste 1:1 potete cortesemente confermarmi? Ringrazio 🙏
20.07.2024 - 16:42DROPS Design answered:
Buonasera Cecilia, al momento non ci sono correzioni per il modello. Buon lavoro!
20.07.2024 - 22:31
![]() Darlene Cossarini wrote:
Darlene Cossarini wrote:
Thank you for your response to my first question. It worked. But now, I do not understand this instruction, "On the next row knit together the 10-10-10-12-12-12 stitches over the cable mid front, 2 and 2 (= 5-5-5-6-6-6 stitches decreased). This is from the instructions for the front. Please explain. I have tried to figure it out on my own, but have no idea.
13.10.2022 - 07:59DROPS Design answered:
Dear Mrs Cossarini, you need more stitches for the cable than for stocking stitch, so that you need to decrease the number of stitches in the cable to avoid the neck loosing its shape (become wider than expected), you have then to work K2 tog a total of 5 or 6 times accross the knitted stitches in the diagram to decrease 5 or 6 stitches. Happy knitting!
13.10.2022 - 09:33
![]() Darlene Cossarini wrote:
Darlene Cossarini wrote:
This is my first time knitting a sweater in the round. I have completed the main part of the body and do not quite understand how to do the dividing row between front and back. Is there a video I can watch or an explanation I can read. I love the pattern so far, and the sweater is turning out beautifully. thank you.
09.10.2022 - 07:09DROPS Design answered:
Dear Darlene, you should have a marker inserted in each side. Cast off 3 stitches on each side of each marker (6 in total for each armhole). For example, from the beginning on the row on one side, cast off 3 stitches, work according to the pattern until 3 stitches remain before the next marker, cast off the next 6 stitches (the marker should be in the middle of these stitches; remove the marker). Work according to the pattern until 3 stitches remain in the round and cast off these 3 stitches. Now cut the thread and work the stitches on the front and the back separately. Happy knitting!
09.10.2022 - 20:04
![]() Lene Holmlund wrote:
Lene Holmlund wrote:
Jeg strikker 7/8 år. Ved 32 cm tager jeg ind til ærmegab. Skal så strikke helt til 46 cm. Bliver det ikke et kæmpe ærmegab?
19.09.2022 - 15:28DROPS Design answered:
Hej Lene, ærmegabet skal strikkes til du har 48 cm = 16 cm, se også måleskitsen nederst i opskriften :)
20.09.2022 - 14:43
![]() Francoise wrote:
Francoise wrote:
Est il nécessaire de faire ces augmentations et diminutions au premier rang ne peut on pas tricoter tout droit ? Merci de votre réponse et bravo pour vos modèle
29.01.2022 - 11:34DROPS Design answered:
Bonjour Françoise et merci, ces diminutions et augmentations sont effectivement indispensables pour bien conserver la bonne largeur (le nombre de mailles en côtes, torsades et jersey n'est pas le même pour la même largeur car les côtes et les torsades resserrent l'ouvrage). Bon tricot!
31.01.2022 - 08:48
![]() Mary Jane Kimball wrote:
Mary Jane Kimball wrote:
I am knitting Drops 30-13. I do not understand the instruction or reason for YO between stitch 12 and 13 on the diagram . Is this an increase? Why is there a YO in the middle of the cable? This would increase the stitch count from 24 to 25 for the center cable. Please clarify.
16.02.2021 - 17:55DROPS Design answered:
Hi Mary Jane, The yarn over is on the last row of the rib, so will not affect the cabling. The extra stitch means there is now an even number of stocking stitches on each side of the cable. Happy knitting!
17.02.2021 - 07:41
![]() Mary Baldwin wrote:
Mary Baldwin wrote:
Can you please indicate how MUCH yarn is needed for this project? If it is here, I missed it.
15.11.2020 - 17:14DROPS Design answered:
Dear Mrs Baldwin, you will find requested amount of yarn for each size at the beginning of the pattern, ie in the header, together with the sizes and the needle size / tension. For ex in size 2 years you need here 150 g DROPS Air / 50 g a ball = 3 balls DROPS Air in the first size / or 300 g DROPS Paris/50 g a ball = 6 balls DROPS Paris in the first size. Happy knitting!
16.11.2020 - 09:10
|
||||||||||||||||
Isak#isaksweater |
||||||||||||||||
|
|
||||||||||||||||
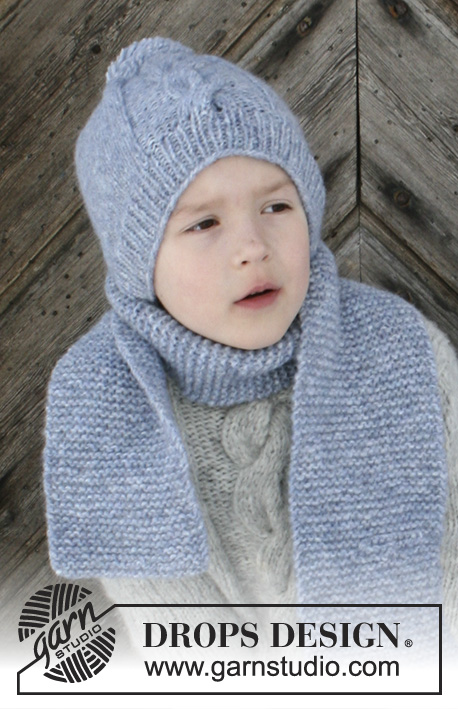
Knitted children’s jumper with cables in DROPS Air or DROPS Paris. Sizes 2 - 12 years.
DROPS Children 30-13 |
||||||||||||||||
|
INFORMATION FOR THE PATTERN: DECREASE TIP: To work out how to decrease evenly, count the number of stitches to be decreased over (e.g. 25 stitches) and divide by the number of decreases to be made (e.g. 5) = 5. In this example, knit every 4th and 5th stitch together. PATTERN: See diagrams A.1 and A.2. Choose diagram for your size. The diagrams show all the rows in the pattern seen from the right side. INCREASE TIP (for mid under sleeve): Start 1 stitch after the marker thread, make 1 yarn over, work until there is 1 stitch left on the round, make 1 yarn over and knit 1 (= 2 stitches increased). On the next round knit the yarn overs twisted to prevent holes. ---------------------------------------------------------- JUMPER: The piece is worked in the round with circular needle as far as the armholes, then the front and back pieces are continued separately, back and forth on the needle. The sleeves are worked in the round with double pointed needles. BODY: Cast on 120-128-136-144-152-160 stitches with circular needle size 4.5 mm. Knit 1 round. Then work rib (= knit 1 / purl 1) for 4 cm. Change to circular needle size 5.5 mm. Insert 1 marker thread at the beginning of the round (= in the side). The next round is worked as follows: Knit the first 21-23-25-25-27-29 stitches and, at the same time, decrease 4 stitches evenly over these stitches – read DECREASE TIP, work A.1 (choose diagram for your size = 19-19-19-23-23-23 stitches increased to 20-20-20-24-24-24 stitches on the first round), knit 21-23-25-25-27-29 stitches and, at the same time, decrease 4 stitches evenly over these stitches, insert 1 marker thread (= in the side), knit the next 59-63-67-71-75-79 stitches and decrease 9-9-9-11-11-11 stitches evenly over these stitches. There are now 54-58-62-66-70-74 stitches between the marker threads on the front piece and 50-54-58-60-64-68 stitches on the back piece = a total of 104-112-120-126-134-142 stitches on the needle. The next round is worked as follows: 17-19-21-21-23-25 stitches stocking stitch, continue A.1 (= 20-20-20-24-24-24 stitches) and work stocking stitch to end of round. Continue the pattern in this way. When A.1 has been completed, work A.2 over these 20-20-20-24-24-24 stitches. Repeat A.2 upwards. When the piece measures 23-26-29-32-35-38 cm cast off 6 stitches in each side for the armhole (cast off 3 stitches on each side of both marker threads). The front and back pieces are now finished separately. BACK PIECE: = 44-48-52-54-58-62 stitches. Work stocking stitch back and forth and cast off for the armholes at the beginning of each row in each side as follows: Cast off 2 stitches 1 time in each side and then 1 stitch 1-1-2-1-1-2 times in each side = 38-42-44-48-52-54 stitches. When the piece measures 34-38-42-46-50-54 cm cast off the middle 16-18-20-22-22-24 stitches for the neck and each shoulder is finished separately. Continue by casting off 1 stitch on next row from the neck = 10-11-11-12-14-14 stitches left on the shoulder. Continue working until the piece measures 36-40-44-48-52-56 cm and cast off. Work the other shoulder in the same way. FRONT PIECE: = 48-52-56-60-64-68 stitches. Continue with stocking stitch and A.2 and cast off for the armholes at the beginning of each row in each side as follows: Cast off 2 stitches 1 time in each side and then 1 stitch 1-1-2-1-1-2 times in each side = 42-46-48-54-58-60 stitches. Continue working stocking stitch and A.2 until the piece measures 31-34-38-41-45-48 cm. On the next row knit together the 10-10-10-12-12-12 stitches over the cable mid front, 2 and 2 (= 5-5-5-6-6-6 stitches decreased). On the next row, place the middle 9-11-13-14-14-16 stitches on 1 thread for the neck and each shoulder is finished separately. Continue to cast off for the neck at the beginning of each row from the neck as follows: Cast off 2 stitches 1 time and then 1 stitch 2-2-2-3-3-3 times = 10-11-11-12-14-14 stitches left on the shoulder. Continue working until the piece measures 36-40-44-48-52-56 cm and cast off. Work the other shoulder in the same way. SLEEVE: Cast on 32-32-34-34-36-36 stitches with double pointed needles size 4.5 mm. Knit 1 round. Then work rib (= knit 1 / purl 1) for 4 cm. Change to double pointed needles size 5.5 mm. Insert 1 marker thread at the beginning of the round (= mid under the sleeve). Knit 1 round where you decrease 4 stitches evenly on round in all sizes – read DECREASE TIP = 28-28-30-30-32-32 stitches. Continue to work stocking stitch in the round. When the piece measures 6 cm increase 2 stitches mid under the sleeve – read INCREASE TIP. Increase in this way every 3-3-4-3½-4½-3½ cm a total of 6-7-7-8-8-10 times = 40-42-44-46-48-52 stitches. When the piece measures 24-28-32-35-39-42 cm cast off 6 stitches mid under the sleeve (cast off 3 stitches on each side of the marker thread). Change to circular needle size 5.5 mm and work the sleeve cap back and forth in stocking stitch at the same time as you cast off at the beginning of each row in each side as follows: Cast off 2 stitches 1-2-2-2-2-3 times in each side and then 1 stitch 1 time in each side. Continue by casting off 2 stitches at the beginning of each row in each side until the piece measures 29-34-38-42-46-50 cm. Cast off 3 stitches at the beginning of the next 2 rows and then cast off the remaining stitches. The sleeve measures approx. 30-35-39-43-47-51 cm from the top down. Work another sleeve in the same way. ASSEMBLY: Sew the shoulder seams. Sew in the sleeves. NECKLINE: Start mid back of neck and knit up from the right side approx. 40 to 62 stitches around the neck (including the stitches on the thread in front) with short circular needle size 4.5 mm. Knit 1 round where you increase evenly to 54-64-66-70-70-76 stitches. Continue by working rib in the round (= knit 1 / purl 1) for 3 cm. Change to circular needle size 5.5 mm and cast off with knit over knit and purl over purl. |
||||||||||||||||
Diagram explanations |
||||||||||||||||
|
||||||||||||||||
 |
||||||||||||||||
 |
||||||||||||||||
Have you finished this pattern?Tag your pictures with #dropspattern #isaksweater or submit them to the #dropsfan gallery. Do you need help with this pattern?You'll find 30 tutorial videos, a Comments/Questions area and more by visiting the pattern on garnstudio.com. © 1982-2026 DROPS Design A/S. We reserve all rights. This document, including all its sub-sections, has copyrights. Read more about what you can do with our patterns at the bottom of each pattern on our site. |
||||||||||||||||


With over 40 years in knitting and crochet design, DROPS Design offers one of the most extensive collections of free patterns on the internet - translated to 17 languages. As of today we count 324 catalogues and 12290 patterns translated into English (UK/cm). 12290
We work hard to bring you the best knitting and crochet have to offer, inspiration and advice as well as great quality yarns at incredible prices! Would you like to use our patterns for other than personal use? You can read what you are allowed to do in the Copyright text at the bottom of all our patterns. Happy crafting!
Post a comment to pattern DROPS Children 30-13
We would love to hear what you have to say about this pattern!
If you want to leave a question, please make sure you select the correct category in the form below, to speed up the answering process. Required fields are marked *.