
Popular categories
Looking for a yarn?


Comments / Questions (48)
![]() Teresa wrote:
Teresa wrote:
Sono arrivata alle diminuzioni per scollo e scalfo: dal disegno sembra che inizino contemporaneamente, è esatto? I 22cm (taglia M) coincidono per me con il primo ferro dritto per le diminuzioni dello scollo. Grazie
05.04.2020 - 00:55DROPS Design answered:
Buongiorno Teresa. Per la taglia M, a 22 cm divide il lavoro al centro. Le diminuzioni per lo scollo iniziano al primo ferro sul diritto del lavoro. Per lo scalfo, lavora a legaccio le 10 m sul lato dello scalfo per 4 ferri, poi intreccia 7 m per lo scalfo e prosegue con le diminuzioni come indicato nel testo. Buon lavoro!
05.04.2020 - 08:30
![]() Catherine Sybille Gervais wrote:
Catherine Sybille Gervais wrote:
Bonjour, Je tricote la taille large et je n’ai pas assez de 200 gr de drops muskat pour la tricoter au complet. Pourtant ma swatch indique que j’ai parfaitement la bonne tension. N’y a t il pas assez de laine dans le 200gr pour tricoter une swatch et le patron? Merci
19.03.2020 - 03:38
![]() Gabriella wrote:
Gabriella wrote:
Buonasera. Nei diagrammi ogni riga rappresenta un ferro o andata e ritorno? Grazie
24.05.2019 - 22:38DROPS Design answered:
Buongiorno Gabriella. Ogni riga rappresenta un ferro. Buon lavoro!
25.05.2019 - 06:23
![]() Gabriella wrote:
Gabriella wrote:
Dalla spiegazione mi sembra di capire che il dietro ha lo scollo a V come il davanti, è così? Grazie
14.05.2019 - 19:09DROPS Design answered:
Buongiorno Gabriella. Sì esatto, il dietro e il davanti sono uguali. Buon lavoro!
14.05.2019 - 20:23
![]() Monica wrote:
Monica wrote:
Buongiorno, sono arrivata a cm 7, ho fatto un gettato dopo la prima maglia legaccio da ogni lato, lavorato quel gettato a diritto ritorto sul ferro di rovescio e ora sono sul diritto ma lavorando 1m legaccio, 1dir, A2 il motivo non combacia, mi potreste dire dov è l errore? grazie mille, saluti.
04.04.2019 - 10:10DROPS Design answered:
Buongiorno Monica. Deve continuare a lavorare le maglie del diagramma A2 come già impostate, lavorando quelle aumentate di conseguenza. P.es se ha aumentato e il ferro successivo è un ferro 1 o 3 del diagramma A2, lavora 1 maglia vivagno, 1 m dir, e poi riprende con 1 m rovescio, 1 m dir e così via. Buon lavoro!
04.04.2019 - 11:43
![]() Petra wrote:
Petra wrote:
A.3 mallikuvassa pitää aloittaa nuolella merkitystä kohdasta. Ohje sanoo että tee A.3 mallikuvio loppuun niin tarkoittaako se että ennen nuolella merkittyä kerrosta tuleva kuvio on tehtävä myös että A.3 on tehty loppuun vai loppuuko tuohon kuvion yläreunaan. Missä muuten tullaan tarvitsemaan mallikuvio A.3 alaosaa?
30.06.2018 - 15:12
![]() Anette Öhrn wrote:
Anette Öhrn wrote:
Skulle vilja kunna översätta redan tidigare frågor och svar till mitt språk. Kanske jag då slipper att fråga igen...
11.05.2018 - 18:42
![]() Celine wrote:
Celine wrote:
Hei, Jeg forstår ikke hvordan jeg skal gå frem med mønster A.3. Hvis det kun er 7 masker som skal strikkes med mønster, hvordan skal jeg strikke de resterende maskene? Skal jeg gå rett fra A.2 til A.3 midterste ved pilen? Skal jeg dele toppen etter å ha strikket A.3?
21.04.2018 - 20:02
![]() Suzy wrote:
Suzy wrote:
I'm confused about the first row garter stitch. Does it mean I knit 3 then knit 1 then, purl then knit?
11.03.2018 - 02:37DROPS Design answered:
Dear Suzy, the first row (wrong side) is purled. The next row (right side) work 3 stitches in garter stitch, 1 knit, repeat A.1 (1 purl/1 knit) until 3 stitch remain in the row, work 3 stitches in garter stitch.
11.03.2018 - 16:04Camila wrote:
Cuando se logran los 20 cm. y dicen que hay que pasar a A3, piden hacer calzar la hilera marcada con flecha para ser tejida por el lado revés. Cuando miro el diagrama muestran que la hilera con la flecha viene inmediatamente luego de hacer una hilera realizada por el lado revés. Siendo así como hago calzarlo? Tendría que omitir la fila de puntos revés por el lado revés que sale en el diagrama??. El diagrama me confunde
20.01.2018 - 18:13DROPS Design answered:
Hola Camila. Ten en cuenta que en este patrón la primera fila se trabaja por el lado revés. En este caso, la fila con la flecha, justo toca trabajarla por el lado revés. (revés-derecho-revés-derecho-revés...).
28.01.2018 - 16:39
|
|||||||||||||
Mazo#mazotop |
|||||||||||||
 |
 |
||||||||||||
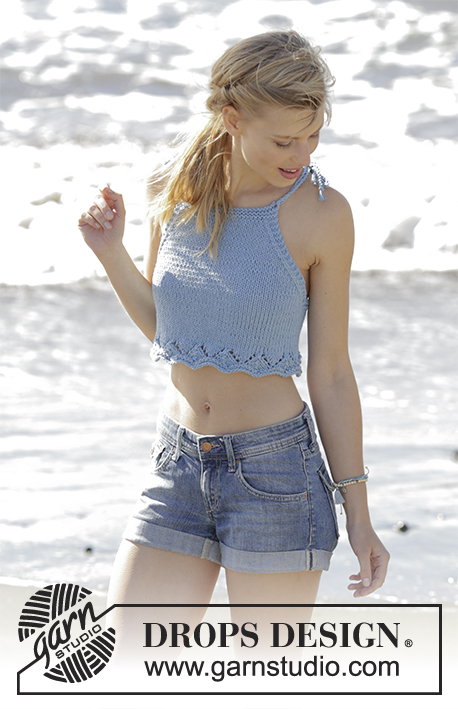
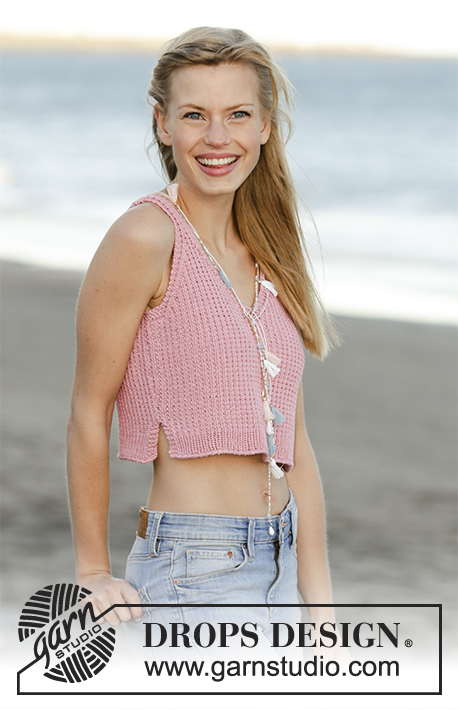
Top with V-neck, textured pattern and vents in the sides, worked bottom up in DROPS Muskat. Size: S - XXXL.
DROPS 178-66 |
|||||||||||||
|
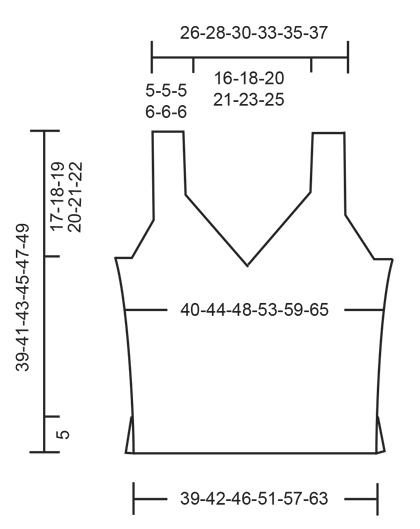
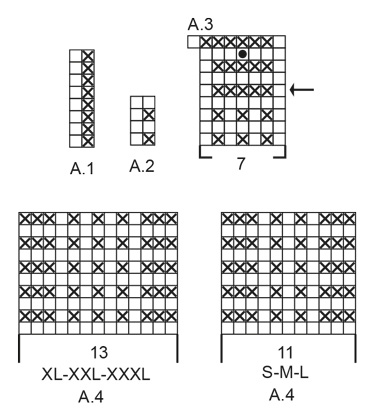
GARTER STITCH (back and forth): Knit all rows. 1 ridge = knit 2 rows. PATTERN: See diagrams A.1 to A.4. Diagrams show all rows in pattern seen from the right side. Choose diagram for your size. INCREASE TIP: Increase 1 stitch by making a yarn over. On next row knit yarn over twisted to avoid hole. NOTE: Work the new stitches gradually in the pattern A.2. DECREASE TIP: Decrease 1 stitch inside 3 edge stitches in garter stitch. All decreases are done from the right side. Decrease as follows after 3 edge stitches in garter stitch: Slip 1 stitch knitwise, knit 1, pass slipped stitch over stitch worked Decrease as follows before 3 edge stitches in garter stitch: Begin 2 stitches before the 3 edge stitches in garter stitch and knit 2 together. ---------------------------------------------------------- TOP: Worked back and forth in 2 parts and sewn together when finished. BACK PIECE: Cast on 81-89-97-107-119-133 stitches with Muskat on circular needle size 4 mm. Purl 1 row from wrong side. Work rib as follows (1st row = right side): Work 3 stitches in GARTER STITCH - see explanation above, knit 1 stitch, repeat A.1 (= 2 stitches) until 3 stitches remain on row, work 3 stitches in garter stitch. Continue pattern back and forth like this until A.1 has been worked vertically. Then work A.2 (= 2 stitches) over A.1. REMEMBER THE KNITTING TENSION! When piece measures 5 cm, cast on 1 new stitch at the end of the next 2 rows (marks where vents end) = 83-91-99-109-121-135 stitches. Work pattern as follows: 1 edge stitch in garter stitch, knit 1, A.2 until 1 stitch remains, 1 edge stitch in garter stitch. When piece measures 7 cm, increase 1 stitch inside 1 edge stitches in garter stitch in each side - READ INCREASE TIP! Repeat increase when piece measures 10 cm = 87-95-103-113-125-139 stitches. When piece measures 19-20-21-22-23-24 cm, work from arrow in A.3 over the middle 7 stitches on row - adjust so that this row marked with arrow is worked from wrong side. On first row from right side after A.3 work over the first 44-48-52-57-63-70 stitches on row and slip the remaining 44-48-52-57-63-70 stitches on 1 stitch holder. RIGHT SIDE AT THE BACK: = 44-48-52-57-63-70 stitches. READ ALL OF THE FOLLOWING SECTION - decrease for neck and armhole at the same time as follows: Work pattern A.2 as before with 3 edge stitches in garter stitch towards neck and 1 edge stitch in garter stitch towards the side. NECK: On first row from right side begin decrease for neck. Decrease 1 stitch inside the 3 edge stitches in garter stitch - READ DECREASE TIP. Decrease like this every other row (i.e. on every row from right side) 16-18-20-22-24-26 times in total. ARMHOLE: When piece measures 21-22-23-24-25-26 cm, work in garter stitch over the outermost 10-10-12-11-11-14 stitches towards the side (including 1 edge stitch in garter stitch). When 4 rows have been worked (= 2 ridges) over these stitches, cast off the first 7-7-9-8-8-11 stitches at beginning of row for armhole. Work the next 3 stitches in garter stitch (= edge towards armhole). Decrease 1 stitch inside the 3 edge stitches in garter stitch towards the armhole. Decrease like this every other row (i.e. on every row from right side) 10-12-12-14-18-20 times in total. After all cast offs and decreases for armhole and neck, 11-11-11-13-13-13 stitches remain on row for strap. Continue the pattern as before with 3 edge stitches in garter stitch in each side. Work strap as shown in A.4 - choose diagram for size. When piece measures 39-41-43-45-47-49 cm, cast off all stitches. LEFT SIDE AT THE BACK: Slip the 44-48-52-57-63-70 stitches from stitch holder in the other side back on circular needle size 4 mm and work the same way as right side at the back but reversed – NOTE: When casting off for armhole in the side, cast off at beginning of row from wrong side (instead of beginning of row from right side). The remaining decreases for armhole and neck are done from right side. FRONT PIECE: Cast on and work as back piece. ASSEMBLY: Sew the two straps together with grafting/kitchener stitches to avoid a chunky seam. Sew side seam inside 1 edge stitch in garter stitch in each side from armhole and down to vent. Repeat in the other side. Fasten off. |
|||||||||||||
Diagram explanations |
|||||||||||||
|
|||||||||||||
 |
|||||||||||||
 |
|||||||||||||
Have you finished this pattern?Tag your pictures with #dropspattern #mazotop or submit them to the #dropsfan gallery. Do you need help with this pattern?You'll find 23 tutorial videos, a Comments/Questions area and more by visiting the pattern on garnstudio.com. © 1982-2026 DROPS Design A/S. We reserve all rights. This document, including all its sub-sections, has copyrights. Read more about what you can do with our patterns at the bottom of each pattern on our site. |
|||||||||||||


With over 40 years in knitting and crochet design, DROPS Design offers one of the most extensive collections of free patterns on the internet - translated to 17 languages. As of today we count 324 catalogues and 12239 patterns translated into English (UK/cm). 12239
We work hard to bring you the best knitting and crochet have to offer, inspiration and advice as well as great quality yarns at incredible prices! Would you like to use our patterns for other than personal use? You can read what you are allowed to do in the Copyright text at the bottom of all our patterns. Happy crafting!
Post a comment to pattern DROPS 178-66
We would love to hear what you have to say about this pattern!
If you want to leave a question, please make sure you select the correct category in the form below, to speed up the answering process. Required fields are marked *.