
Popular categories
Looking for a yarn?


Comments / Questions (93)
![]() Sonja wrote:
Sonja wrote:
Mooi vrolijk model
07.06.2016 - 08:56
![]() Carole Gelinas wrote:
Carole Gelinas wrote:
Très beau modèle, mise en valeur de la silhouette,...
05.06.2016 - 02:18
![]() Denise M wrote:
Denise M wrote:
A very flattering style, and I like the stitch combinations.
05.06.2016 - 00:44
![]() Nechyta wrote:
Nechyta wrote:
Bellísimo y abrigador
04.06.2016 - 02:22
![]() June wrote:
June wrote:
Superlekker
03.06.2016 - 23:34
![]() Lise wrote:
Lise wrote:
Super flot
03.06.2016 - 23:11
![]() Manou wrote:
Manou wrote:
J'aime ce modèle très élégant
03.06.2016 - 19:49
![]() Janice wrote:
Janice wrote:
Lovely
03.06.2016 - 18:27
![]() Martha Reichenbach wrote:
Martha Reichenbach wrote:
Ein Superpullover -
03.06.2016 - 18:20
![]() Grete wrote:
Grete wrote:
Lekker
03.06.2016 - 15:56
|
||||||||||||||||||||||||||||||||||||||||
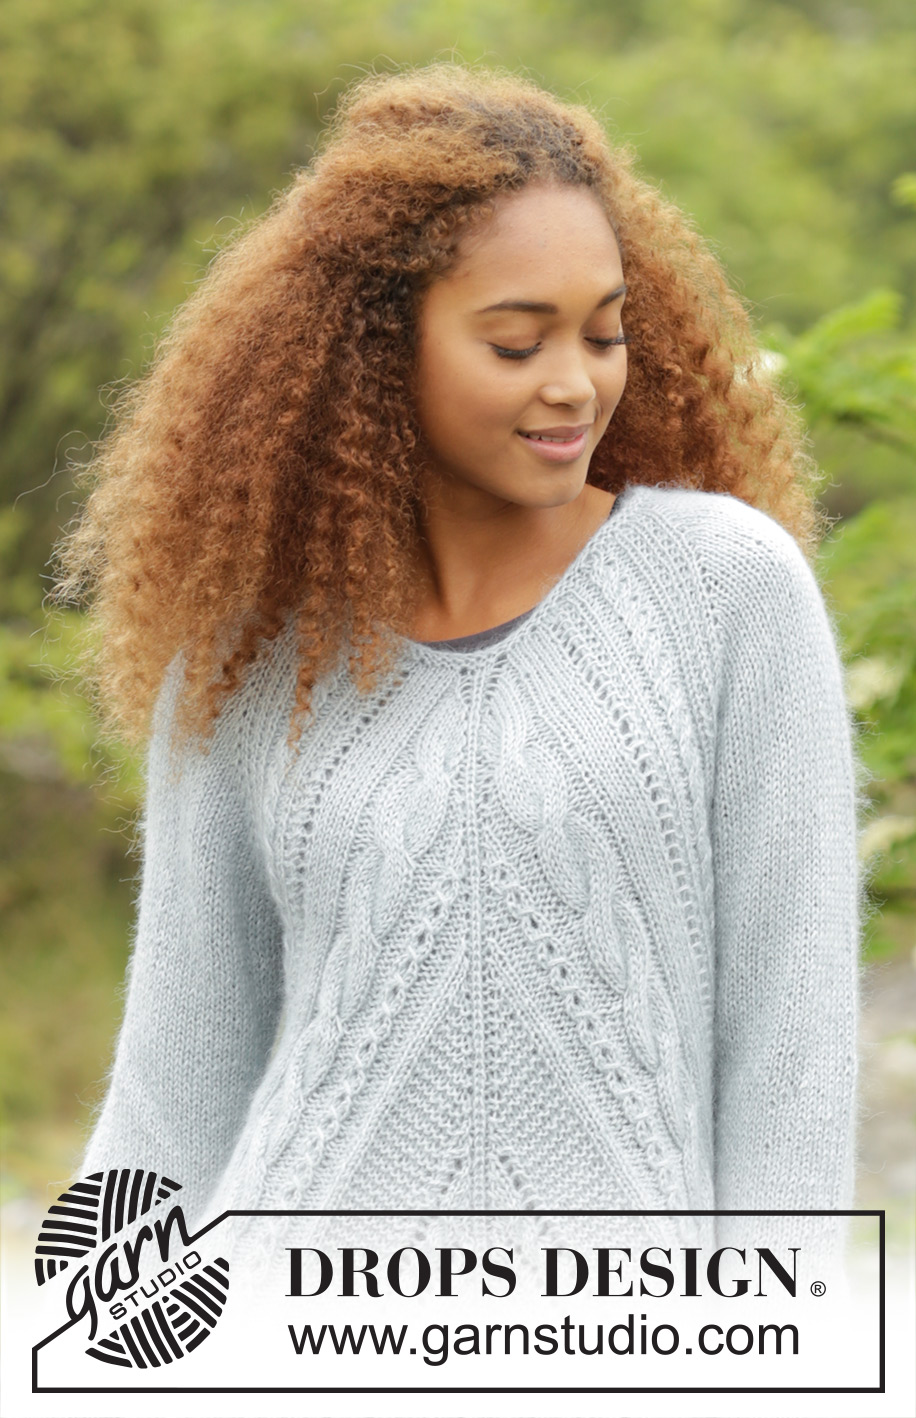
Winter Flair#winterflairtunic |
||||||||||||||||||||||||||||||||||||||||
 |
 |
|||||||||||||||||||||||||||||||||||||||
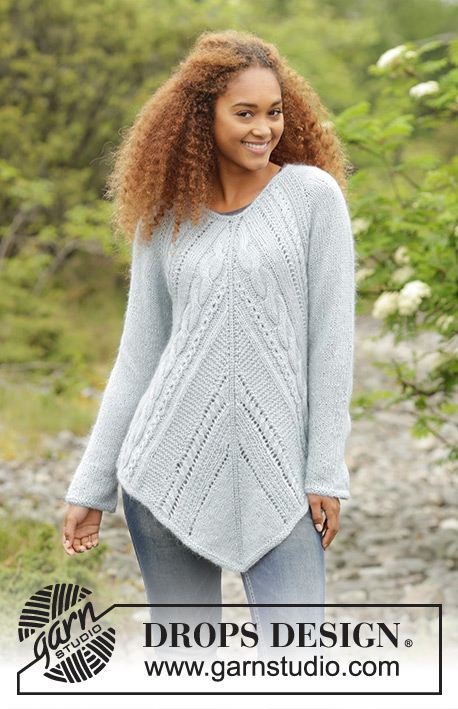
Knitted DROPS tunic with cables, garter st and lace pattern, worked top down in ”Alpaca” and ”Kid-Silk”. Size: S - XXXL.
DROPS 172-1 |
||||||||||||||||||||||||||||||||||||||||
|
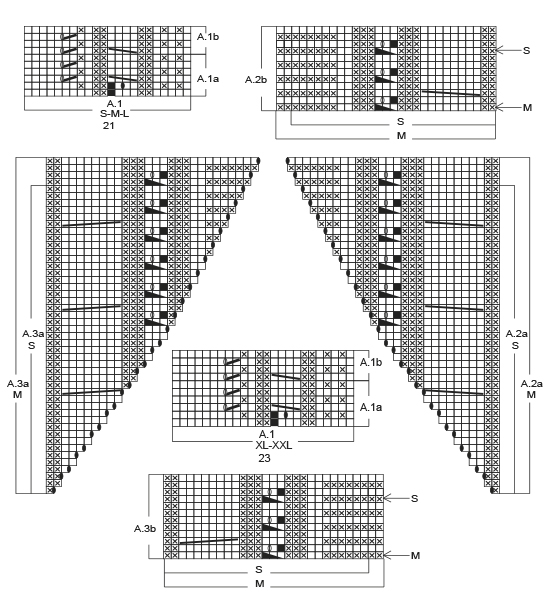
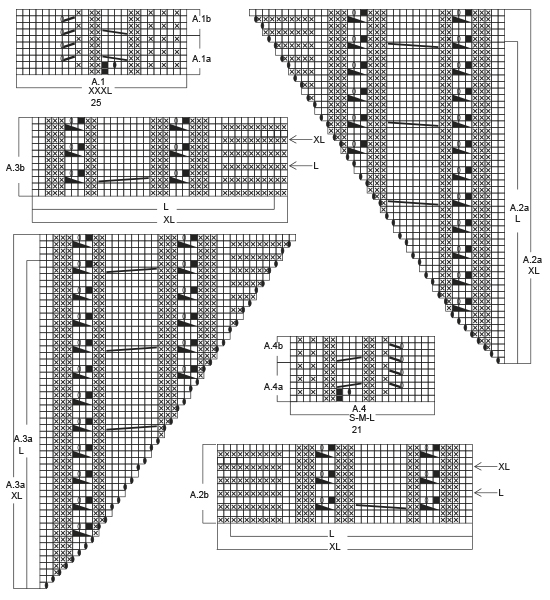
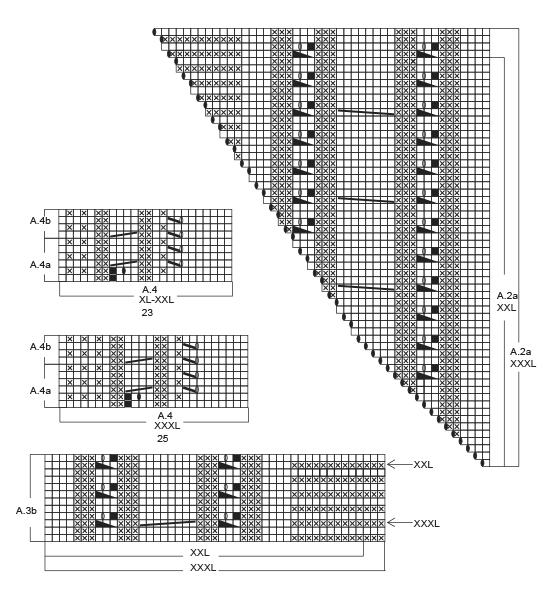
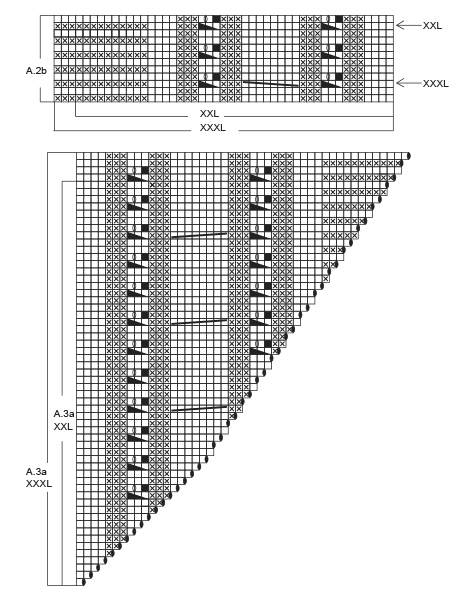
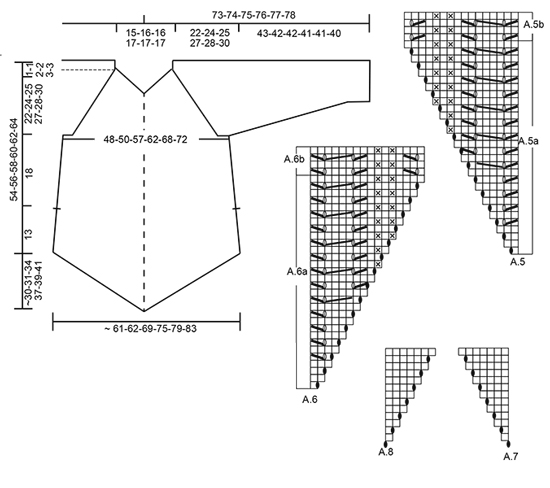
GARTER ST (worked in the round): 1 ridge = 2 rounds. * K 1 round and P 1 round *, repeat from *-*. GARTER ST (back and forth): K all rows. 1 ridge = 2 rows K. RAGLAN: On sleeves inc for raglan with YO K twisted on next round, they should not make holes. Inc as follows: Inc with 1 YO after 1st and 3rd marker and before 2nd and 4th marker as follows: Inc every round 0-2-4-0-0-0 times in total. Inc every other round 22-23-23-27-24-26 times in total. Inc every 4th round, 0-0-0-0-2-2 times in total (= 22-25-27-27-26-28 times in total) = 48-54-60-60-62-66 sts in total on each sleeve. PATTERN: See diagrams A.1 to A.8. See diagram for correct size. DECREASE TIP-1: When working in the round, dec as follows: Dec as follows at each marker: Work until 3-3-3-5-6-6 sts remain before marker, K 2 tog (= 1 st dec), 2-2-2-6-8-8 sts in garter st (marker is in the middle of these sts), slip 1 st as if to K, K 1, psso (= 1 st dec). When working back and forth, dec as follows: All dec are done from RS. Work 3-3-3-3-4-4 sts in garter st, slip 1 st as if to K, K 1, psso (= 1 st dec), work pattern as before until 5-5-5-5-6-6 sts remain, K 2 tog (= 1 st dec), finish with 3-3-3-3-4-4 sts in garter st. DECREASE TIP-2 (applies to sleeve): Dec as follows at marker: Work until 3 sts remain before marker, K 2 tog (= 1 st dec), K 2 (marker is in the middle of these sts), slip 1 st as if to K, K 1, psso (= 1 st dec). CAST-OFF TIP: To avoid a tight cast-off edge you may use a needle ½-1 size larger. ---------------------------------------------------------- TUNIC: Worked in the round, top down. Cast on 80-84-86-92-96-102 sts on circular needle size 4.5 mm with 1 strand Alpaca and 1 strand Kid-Silk. Work 2 ridges in GARTER ST - see explanation above. Switch to circular needle size 5.5 mm. K 1 round while AT THE SAME TIME inc 22-18-20-22-26-28 sts evenly = 102-102-106-114-122-130 sts. On next round work pattern and inc for RAGLAN - see explanation above, as follows: Work A.1a over the first 21-21-21-23-23-25 sts, A.2a over next st, P 1, K 1 (= mid back), P 1, A.3a over next st, A.4a over the next 21-21-21-23-23-25 sts (= back piece), insert 1st marker, K 4-4-6-6-10-10, insert 2nd marker (= sleeve), A.1a over the next 21-21-21-23-23-25 sts, A.2a over next st, P 1, K 1 (= mid front), P 1, A.3a over next st, A.4a over the next 21-21-21-23-23-25 sts (= front piece), insert 3rd marker, K 4-4-6-6-10-10, insert 4th marker (= sleeve). Continue pattern like this. REMEMBER THE KNITTING TENSION When A.1a and A.4a have been worked 1 time vertically, repeat A.1b and A.4b vertically. When A.2a and A.3a have been worked 1 time vertically, there are 298-318-362-378-402-430 sts on needle. Piece measures approx. 22-24-25-27-28-30 cm on the shortest part of piece. Work next round as follows: Continue with A.1b over the first 22-22-22-24-24-26 sts as before, A.2b over the next 27-29-37-39-44-47 sts, 1 YO, P 1, K 1 (= mid back), P 1, 1 YO, A.3b over the next 27-29-37-39-44-47 sts, A.4b over the next 22-22-22-24-24-26 sts, slip the next 48-54-60-60-62-66 sts on a stitch holder for sleeve, cast on 6-6-6-10-12-12 sts under sleeve, insert 1 marker in the middle of the new sts (= side marker), A.1b over the next 22-22-22-24-24-26 as before, A.2b over the next 27-29-37-39-44-47 sts, 1 YO, P 1, K 1 (= mid front), P 1, 1 YO, A.3b over the next 27-29-37-39-44-47 sts, A.4b over the next 22-22-22-24-24-26 sts, slip the next 48-54-60-60-62-66 sts on a stitch holder for sleeve, cast on 6-6-6-10-12-12 sts under sleeve, insert 1 marker in the middle of the new sts (= side marker) = 218-226-258-282-306-326 sts. Work 1 round pattern, K YOs twisted mid front and mid back, they should not make holes. Work next round as follows: Continue with * A.1b over the first 22-22-22-24-24-26 sts as before, A.2b over the next 27-29-37-39-44-47 sts, A.5a over next st (inc 1 st in A.5a), P 1, K 1 (= mid back/front), P 1, A.6a over next st (inc 1 st in A.6a), A.3b over the next 27-29-37-39-44-47 sts, A.4b over the next 22-22-22-24-24-26 sts as before, K 2 tog (= 1 st dec), 2-2-2-6-8-8 sts in garter st, slip 1 st as if to K, K 1, psso (= 1 st dec) *, repeat from *-* 2 times in total. On this round inc 2 sts mid front and mid back and dec 2 sts in each side of piece, i.e. no of sts is the same. Insert 1 marker in piece, NOW MEASURE PIECE FROM HERE. Continue in the round as follows: Round/row 1: Work 1 round/row with pattern as before (= 1 round/row without YO in diagram). Round/row 2: Work pattern as before and dec 1 st on each side of each side marker – READ DECREASE TIP-1. On this round/row inc 2 sts mid front and mid back and dec 2 sts in each side of piece, i.e. no of sts is the same. Round/row 3: Work as 1st round/row. Round/row 4: Work as 2nd round/row. Round/row 5: Work as 1st round/row. Round/row 6: Work as 2nd round/row. Round/row 7: Work as 1st round/row. Round/row 8: Work pattern as before. On this round/row inc 2 sts mid front and mid back = 4 sts inc in total. Do not dec before and after side markers. Repeat 1st to 8th round/row until finished measurements. When A.5a and A.6a have been worked 1 time vertically, work A.5b and A.6b vertically. Now work A.7 after A.5b and A.8 before A.6a mid front and mid back until finished measurements, i.e. work inc sts mid front/back in stocking st. When piece measures 18 cm from marker under sleeve, adjust so that last round is 1 round with YO, divide piece at side markers, work front piece and back piece separately until finished measurements. FRONT PIECE: (Beg at left side marker. First row = from WS). Work pattern and repeat 1st to 8th round/row as before, but work the outermost 3-3-3-3-4-4 sts in each side of piece in GARTER ST – see explanation above. When piece measures 30 cm from marker under sleeve, switch to circular needle size 4.5 mm. Work 2 ridges over all sts AT THE SAME TIME on first row dec 2 sts over each cable. Cast off - READ CAST-OFF TIP. BACK PIECE: Work as front piece. SLEEVE: = 48-54-60-60-62-66 sts. Work sleeve in stocking st in the round on double pointed needles. Slip sts from stitch holder back on double pointed needles size 5.5 mm and cast on 6-6-6-10-12-12 sts under sleeve = 54-60-66-70-74-78 sts. Work in stocking st in the round and insert a marker in the middle of the new sts under sleeve (i.e. 3-3-3-5-6-6 new sts on each side of marker). NOW MEASURE THE PIECE FROM HERE. When piece measures 4 cm, dec 1 st on each side of marker - READ DECREASE TIP-2. Dec like this approx. every 3½-2½-2-2-2-1½ cm 9-12-14-15-16-17 times in total = 36-36-38-40-42-44 sts. When sleeve measures 43-42-42-41-41-40 cm (NOTE: Shorter measurements in the larger sizes because of longer yoke) switch to double pointed needles size 4.5 mm. Work 2 ridges. Cast off. Work the other sleeve the same way. ASSEMBLY: Sew the opening under the sleeve. |
||||||||||||||||||||||||||||||||||||||||
Diagram explanations |
||||||||||||||||||||||||||||||||||||||||
|
||||||||||||||||||||||||||||||||||||||||
 |
||||||||||||||||||||||||||||||||||||||||
 |
||||||||||||||||||||||||||||||||||||||||
 |
||||||||||||||||||||||||||||||||||||||||
 |
||||||||||||||||||||||||||||||||||||||||
 |
||||||||||||||||||||||||||||||||||||||||
Have you finished this pattern?Tag your pictures with #dropspattern #winterflairtunic or submit them to the #dropsfan gallery. Do you need help with this pattern?You'll find 28 tutorial videos, a Comments/Questions area and more by visiting the pattern on garnstudio.com. © 1982-2026 DROPS Design A/S. We reserve all rights. This document, including all its sub-sections, has copyrights. Read more about what you can do with our patterns at the bottom of each pattern on our site. |
||||||||||||||||||||||||||||||||||||||||


With over 40 years in knitting and crochet design, DROPS Design offers one of the most extensive collections of free patterns on the internet - translated to 17 languages. As of today we count 324 catalogues and 12290 patterns translated into English (UK/cm). 12290
We work hard to bring you the best knitting and crochet have to offer, inspiration and advice as well as great quality yarns at incredible prices! Would you like to use our patterns for other than personal use? You can read what you are allowed to do in the Copyright text at the bottom of all our patterns. Happy crafting!
Post a comment to pattern DROPS 172-1
We would love to hear what you have to say about this pattern!
If you want to leave a question, please make sure you select the correct category in the form below, to speed up the answering process. Required fields are marked *.