
Popular categories
Looking for a yarn?


Comments / Questions (76)
![]() Alina Gabriela wrote:
Alina Gabriela wrote:
Dear Drops designers, please help me clarify my confusion where it says "knitt 2 rows of Pattern 1 (M1) in garter st". I assume to work first 2 rows in garter and only after to work M1, or else how can I work both concomitent ?!! It may sound silly but I very much need your clarification. Thank you for the wonderful patterns
29.03.2025 - 16:02DROPS Design answered:
Dear Alina Gabriela, you have to work the 2 rows as shown in M.1 but work them in garter stitch in the round, this means work the first row M.1 exactly as shown in diagram (with knit stitches, decreases and yarn overs), and on 2nd row in M.1 purl all stitches to get garter stitch (instead of knitting stitches as shown in M.1). Happy knitting!
31.03.2025 - 09:56
![]() Annelies Smulders wrote:
Annelies Smulders wrote:
Begonnen met patroon maar graag het basis patroon is voor de zigzag tot de hoogte van 28 cm… is dat de M1 e 1 telkens herhalen?
03.03.2025 - 10:09DROPS Design answered:
Dag Annelies,
Nadat je geminderd hebt op 28 cm zijn er minder steken in het basispatroon en daarom brei je a.h.w. verder met het volgende basispatroon met minder steken tussen de omslagen en het samen breien.
12.03.2025 - 11:51
![]() Sina wrote:
Sina wrote:
Hallo, tolles Kleid. Könnt ihr hierzu einen Bolero oder ein Tuch empfehlen, welches passt?
18.08.2024 - 18:25
![]() Georgina wrote:
Georgina wrote:
Is drops muskat no.79 and 38 expired because they are not available on the market? Can you offer me other colours to replace them? Thank you
16.08.2024 - 11:49DROPS Design answered:
Dear Georgina, the shadecard for Muskat has been updated since the pattern has been published. Your DROPS Store will be able to help you choosing the best matching colours, even per mail or telephone, see list here. Happy knitting!
16.08.2024 - 16:03
![]() Eliana wrote:
Eliana wrote:
Buongiorno, vorrei anche sapere quando devo usare i ferri 3,5
05.08.2024 - 13:47DROPS Design answered:
Buonasera Eliana, deve usare i ferri n° 3,5 mm dopo il bordo iniziale. Buon lavoro!
09.08.2024 - 21:40
![]() Eliana wrote:
Eliana wrote:
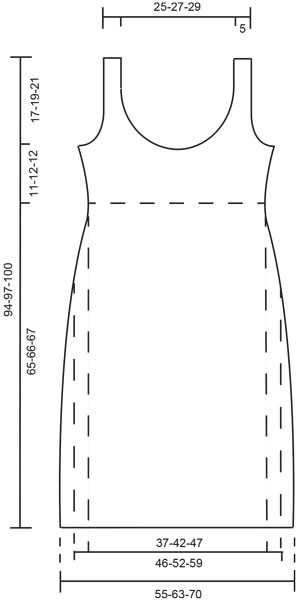
Buongiorno, dal disegno non riesco a capire la misura del modello a livello del seno. Io sono 94 cm e sono indecisa tra la taglia M e la L Grazie
05.08.2024 - 13:42DROPS Design answered:
Buongiorno Eliana, deve guardare la linea interna: la misura del seno per le 3 taglie è 37-42-47. Buon lavoro!
05.08.2024 - 14:28
![]() Lynn Alison Davies wrote:
Lynn Alison Davies wrote:
I've been trying to send a picture of Beach Mermaid which I knitted, as I changed the colours
26.06.2024 - 21:14DROPS Design answered:
Dear Mrs Davies, read more on how to share your pictures with us here. Can't wait to see them!
27.06.2024 - 09:01
![]() BARREAU Évelyne wrote:
BARREAU Évelyne wrote:
Je n'arrive pas à interpréter le diagramme de la robe Muskat DROPS 68-23 . Pour le changement des couleurs c'est bon , mais c'est pour la construction du tricot qui me pose problème .
04.01.2024 - 11:51DROPS Design answered:
Bonjour Mme Barreau, vous allez tricoter le point zigzag en suivant les diagrammes comme indiqué; répétez d'abord les 2 rangs de M.1 puis tricotez les 2 rangs ".1" pour diminuer. Tricotez ensuite M.2 jusqu'à la hauteur indiquée puis diminuer comme indiqué au 1er rang de ".2" et ainsi de suite. Autrement dit, les 2 rangs des diagrammes M.1,M.2,M.3... se répètent en hauteur et on diminue à la hauteur indiquée pour votre taille via les diagrammes 1., 2. 3. etc.. En espérant que ce soit plus clair ainsi. Bon tricot!
04.01.2024 - 13:12
![]() Hiske wrote:
Hiske wrote:
Sorry typo: mz 23 steken op 10 cm op pen 3 en 21 steken op pen 3,5 Hoe kan in het patroon met verschillende grootte pennen hetzelfde aantal steken worden gebreid?
01.06.2023 - 16:57DROPS Design answered:
Dag Hiske,
Het lijkt me het handigst dat je de naalddikte aanpast, zodat je voor zowel het patroon als de ribbelsteek op 23 steken uitkomt.
04.06.2023 - 10:19
![]() Hiske wrote:
Hiske wrote:
In het patroon staat bij de steken verhouding 23 steken voor zowel pen 3,5 als voor pen 3. Met pen 3 heb ik idd 23 steken op 20 cm, met pen 3,5 21 steken. Waarom is voor 2 verschillende pennen het zelfde aantal steken opgegeven? Welke pennen kan ik gebruiken voor dit patroon?
31.05.2023 - 08:15DROPS Design answered:
Dag Hiske,
Met pendikte 3,5 mm brei je een stekenverhouding van 23 steken in patroon en met pen 3 in ribbelsteek.
01.06.2023 - 13:17
|
||||||||||||||||||||||||||||||||||||||||||||||
Beach Mermaid |
||||||||||||||||||||||||||||||||||||||||||||||
 |
 |
|||||||||||||||||||||||||||||||||||||||||||||
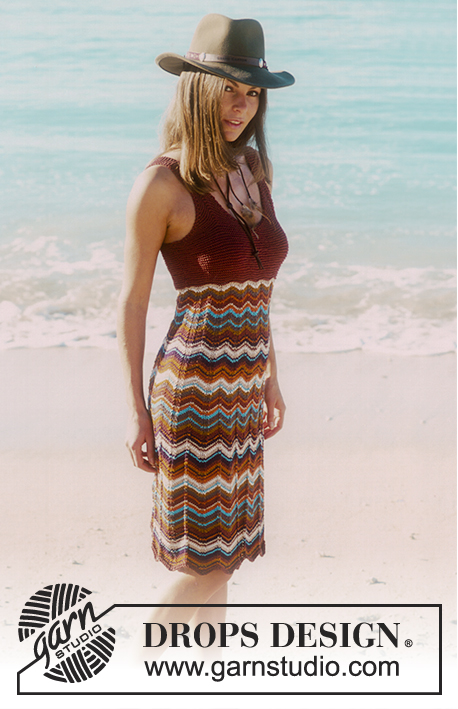
DROPS Dress in Muskat
DROPS 68-23 |
||||||||||||||||||||||||||||||||||||||||||||||
|
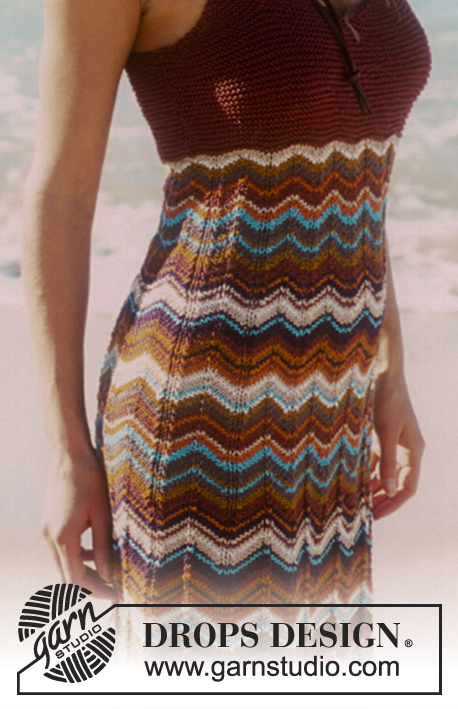
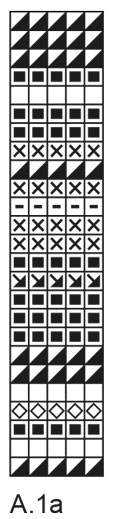
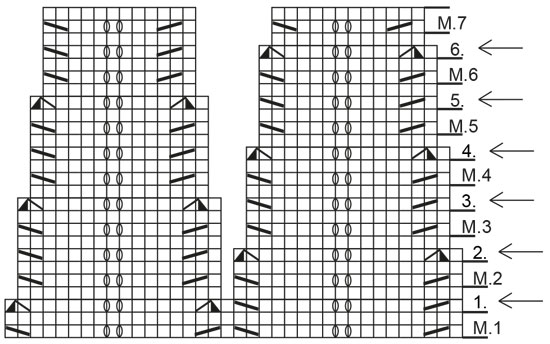
Tension: 23 sts x 30 rows on mid-size needles in pattern = 10 x 10 cm. 23 sts x 40 rows on smallest needles in garter st = 10 x 10 cm. Pattern: See charts. The pattern is seen from the right side. The chart marked «A.1a and A.1b" indicates the stripe pattern. The other chart is for the zig-zag pattern and has lines marked «M.1", «M.2", etc. These are the Pattern numbers referred to in the instructions: «M.» is the abbreviation for «Pattern» in Norwegian. The alternate lines marked with an arrow and a number are the decrease rows – decs are made on the 2nd row of each. Garter st, when knitting flat: Knit all sts, all rows. Garter st, when knitting in the round: *Rnd 1, knit. Rnd 2, purl.* Repeat from * - *. Knitting tips-1 (for back of yoke): All decs are made on right side rows. Dec 1 st inside 1 edge st as follows: After edge st: K 2 tog. Before edge st: sl 1, K 1, psso. Knitting tips-2 (for front of yoke): All decs are made on right side rows. Dec 2 sts on the row as follows: K 1, K 3 tog, then knit across until the st before the marker, yo, K the st before the marker, sl marker, yo, knit across row until 4 sts remain, then knit as follows: Sl 1, K 2 tog, psso, K 1. Dress: The dress is knit in the round from the bottom edge. Read the entire Pattern instructions above before beginning. Cast on 252-288-324 sts loosely on larger circular needles with terracotta. Knit 2 rows of Pattern 1 in garter st. Change to smaller circular needles and stockinette st. Continue to knit Pattern 1 with color changes as indicated in A.1a and A.1b. When the piece measures 28 cm start Dec 1. 14-16-18 sts are decreased each dec row. After Dec. 1 = 238-272-306 sts remain, knit Pattern 2. When the piece measures 33 cm start Dec. 2 = 224-256-288 sts remain, then knit Pattern 3. When the piece measures 38 cm start Dec. 3 = 210-240-270 sts remain, then knit Pattern 4. When the piece measures 42 cm start Dec. 4 = 196-224-252 sts remain, then knit Pattern 5. When the piece measures 47 cm start Dec. 5 = 182-208-234 sts remain, then knit Pattern 6. When the piece measures 53 cm start Dec. 6 = 168-192-216 sts, then knit Pattern 7. When the piece measures 65-66-67 cm change to smallest circular needles and terracotta and knit garter st. Measure the piece from here. When the garter st portion measures 11-12-12 cm, knit the next row as follows: bind off 3 sts for armhole, 86-98-110 sts for the front, bind off 7 sts for armhole, 68-80-92 sts for the back, bind off 4 sts for armhole. Knit each side separately. Back: = 68-80-92 sts. Dec 1 st for each armhole every other row 7-10-14 times - see knitting tips-1 = 54-60-64 sts, bind off. Front: = 86-98-110 sts. Put 43-49-55 sts at one side on a st holder. 1st strap: Mark the center st of the 43-49-55 remaining sts on needle. Knit garter st - at the same time dec at edges and inc at marker - see knitting tips-2. This decreases 2 sts per row. Dec every other row a total of 16-19-22 times = 11-11-11 sts remain. Continue to knit garter st over these 11 sts for strap. Bind off when strap measures approx. 30 cm or correct length - try on dress to check correct length of strap. 2nd strap: Put the 43-49-55 sts from st holder on needles and knit the same as the 1st strap. Assembly: Sew side seams on bodice. Sew straps to back. |
||||||||||||||||||||||||||||||||||||||||||||||
Diagram explanations |
||||||||||||||||||||||||||||||||||||||||||||||
|
||||||||||||||||||||||||||||||||||||||||||||||
 |
||||||||||||||||||||||||||||||||||||||||||||||
 |
||||||||||||||||||||||||||||||||||||||||||||||
 |
||||||||||||||||||||||||||||||||||||||||||||||
 |
||||||||||||||||||||||||||||||||||||||||||||||
Have you finished this pattern?Tag your pictures with #dropspattern or submit them to the #dropsfan gallery. Do you need help with this pattern?You'll find 15 tutorial videos, a Comments/Questions area and more by visiting the pattern on garnstudio.com. © 1982-2026 DROPS Design A/S. We reserve all rights. This document, including all its sub-sections, has copyrights. Read more about what you can do with our patterns at the bottom of each pattern on our site. |
||||||||||||||||||||||||||||||||||||||||||||||


With over 40 years in knitting and crochet design, DROPS Design offers one of the most extensive collections of free patterns on the internet - translated to 17 languages. As of today we count 325 catalogues and 12298 patterns translated into English (UK/cm). 12298
We work hard to bring you the best knitting and crochet have to offer, inspiration and advice as well as great quality yarns at incredible prices! Would you like to use our patterns for other than personal use? You can read what you are allowed to do in the Copyright text at the bottom of all our patterns. Happy crafting!
Post a comment to pattern DROPS 68-23
We would love to hear what you have to say about this pattern!
If you want to leave a question, please make sure you select the correct category in the form below, to speed up the answering process. Required fields are marked *.