
Popular categories
Looking for a yarn?


Comments / Questions (37)
![]() Jackie wrote:
Jackie wrote:
CONT...any straight rows after the increases until it measures 39cm). Could there be an error in the number of repeats given for each increase: (sm size) set-up increases (3 rows); inc2-12 repeats every other round (24 rows); inc3-11 repeats every 4th rnd (44 rows); inc4-16 repeats every other rnd (32 rows). In the inc3 section (11 rep/4th round), only 2-5 repeats (12 rows) would work depending on # of straight rows after increases. Please advise on increases to achieve intended pattern shape.
19.10.2019 - 17:34DROPS Design answered:
Dear Jackie, in size S/M you will increase before 1st/4th marker + after 3rd/6th marker a total of 13 times every other round (= 26 rounds) + 11 times every 4th round (= 44 rounds) = 26+44= 70 rounds - at the same time, increase on each side of 2nd/5th marker 17 times in total in every other round (= 34 rounds), but these 34 rounds are not coming extra, they are the same as the first 34 rounds where you increase on other markers. Make sure to check your tension in pattern to recalculate the increases and make them a different way if required so that you get the correct length. Happy knitting!
21.10.2019 - 10:09
![]() Jackie wrote:
Jackie wrote:
Hi! I am starting the Shelter poncho and am recalculating the pattern for my yarn/gauge and a size. In recalculating your pattern, it seems the measurements given in the diagram do not add up to the number of rows given in the written instructions. Both the diagram and instructions shows 39cm after the collar to the the end of the section in the round. With a gauge of 20rows/10cm, this would be 78 rows. The written instructions show 103 rows through the increase rows (not including...CONTINUED
19.10.2019 - 17:17DROPS Design answered:
Dear Jackie, the tension is given in stocking stitch while the poncho is then worked in English rib (with P2 between each stitch in English rib), the number of rows in pattern will be different than in stocking stitch. You can make a swatch to recalculate the number of rows/height required fro your tension. Happy knitting!
21.10.2019 - 10:05
![]() Lena wrote:
Lena wrote:
Love your designs, unfortunately I have great difficulty understanding any of them and especially this one which is sad for me.
06.09.2019 - 22:01
![]() Carolina wrote:
Carolina wrote:
Muchas gracias, intentaré enviarles foto via Facebook
04.06.2019 - 18:06
![]() Carolina wrote:
Carolina wrote:
Señores Drops, Su último mensaje para mí, dice: “Ver la respuesta abajo”.......y abajo no hay ninguna respuesta nueva! Ha sido muy difícil y demoroso explicarles mi duda por este medio. Yo entiendo lo que significa un cuadrado en blanco en el diagrama; pero esa NO es mi pregunta!..Les agradeceré indicarme un mail donde pueda adjuntarles una imágen más explícita de lo que yo veo en sus patrones y así puedan finalmente ayudarme. Muchas gracias
29.05.2019 - 00:35DROPS Design answered:
Hola Carolina. La respuesta abajo a la que nos referimos es la del 28 de mayo en respuesta a su pregunta del 26 a la 1:19. De momento nadie más ha comentado que tuviera problemas como usted con los diagramas, por lo que suponemos que no se trata de un error de la página, sino que de su ordenador. ¿Ha probado en otro ordenador, otro navegador u otro dispositivo electrónico? Puede que así se visualice mejor.
03.06.2019 - 22:37
![]() Carolina wrote:
Carolina wrote:
A continuación les menciono solo algunos de muchos patrones en los que sucede lo mismo: - DROPS/199/27 “Lucy in the Sky” - DROPS/172/21 “Swing Along” - DROPS/201/24 “Lamella” - DROPS/194/26 “Amethyst Amour” - DROPS/195/9 “Videira” - DROPS/167/29 “Candyfloss” ...etc., etc. Les agradeceré mucho una respuesta más rápida, ya que pasaron casi dos meses antes de tener su respuesta.... y aun espero para empezar a tejer.... Muchas gracias.
26.05.2019 - 01:42DROPS Design answered:
(Continuación de la repuesta )No se pueden adjuntar fotos a las preguntas y no trabajamos con e-mail. Si eso, existe un grupo de Facebook llamado DROPS Workshop, donde puede adjuntar fotos de lo que ve en su pantalla y explicar su problema. Nosotros también podremos ver así su error y quizá encontremos una solución. Si avisa cuando lo haya publicado, echaremos un vistazo a la foto para encontrar una solución.
28.05.2019 - 22:18
![]() Carolina wrote:
Carolina wrote:
....Entonces, cuando en el diagrama veo un cuadrado blanco, no sé cuál de esas cuatro indicaciones debo seguir....se entiende ahora?. Lo lógico es que en la explicación de los símbolos del diagrama, aparezca solo UNA VEZ el cuadrado en blanco (que significará “tejer un punto de derecho por el lado derecho y de revés por el lado revés”), pero aparecen varios cuadrados blancos, con distintas instrucciones cada uno......
26.05.2019 - 01:32
![]() Carolina wrote:
Carolina wrote:
Hola. Trataré de aclarar mi pregunta. Me basaré en el DROPS/178/34 “So Far”, ya que es un buen ejemplo para lo que trato de preguntarles. En el 178/34, aparecen CUATRO explicaciones distintas para un cuadrado en blanco..... : a) = derecho por el lado derecho, revés por el lado revés b) = revés por el lado derecho, derecho por el lado revés c) = tejer 2 puntos juntamente de derecho d) = deslizar 1 punto....etc, etc
26.05.2019 - 01:19DROPS Design answered:
Hola Carolina. Un cuadrado blanco en todos estos patrones significa lo mismo: derecho por el lado derecho y revés por el lado revés. Los otros cuadrados (que dices que están en blanco) son: un cuadrado con un punto negro dentro significa revés por el lado derecho , derecho por el lado revés; dos cuadrados con una linea diagonal - trabajar 2 puntos juntos de derecho etc. Todos las diagramas son correctas. Prueba a usar otro navegador si tienes problemas al visualizar los diagramas. También puedes intentar descargarlos o imprimirlos y ver si también quedan cuadrados blancos o si se ven los símbolos.
28.05.2019 - 22:18
![]() Carolina wrote:
Carolina wrote:
Hola Garnstudio, ....por qué en varios de sus patrones , en la explicación de los símbolos del Diagrama, aparecen los cuadritos en blanco?, como por ejemplo en este patrón,,,.......solo debiera aparecer uno en blanco (el que explica el significado de los cuadros en blanco) y los demás debieran llevar la figura del cuadrado del que se explicará el significado.... Desde ya gracias por su respuesta
06.04.2019 - 21:43DROPS Design answered:
Hola Carolina. Veo varias preguntas tuyas sobre los diagramas y no entiendo cuál es el problema. Los diagramas están correctos. El cuadrado blanco normalmente significa un punto de derecho por el lado derecho y de revés por el lado revés. A veces hay unos espacios en blanco en los diagramas cuando el patrón es tridimensional. Si puedes mencionar el patrón concreto y la fila concreta donde tienes problemas, intentaré ayudarte.
25.05.2019 - 20:28
![]() Josianne wrote:
Josianne wrote:
Guten Tag, Ich stricke in Grösse L/M, dass heisst dass ich 102 Maschen. Könnt Ihr mir sagen (von rechts nach links) an welchen Maschen die Markierung 1 bis 6 kommen? Ich komme mit der Strichanleitung nicht klar. Vielen Dank im voraus
17.10.2018 - 20:28DROPS Design answered:
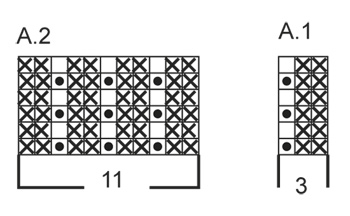
Liebe Josianne, so setzen Sie die Markierungen ein: A.1 (= 3 M) 7 x und den 1. Markierer an der letzten Masche anbringen (= 21. Masche), A.2 (= 11 M) und den 2. Markierer an der mittleren Masche anbringen (=27. Masche), die letzte M von A.1 stricken und den 3. Markierer an dieser Masche anbringen (= 33. Masche), A.1 13 x und den 4. Markierer an der letzten M anbringen (=72. Masche) , A.2 und den 5. Markierer an der mittleren Masche anbringen (= 78. Masche), die letzte M von A.1 stricken und den 6. Markierer an dieser Masche anbringen (= 84. Masche), A.1 6 x. Viel Spaß beim stricken!
18.10.2018 - 09:34
|
||||||||||
Shelter#shelterponcho |
||||||||||
|
|
||||||||||
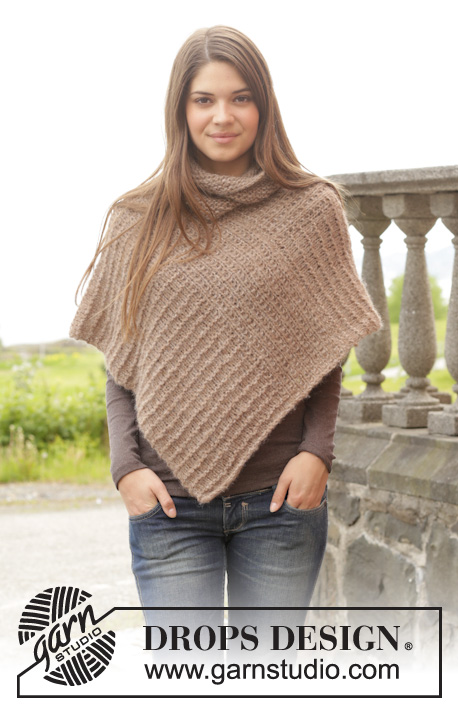
Knitted DROPS poncho in false English rib, worked top down in ”Big Merino”. Size S-XXXL.
DROPS 156-31 |
||||||||||
|
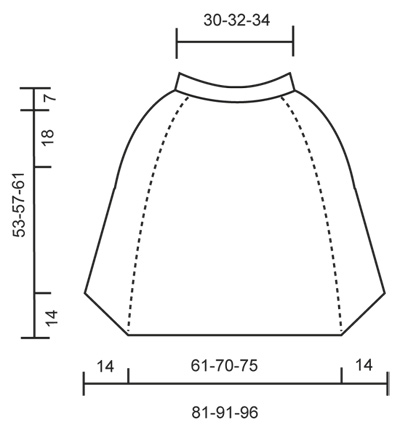
GARTER ST (back and forth on needle): K all rows. 1 ridge = 2 rows K. PATTERN: See diagrams A.1 and A.2. Diagrams show all rows seen from RS. INCREASE TIP: Inc 1 st by making 1 YO, on next round work YO twisted (i.e. work in back loop of st instead front) to avoid holes. NOTE! Work the inc sts in pattern A.1/A.2. On first inc work the new sts as last st in pattern A.1 (i.e. on next round after round with inc, K YOs twisted. After the next 2 rounds with inc, P YOs twisted). DECREASE TIP: Dec inside 1 edge st in garter st. Dec before 1 edge st as follows: K 2 tog. Dec after 1 edge st as follows: Slip 1 st as if to K, K 1, psso. ---------------------------------------------------------- PONCHO: Work top down on circular needle. First work a neck edge back and forth, then work poncho in the round on circular needle, then continue back and forth on front and back piece. Cast on 96-102-108 sts on circular needle size 5.5 mm with Big Merino. Work in GARTER ST back and forth - see explanation above - for 7 cm. Then work in the round. NOW MEASURE THE PIECE FROM HERE. Work 1 round in stocking st. On next round work as follows from the back: A.1 (= 3 sts) 6-7-7 times in width, insert 1st marker in last st, A.2 (= 11 sts), insert 2nd marker in the middle st (= middle of shoulder), work last st in A.1, insert 3rd marker in this st, A.1 12-13-14 times in width, insert 4th marker in last st, A.2, insert 5th marker in the middle st (= middle of shoulder), work last st in A.1, insert 6th marker in this st, A.1 6-6-7 times in width. Continue like this, AT THE SAME TIME on next round beg inc: Work until 1st marker, 1 YO, work until 2nd marker, 1 YO on each side of this st, work until 3rd marker, work st with marker, 1 YO, work until 4th marker, 1 YO, work until 5th marker, 1 YO on each side of this st, work until 6th marker and work this st, 1 YO, work the rest of round = 104-110-116 sts. Work the inc sts in pattern A.1/A.2 - READ INCREASE TIP. REMEMBER THE KNITTING TENSION! Inc as follows before 1st and 4th marker and after 3rd and 6th marker (= 4 inc): Repeat inc every other round 12-18-21 more times, and every 4th round 11 times in all sizes. Inc on each side of 2nd and 5th marker as follows (= 4 inc): Repeat inc every other round 16 more times. When inc are done, there are 260-290-306 sts on round. When piece measures 39-43-47 cm, work as follows from beg of round: Work the first 62-71-74 sts (= back piece), cast off the next 5 sts, work the next 125-140-148 sts (= front piece), cast off the next 5 sts, work the remaining 63-69-74 sts (= back piece). Then finish front and back piece back and forth separately. FRONT PIECE: There are now 125-140-148 sts for front piece. Continue back and forth with pattern over front piece as before, AT THE SAME TIME work 1 edge st in garter st in each side. On next row from RS beg dec in each side of piece - READ DECREASE TIP. Repeat dec on every row from RS 13 more times = 97-112-120 sts. Piece measures 53-57-61 cm - adjust so that next row is 2nd, 4th or 6th row in diagram. Cast off sts with K over K and P over P. NOTE! Cast off YOs with P. Cut and fasten the yarn. BACK PIECE: Work as front piece. ASSEMBLY: Sew tog edge in garter st in the back of neck. Sew neatly tog st by st to get a nice seam. Cut the yarn and fasten. |
||||||||||
Diagram explanations |
||||||||||
|
||||||||||
 |
||||||||||
 |
||||||||||
Have you finished this pattern?Tag your pictures with #dropspattern #shelterponcho or submit them to the #dropsfan gallery. Do you need help with this pattern?You'll find 19 tutorial videos, a Comments/Questions area and more by visiting the pattern on garnstudio.com. © 1982-2026 DROPS Design A/S. We reserve all rights. This document, including all its sub-sections, has copyrights. Read more about what you can do with our patterns at the bottom of each pattern on our site. |
||||||||||


With over 40 years in knitting and crochet design, DROPS Design offers one of the most extensive collections of free patterns on the internet - translated to 17 languages. As of today we count 324 catalogues and 12290 patterns translated into English (UK/cm). 12290
We work hard to bring you the best knitting and crochet have to offer, inspiration and advice as well as great quality yarns at incredible prices! Would you like to use our patterns for other than personal use? You can read what you are allowed to do in the Copyright text at the bottom of all our patterns. Happy crafting!
Post a comment to pattern DROPS 156-31
We would love to hear what you have to say about this pattern!
If you want to leave a question, please make sure you select the correct category in the form below, to speed up the answering process. Required fields are marked *.