
Popular categories
Looking for a yarn?


Comments / Questions (77)
![]() Stephanie wrote:
Stephanie wrote:
After working a2 in size small I have 6 stitches extra after all the required decreases. I am wondering if the pattern forgot to take the 3stockinette sts on each side of the edge stitches off in the decreases. Or have I done something wrong.because everything matches up perfectly otherwise. So I'm thinking that I should decrease 21 sts by the end of a2
27.01.2014 - 00:53DROPS Design answered:
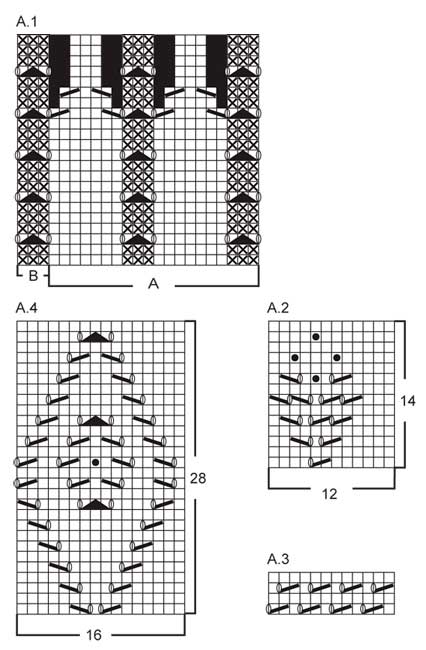
Dear Stephanie, after A.1 you have 181 sts, work A.2 as follows : 5 sts in garter st, A.2 (= 12 sts) a total of 14 times (= 168 sts), 3 sts in st st, 5 sts in garter st = 181 sts. After A.2 work 4 rows st st while dec on 3rd row 15 sts evenly = 166 sts remain. Happy knitting!
27.01.2014 - 09:39
![]() Simone wrote:
Simone wrote:
Was fuer ein schönes und feminines Jäckchen, das werde ich stricken
16.01.2014 - 11:53
![]() Martha wrote:
Martha wrote:
Ein sehr schönes Modell, wie für mich gemacht!
13.01.2014 - 22:51
![]() CATHERINE VALLEE wrote:
CATHERINE VALLEE wrote:
Jolis points et joli coupe très féminine
10.01.2014 - 20:41
![]() Bettina wrote:
Bettina wrote:
Frais et coquet. SUPERBE.
10.01.2014 - 15:36
![]() SIMONETTA MESCIA wrote:
SIMONETTA MESCIA wrote:
SUPER
08.01.2014 - 17:50
![]() Marie France wrote:
Marie France wrote:
Joli gilet
07.01.2014 - 11:33
![]() Gallet wrote:
Gallet wrote:
Tres seduisant, tres feminin
06.01.2014 - 21:31
![]() Ingrid wrote:
Ingrid wrote:
Kvinnlig fint mönster.Den vill jag sticka.
06.01.2014 - 15:48
![]() Tiivi wrote:
Tiivi wrote:
This design is absolutely wonderful - so feminine. Hopefully will have one in my wardrobe :-).
06.01.2014 - 14:05
|
|||||||||||||||||||||||||
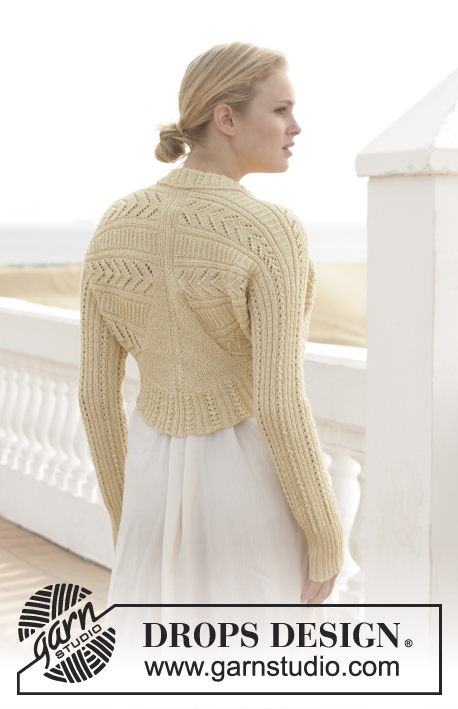
Ocean Breeze#oceanbreezecardigan |
|||||||||||||||||||||||||
 |
 |
||||||||||||||||||||||||
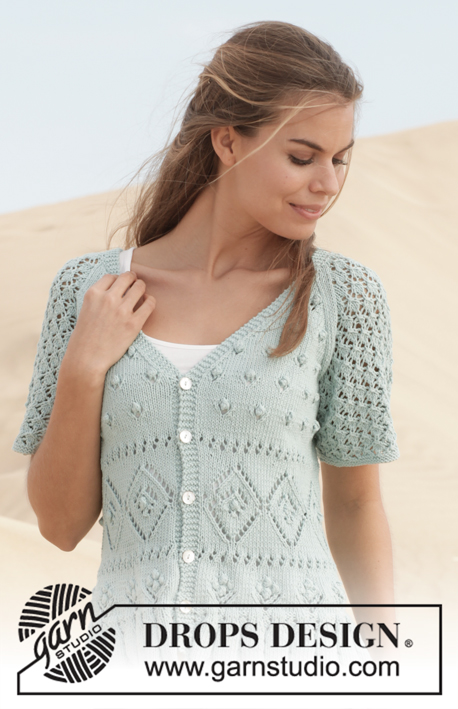
Knitted DROPS jacket with lace pattern and raglan in ”Cotton Light”. Size: S - XXXL.
DROPS 152-1 |
|||||||||||||||||||||||||
|
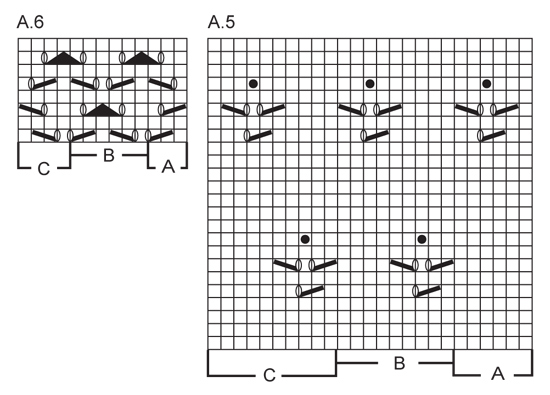
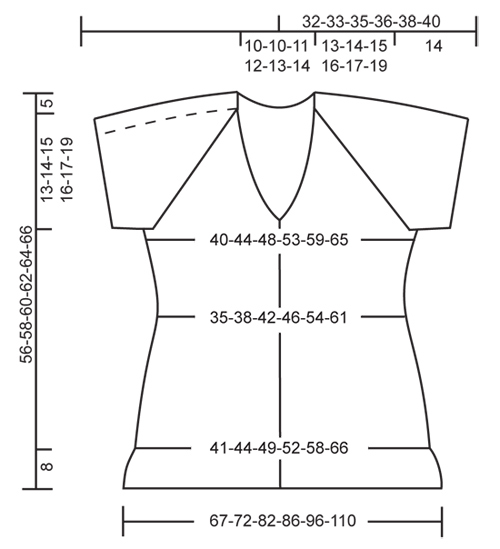
GARTER ST (back and forth on circular needle): K all rows. 1 ridge = 2 rows K. GARTER ST (in the round on double pointed needles): * K 1 round and P 1 round *, repeat from *-*. 1 ridge = 2 rounds. PATTERN: See diagrams A.1 to A.6. The diagrams show all rows in pattern seen from RS. BUTTONHOLES: Dec for buttonholes on right band. 1 buttonhole = K tog second and third st from edge and make 1 YO. Dec for buttonholes when piece measures: SIZE S: 8, 15, 22, 29 and 35 cm SIZE M: 8, 15, 22, 29 and 35 cm SIZE L: 8, 15, 22, 29 and 35 cm SIZE XL: 8, 15, 22, 29 and 35 cm SIZE XXL: 8, 15, 22, 29 and 35 cm SIZE XXXL: 8, 14, 20, 26 and 32 cm DECREASE TIP 1: All dec are done from RS! Dec 1 st by K 2 sts tog. DECREASE TIP 2: Dec inside 5 band sts in each side. All dec are done from RS! Dec as follows after 5 band sts: Slip 1 st as if to K, K 1, psso. Dec as follows before 5 band sts: K 2 tog. INCREASE TIP: Inc 1 st by making 1 YO. On next row work YO twisted to avoid holes. RAGLAN: Dec on each side of marker in each raglan line. All dec are done from RS! Beg 3 sts before marker and work as follows: K 2 tog, K 2 (marker is between these 2 sts), slip 1 st as if to K, K 1, psso (= 2 sts dec). ---------------------------------------------------------- BODY: Worked back and forth on circular needle from mid front. Cast on 293-313-353-373-413-473 sts (incl 5 band sts in each side towards mid front) on circular needle size 3.5 mm with Cotton Light. P 1 row from WS. Work next row as follows from RS: 5 band sts in GARTER ST - see explanation above, work pattern according to diagram A.1A until 8 sts remain, work A.1B (= 3 sts) and finish with 5 band sts in GARTER ST. Continue pattern like this back and forth. When A.1 has been worked, there are 181-193-217-229-253-289 sts on needle and piece measures approx. 8 cm vertically, remember BUTTONHOLES on right band - see explanation above. Work next row as follows from RS: 5 band sts in garter st, work pattern according to diagram A.2 until 8 sts remain, work 3 sts in stocking st and finish with 5 band sts in garter st. Continue pattern like this. REMEMBER THE KNITTING TENSION! When A.2 has been worked, piece measures approx. 13 cm. Work 4 rows in stocking st (1st row = RS and continue bands in garter st) while AT THE SAME TIME on 3rd row (= RS) dec 15-12-15-15-9-12 sts evenly - READ DECREASE TIP 1 (do not dec over bands) = 166-181-202-214-244-277 sts remain on needle. Then work A.3 1 time vertically with 5 band sts in garter st in each side. After A.3 work 4 rows in stocking st while AT THE SAME TIME on 1st row (= RS) dec 11-10-15-11-9-10 sts evenly (do not dec over bands) = 155-171-187-203-235-267 sts remain on needle. Work next row as follows from RS: 5 band sts as before, work pattern according to diagram A.4 until 6 sts remain on row, work 1 st in stocking st and finish with 5 band sts in garter st as before. When A.4 has been worked 1 time vertically, work 4 rows in stocking st (1st row = RS and continue bands in garter st) while AT THE SAME TIME on 2nd row (= WS) inc 11-13-9-14-9-4 sts evenly - READ INCREASE TIP (do not inc over bands) = 166-184-196-217-244-271 sts remain on needle. Then work A.3 1 time vertically with 5 band sts in garter st in each side. After A.3 work 4 rows in stocking st while AT THE SAME TIME on 2nd row (= WS) inc 13-13-10-16-7-7 sts evenly (do not inc over bands) = 179-197-206-233-251-278 sts remain on needle. The piece now measures approx. 31 cm vertically in all sizes. Work next row as follows from RS: 5 band sts as before, work pattern according to diagram A.5A (= 6 sts), work pattern according to diagram A.5B until 15 sts remain on row, work A.5C (= 10 sts) and finish with 5 band sts as before. Continue pattern like this back and forth. AT THE SAME TIME insert 1 marker 47-52-54-61-65-72 sts in from each side (= 85-93-98-111-121-134 sts between markers on back piece). When piece measures 36-36-36-36-36-33 cm (adjust so that approx. 2 rows have been worked after last buttonhole on right band), work short rows over bands as follows (beg from RS): K 5 band sts, turn piece, tighten yarn and K, turn piece and work as before over all sts, turn piece, K 5 band sts, turn piece, tighten yarn and K. Then work back and forth over all sts as before, AT THE SAME TIME on 1st row from RS dec 1 st in each side towards mid front for V-neck – READ DECREASE TIP 2. Repeat dec every other row (i.e. every row from RS) 21-24-26-30-33-38 times in total – NOTE: Work sts that do not fit the pattern in stocking st while decreasing. AT THE SAME TIME when piece measures approx. 38-39-40-41-42-42 cm – adjust so that next row is worked from WS, cast off for armholes in each side as follows: Work until 3 sts remain before first marker in the side, cast off the next 6 sts, work until 3 sts remain before marker in the other side, cast off the next 6 sts and work the rest of row. There are now 79-87-92-105-115-128 sts on back piece and approx. 41-45-46-51-53-57 sts on each front piece (depending on no of sts dec for V-neck). Put piece aside and work the sleeves (dec for V-neck are continued on yoke). SLEEVE: Worked in the round on double pointed needles. Cast on 71-77-79-85-87-93 sts on double pointed needles size 3 mm with Cotton Light. Work 2 ridges in GARTER ST in the round - see explanation above. Switch to double pointed needles size 3.5 mm and K 1 round while AT THE SAME TIME dec 10-10-12-12-14-14 sts evenly = 61-67-67-73-73-79 sts on needle. On next round work as follows: Work A.6A (= 3 sts), work pattern according to diagram A.6B until 4 sts remain on round and finish with A.6C (= 4 sts). Continue pattern in the round like this. When piece measures approx. 14 cm in all sizes – finish after 5th round in A.6, cast off on next round the middle 6 sts under sleeve = 55-61-61-67-67-73 sts remain on row. Put piece aside and knit another sleeve. YOKE: Slip sleeves on to same circular needle as body where armholes were cast off (without working them first) = approx. 271-299-306-341-355-388 sts on needle. Insert 1 marker in all transitions between sleeves and body (= 4 markers). Continue back and forth as before with A.5 on body, A.6 on sleeves and neck dec in each side towards mid front as before – NOTE: Make sure to make the same no of YOs as dec sts in the pattern on body and sleeves so that the no of sts is correct. In addition on first row (= RS) dec for RAGLAN on each side of all markers – see explanation above (= 8 sts dec). Repeat dec for raglan on every row from RS 18-20-21-23-24-26 times in total. After all dec for raglan and neck, 91-99-96-111-115-128 sts remain on needle. AT THE SAME TIME after last row with dec for raglan work 1 row from WS as before. Work next row as follows from RS: Work 5 band sts as before, slip them on 1 stitch holder, work until 5 band sts remain on row, slip these 5 sts on 1 stitch holder = 81-89-86-101-105-118 sts on row. K 1 row from WS while AT THE SAME TIME dec 18-26-21-34-36-47 sts evenly = 63-63-65-67-69-71 sts remain on needle. Cast off with K from RS and cut the yarn. BAND + NECK EDGE: Slip the 5 band sts from stitch holder on right front piece back on needle size 3.5 mm. Continue in garter st back and forth over these 5 sts. Work until neck edge measures approx. 15-17 cm from where sts were slipped back on needle (place neck edge towards neckline on garment mid back, lightly pull it and make sure that it fits the measurements), then cast off. Repeat along left front piece. Sew seam mid back inside cast-off edge (seam should be in towards WS on garment). Sew neck edge to neckline - sew in outer loops of edge sts to edge in garter st so that neck edge is placed nicely towards the neckline. Sew the opening under the sleeves. Sew on buttons. |
|||||||||||||||||||||||||
Diagram explanations |
|||||||||||||||||||||||||
|
|||||||||||||||||||||||||
 |
|||||||||||||||||||||||||
 |
|||||||||||||||||||||||||
 |
|||||||||||||||||||||||||
Have you finished this pattern?Tag your pictures with #dropspattern #oceanbreezecardigan or submit them to the #dropsfan gallery. Do you need help with this pattern?You'll find 29 tutorial videos, a Comments/Questions area and more by visiting the pattern on garnstudio.com. © 1982-2026 DROPS Design A/S. We reserve all rights. This document, including all its sub-sections, has copyrights. Read more about what you can do with our patterns at the bottom of each pattern on our site. |
|||||||||||||||||||||||||


With over 40 years in knitting and crochet design, DROPS Design offers one of the most extensive collections of free patterns on the internet - translated to 17 languages. As of today we count 325 catalogues and 12298 patterns translated into English (UK/cm). 12298
We work hard to bring you the best knitting and crochet have to offer, inspiration and advice as well as great quality yarns at incredible prices! Would you like to use our patterns for other than personal use? You can read what you are allowed to do in the Copyright text at the bottom of all our patterns. Happy crafting!
Post a comment to pattern DROPS 152-1
We would love to hear what you have to say about this pattern!
If you want to leave a question, please make sure you select the correct category in the form below, to speed up the answering process. Required fields are marked *.