
Popular categories
Looking for a yarn?


Comments / Questions (68)
![]() Karen wrote:
Karen wrote:
Skøn trøje! Men jeg foretrækker at strikke kanten på rygstykkerne som snoninger også i stedet for rib (ligesom den til ærmerne) og vendestrik, så trøjen bliver lidt længere midt bagpå - ellers kan forstykkerne godt virke tunge ift. ryggen. Jeg er enig med de andre kommentarer i, at et traditionelt ærme, der slutter ved skulderen samt ingen slids passer bedre til designet.
31.07.2020 - 17:17
![]() Judith wrote:
Judith wrote:
Ich habe eine Frage zu den verkürzten Reihen-1 rechtes Vorderteil: "wenden und zurückstricken (die Umschläge re stricken, sodass Löcher entstehen)" - was ist mit den Umschlägen gemeint? Sie werden dort soweit ich weiß das erste Mal erwähnt. Handelt es sich um die Stelle, wo ich bei den verkürzten Reihen wende? Dann entsteht aber nicht wirklich ein Loch, wenn ich beim Wenden die "Randmasche" einfach nur rechts abstricke? Danke für Voraus für Ihre Hilfe!
17.07.2017 - 16:37DROPS Design answered:
Liebe Judith, wenn die verkürzten Reihen gestrickt sind bis noch 3 M übrig sind, dann die nächste Reihe stricken Sie mit Umschläge wie erklärt, dann bein der nächsten Reihe stricken Sie diese Umschläge rechts so dass Löcher entstehen. Viel Spaß beim stricken!
18.07.2017 - 08:30Tuuli wrote:
Hi! I plan to knit this garment using Drops Sarfar cotton yarn that has slightly differing gauge from that of Alpaca. Should I take this into consideration as Sarfar is recommended as substitute? How much of a difference should I expect in terms of piece lenght?
25.02.2016 - 17:57
![]() Birgit Delbrüger wrote:
Birgit Delbrüger wrote:
Ich verstehe die Anleitung unter dem Korrekturreiter nicht. Worauf bezieht sich das?
20.01.2015 - 10:48DROPS Design answered:
Sie brauchen den Korrekurreiter nicht weiter zu beachten, wenn Sie die Jacke nach der Online-Anleitung stricken, die Korrekturen gelten für die gedruckten Hefte, in der Online-Anleitung sind sie enthalten.
21.01.2015 - 21:55
![]() Sirius Boessenkool wrote:
Sirius Boessenkool wrote:
Made this, aboslutely love it, in a beautiful greengrey wool. However, for me, the vest is slightly shorter than on the model, I have found this with multiple drops patterns. If I were to make it again I'd lengthen it a bit. It was a pleasure to knit this pattern though, and a pleasure to wear the vest.
25.11.2014 - 19:47
![]() Anne Lies wrote:
Anne Lies wrote:
Bij de mouwen staat 3 ribbels in ribbels breien (na het boordje) Moet dat zijn 3 cm? of naalden?
14.04.2014 - 10:02DROPS Design answered:
Hoi Anne. Je breit 3 ribbels = 6 nld ribbelst
14.04.2014 - 12:23
![]() Lotta wrote:
Lotta wrote:
Mycket roligt mönster, kul att sticka. Jag flyttade upp ärmkullen och koftan sitter perfekt med säkerhetsnål som knäppning
01.02.2014 - 15:09
![]() Claudia Kronsbein wrote:
Claudia Kronsbein wrote:
Gibt es eine maschenprobe für das Garn?
06.01.2014 - 08:45DROPS Design answered:
Liebe Claudia, die Maschenprobe steht im oberen Teil der Anleitung: 10 x 10 cm = 24 M x 48 R kraus re.
06.01.2014 - 11:46
![]() Kathrine B. Norvik wrote:
Kathrine B. Norvik wrote:
Er det riktig at det bare skal legges opp 11 masker på ermet?
25.09.2013 - 14:03DROPS Design answered:
Hej Kathrine. Ja, du begynder med at strikke de lille kabel for enden af aermet. Naar du er faerdig lukker du af og strikker masker op langs kanten og felles/økes det jevnt fordelt til 60-60-62-62-64-64 m
25.09.2013 - 14:57
![]() Anne Tranvouez wrote:
Anne Tranvouez wrote:
Merci de votre réponse. Une nouvelle question : Pourquoi utiliser une aiguille circulaire pour tricoter en aller-retour ? Merci
03.09.2013 - 15:57DROPS Design answered:
Bonjour Mme Tranvouez, on utilise des aiguilles circulaires même pour tricoter en allers et retours, on a ainsi suffisamment de place pour y loger toutes les mailles. Si vous n'êtes pas habituée, n'hésitez pas à consulter nos vidéos pour apprendre. Bon tricot!
03.09.2013 - 17:02
|
|||||||||||||
Ruby Turns#rubyturnscardigan |
|||||||||||||
 |
 |
||||||||||||
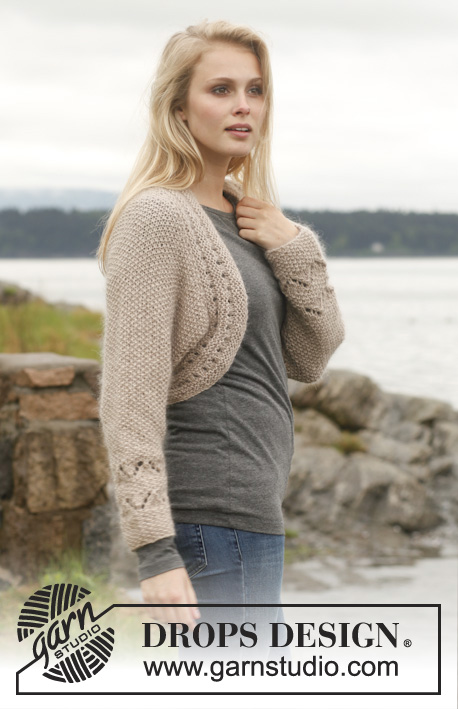
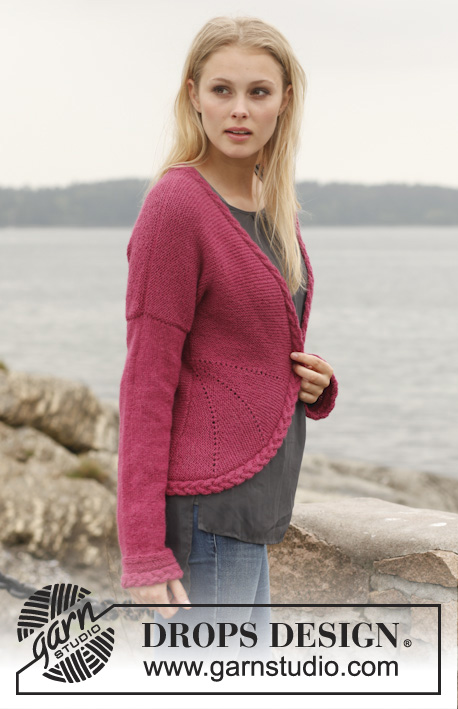
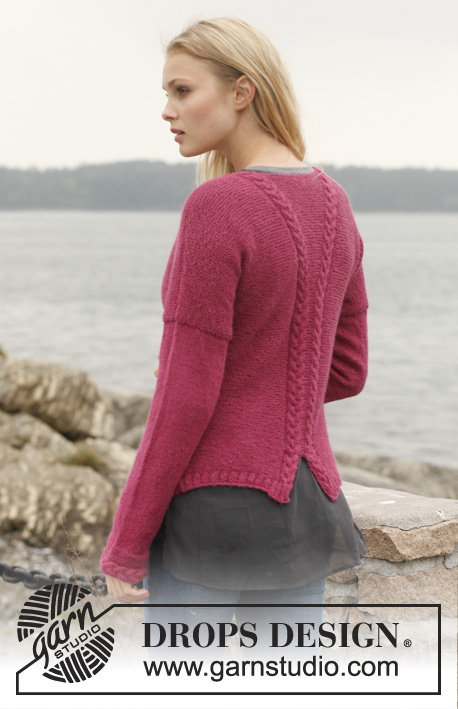
Knitted DROPS jacket in garter st with rounded front edges and cables in ”Alpaca”. Size: S - XXXL.
DROPS 151-3 |
|||||||||||||
|
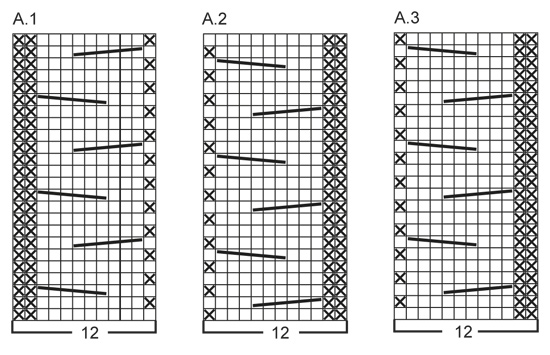
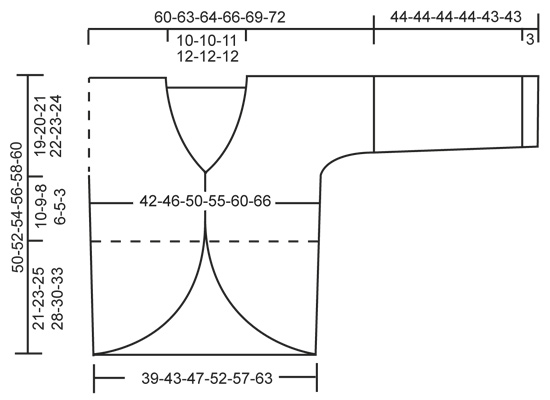
GARTER ST (back and forth on circular needle): K all rows. 1 ridge = 2 rows K. PATTERN: See diagrams A.1 to A.3. The diagrams show all rows in pattern seen from RS. SHORT ROWS 1 RIGHT FRONT PIECE: Work short rows to get a rounded edge on front piece. Short rows (1 repetition) are worked in garter st and cable pattern as follows – 1st row = RS: Row 1-2: Work A.1 (= 12 sts) + 1 st in garter st, turn piece and work back (i.e. 1 st in garter st and A.1 over the last 12 sts). Row 3-4: Work A.1 + 2 sts in garter st, turn and work back (remember A.1 over the last 12 sts). Row 5-6: Work A.1 + 4 sts in garter st, turn piece and work back. Row 7-8: Work A.1 + 6 sts in garter st, turn piece and work back. Continue like this by working A.1 + 2 sts in garter st more every time until 3 sts remain on row, then work next row as follows from RS: Work A.1, * K 2 tog, 1 YO *, repeat from *-* until 3 sts remain on row and finish with K 3, turn and work back (K YOs to make holes). 1 repetition = 44-50-54-60-66-74 rows in total. SHORT ROWS 2 RIGHT FRONT PIECE: (1st row = RS.) Row 1-2: Work A.1 (= 12 sts), turn piece and work A.1 back. Row 3-4: Work A.1 + 3-9-3-11-5-1 st in garter st, turn and work back (remember A.1 over the last 12 sts). Row 5-6: Work A.1 + 7-13-8-15-10-7 sts in garter st, turn and work back. Row 7-8: Work A.1 + 11-17-13-19-15-13 sts in garter st, turn and work back. Row 9-10: Work A.1 + 15-21-18-23-20-19 sts in garter st, turn and work back. Continue like this by working A.1 + 4-4-5-4-5-6 sts in garter st more every time until all sts on row have been worked back and forth. 1 repetition = 24-24-24-28-28-28 rows in total. SHORT ROWS 1 LEFT FRONT PIECE: Short rows (1 repetition) are worked in garter st and cable pattern as follows – NOTE: 1st row = WS, i.e. read 1st row in A.2 from left to right. Row 1-2: Work A.2 (= 12 sts) + 1 st in garter st, turn piece and work back (i.e. 1 st in garter st and A.2 from RS over the last 12 sts). Row 3-4: Work A.2 + 2 sts in garter st, turn and work back (remember A.2 over the last 12 sts). Row 5-6: Work A.2 + 4 sts in garter st, turn piece and work back. Row 7-8: Work A.2 + 6 sts in garter st, turn piece and work back. Continue like this by working A.2 + 2 sts in garter st more every time until 3 sts remain on row, then work next row as follows from WS: Work A.2, * K 2 tog, 1 YO *, repeat from *-* until 3 sts remain on row and finish with K 3, turn and work back (K YOs to make holes). 1 repetition = 44-50-54-60-66-74 rows in total. SHORT ROWS 2 LEFT FRONT PIECE: (1st row = WS.) Row 1-2: Work A.2 (= 12 sts), turn piece and work A.2 back. Row 3-4: Work A.2 + 3-9-3-11-5-1 st in garter st, turn and work back (remember A.2 over the last 12 sts). Row 5-6: Work A.2 + 7-13-8-15-10-7 sts in garter st, turn and work back. Row 7-8: Work A.2 + 11-17-13-19-15-13 sts in garter st, turn and work back. Row 9-10: Work A.2 + 15-21-18-23-20-19 sts in garter st, turn and work back. Continue like this by working A.2 + 4-4-5-4-5-6 sts in garter st more every time until all sts on row have been worked back and forth. 1 repetition = 24-24-24-28-28-28 rows in total. DECREASE TIP: All dec are done from RS. Dec 1 st after A.1 as follows: Slip 1 st as if to K, K 1, psso. Dec 1 st before A.2/A.3 as follows: K 2 tog. INCREASE TIP: Inc 1 st by making 1 YO. On next row K YO twisted to avoid holes. ---------------------------------------------------------- RIGHT FRONT PIECE: Worked back and forth on circular needle. Cast on 55-61-65-71-77-85 sts on circular needle size 3 mm with Alpaca. Work SHORT ROWS 1 RIGHT FRONT PIECE - see explanation above. Work a total of 3 repetitions with short rows 1. REMEMBER THE KNITTING TENSION! After last repetition work 1 repetition with SHORT ROWS 2 RIGHT FRONT PIECE. Insert 1 marker after last repetition. The rounded edge is finished. Continue back and forth over all sts in garter st and A.1 over the outermost 12 sts towards mid front. When piece measures 9-8-7-6-5-4 cm from marker, dec 1 st for neck inside A.1 towards mid front - READ DECREASE TIP. Repeat dec every 4th row (i.e. every other row from RS) 3-4-4-4-4-5 more times (= 4-5-5-5-5-6 times in total) and then every 6th row 8-8-8-9-9-9 times in total. AT THE SAME TIME when piece measures 10-9-8-6-5-3 cm from marker, cast on new sts at the end of every row towards the side for sleeve as follows: Cast on 3-2-2-2-1-1 st 3 times in total and then 13-14-11-7-8-4 sts 1 time. After all inc and dec, 65-68-69-70-74-77 sts remain on needle. Continue in garter st and A.1 towards mid front until piece measures 29-29-29-28-28-27 cm from marker. On next row from RS K the first 8 K sts in cable tog 2 by 2 = 61-64-65-66-70-73 sts remain on needle. Loosely cast off on next row. LEFT FRONT PIECE: Cast on and work as right but reversed. I.e. work SHORT ROWS 1 LEFT FRONT PIECE – see explanation above, then SHORT ROWS 2 LEFT FRONT PIECE – see explanation above. And work A.2 instead of A.1. At the top on shoulder dec the last 8 K sts in cable tog (instead of the first 8). BACK PIECE: Work in 2 parts to make a vent mid back, then place tog and work over all sts. LEFT BACK PIECE: Cast on 53-61-65-69-77-81 sts on circular needle size 3 mm with Alpaca. P 1 row from WS. Continue to work rib as follows: Row 1 (= RS): 2 edge sts in garter st, K 2, P 2, K 2, P 2, K 2, P 2, * K 2, 2 sts in garter st *, repeat from *-* until 3 sts remain on row and finish with K 2 and 1 edge st in garter st. Row 2 (= WS): 1 edge st in garter st, P 2, * 2 sts in garter st, P 2 *, repeat from *-* until 14 sts remain on row, K 2, P 2, K 2, P 2, K 2, P 2 and 2 edge sts in garter st. Repeat row 1 and 2 until piece measures 3 cm. Work next row as follows from RS: 1 edge st in garter st, work A.1 (= 12 sts – there will be 2 sts in garter st at beg of row) AT THE SAME TIME dec 1 st in stocking st section in A.1 (the last 2 P sts in A.1 will be above 2 P in rib), then work in garter st over the other 39-47-51-55-63-67 sts while AT THE SAME TIME dec 0-3-3-1-3-0 sts evenly over these sts = 52-57-61-67-73-80 sts on row. Continue pattern like this with A.1 and garter st until piece measures 8-8-8-10-10-10 cm. Put piece aside and knit right back piece. RIGHT BACK PIECE: Cast on as left back piece. P 1 row from WS. Continue to work rib as follows: Row 1 (= RS): 1 edge st in garter st, * K 2, 2 sts in garter st *, repeat from *-* until 16 sts remain on row, K 2, P 2, K 2, P 2, K 2, P 2, K 2 and 2 edge sts in garter st. Row 2 (= WS): 2 edge sts in garter st, P 2, K 2, P 2, K 2, P 2, K 2, P 2, * 2 sts in garter st, P 2 *, repeat from *-* until 1 st remains on row and finish with 1 edge st in garter st. Repeat row 1 and 2 until piece measures 3 cm. Work next row as follows from RS: Work 39-47-51-55-63-67 sts in garter st (incl 1 edge st) AT THE SAME TIME dec 0-3-3-1-3-0 sts evenly over these sts, then work A.3 AT THE SAME TIME dec 1 st in stocking st section on cable (so that pattern fits over rib), finish with 1 edge st in garter st (there will be 2 sts in garter st at the end of row) = 52-57-61-67-73-80 sts on row. Continue pattern like this in garter st and A.3 until piece measures 8-8-8-10-10-10 cm – finish after same row in pattern as on left back piece. Now slip sts from right back piece tog with sts from left back piece so that cables are against each other mid back and work back and forth over all 104-114-122-134-146-160 sts as follows (seen from RS): 39-44-48-54-60-67 sts in garter st, work A.3 (= 12 sts), work 2 sts in garter st, work A.1 (= 12 sts) and finish with 39-44-48-54-60-67 sts in garter st. Continue the pattern like this. AT THE SAME TIME when piece measures 10 cm, inc 1 st in each side by working 2 sts in second and next to last st in garter st in each side. Repeat inc every 8-8-6-6-6-6 cm 2-2-3-3-3-3 more times (3-3-4-4-4-4 times in total) = 110-120-130-142-154-168 sts. READ ALL OF THE FOLLOWING SECTION BEFORE CONTINUING: When piece measures 31-32-33-34-35-36 cm, cast on new sts at the end of every row in each side for sleeves as follows: Cast on 3-2-2-2-1-1 st 3 times in total and then 13-14-11-7-8-4 sts 1 time = 154-160-164-168-176-182 sts on row. AT THE SAME TIME when piece measures 31-32-33-34-35-36 cm - adjust so that next row is from RS, beg displacement of A.1 and A.3 so that cables beg to slant outwards and there are more sts in garter st between the 2 cables. This is done as follows: Insert 1 marker on each side of A.1 and A.3. Work in garter st until 2 sts remain before first marker (i.e. before A.3), dec 1 st – READ DECREASE TIP, work A.3 and inc 1 st after second marker – READ INCREASE TIP, work in garter st until third marker (i.e. before A.1), inc 1 st, work A.1 and dec 1 st after last marker – READ DECREASE TIP, then work in garter st over the remaining sts. Repeat displacement every 4th row (i.e. every other row from RS), 3 more times (= 4 times in total) and then every 8th row 7-7-8-9-9-9 times in total. After last displacement there are 24-24-26-28-28-28 sts in garter st between 2nd and 3rd marker mid back and 26-26-28-30-30-30 sts in garter st in total between the 2 cables mid back. When piece measures 48-50-52-54-56-58 cm, cast off the middle 20-20-22-24-24-24 sts for neck and finish each shoulder separately. Then cast off for neck at beg of every row from neck as follows: Cast off 1 st 2 times = 65-68-69-70-74-77 sts remain on row. When piece measures 50-52-54-56-58-60 cm – adjust so that front and back pieces are the same length, work next row from RS and K 8 of the 9 K sts in cable tog 2 by 2 = 61-64-65-66-70-73 sts remain on row. Loosely cast off on next row. Repeat in the other side of neck. SLEEVE: Worked back and forth on circular needle. Cast on 11 sts on circular needle size 3 mm with Alpaca. P 1 row from WS but when 5 sts remain on row, work 2 sts in each of the next 4 sts before finishing with 1 edge st in garter st. Work next row as follows from RS: Work A.1 (= 12 sts) and finish with 3 sts in garter st. Continue pattern back and forth like this until piece measures 24-24-25-25-26-26 cm. On next row from RS K the first 8 K sts in cable tog 2 by 2 = 11 sts remain on row, loosely cast off and cut the yarn. Pick up from RS 1 st in every ridge along the side with 3 sts in garter st at the edge (pick up inside 1 edge st in garter st). On next row (= WS) dec/inc evenly to 60-60-62-62-64-64 sts (incl 1 edge st in each side). Work 3 ridges in garter st back and forth on row, then work in stocking st with 1 edge st in garter st in each side. When piece measures 8-8-10-8-12-9 cm, inc 1 st in each side by working 2 sts in the second and next to last st in each side. Repeat inc in each side every 3-2½-2-2-1½-1½ cm, 11-13-15-17-18-21 more times (= 12-14-16-18-19-22 inc in total in each side) = 84-88-94-98-102-108 sts. Loosely cast off when piece measures 44-44-44-44-43-43 cm. Work another sleeve the same way but work cable edge at the bottom of sleeve reversed. I.e. after cast-on P 1 row from WS while at the same time working 2 sts in second, third, fourth and fifth st at beg of row (instead of end of row). Work next row as follows from RS: 3 sts in garter st and then A.3. Continue as first sleeve. ASSEMBLY: Sew the shoulder seams. Sew in the sleeves inside 1 edge st. Sew underarm and side seams in one inside 1 edge st. |
|||||||||||||
Diagram explanations |
|||||||||||||
|
|||||||||||||
 |
|||||||||||||
 |
|||||||||||||
Have you finished this pattern?Tag your pictures with #dropspattern #rubyturnscardigan or submit them to the #dropsfan gallery. Do you need help with this pattern?You'll find 19 tutorial videos, a Comments/Questions area and more by visiting the pattern on garnstudio.com. © 1982-2026 DROPS Design A/S. We reserve all rights. This document, including all its sub-sections, has copyrights. Read more about what you can do with our patterns at the bottom of each pattern on our site. |
|||||||||||||


With over 40 years in knitting and crochet design, DROPS Design offers one of the most extensive collections of free patterns on the internet - translated to 17 languages. As of today we count 324 catalogues and 12290 patterns translated into English (UK/cm). 12290
We work hard to bring you the best knitting and crochet have to offer, inspiration and advice as well as great quality yarns at incredible prices! Would you like to use our patterns for other than personal use? You can read what you are allowed to do in the Copyright text at the bottom of all our patterns. Happy crafting!
Post a comment to pattern DROPS 151-3
We would love to hear what you have to say about this pattern!
If you want to leave a question, please make sure you select the correct category in the form below, to speed up the answering process. Required fields are marked *.