
Popular categories
Looking for a yarn?


Comments / Questions (201)
![]() Linda Timmons wrote:
Linda Timmons wrote:
I’m confused about when I do the first buttonhole and decrease. Are they done at 4 cm together with the cable or on the next row
28.03.2026 - 20:46DROPS Design answered:
Dear Mrs Timmons, measure these 4 cm from the cast on edge. Happy knitting!
07.04.2026 - 10:17
![]() Monika wrote:
Monika wrote:
Hallo, bei der Haube steht: "Jetzt von der linken Seite wie folgt stricken: ...." "Weiter von der rechten Seite wie folgt:..." Was bedeutet bitte von der linken bzw. von der rechten Seite? Danke.
27.11.2025 - 02:16DROPS Design answered:
Liebe Monika, hier bedeutet "rechte Seite" die Hin-Reihen und "linke Seite" die Rück-Reihen. Viel Spaß beim Stricken!
27.11.2025 - 09:52
![]() Gisele Worley wrote:
Gisele Worley wrote:
I am wondering if this pattern could be done for a size 6 and size 9.
08.09.2025 - 04:22DROPS Design answered:
Hi Gisele, this pattern is designed for 5 sizes: 1/3 months - 6/9 months - 12/18 months, 2 years - 3/4 years. Choose the size that suits you best. Happy knitting!
20.09.2025 - 22:14
![]() Lucy wrote:
Lucy wrote:
DROPS Baby 17-1 #cableprincessjacket DROPS design: Modell Nr. ME-004-by - Jacke Ich bim am Sticken der Babyjacke. Meine Frage bei den Ärmeln: Nach den 2 Krausrippen, Markierungsfaden anbringen. Nach 4 cm glatt links (bis dahin alles klar), dann „beidseitig des Markierungsfadens je 1 M zunehmen“ - wie soll das gehen mit linken Maschen? Aus dem Querfaden kann ich wohl nicht 2 Maschen aufnehmen??? Gibt ein Loch und sieht nicht schön aus. Danke für Ihre Hilfe. LG
27.05.2025 - 20:49DROPS Design answered:
Dear Lucy, die Zunahmen Mitte unter die Ärmel können Sie stricken, wie Sie es am liebsten haben; hier finden Sie verschiedene Technik zum Zunehmen. Viel Spaß beim Stricken!
28.05.2025 - 08:35
![]() Kasia wrote:
Kasia wrote:
A czy robiąc jerseyem prawym wystarczy dodać z każdej strony warkocza 1 oczko lewe czy więcej
29.10.2024 - 12:41DROPS Design answered:
Witaj Kasiu, dodałabym więcej, np. 2. Możesz zrobić próbkę i zobaczyć jak Ci się będzie podobać. Pozdrawiamy!
29.10.2024 - 15:39
![]() Kasia wrote:
Kasia wrote:
Dzień dobry Czy można ten sweterek zrobić jerseyem prawym zamiast lewym?
29.10.2024 - 12:29DROPS Design answered:
Witaj Kasiu, oczywiście że można :) Miłej pracy!
29.10.2024 - 12:35
![]() Gabriele Simon wrote:
Gabriele Simon wrote:
Liebes Strickteam, ihre Anleitung ist grds. sehr verständlich. Wie wird jedoch die Abnahme in der Passe gearbeitet? In JEDER? 8. R., 6. R., und 4.R abn. ? - die Passe besteht aus ca. 31 R und was bedeutet in diesem Zusammenhang '2, 3 Mal' (Gr. 62/68) Über eine Antwort würde ich mich sehr freuen. Vielen Dank für Ihre Bemühungen. Mit freundlichen Grüßen G. Simon
09.03.2024 - 20:52DROPS Design answered:
Liebe Frau Simon, nach der 1. Abnahmen wie beschrieben, nehmen Sie noch so ab: 2 Mal in jeder 6. Reihe dann -3 Mal in jeder 4. Reihe. Viel Spaß beim Stricken!
11.03.2024 - 08:17
![]() Miris wrote:
Miris wrote:
Bonjour, pour les diminutions de l'empiècement, il y a 8m env entre chaque torsade. Chaque diminution enlève 2m entre les torsades ? Donc 1fois ts les 6rgs, reste 6m/ 4fois ts les 4 rgs, reste 4m,2m,0m et ?? Il n'y a plus de m à la 4ème fois ? Merci
23.10.2023 - 20:15DROPS Design answered:
Bonjour Miris, vous ne devez diminuer qu'une seule maille dans chacune de ces sections 8 mailles envers, autrement dit, la 1ère fois, vous diminuez à gauche de chaque torsade (= au début des sections 8 mailles envers), la fois suivante, vous diminuez à droite de chaque torsade (= à la fin des sections 7 mailles envers) et ainsi de suite. Bon tricot!
24.10.2023 - 09:20
![]() Miris wrote:
Miris wrote:
Merci pour cette super astuce !! Je vais essayer :)
23.10.2023 - 16:39
![]() Miris wrote:
Miris wrote:
En fait, c'est le jersey envers sur aiguilles double pointe qui me pose problème. En jersey endroit, c'est très régulier, je n'ai aucune démarcation. J'ai donc réalisé les manches en jersey endroit, cela fera une variante au modèle. Et je l'ai réalisé avec la technique du magic loop. De même avec cette technique, je n'arrive pas à un rendu régulier avec le jersey envers. Je suis intéressée par vos suggestions. Merci :)
22.10.2023 - 23:58DROPS Design answered:
Bonjour Miris, c'est sûrement une question de tension différente du jersey envers, essayez la technique de la réponse précédente. Bon tricot!
23.10.2023 - 10:13
|
|||||||
Cable Princess#cableprincessjacket |
|||||||
 |
 |
||||||
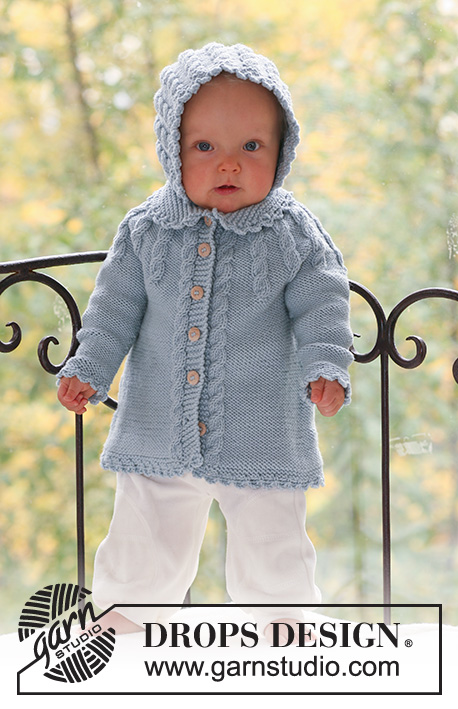
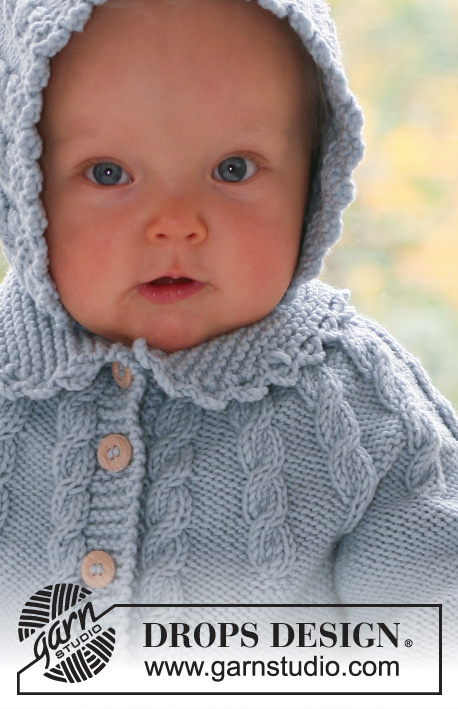
Set of knitted jacket and bonnet with cables for baby and children in DROPS Merino Extra Fine
DROPS Baby 17-1 |
|||||||
|
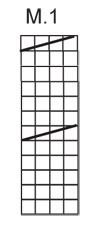
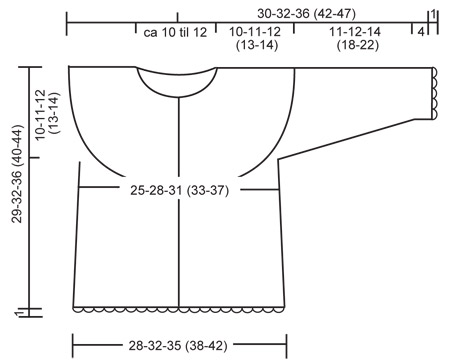
PATTERN: See diagram M.1 – the diagram shows pattern from the RS. GARTER ST (back and forth on needle): K all rows. GARTER ST (in the round): K 1 round, P 1 round. BUTTONHOLES: Make buttonholes on right front band. 1 buttonhole = K tog 2nd and 3rd st from mid front and make 1 YO. Make buttonholes when piece measures: SIZE 1/3 months: 4, 8, 13, 17, 22 and 26 cm SIZE 6/9 months: 4, 9, 14, 19, 24 and 29 cm SIZE 12/18 months: 4, 10, 16, 22, 28 and 33 cm SIZE 2 years: 5, 11, 18, 24, 31 and 37 cm SIZE 3/4 years: 5, 12, 19, 26, 33 and 40 cm DECREASING TIP (applies to jacket): Make all dec from RS. Dec 1 st to the left and to the right alternately of all cables by P2 tog, i.e. the first dec is made to the left and the next dec is made to the right of all cables, etc. Decrease only on the inside of the outermost cable towards the band in each side. CROCHET PICOT BORDER: With crochet hook size 4 mm: 1 dc in first st, * 4 ch, 1 tr in the first of these ch (= 1 picot), skip 1 cm, 1 dc in next st *, repeat from *-*. ---------------------------------------------------------- JACKET BODY PIECE: Worked back and forth on circular needle from mid front. Cast on 128-144-158 (170-186) sts (includes 5 front band sts each side towards mid front) on circular needle size 4 mm with Merino Extra Fine. Work 4 rows garter st (first row = RS) – SEE ABOVE. Work next row as follows from RS: 5 front band sts in garter st, P1, K2 in each of the next 2 sts (i.e. 2 sts inc to 4), P across the row until 8 sts remain, K2 in each of the next 2 sts, P1 and 5 front band sts in garter st = 132-148-162 (174-190) sts. Insert 1 marker 36-40-44 (47-51) sts in from each side (= 60-68-74 (80-88) sts between markers on back piece). Work next row as follows from WS: 5 garter sts, K1, M.1, K across the row until 10 sts remain, M.1, K1, 5 garter sts. Work next row as follows from RS: 5 garter sts, P1, M.1, P across the row until 10 sts remain, M.1, P1, 5 garter sts. Continue in pattern like this (i.e. front band sts in garter st, 1 st in reverse stocking st inside front bands, 1 cable (= M.1) each side and remaining sts in reverse stocking st). REMEMBER THE KNITTING TENSION! AT THE SAME TIME when piece measures 4 cm dec 1 st on each side of both markers by P2 tog. Repeat the dec on every 4 cm a total of 4-4-4 (5-5) times = 116-132-146 (154-170) sts. AT THE SAME TIME when piece measures 4-4-4 (5-5) cm make buttonhole on right front band – SEE ABOVE. When piece measures approx 19-21-24 (27-30) cm – adjust so that next row is from WS – cast off 6 sts each side for armhole (= 3 sts on each side of both markers) = 104-120-134 (142-158) sts left on row. Put piece aside and knit the sleeves. SLEEVE: Worked in the round on double pointed needles. Cast on 28-30-32 (34-38) sts on double pointed needles size 4 mm with Merino Extra Fine. Work 4 rounds garter st – SEE ABOVE. Continue in reverse stocking st, and insert a marker at beg of round = mid under arm. When piece measures 4 cm inc 1 st on each side of marker and repeat the inc on every 6-5-6 (6-8) round a total of 5-6-7 (8-8) times = 38-42-46 (50-54) sts. When piece measures 14-15-18 (22-26) cm cast off 6 sts mid under arm = 32-36-40 (44-48) sts. Put piece aside and knit the other sleeve. YOKE: Slip sleeves on the same circular needle as body piece where cast off for armhole = 168-192-214 (230-254) sts. Work 1 row from RS with front bands and cables as before and remaining sts in reverse stocking st, AT THE SAME TIME dec 0-4-6 (2-6) sts evenly (do not dec on front bands and cables) = 168-188-208 (228-248) sts. Work next row as follows from WS: 5 garter sts, K1, M.1, * K8, P2 in each of the next 2 sts (i.e. 2 sts inc to 4) *, repeat from *-* until 18 sts remain, K8, M.1, K1 and 5 garter sts = 196-220-244 (268-292) sts. Work next row as follows from RS: 5 garter sts, P1, M.1, * P8, M.1 *, repeat from *-* 15-17-19 (21-23) times, P1 and 5 garter sts. Continue in pattern like this, AT THE SAME TIME on next row from RS start dec to shape the round yoke – SEE DECREASING TIP. Continue to dec on every 8th row: 0-0-1 (2-3) more times, on every 6th row: 1-2-2 (1-1) times in total and then on every 4th row: 4-3-2 (2-1) times in total (there are now 2 purled stitches between every cable). AT THE SAME TIME when yoke measures 8-9-10 (11-12) cm slip 8 sts each side towards mid front on stitch holders for neck. Cast off to shape the neckline each side at the beg of every row from mid front: 1 st 2 times. When yoke measures 10-11-12 (13-14) cm dec all P2 between cables to P1 and K tog the 4 sts on each cable 2 by 2 = approx 43-49-55 (61-67) sts left on row. COLLAR: Pick up 10 sts on each side of neckline mid front (incl sts on stitch holders). K 1 row from WS, AT THE SAME TIME adjust no of sts evenly to 50-54-58 (62-66). Work garter st back and forth on needle until collar measures 3-3-4 (4-5) cm. Now cast off 1 st each side a total of 4 times and then cast off remaining sts. Collar measures approx 5-5-6 (6-7) cm. ASSEMBLY: Sew openings under arms. Crochet a picot border – SEE ABOVE – round collar, round sleeve edges and along bottom edge of jacket. Sew on buttons. ---------------------------------------------------------- BONNET: Worked back and forth on circular needle. LOOSELY cast on 64-70-76 (82-88) sts on circular needle size 4 mm with Merino extra fine. Work 4 rows garter st – SEE ABOVE. Work next row as follows from RS: 1 garter st, * K2 in each of the next 2 sts, P4 *, repeat from *-* until 3 sts remain, K2 in each of the next 2 sts, 1 garter st = 86-94-102 (110-118) sts. Continue as follows from WS: 1 garter st, * M.1, K 4 *, repeat from *-* until 5 sts remain, M.1 (= 4 sts) and 1 garter st. Work next row as follows from RS: 1 garter st, * M.1, P 4 *, repeat from *-* until 5 sts remain, M.1 (= 4 sts), 1 garter st. Continue in pattern like this until piece measures approx 10-11-12 (13-14) cm – adjust so that next row is from RS – and now K tog the 4 sts on each cable 2 by 2 = 64-70-76 (82-88) sts. On next row from WS cast off the first 23-25-27 (29-31) sts, work remaining sts on row. On next row from RS cast off the first 23-25-27 (29-31) sts = 18-20-22 (24-26) sts left on row (= back piece). Work garter st back and forth on these sts for 11-12-13 (14-15) cm, cast off. ASSEMBLY: Sew the sides on the piece mid back to side pieces, sew edge to edge to avoid a chunky seam. Pick up approx 60 to 84 sts (divisible by 4) along bottom edge of bonnet on circular needle size 4 mm, K 1 row from WS and K 1 row from RS. Work next row as follows from WS: K2, * P2 tog, 1 YO *, repeat from *-* and K2 (= eyelet row). K 2 rows on all sts and cast off. Crochet a ch-string measuring approx 70 cm with crochet hook size 4 mm and thread string through eyelet row. Crochet a picot border – SEE ABOVE – round the front opening of bonnet. |
|||||||
Diagram explanations |
|||||||
|
|||||||
 |
|||||||
 |
|||||||
Have you finished this pattern?Tag your pictures with #dropspattern #cableprincessjacket or submit them to the #dropsfan gallery. Do you need help with this pattern?You'll find 18 tutorial videos, a Comments/Questions area and more by visiting the pattern on garnstudio.com. © 1982-2026 DROPS Design A/S. We reserve all rights. This document, including all its sub-sections, has copyrights. Read more about what you can do with our patterns at the bottom of each pattern on our site. |
|||||||


With over 40 years in knitting and crochet design, DROPS Design offers one of the most extensive collections of free patterns on the internet - translated to 17 languages. As of today we count 324 catalogues and 12290 patterns translated into English (UK/cm). 12290
We work hard to bring you the best knitting and crochet have to offer, inspiration and advice as well as great quality yarns at incredible prices! Would you like to use our patterns for other than personal use? You can read what you are allowed to do in the Copyright text at the bottom of all our patterns. Happy crafting!
Post a comment to pattern DROPS Baby 17-1
We would love to hear what you have to say about this pattern!
If you want to leave a question, please make sure you select the correct category in the form below, to speed up the answering process. Required fields are marked *.