
Popular categories
Looking for a yarn?


Comments / Questions (23)
![]() Coulom Jacqueline wrote:
Coulom Jacqueline wrote:
Je ne comprends pas les explications lors de l'assemblage: relever 209mailles ou 319 mailles? faut-il relever 209 mailles sur chaque devant et 110mailles sur le dos? ça me semble beaucoup! laine de belle qualité qui fait un excellent tricot. merci pour ce complément d'information.
24.10.2022 - 13:06DROPS Design answered:
Bonjour Mme Coulom, en fonction de la taille tricotée et de votre tension en hauteur (votre nombre de rangs le long des devants), vous devrez relever entre 209 et 319 mailles, veillez juste bien à ce que votre nombre de mailles soit multiple de 5 + 4 pour que les côtes tombent juste ensuite. Bon tricot!
24.10.2022 - 16:23
![]() Nathan wrote:
Nathan wrote:
Bonjour, Je ne suis pas sûr de comprendre ce passage : (ASSEMBLAGE) "Avec le fil Naturel Alpaca et les aiguilles 3 relever sur la bordure extérieure de la bordure de boutonnage env 300-400 m." Sur quelle portion des côtes dois-je relever ces 300-400m ? Tout le tour ? Seulement un côté ? Les deux ? Le reste du gilet s'est fait tout seul, Alaska est très agréable à tricoter ! Merci d'avance pour votre réponse.
05.12.2019 - 15:34DROPS Design answered:
Bonjour Nathan, cette partie a été reformulée pour qu'elle soit plus claire, vous allez en fait faire une sorte de petite "doublure" sur l'envers pour cacher les mailles relevées des bordures des devants et du col: vous relevez les mailles sur l'envers tout le long de la bordure en côtes (dans le 1er rang rang des bordures devants/le col) et assemblez cette petite partie de l'autre côté des mailles relevées (côté dos cette fois). En espérant que ces explications supplémentaires vous aideront. Bon tricot!
06.12.2019 - 08:43
![]() Doris Steinmayr wrote:
Doris Steinmayr wrote:
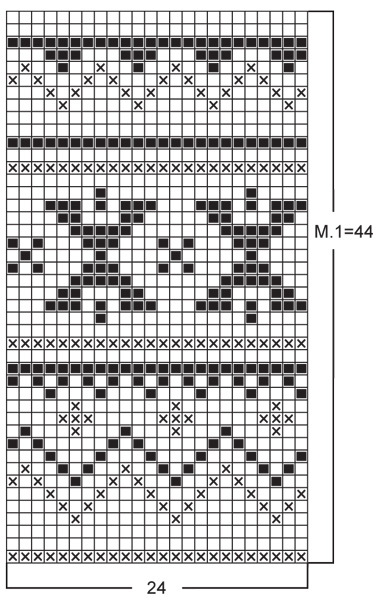
Ich habe Probleme mit den Ärmeln, wie teile ich das Muster ein, wenn ich alle 5 Reihe 2 Maschen zunehme
10.09.2018 - 11:48DROPS Design answered:
Liebe Frau Steinmayr, am Anfang der Runde werden die Maschen in M.1 wie die letzten Maschen im Diagram gestrickt und am Ende der Runde werden die Maschen in M.1 wie die ersten Maschen im Diagram gestrickt, so haben Sie immer mehr Maschen in M.1 gestrickt und das Muster wird herum gestrickt. Diese Lektion kann Ihnen damit helfen. Viel Spaß beim stricken!
11.09.2018 - 08:58
![]() Eva Karlsen wrote:
Eva Karlsen wrote:
Når en har lagt til stolpen , blir ikke da vidden på forstykkene for stor i forhold til ryggen ?? Er dette regnet med i måleskjema ??
28.07.2016 - 13:33DROPS Design answered:
Hej Eva, ja det stemmer, det er meningen at den skal overlappe foran. God fornøjelse!
22.12.2016 - 09:45
![]() Anja wrote:
Anja wrote:
Hallo Ich möchte mit dem Schalkragen starten. Gemäss Anleitung muss die Zahl der aufzunehmenden Maschen durch 5 und 4 teilbar sein. 209 und 319 sind nicht durch 4 und 5 teilbar, wohl aber zB 320. Bin ich in dem korrekt oder habe ich da was falsch verstanden. Hat es am Schalkragen auch Randmaschen zu beachten? Vielen Dank für Ihre Rückmeldung.
05.11.2015 - 23:28DROPS Design answered:
"5 + 4" bedeutet, dass die Maschenzahl durch 5 teilbar sein muss und dann noch 4 M übrig sein müssen. 209 = 41 x 5 + 4 und 319 = 63 x 5 + 4. Die Randmaschen sind in den Schalkragen-Maschen enthalten.
07.11.2015 - 12:14
![]() Anja wrote:
Anja wrote:
Hallo Ich möchte mit dem Schalkragen starten. Gemäss Anleitung muss die Zahl der aufzunehmenden Maschen durch 5 und 4 teilbar sein. 209 und 319 sind nicht durch 4 und 5 teilbar, wohl aber zB 320. Bin ich in dem korrekt oder habe ich da was falsch verstanden. Hat es am Schalkragen auch Randmaschen zu beachten? Vielen Dank für Ihre Rückmeldung.
05.11.2015 - 22:41DROPS Design answered:
Antwort siehe oben! :-)
07.11.2015 - 12:14
![]() Lis Berenkuil wrote:
Lis Berenkuil wrote:
Mønsteret viser ret siden, hvordan strikkes der tilbage.
08.07.2015 - 17:11DROPS Design answered:
Hej Lis. Mönstret strikkes i glatstrik, saa du strikker vrang tilbage. Hver anden raekke i diagrammet er vrangen (altsaa 2, 4, 6 osv). Du kan se her hvordan vores diagrammmer laeses. God fornöjelse.
30.07.2015 - 13:52
![]() Ingrid wrote:
Ingrid wrote:
Ik heb dit vest gebreid van het genoemde garen en het was prachtig. Helaas pilt de wol verschrikkelijk, zodat mijn werk er nu bijzonder droevig uitziet. Wat een teleurstelling
14.05.2015 - 16:12
![]() Tessica wrote:
Tessica wrote:
Wat wordt er bedoeld met de knoopsgatbies. Ik kan het op de foto niet zien. En moeten de knopen niet op het rechervoorpand?
17.03.2015 - 22:19DROPS Design answered:
Hoi Tessica. Wij bedoelen hier de breede bies langs de voorkanten in boordsteek - die zie je wel op de foto. De knopen komen inderdaad op het rechtervoorpand, de lusjes op het linkervoorpand. Ik pas het patroon aan.
18.03.2015 - 15:34
![]() Andrea Felser wrote:
Andrea Felser wrote:
Hallo, sind auf der Strickschrift für das Muster nur die Hinreihen (rechte Maschen ) zu sehen? Vielen Dank für eine kleine Hilfestellung. Freundliche Grüße, A. Felser
13.03.2015 - 14:05DROPS Design answered:
Es sind alle R eingezeichnet, Hin- UND Rück-R. Das Muster wird glatt re gestrickt, es wird auch in den Rück-R gemustert. In den Rück-R müssen Sie somit den Faden, mit dem Sie gerade nicht stricken, vor der Arbeit herführen.
14.03.2015 - 18:05
|
||||||||||
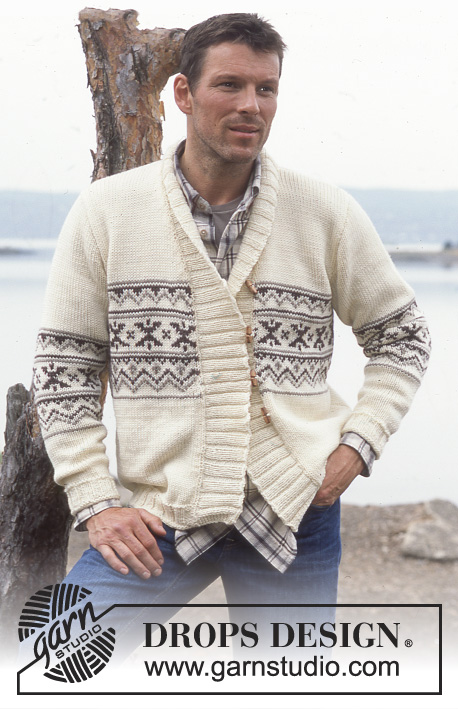
Winter Lodge |
||||||||||
 |
 |
|||||||||
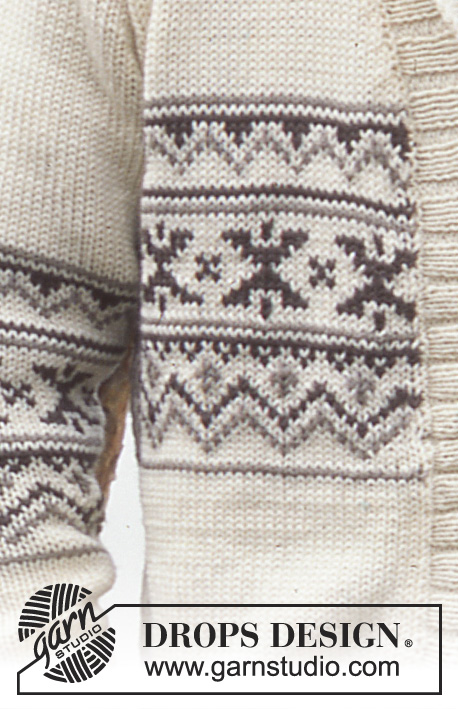
Knitted jacket for men, with shawl collar and Nordic pattern in DROPS Alaska
DROPS 85-15 |
||||||||||
|
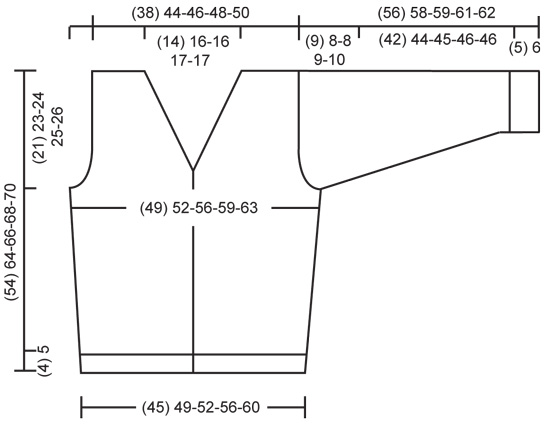
Rib: * K 3, P 2 *, repeat from *-*. Garter st (back and forth on needle): 1 ridge = 2 rows, 1st row: K, 2nd row K. Garter st (on circular needle): 1 ridge = 2 rounds, 1st round: P, 2nd round: K.. Pattern: See diagram M.1. The whole pattern is worked in stocking st. Body: The jacket is worked back and forth on circular needle from mid front. Cast on (155) 170-180-190-210 sts (incl 1 edge st in each side towards mid front) with circular needle size 4 mm and off white Alaska. Work 1 ridge, then work rib as follows (seen from RS): 1 edge st, * K 3, P 2 *, repeat from *-*, finish with K 3 and 1 edge st. When the rib piece measures (4) 5 cm change to circular needle size 5 mm and work 1 ridge, at the same time adjusting the no. of sts to (155) 167-179-191-207 sts on ridge’s 1st row. Continue to work stocking st. Insert 1 marker thread (39) 42-45-48-52 sts in from each side = (77) 83-89-95-103 sts between marker threads mid back. Remember knitting tension! When piece measures (5) 6-6-6-10 cm inc 1 st each side of marker threads in each side every (3.5.) 7-7-8-10 cm in total (3) 3-3-3-2 times = (167) 179-191-203-215 sts. When piece measures (13) 21-22-23-24 cm work M.1 with 1 edge st in each side towards mid front. At the same time, when piece measures (33) 41-42-43-44 cm work the next row as follows (from RS): (39) 42-45-48-51 sts (= right front piece), cast off 6 sts for armhole, work (77) 83-89-95-101 sts (= back piece), cast off 6 sts for armhole, work (39) 42-45-48-51 sts (= left front piece). Each piece is finished separately. Left front piece: = (39) 42-45-48-51 sts. Continue to cast off for armhole in side every 2nd row: 2 sts (1) 1-1-2-2 times and 1 st (4) 2-3-3-4 times. At the same time when piece measures (36) 43-44-45-47 cm cast off towards the neck every 2nd row: 1 st (12) 14-14-15-15 times = (21) 24-26-26-28 sts remain on shoulder. Cast off the remaining sts when piece measures (54) 64-66-68-70 cm. Right front piece: = (39) 42-45-48-51 sts. Work as for right front piece but cast off for armhole and neck on opposite side. Back piece: = (77) 83-89-95-101 sts. Continue to cast off for armholes in each side as for front piece = (65) 75-79-81-85 sts remain on needle. When piece measures (52) 62-64-66-68 cm cast off the middle (19) 23-23-25-25 sts for neck. Continue to cast off towards neck every 2nd row: 1 st (2) 2 times = (21) 24-26-26-28 sts remain on each shoulder. Cast off remaining sts when piece measures (54) 64-66-68-70 cm. Sleeves: Cast on (40) 40-45-45-45 sts on double pointed needles size 4 mm and off white Alaska and work 1 ridge, then work rib until the piece measures (5) 6 cm. Change to double pointed needles size 5 mm and work 1 ridge while at the same time adjusting no. of sts to (38) 40-43-43-43 sts on ridge’s 1st row. Continue working stocking st. When the piece measures (10) 8-8-12-11 cm, inc 2 sts mid under arm every (2.5) 2.5-2.5-2-2 cm in total (14) 17-17-18-20 times = (66) 74-77-79-83 sts. At the same time when piece measures (17) 18-18-19-19 cm, work M.1 (work the inc sts into pattern). When piece measures (47) 50-50-51-51 cm cast off 6 sts mid under arm and finish working back and forth on needle. Continue to cast off for sleeve cap in each side every 2nd row: 3 sts (2) 2 times, 2 sts (2) 2-2-3-4 times, 1 st (2) 1 time, then cast off 2 sts in each side until piece measures (55) 57-58-60-61 cm then cast off 3 sts (1) 1 time in each side. Cast off the remaining sts when piece measures approx. (56) 58-59-61-62 cm. Assembly: Sew shoulder seams. Band: Pick up 209 - 319 sts (divisible by 5 + 4) along right front piece, continue back of neck and down left front piece with circular needle size 4 mm and off white Alaska. Work 1 row K from WS and 1 row K from RS. Then continue with rib with K 3, P 3 and 3 ridge sts in each side (seen from RS). When rib piece measures (6) 7 cm (incl ridge) inc on next row on WS all P 3 to P 4 across middle 38 sts, this is done so that the band will lie neatly. When piece measures (8) 9 cm (incl ridge), loosely cast off with K over K and P over P. Lining: To cover the pick-up edge on inside of band. Pick up 300 - 400 sts with off white Alpaca and needle size 3 mm along inside of band – picked up in 1st row of band and worked inwards towards body. Work 4 rows stocking st, loosely cast off. Fasten lining neatly inside 1 st on body. Loops: Crochet 4 button loops on right front piece with off white Alaska and crochet hook size 4 mm. 1 loop = 1 dc in outermost st of band, 7 ch, skip 1 st, 1 dc. The top loop is worked where the slope for the neck starts, then each loop is worked further down with approx (5) 6 cm gap. Sew in sleeves. Sew on buttons. |
||||||||||
Diagram explanations |
||||||||||
|
||||||||||
 |
||||||||||
 |
||||||||||
Have you finished this pattern?Tag your pictures with #dropspattern or submit them to the #dropsfan gallery. Do you need help with this pattern?You'll find 27 tutorial videos, a Comments/Questions area and more by visiting the pattern on garnstudio.com. © 1982-2026 DROPS Design A/S. We reserve all rights. This document, including all its sub-sections, has copyrights. Read more about what you can do with our patterns at the bottom of each pattern on our site. |
||||||||||


With over 40 years in knitting and crochet design, DROPS Design offers one of the most extensive collections of free patterns on the internet - translated to 17 languages. As of today we count 324 catalogues and 12290 patterns translated into English (UK/cm). 12290
We work hard to bring you the best knitting and crochet have to offer, inspiration and advice as well as great quality yarns at incredible prices! Would you like to use our patterns for other than personal use? You can read what you are allowed to do in the Copyright text at the bottom of all our patterns. Happy crafting!
Post a comment to pattern DROPS 85-15
We would love to hear what you have to say about this pattern!
If you want to leave a question, please make sure you select the correct category in the form below, to speed up the answering process. Required fields are marked *.