
Popular categories
Looking for a yarn?


Comments / Questions (97)
![]() Maria Renato wrote:
Maria Renato wrote:
Ho fatto la sciarpa a coste inglese ora alla fine devi fare un giro al diritto e poi chiudere?
27.11.2025 - 22:29DROPS Design answered:
Buonasera Maria, quando raggiunge la lunghezza indicata può chiudere il lavoro. Buon lavoro!
28.11.2025 - 21:51
![]() Monique HARION wrote:
Monique HARION wrote:
Bonjour, je ne suis pas très à l'aise avec des aiguilles circulaires. Et pour pouvoir bien interpréter vos explications ce serait bien de me dire si je dois tout diviser par 2 et lorsque je dois diminuer aux emmanchures et faire l'encolure, c'est un peu compliqué lorsque j'ai 2 aiguilles séparées. Merci pour votre retour rapide.
30.12.2024 - 15:39DROPS Design answered:
Bonjour Mme Harion, dans cette leçon, nous donnons quelques astuces pour adapter un modèle sur aiguilles droites, pensez bien recalculer chaque partie pour que tout tombe juste si besoin. Bon tricot!
02.01.2025 - 14:58
![]() Christina wrote:
Christina wrote:
Vilket kroppsmått i cm passar til XXL?
03.10.2024 - 23:27DROPS Design answered:
Hej Christina. Längst ner på mönstret har du en måttskiss med plaggets mått i cm i alla storlekar. Mvh DROPS Design
09.10.2024 - 08:35
![]() Sally wrote:
Sally wrote:
Hi could I pls get some clarification on the raglan shaping? I’m doing the 3rd size, so I’m decreasing 20 times and then 10 while also checking the measurement. Im at 61cm right after finishing the last decrease and confused on what to do next. I’ve put 20 stitches on a holder. The pattern says to continue knitting and bind off every other row. Can you explain what we’re knitting back and forth, the 20 stitches or the remaining stitches on the needle? And how do i bind off?
14.08.2024 - 23:01DROPS Design answered:
Hi Sally, You are continuing back and forth, working all the stitches apart from the neck-stitches which are on the thread/stitch holder. You bind off every 2nd row to shape the neckline upwards, 2 stitches x 1 on each side (both beginning and end of row), then 1 stitch x 2 on each side. Hope this helps and happy knitting!
15.08.2024 - 06:37
![]() Abrian wrote:
Abrian wrote:
Hi. For the raglan shaping decreases, do I decrease each row 10 times first or do the 20 rows of every other row decrease first? Hope that makes sense. Thanks!
27.07.2024 - 03:00DROPS Design answered:
Dear Abrian, decrease in the order indicated in the pattern. So first you decrease less often, every other row, 20 times. Then you will start decreasing more steeply, so you decrease every row 10 times. Happy knitting!
28.07.2024 - 17:27
![]() Willy Van Ommen wrote:
Willy Van Ommen wrote:
Ik ben met de mouw begonnen en moet meerderen. Ik begrijp niet hoe de te meerderen steken gebreid worden. Heb tot nu toe 3 recht 3 averecht gebreid. Hoe kom ik tot 6 steken in dit gedeelte als ik alleen vanuit de markering meerder?
25.07.2024 - 09:41DROPS Design answered:
Dag Willy,
Helaas verspringt het patroon als je meerdert onder de arm en daar is niets aan te doen. Je breit het patroon tot zo ver mogelijk onder de mouw en na de markeerdraad pak je het patroon op aan de andere kant van de mouw.
31.07.2024 - 20:04
![]() Abrian wrote:
Abrian wrote:
I’m not understanding how to put the sleeves onto the needles. Could I get some further explanation please? And where do the 4 stitch markers go? Thanks!
15.04.2024 - 01:46DROPS Design answered:
Hi Abrian, The sleeves go where the stitches have been cast off on each side of the body for the armholes. If it makes it easier, work as far as the first set of cast-off stitches, insert a marker, place the sleeve stitches onto the circular needle, starting after the cast-off stitches mid-under the sleeve, work the sleeve, insert a marker, work to the second armhole on the body (to the cast-off stitches), insert a marker, place the second sleeve on the needle, work the sleeve then insert the fourth marker. Work to beginning of round. Happy knitting!
15.04.2024 - 06:47
![]() Cindy Van Reck wrote:
Cindy Van Reck wrote:
Ik begrijp niet wat men bedoeld met "zet de middelste 20 steken van de middenvoor op een hulpnaald....wat is de middenvoor voor in het patroon?
16.12.2023 - 16:49DROPS Design answered:
Dag Cindy,
Midden voor zijn de steken die tussen de 2 raglanlijnen aan de voorkant zitten. Op dat moment zijn het voor- en achterpand nog hetzelfde. Als je de toer steeds op een pand begint en eindigt, dan zou ik dat aanhouden als de achterkant en op het andere pand de middelste steken op een hulpdraad zetten.
17.12.2023 - 17:27
![]() Els Schellekens wrote:
Els Schellekens wrote:
Ik heb een vraag over de raglanminderingen. Moet je eerst de raglanminderingen om de twee naalden doen en dan pas die om de naald, of moet je die twee tegelijkertijd combineren? Bedankt!
30.11.2023 - 07:01DROPS Design answered:
Dag Els,
Nee, je doet het niet tegelijkertijd. Je mindert eerst een x aantal (afhankelijk van je maat) in elke 2e naald. Als je dat gedaan hebt, dan minder je een x aantal op elke naald.
02.12.2023 - 17:32
![]() Cindy Van Reck wrote:
Cindy Van Reck wrote:
Meerder bij de mouw 12 keer 1 steek aan weerszijden van de 6 av met de merkdraad... begin in dan juist naast de merknaam of in de r steken ervoor en ernaast...vind ik niet duidelijk eigenlijk.. of ik zie het niet?
30.10.2023 - 15:45
|
|
Of The Sea |
|
 |
 |
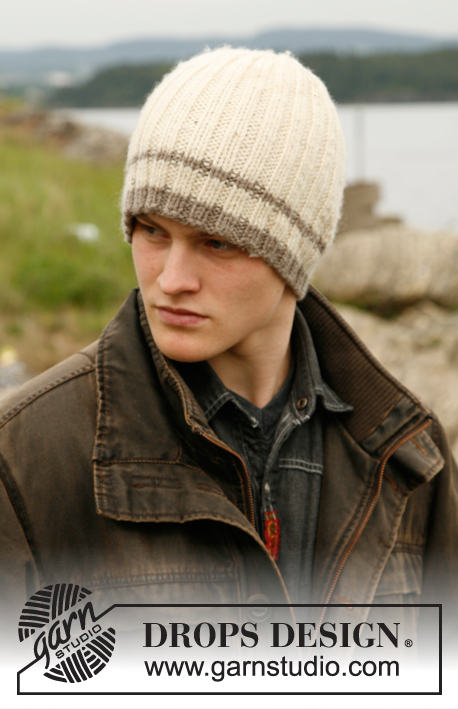
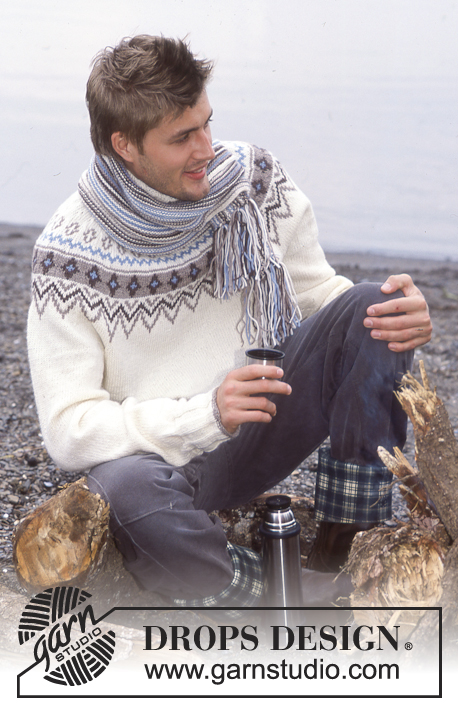
Men's knitted sweater with raglan and rib in DROPS Alaska, and scarf with English rib in DROPS Snow. Size: 12 years - XXL
DROPS 85-2 |
|
|
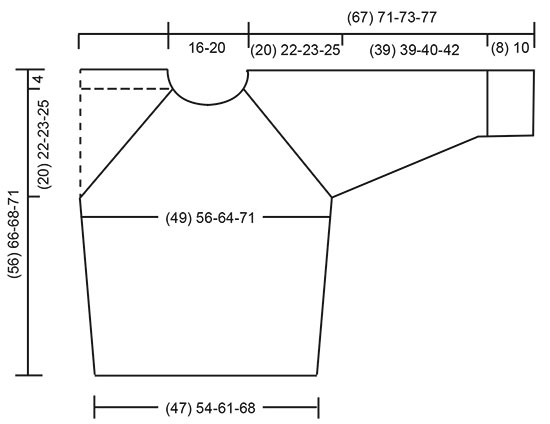
SWEATER Decreasing tips (for raglan): Dec as follows from right side: Start 4 sts before the marker: K 2 tog, K 4 (the marker is in the center of these 4 sts), slip 1 as if to knit, K 1, psso. Dec as follows from wrong side: Start 4 sts before the marker: P 2 tog, twisting sts, P 4 (the marker is in the center of these 4 sts), P 2 tog. (If it is too difficult to twist the sts, sl them, return to left needle 1 by 1, twisting each, and then P 2 tog). BODY Cast on 160-184-208-232 sts on circular needles; join and place a marker at the join. Knit 2 rows stockinette st, then establish rib as follows: P 1, *K 6, P 6*, repeat from *-* over 72-84-96-108 sts, K 6, P 1, place a marker (= side), P 1, *K 6, P 6*, repeat from *-* over 72-84-96-108 sts, K 6, P 1. Continue the rib as established. When the piece measures 10-15-15-15 cm and 20-30-30-30 cm inc 1 st at each side of each marker – P the increased sts – = 168-192-216-240 sts. When the piece measures 32-40-41-42 cm bind off 12 sts at each side for armhole (= K 3, P 6, K 3) = 72-84-96-108 sts remain on Front and Back. Lay piece aside and knit the sleeves. Sleeve: Cast on 48-48-60-60 sts on double-pointed needles; join and place a marker at the join. Knit 2 rows stockinette st, then knit rib (P 3, K 3) over all sts. When the piece measures 8-10-10-10 cm, change to * K 6, P 6 * rib as on Body – start at marker with P 3 so that the marker is centered in a P 6. When the piece measures 10-13-13-11 cm inc 1 st on both sides of the P 6 containing the marker every 3-3-3-3.5 cm a total of 12 times (knit the increased sts in the rib as you go along, i.e P first 6 inc sts, K next 6 sts) = 72-72-84-84 sts. When the piece measures 47-49-50-52 cm bind off 6 sts each side of marker = 60-60-72-72 sts remain. Lay piece aside and knit a second sleeve. Yoke: Put the sleeves in on the same circular needles as Body where you bound off for armholes = 264-288-336-360 sts. Put a marker in each transition between front, back and sleeves = 4 markers. Knit 0-1-1-1 row before raglan shaping begins. Raglan shaping: Dec 1 st at each side of all markers (= 8 decs) – see Decreasing tips above. Dec every other row 21-24-20-25 times and every row 3-0-10-5 times. At the same time when the piece measures 49-59-61-64 cm put the 8-20-20-32 sts at center front on a st holder for the neck and knit back and forth. Bind off at each neck edge every other row: 2 sts 1 time and 1 st 2 times. After all raglan and neck shaping is complete 56-68-68-80 sts remain and the piece measures approx. 56-66-68-71 cm to shoulder. Neckband: Pick up approx. 16 sts for smallest size, 28 to 40 sts for other sizes at front neck (incl. sts on st holder) = 72 sts for smallest size, 96 to 120 sts for other sizes; join and place a marker at the join. P 1 row, K 1 row and P 1 row, then K 1 row, decreasing evenly distributed to 72-84-90-96 sts. Then knit rib (K 3, P 3) until the collar measures 10-10-12-12 cm. Bind off in rib. Fold the rib in half to wrong side and stitch in place. Assembly: Sew opening under the sleeve. SCARF: English rib: Row 1 (wrong side): K 1 (edge st knit in garter st), *K 1, yo, sl 1 as if to purl*, repeat *-* to last 2 sts, K 2. Row 2 (right side): K 1 (edge st knit in garter st), *yo, sl 1 as if to purl, K tog the next st and yo from previous row*, repeat *-* to last 2 sts, yo, sl 1 as if to purl, K 1 (edge st knit in garter st). Row 3 (wrong side): K 1 (edge st), *K tog the next st and yo from previous row, yo, sl 1 as if to purl*, repeat *-* to last 2 sts + yo from previous row, K tog the next st and yo, K 1. Repeat rows 2 and 3 over all sts. Scarf: Loosely cast on 13 sts and knit English rib – see instructions above. Bind off when the piece measures approx 150 cm. |
|
 |
|
Have you finished this pattern?Tag your pictures with #dropspattern or submit them to the #dropsfan gallery. Do you need help with this pattern?You'll find 31 tutorial videos, a Comments/Questions area and more by visiting the pattern on garnstudio.com. © 1982-2026 DROPS Design A/S. We reserve all rights. This document, including all its sub-sections, has copyrights. Read more about what you can do with our patterns at the bottom of each pattern on our site. |
|


With over 40 years in knitting and crochet design, DROPS Design offers one of the most extensive collections of free patterns on the internet - translated to 17 languages. As of today we count 324 catalogues and 12290 patterns translated into English (UK/cm). 12290
We work hard to bring you the best knitting and crochet have to offer, inspiration and advice as well as great quality yarns at incredible prices! Would you like to use our patterns for other than personal use? You can read what you are allowed to do in the Copyright text at the bottom of all our patterns. Happy crafting!
Post a comment to pattern DROPS 85-2
We would love to hear what you have to say about this pattern!
If you want to leave a question, please make sure you select the correct category in the form below, to speed up the answering process. Required fields are marked *.