
Popular categories
Looking for a yarn?


Comments / Questions (17)
![]() Sabine wrote:
Sabine wrote:
Hej Mönstret går inte ihop på bakstycket i storlek s första varvet efter resåren. Det står att man ska ha 136 m kvar på stickan efter varv 3 men enligt mönstret så minskar du bara med 12 maskor vilket innebär att du har 144 m kvar på stickan vid varvet slut.
21.02.2026 - 12:24
![]() Dorte wrote:
Dorte wrote:
Når der står : arbejdet måler nu….. er det så det samlet arbejde eller det afsnit man er i gang med? Fx på bagstykket. Når Ribben måler 6 cm skal man i gang med mønstre. Når arbejdet måler 21 cm skal man tage ind. Er de 21 cm med eller uden ribkanten ?
15.02.2026 - 20:39DROPS Design answered:
Hei Dorte. Man måler fra oppleggskanten om ikke annet er beskrevet i oppskriften. mvh DROPS Design
16.02.2026 - 11:15
![]() Louise wrote:
Louise wrote:
Ang. "BAKSTYCKE:", (efter "Sticka VARV 1 och 2 tills arbetet mäter 5-5-5-5-6-6-6 cm."), "Nu stickas de nästa 2 varven så här: VARV 1 (= rätsidan): ": I slutet av varvet står det att man ska "sticka resår (= 2 avigmaskor tillsammans / 1 avigmaska / 2 rätmaskor) över de nästa 15-15-20-25-30-35-40 maskorna" men för att resåren ska stämma med föregående varv måste man sticka 2 rätmaskor först, följt av avigmaskorna. Så vilket är rätt? Tacksam för hjälp!
16.01.2026 - 04:34DROPS Design answered:
Hei Louise. Oppskriften er oversendt til design avd. for en dobbeltsjekk. mvh DROPS Design
29.01.2026 - 12:51
![]() Karen wrote:
Karen wrote:
Back piece: row 1 it starts rib with purl 3 k2 but ends with k2 purl 3 at the end of the row. Is this correct? This is for size medium for the finnley cardigan.
10.12.2025 - 21:11DROPS Design answered:
Hi Karen, Yes, this is correct and results in the pattern being the same (but mirrored) on both front pieces. Regards, Drops Team.
11.12.2025 - 06:27
![]() Linda wrote:
Linda wrote:
This is wrong - Left front Now work as follows: ROW 1 (right side): Work 1 edge stitch in garter stitch, rib (purl 2 together, purl 2, knit 2) across the next 15-15-20-25-30-35-40 stitches Should be purl 2 together, purl 1, knit 2. Wrong at both ends of the row
03.12.2025 - 18:36DROPS Design answered:
Dear Linda, thanks for. noticing, a correction will come.
04.12.2025 - 08:35
![]() Ada wrote:
Ada wrote:
Ik snap het laatste stuk v.h. voorpand niet. - aan het einde v.d. minderingen voor de taille zijn er 79 st. over ✅ - na armsgaten zijn er nog 75 st over (steken v.d. sjaalkraag niet meegerekend)✅ - bij overgang naar A4 8 st. minderen: 67 st. (sjaalkraag niet meegerekend)✅ - uiteindelijk worden er 40 st. afgekant voor schoudernaad. Wat gebeurt er met de 67-40=27 steken die dan overblijven: dit zijn geen st. van de sjaalkraag. Of worden die toegevoegd aan de st. v.d. sjaalkraag?
30.11.2025 - 16:23DROPS Design answered:
Dag Ada,
Door aan de ene kant van A.5 te meerderen en aan de andere kant te minderen, wordt de sjaalkraag breder en verschuift A.5. De overige steken worden in A.4 gebreid. De steken die overblijven horen dus bij de sjaalkraag.
30.11.2025 - 18:12
![]() Linda wrote:
Linda wrote:
At what stage do we change to 4mm needles on the back ? It doesn't say anywhere.
18.11.2025 - 18:50DROPS Design answered:
Dear Linda, switch to needle 4 mm just when working A.3, A.1x, A.2x etc.. pattern is now fixed, thanks for noticing. Happy knitting!
20.11.2025 - 09:34
![]() Linda wrote:
Linda wrote:
Back piece end of First row rib ( purl three knit two) 1 garter stitch should say rib (knit two purl three) to keep the piece symmetrical. Otherwise the rib looks wrong.
18.11.2025 - 18:45DROPS Design answered:
Fixed thanks for noticing.
20.11.2025 - 09:34
![]() Bente Olesen wrote:
Bente Olesen wrote:
Skal man ikke skifte til pind nr 4 på bagstykket?
11.11.2025 - 13:41DROPS Design answered:
Hei Bente. Oppskriften er oppdatert (med skifte av pinne str. på bakstykket), mvh DROPS Design
17.11.2025 - 19:55
![]() Anneke De Goeij wrote:
Anneke De Goeij wrote:
Op een hoogte van 23 cm bij het achterpand moet er worden geminderd (16 steken). Als je verder leest, dan zouden het 24 steken zijn. Volgens mij klopt hier iets niet. Volgens mij moet je alleen minderen in A3 aan het begin van de naald voor A1 (32 steken) en het eind van de naald na A1 (32 steken) en niet in het middenstuk (50 steken). Graag nog even goed kijken naar de beschrijving
02.11.2025 - 18:28DROPS Design answered:
Dag Anneke,
Je mindert aan beide zijkanten 8 steken waardoor je van 192 naar 176 steken gaat. Daarna brei je A.3 over de eerste en laatste 24 steken (in plaats van over de eerste en laatste 32 steken) vanwege de minderingen die je gemaakt had.
05.11.2025 - 19:25
|
||||||||||||||||
Finnley Cardigan#finnleycardigan |
||||||||||||||||
 |
 |
|||||||||||||||
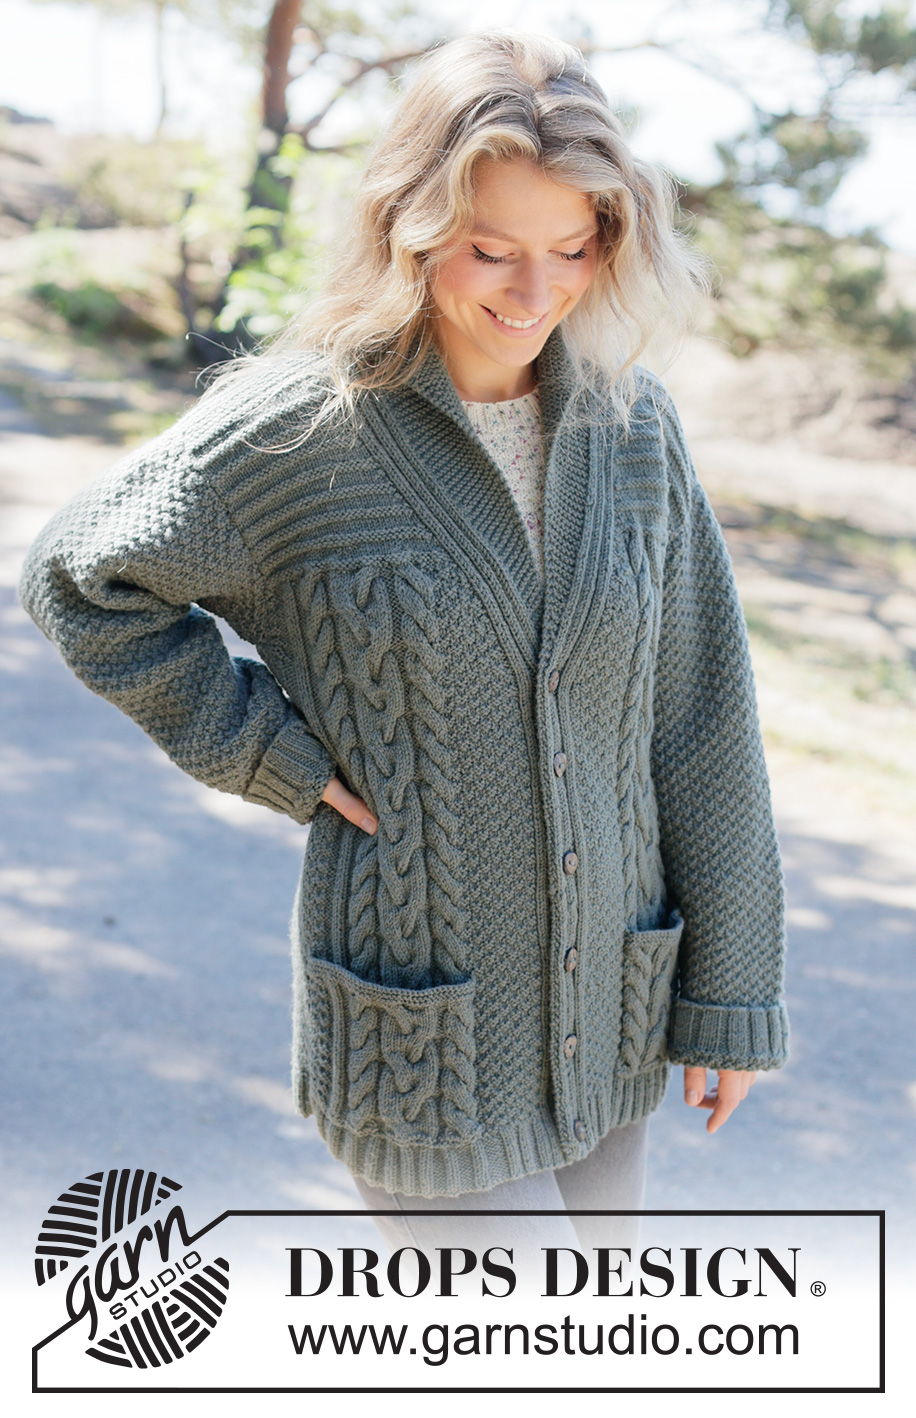
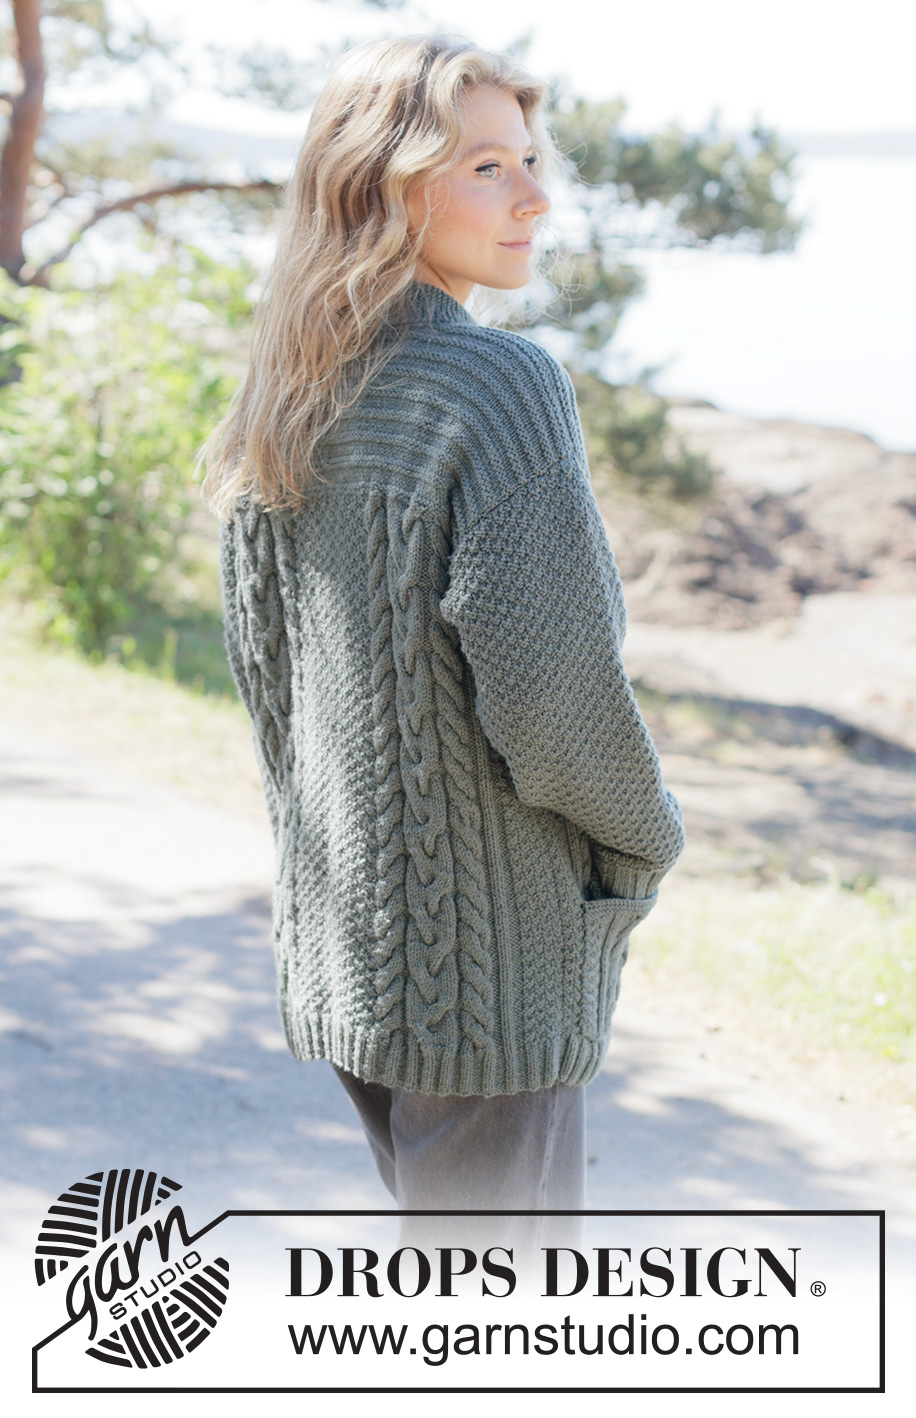
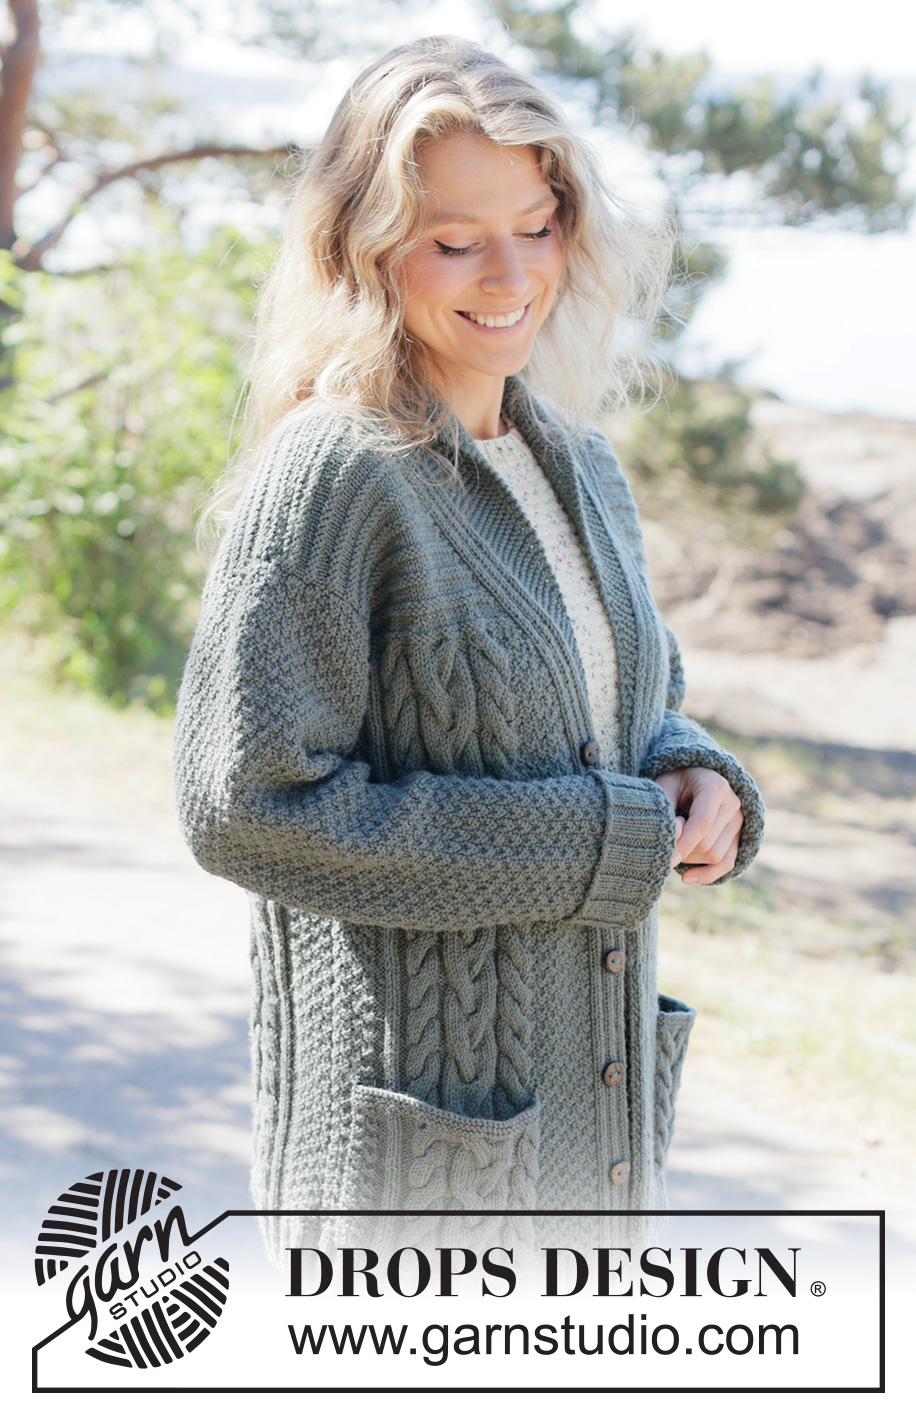
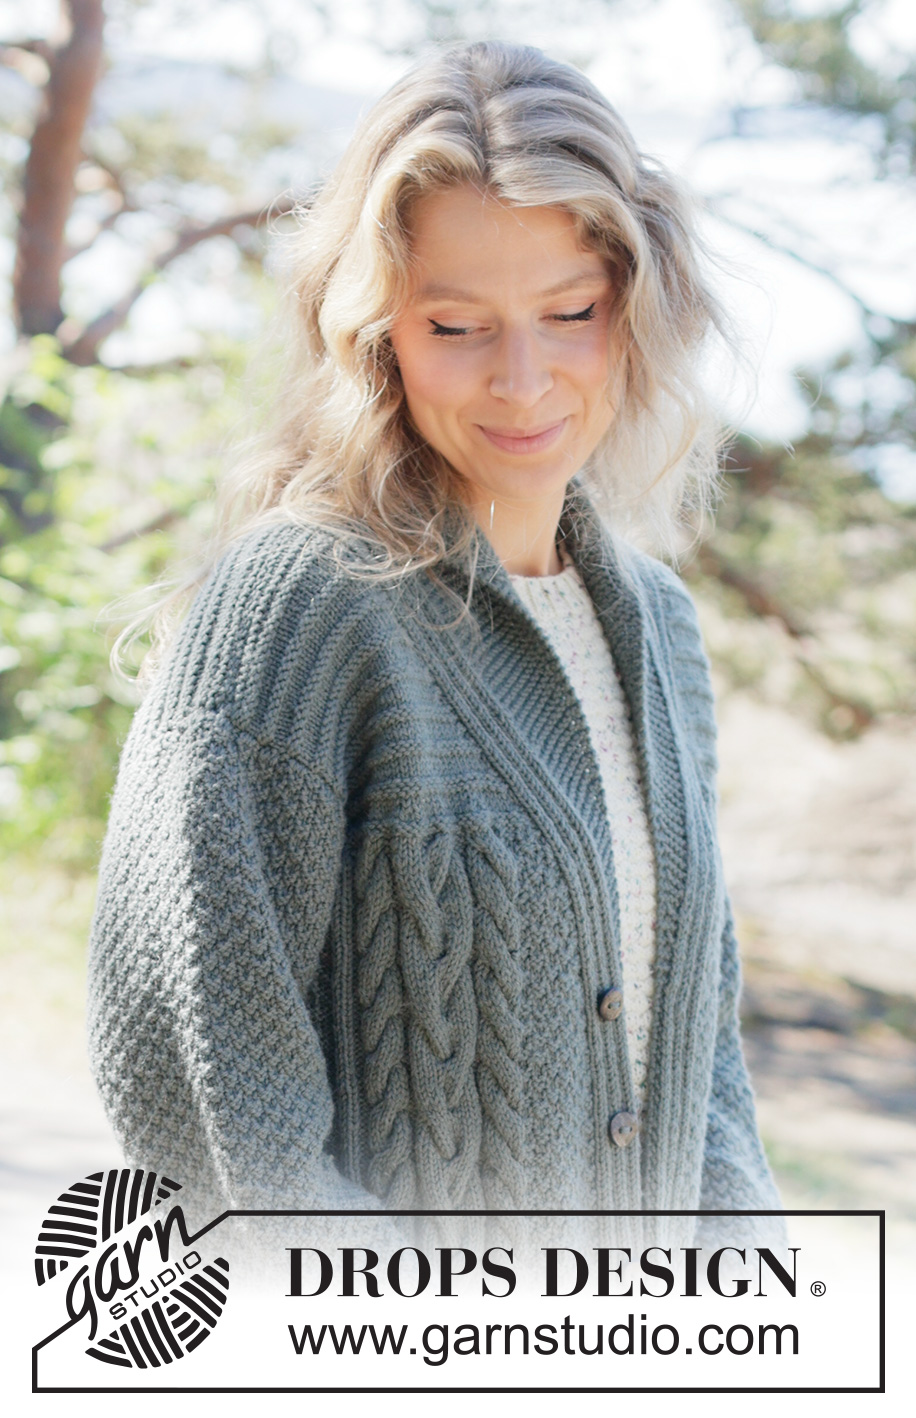
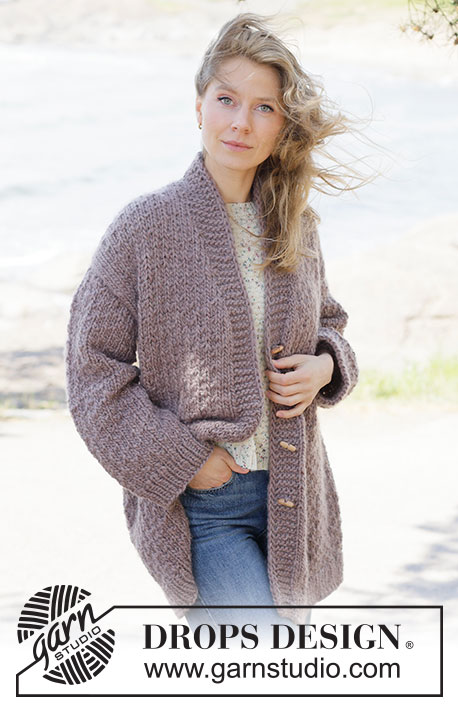
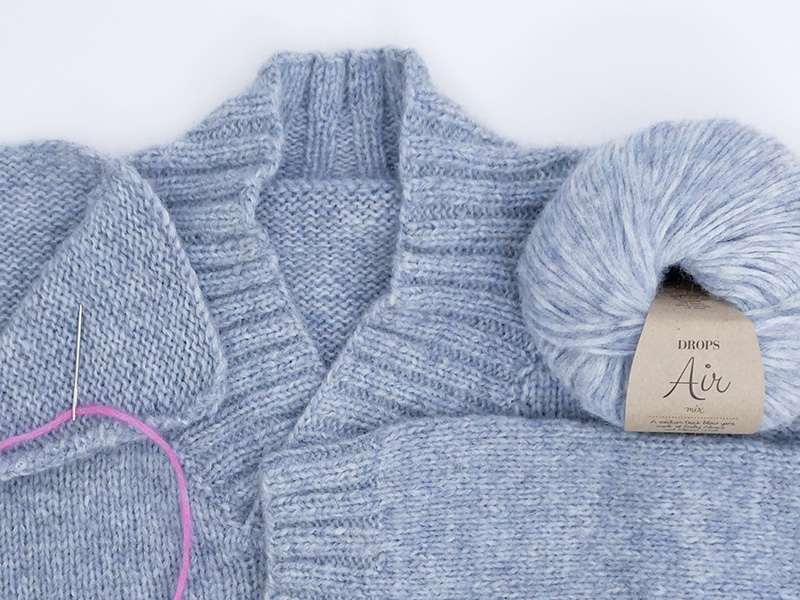
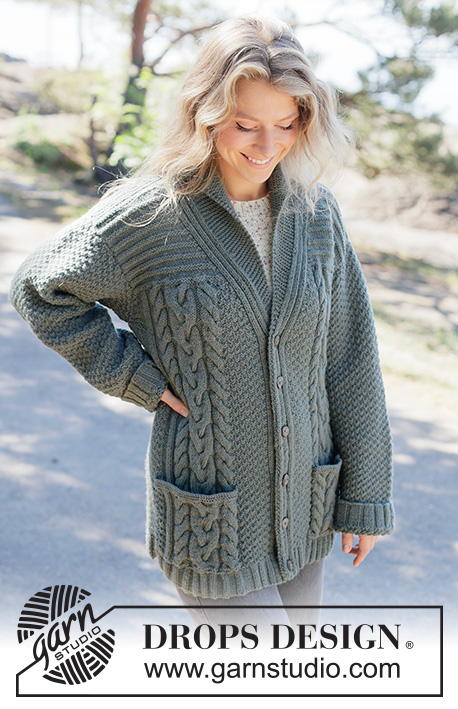
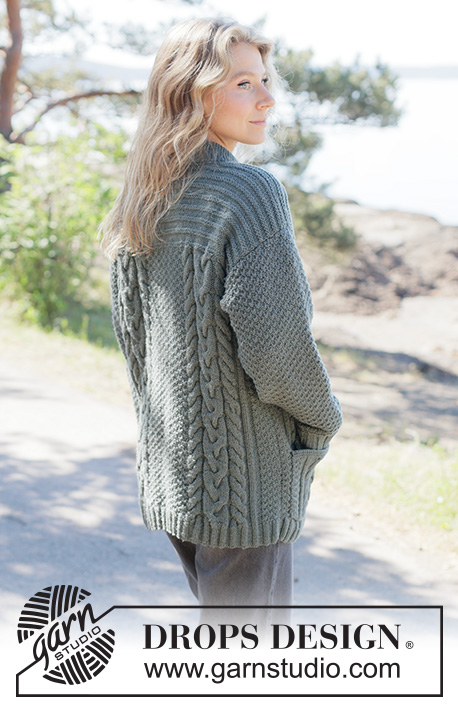
Knitted long jacket in DROPS Lima or DROPS Karisma. The piece is worked bottom up with sewn-in sleeves, cables, double moss stitch, pockets and shawl collar. Sizes XS - XXXL.
DROPS 263-13 |
||||||||||||||||
|
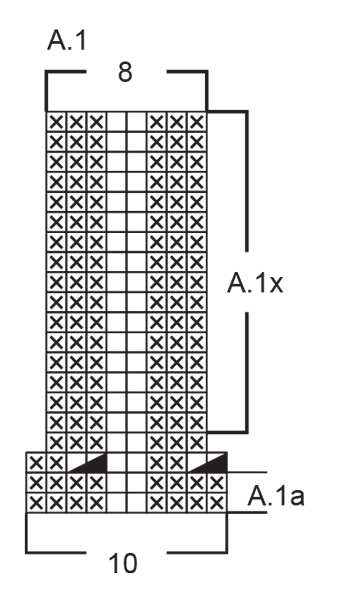
------------------------------------------------------- EXPLANATIONS FOR THE PATTERN: ------------------------------------------------------- GARTER STITCH (worked back and forth): Knit all rows, from both the right and wrong side. 1 ridge in height = knit 2 rows. PATTERN: See diagrams A.1 to A.6. The diagrams show the pattern from the right side. The diagrams are worked from right to left when working from the right side and left to right when working from the wrong side. INCREASE TIP: Increase 1 stitch by making 1 yarn over. On the next row work the yarn over twisted to avoid a hole, then work the new stitch into the pattern. DECREASE TIP: All decreases are worked form the right side! After A.1: Purl 2 together. Before A.1: Work until there are 2 stitches left before A.1, purl 2 together. BUTTONHOLES: The buttonholes are worked on the left band. 1 buttonhole = Knit together the 6th and 7th stitch from the edge, make 1 yarn over. Work the buttonholes when the piece measures: XS: 2, 9, 17, 25, 33 and 41 cm. S: 2, 10, 18, 26, 34 and 42 cm. M: 3, 11, 19, 27, 35 and 43 cm. L: 3, 12, 20, 28, 36 and 44 cm. XL: 4, 13, 21, 29, 37 and 45 cm. XXL: 5, 14, 22, 30, 38 and 46 cm. XXXL: 5, 14, 23, 32, 40 and 48 cm. SHORT ROWS (for shawl collar): To avoid the collar tightening as you work upwards, short rows are worked across the garter stitches every 14th row as follows: Start from mid-front and knit the garter stitches (= collar), turn, tighten the strand and knit back to beginning of row. On the right front piece the short row is worked at the beginning of the row from the right side, on the left front piece at the beginning of the row from the wrong side. ------------------------------------------------------- START THE PIECE HERE: ------------------------------------------------------- JACKET – SHORT OVERVIEW OF THE PIECE: The piece is worked back and forth bottom up. The front pieces, back piece and sleeves are all worked separately. The pieces are then sewn together. BACK PIECE: Cast on 146-156-166-191-206-216-226 stitches with circular needle size 3.5 mm and DROPS Lima or DROPS Karisma. ROW 1 (right side): 1 edge stitch in GARTER STITCH – read explanation above, work rib (purl 3, knit 2) across the next 15-15-20-25-30-35-40 stitches, work A.1a (= 10 stitches), A.2a (= 36 stitches), work rib (knit 2, purl 3) across the next 22-32-32-47-52-52-52 stitches, work A.2a (= 36 stitches), A.1a (= 10 stitches), work rib (knit 2, purl 3) across the next 15-15-20-25-30-35-40 stitches, 1 edge stitch in garter stitch. ROW 2 (wrong side): 1 edge stitch in garter stitch, continue the rib across the next 15-15-20-25-30-35-40 stitches, work A.1a (= 10 stitches), A.2a (= 36 stitches), continue the rib across the next 22-32-32-47-52-52-52 stitches, work A.2a (= 36 stitches), A.1a (= 10 stitches), continue the rib across the next 15-15-20-25-30-35-40 stitches, 1 edge stitch in garter stitch. Repeat ROWS 1 and 2 until the piece measures 5-5-5-5-6-6-6 cm. Now work as follows: ROW 1 (right side): 1 edge stitch in garter stitch, work rib (2 purled together, purl 1, knit 2) across the next 15-15-20-25-30-35-40 stitches (= 12-12-16-20-24-28-32 stitches), work row 3 in A.1 (= 8 stitches), work row 3 in A.2 (= 34 stitches), work rib (knit 2, purl 2 together, purl 1) across the next 22-32-32-47-52-52-52 stitches (= 18-26-26-38-42-42-42 stitches), work row 3 in A.2 (= 34 stitches), work row 3 in A.1 (= 8 stitches), work rib (knit 2, purl 2 together, purl 1) across the next 15-15-20-25-30-35-40 stitches (= 12-12-16-20-24-28-32 stitches), 1 edge stitch in garter stitch = 128-136-144-164-176-184-192 stitches. ROW 2 (wrong side): 1 edge stitch in garter stitch, knit above knit and purl above purl across the next 12-12-16-20-24-28-32 stitches, work row 4 in A.1 (= 8 stitches), work row 4 in A.2 (= 34 stitches), knit above knit and purl above purl across the next 18-26-26-38-42-42-42 stitches, work row 4 in A.2 (= 34 stitches), work row 4 in A.1 (= 8 stitches), knit above knit and purl above purl across the next 12-12-16-20-24-28-32 stitches, 1 edge stitch in garter stitch. Switch to needle size 4 mm. Continue as follows: 1 edge stitch in garter stitch, A.3 across the next 12-12-16-20-24-28-32 stitches, A.1x, A.2x, A.3 across the next 18-26-26-38-42-42-50 stitches, A.2x, A.1x, continue A.3 across the next 12-12-16-20-24-28-32 stitches, 1 edge stitch in garter stitch. When the piece measures 20-21-22-20-21-22-23 cm, decrease on each side – read DECREASE TIP. Decrease 1 stitch inside the 1 edge stitch on each side every 6-6-6-3-3-3-3 cm 4-4-4-8-8-8-8 times = 120-128-136-148-160-168-176 stitches. When all the decreases are finished, continue as follows: 1 edge stitch in garter stitch, continue A.3 across the next 8-8-12-12-16-20-24 stitches, A.1, A.2, continue A.3 across the next 18-26-26-38-42-42-42 stitches, work A.2, A.1, continue A.3 across the next 8-8-12-12-16-20-24 stitches, 1 edge stitch in garter stitch. When the piece measures 46-47-48-49-50-51-53 cm, cast off for the armholes: Cast off 2-2-2-2-3-3-3 stitches at the beginning of the row on each side 2 times (4-4-4-4-6-6-6 stitches cast off on each side) = 112-120-128-140-148-156-164 stitches. Continue the pattern within the 1 edge stitch on each side. When the piece measures 53-54-55-56-57-58-59, work A.4 across all stitches between the edge stitches on each side, AT THE SAME TIME decrease 18-18-18-18-18-18-18 stitches evenly on the row = 94-102-110-122-130-138-146 stitches. Repeat A.4 to finished length. When the piece measures 66-68-70-72-74-76-78 cm cast off the middle 26-26-28-30-32-32-34 stitches for the neckline = 34-38-41-46-49-53-56 shoulder-stitches. Finish the shoulders separately. SHOULDERS: On the next row from the neck, cast off 1 stitch at the beginning of the row = 33-37-40-45-48-52-55 stitches. When the piece measures 67-69-71-73-75-77-79 cm work 1 ridge (see GARTER STITCH). Cast off. The back piece measures approx. 68-70-72-74-76-78-80 cm. RIGHT FRONT PIECE: Cast on 84-89-94-104-114-119-129 with circular needle size 3.5 mm. ROW 1 (right side): Work A.5 (= 12 stitches), work rib (knit 2, purl 3) across the next 10-15-15-20-25-25-30 stitches, work A.2a (= 36 stitches), A.1a (= 10 stitches), work rib (knit 2, purl 3) across the next 15-15-20-25-30-35-40 stitches, 1 edge stitch in garter stitch. ROW 2 (wrong side): Work 1 edge stitch in garter stitch, continue the rib across the next 15-15-20-25-30-35-40 stitches, work A.1a (= 10 stitches), A.2a (= 36 stitches), continue the rib across the next 10-15-15-20-25-25-30 stitches, work A.5 (= 12 stitches). Repeat ROWS 1 and 2 until the piece measures 5-5-5-5-6-6-6 cm. Now work as follows: ROW 1 (right side): Work A.5 (= 12 stitches), knit 2, purl 2 together, purl 1) across the next 10-15-15-20-25-25-30 stitches (= 8-12-12-16-20-20-24 stitches), work row 3 in A.2 (= 34 stitches), work row 3 in A.1 (= 8 stitches), rib (knit 2, purl 2 together, purl 1) across the next 15-15-20-25-30-35-40 stitches (= 12-12-16-20-24-28-32 stitches), 1 edge stitch in garter stitch = 75-79-83-91-99-103-111 stitches. ROW 2 (wrong side): Work 1 edge stitch in garter stitch, knit above knit and purl above purl across the next 12-12-16-20-24-28-32 stitches, work row 4 in A.1 (= 8 stitches), work row 4 in A.2 (= 34 stitches), knit above knit and purl above purl across the next 8-12-12-16-20-20-24 stitches, work A.5 (= 12 stitches). Change to needle size 4 mm and work pattern as follows: ROW 1 (right side): Work A.5 (= 12 stitches), A.3 across the next 8-12-12-16-20-20-24 stitches, A.2x (= 34 stitches), A.1x (= 8 stitches), A.3 across the next 12-12-16-20-24-28-32 stitches, 1 edge stitch in garter stitch. ROW 2 (wrong side): Work 1 edge stitch in garter stitch, A.3 across the next 12-12-16-20-24-28-32 stitches, A.1x (= 8 stitches), A.2x (= 34 stitches), A.3 across the next 8-12-12-16-20-20-24 stitches, A.5 (= 12 stitches). Work ROWS 1 and 2 until the piece measures 20-21-22-20-21-22-23 cm. Now decrease on one side, at the end of the row from the right side, inside 1 edge stitch in garter stitch – remember DECREASE TIP. Decrease 1 stitch every 6-6-6-3-3-3-3 cm 4-4-4-8-8-8-8 times = 71-75-79-83-91-95-103 stitches. When all the decreases are finished, work as follows from the right side: A.5 (= 12), A.3 across the next 8-12-12-16-20-20-24 stitches, A.2x (= 34 stitches), A.1x (= 8 stitches), A.3 across the next 8-8-12-12-16-20-24 stitches, 1 edge stitch in garter stitch. Continue this pattern until the piece measures 40-41-42-43-44-45-46 cm. Now continue the pattern and work the SHAWL COLLAR as described below. NOTE! when the piece measures 46-47-48-49-50-51-53 cm you also cast off for the ARMHOLES, and when the piece measures 53-54-55-56-57-58-59 cm you work A.4 across all stitches (apart from A.5 and the shawl collar mid-front which are continued as before). Read the next 3 sections before continuing. SHAWL COLLAR: Work the first stitch in A.5, make 1 yarn over, work the remaining 11 stitches in A.5 as before, decrease 1 stitch – remember DECREASE TIP, continue the pattern as before to end of row (1 stitch increased and 1 stitch decreased). The yarn over is knitted twisted on the next row and the new stitch continued in garter stitch. This means A.5 is displaced on the row. Work this displacement of A.5 every cm a total of 26-26-26-27-28-28-29 times. The increased stitches mid-front are worked in garter stitch. AT THE SAME TIME, every 14th row work a SHORT ROW– read description above = 27-27-27-28-29-29-30 garter stitches for the collar (including the first stitch in A.5) ARMHOLE: When the piece measures 46-47-48-49-50-51-53 cm, cast off 2-2-2-2-3-3-3 stitches at the beginning of the next 2 rows from the wrong side (4-4-4-4-6-6-6 stitches cast off) = 67-71-75-79-85-89-97 stitches. PATTERN: When the piece measures 53-54-55-56-57-58-59 cm, continue the collar-stitches in garter stitch and A.5, and work A.4 across the other stitches, AT THE SAME TIME decrease 7-7-8-6-8-8-12 stitches evenly on the first row (do not decrease across the collar or A.5) = 60-64-67-73-77-81-85 shoulder-stitches. Continue with A.4, A.5 and garter stitch to finished length. When the piece measures 68-70-72-74-76-78-80 cm, cast off the shoulder-stitches on the next row from the wrong side as follows: Cast off the first 33-37-40-45-48-52-55 stitches and knit the other stitches = 27-27-27-28-29-29-30 collar-stitches on the needle. Now work short rows in garter stitch as follows: ROW 1 (right side): Knit. ROW 2 (wrong side): Knit. ROW 3 (right side): Knit the first 13-13-14-14-15-15-16 stitches, turn and tighten the strand. ROW 4 (wrong side): Knit. Work ROWS 1 to 4 until the collar measures 7-7-7-8-8-8-9 cm from where you cast off for the shoulder. Cast off. LEFT FRONT PIECE: Cast on 84-89-94-104-114-119-129 with circular needle size 3.5 mm. ROW 1 (right side): Work 1 edge stitch in garter stitch, rib (purl 3, knit 2) across the next 15-15-20-25-30-35-40 stitches, work A.1a (= 10 stitches), A.2a (= 36 stitches), rib (purl 3, knit 2) across the next 10-15-15-20-25-25-30 stitches, A.6 (= 12 stitches). ROW 2 (wrong side): Work A.6 (= 12 stitches), continue the rib across the next 10-15-15-20-25-25-30 stitches, work A.2a (= 36 stitches), A.1a (= 10 stitches), continue the rib across the next 15-15-20-25-30-35-40 stitches, 1 edge stitch in garter stitch. Repeat ROWS 1 and 2 until the piece measures 5-5-5-5-6-6-6 cm. Now work as follows: ROW 1 (right side): Work 1 edge stitch in garter stitch, rib (purl 2 together, purl 1, knit 2) across the next 15-15-20-25-30-35-40 stitches (12-12-16-20-24-28-32 stitches), work row 3 in A.1 (= 8 stitches), work row 3 in A.2 (= 34 stitches), rib (purl 2 together, purl 1, knit 2) across the next 10-15-15-20-25-25-30 stitches (= 8-12-12-16-20-20-24 stitches), A.6 (= 12 stitches). There are 75-79-83-91-99-103-111 stitches. ROW 2 (wrong side): Work A.6 (= 12 stitches), knit above knit and purl above purl across the next 8-12-12-16-20-20-24 stitches, work row 4 in A.2 (= 34 stitches), work row 4 in A.1 (= 8 stitches), knit above knit and purl above purl across the next 12-12-16-20-24-28-32 stitches, 1 edge stitch in garter stitch. Change to needle size 4 mm and work pattern as follows: ROW 1 (right side): 1 edge stitch in garter stitch, work A.3 across the next 12-12-16-20-24-28-32 stitches, A.1x (= 8 stitches), A.2x (= 34 stitches), A.3 across the next 8-12-12-16-20-20-24 stitches, A.6 (= 12 stitches). ROW 2 (wrong side): Work A.6 (= 12 stitches), A.3 across the next 8-12-12-16-20-20-24 stitches, A.2x (= 34 stitches), A.1x (= 8 stitches), A.3 across the next 12-12-16-20-24-28-32 stitches, 1 edge stitch in garter stitch. Work ROWS 1 and 2 until the piece measures 20-21-22-20-21-22-23 cm. Now decrease on one side, at the beginning of rows from the right side, inside 1 edge stitch in garter stitch – remember DECREASE TIP. Decrease 1 stitch every 6-6-6-3-3-3-3 cm 4-4-4-8-8-8-8 times = 71-75-79-83-91-95-103 stitches. When all the decreases are finished, work as follows from the right side: 1 edge stitch in garter stitch, work A.3 across the next 8-8-12-12-16-20-24 stitches, A.1x (= 8 stitches), A.2x (= 34 stitches), A.3 across the next 8-12-12-16-20-20-24 stitches, A.6 (= 12 stitches). Continue this pattern until the piece measures 40-41-42-43-44-45-46 cm. Now continue the pattern and work the SHAWL COLLAR as described below. NOTE! when the piece measures 46-47-48-49-50-51-53 cm you also cast off for the ARMHOLES, and when the piece measures 53-54-55-56-57-58-59 cm you work A.4 across all stitches (apart from A.5 and the shawl collar mid-front which are continued as before). Read the next 3 sections before continuing. SHAWL COLLAR: Continue the pattern until there are 14 stitches left on the row, decrease 1 stitch – remember DECREASE TIP, work as before until there is 1 stitch left, make 1 yarn over, 1 edge stitch in garter stitch (= 1 stitch increased and 1 stitch decreased). The yarn over is knitted twisted on the next row and the new stitch continued in garter stitch. This means A.6 is displaced on the row. Work this displacement of A.6 every cm a total of 26-26-26-27-28-28-29 times. The increased stitches mid-front are worked in garter stitch. AT THE SAME TIME, every 14th row work a SHORT ROW– remember description above = 27-27-27-28-29-29-30 garter stitches for the collar (including the last stitch in A.6). ARMHOLE: When the piece measures 46-47-48-49-50-51-53 cm, cast off 2-2-2-2-3-3-3 stitches at the beginning of the next 2 rows from the right side (4-4-4-4-6-6-6 stitches cast off) = 67-71-75-79-85-89-97 stitches. PATTERN: When the piece measures 53-54-55-56-57-58-59 cm, continue the collar-stitches in garter stitch and A.6, and work A.4 across the other stitches, AT THE SAME TIME decrease 7-7-8-6-8-8-12 stitches evenly on the first row (do not decrease across the collar or A.6) = 60-64-67-73-77-81-85 shoulder-stitches. Continue with A.4, A.6 and garter stitch to finished length. When the piece measures 68-70-72-74-76-78-80 cm, cast off the shoulder-stitches on the next row from the right side as follows: Cast off the first 33-37-40-45-48-52-55 stitches and knit the other stitches = 27-27-27-28-29-29-30 collar-stitches. Now work short rows in garter stitch as follows: ROW 1 (wrong side): Knit. ROW 2 (right side): Knit. ROW 3 (wrong side): Knit the first 13-13-14-14-15-15-16 stitches, turn and tighten the strand. ROW 4 (right side): Knit. Work ROWS 1 to 4 until the collar measures 7-7-7-8-8-8-9 cm from the cast-off shoulder-stitches. Cast off. SLEEVES: The sleeve is worked back and forth, bottom up. Cast on 61-66-66-71-71-76-76 stitches with circular needle size 3.5 mm. Work rib (first row = right side) as follows: 1 edge stitch in garter stitch, rib (knit 2, purl 3) until there are 5 stitches left, knit 2, purl 2 and 1 edge stitch in garter stitch. Continue this rib for 4-4-4-4-5-5-5 cm, with the last row from the right side. Change to circular needle size 4 mm. Purl 1 row from the wrong side and decrease 11-12-12-13-13-14-14 stitches evenly on the row = 50-54-54-58-58-62-62 stitches. Continue with A.3 inside the 1 edge stitch in garter stitch on each side. When the sleeve measures 7-7-11-9-8-6-5½ cm increase 1 stitch inside the 1 edge stitch on each side – read INCREASE TIP. Increase like this every 2-2-1½-1½-1½-1½-1½ cm a total of 22-22-24-24-26-26-26 times = 94-98-102-106-110-114-114 stitches. When the sleeve measures 51-51-50-47-46-45-44 cm, cast off for the sleeve cap at the beginning of each row as follows: Cast off 3 stitches 1-1-1-2-2-2-2 times on each side, 2 stitches 1-1-1-1-1-1-1 time and 3 stitches 2-2-2-3-3-3-3 times on each side = 72-76-80-72-76-80-80 stitches. Cast off the remaining stitches. The sleeve measures approx. 54-54-53-51-50-49-48 cm. RIGHT POCKET: The pocket is worked back and forth. Cast on 42 stitches with circular needle size 4 mm. ROW 1 (right side): Knit and increase 6 stitches evenly spaced (increase by working yarn overs) = 48 stitches. ROW 2 (wrong side): Knit, yarn overs knitted twisted to avoid holes. ROW 3 (right side): Work 1 edge stitch in garter stitch, A.2x (= 34 stitches), A.1x (= 8 stitches), A.3 (= 4 stitches), 1 edge stitch in garter stitch. ROW 4 (wrong side): Work 1 edge stitch in garter stitch, A.3 (= 4 stitches), A.1x (= 8 stitches), A.2x (= 34 stitches), 1 edge stitch in garter stitch. Work ROWS 3 and 4 a total of 19 times (38 rows worked). Continue decreasing as follows: 1 edge stitch in garter stitch, knit 2 together, knit 2 together (2 decreased stitches), work as before across the next 7 stitches, knit 2 together, knit 2 together (2 decreased stitches), str work as before across the next 15 stitches, knit 2 together, knit 2 together (2 decreased stitches), work as before across the next 12 stitches, 1 edge stitch in garter stitch. Change to circular needle size 3.5 mm. Work 2 ridges across all stitches (4 knitted rows), with the last row from the right side. Cast off with knit from the wrong side. LEFT POCKET: The pocket is worked back and forth. Cast on 42 stitches with circular needle size 4 mm. ROW 1 (right side): Knit and increase 6 stitches evenly spaced (increase by working yarn overs) = 48 stitches. ROW 2 (wrong side): Knit, yarn overs knitted twisted to avoid holes. ROW 3 (right side): Work 1 edge stitch in garter stitch, A.3 (= 4 stitches), A.1x (= 8 stitches), A.2x (= 34 stitches), 1 edge stitch in garter stitch. ROW 4 (wrong side): Work 1 edge stitch in garter stitch, A.2x (= 34 stitches), A.1x (= 8 stitches), A.3 (= 4 stitches), 1 edge stitch in garter stitch. Work ROWS 3 and 4 a total of 19 times (38 rows worked). Continue decreasing as follows: 1 edge stitch in garter stitch, work as before across the next 12 stitches, knit 2 together, knit 2 together (2 decreased stitches), work as before across the next 7 stitches, knit 2 together, knit 2 together (2 decreased stitches), work as before across the next 15 stitches, knit 2 together, knit 2 together (2 decreased stitches), 1 edge stitch in garter stitch. Change to circular needle size 3.5 mm. Work 2 ridges across all stitches (4 knitted rows), with the last row from the right side. Cast off with knit from the wrong side. ASSEMBLY: Sew the shoulder seams. Sew the sleeves into the body, inside the 1 edge stitch. Sew the sleeve seams and side seams inside the 1 edge stitch. Sew the buttons onto the right band. Sew the cast-off edges on the collars together mid-back and sew the collar to the neckline. Sew the pockets onto the front pieces, making sure the pattern on the pockets matches the pattern on the front pieces. Sew the pockets neatly through both layers in the outermost garter stitch on each side, and at the bottom of the pocket. Cut and fasten the strands. |
||||||||||||||||
Diagram explanations |
||||||||||||||||
|
||||||||||||||||
 |
||||||||||||||||
 |
||||||||||||||||
 |
||||||||||||||||
 |
||||||||||||||||
Have you finished this pattern?Tag your pictures with #dropspattern #finnleycardigan or submit them to the #dropsfan gallery. Do you need help with this pattern?You'll find 29 tutorial videos, a Comments/Questions area and more by visiting the pattern on garnstudio.com. © 1982-2026 DROPS Design A/S. We reserve all rights. This document, including all its sub-sections, has copyrights. Read more about what you can do with our patterns at the bottom of each pattern on our site. |
||||||||||||||||


With over 40 years in knitting and crochet design, DROPS Design offers one of the most extensive collections of free patterns on the internet - translated to 17 languages. As of today we count 325 catalogues and 12291 patterns translated into English (UK/cm). 12291
We work hard to bring you the best knitting and crochet have to offer, inspiration and advice as well as great quality yarns at incredible prices! Would you like to use our patterns for other than personal use? You can read what you are allowed to do in the Copyright text at the bottom of all our patterns. Happy crafting!
Post a comment to pattern DROPS 263-13
We would love to hear what you have to say about this pattern!
If you want to leave a question, please make sure you select the correct category in the form below, to speed up the answering process. Required fields are marked *.