
Popular categories
Looking for a yarn?


Comments / Questions (5)
![]() Kristin Hybertsen wrote:
Kristin Hybertsen wrote:
Hei! Jeg har startet å strikke Icy Pearls Sweater og oppdaget da jeg skulle starte på diagrammet at selve diagrammet mangler i oppskriften! Kan dere være så snill å sende meg det?
28.04.2026 - 22:40DROPS Design answered:
Hei Kristin. Har vært noen problemer med nedlastningen, men skal nå være OK nå. mvh DROPS Design
29.04.2026 - 08:35
![]() Hanneke wrote:
Hanneke wrote:
Hallo, Wat een leuk en uitdagend patroon is dit! Ik wil er graag aan beginnen, maar ik verbaas me over de stekenverhouding van 26 steken en 34 naalden. Op het label van Drops Flora is de stekenverhouding 24 steken en 32 naalden, zoals bij zo ongeveer alle garens in groep A. Is dit een foutje in de beschrijving?
21.04.2026 - 19:49DROPS Design answered:
Dag Hanneke,
De stekenverhouding in het patroon is leidend en kan soms afwijken van de stekenverhouding die bij het garen staat. Maak altijd een proeflapje en pas eventueel de naalddikte aan zodat de stekenverhouding overeenkomt zoals aangegeven in de beschrijving van het patroon.
22.04.2026 - 13:25
![]() Anna wrote:
Anna wrote:
Ich habe noch 9 Knäuel Baby Alpaka Silk. Vermutlich reicht das nicht für Größe L, oder?
15.03.2026 - 13:38DROPS Design answered:
Liebe Anna, BabyAlpaca Silk war 167 m / 50 g (wie Alpaca) - Sie würden ca 503 g Alpaca (dann BabyAlpaca Silk) brauchen (siehe Garnumrechner), so etwas knapp mit nur 9 Knäuel. Viel Spaß beim Stricken!
16.03.2026 - 10:17
![]() Thea wrote:
Thea wrote:
Bij het achterpand, als je 104 steken hebt, knip je de draad af en de steken op een hulpnaald en moet verder met de voorhanden. Op een gegeven moment brei je de voorpanden en achterpand samen maar dan is het achterpand toch nog veel te kort (9 cm)??
18.02.2026 - 10:19DROPS Design answered:
Dag Thea,
Dat klopt en het voorpand is dan ook ongeveer 10 cm. Op het moment dat je de voorpanden en het achterpand samenvoegt, neem je ook steken op voor de mouwen en brei je gelijk de mouwen. Het is dus niet zo dat je armsgaten hebt en later de mouw innaait. (Een deel van het voorpand zit trouwens op het achterpand, dus de schoudernaad zit een beetje op het achterpand, te zien op een van de laatste foto's. Vandaar dat het voorpand ietsje langer is dan het achterpand op het moment van samenvoegen.)
18.02.2026 - 18:34
![]() Karin wrote:
Karin wrote:
Hej! Hur blir denna kofta om man ändrar till Safran? Jag ser d går med ”garnkonverteraren” men tänkte om den blir mycke tyngre..😊
21.12.2025 - 10:26DROPS Design answered:
Hei Karin. Bruk garnkonverteraren og skriv inn garnmenden til Flora eller Nord, slik at du kan regne ut med garnmengden i den str. du skal strikke. Det varierer fra 50 gram (str XS) til 300 gram (XXXL) i de ulik størrelsene. Så kan du selv avgjøre om den blir for tung i den str. du ønsker å strikke. mvh DROPS Design
22.12.2025 - 11:18
|
||||||||||||||||||||||
Icy Pearls Sweater#icypearlssweater |
||||||||||||||||||||||
 |
 |
|||||||||||||||||||||
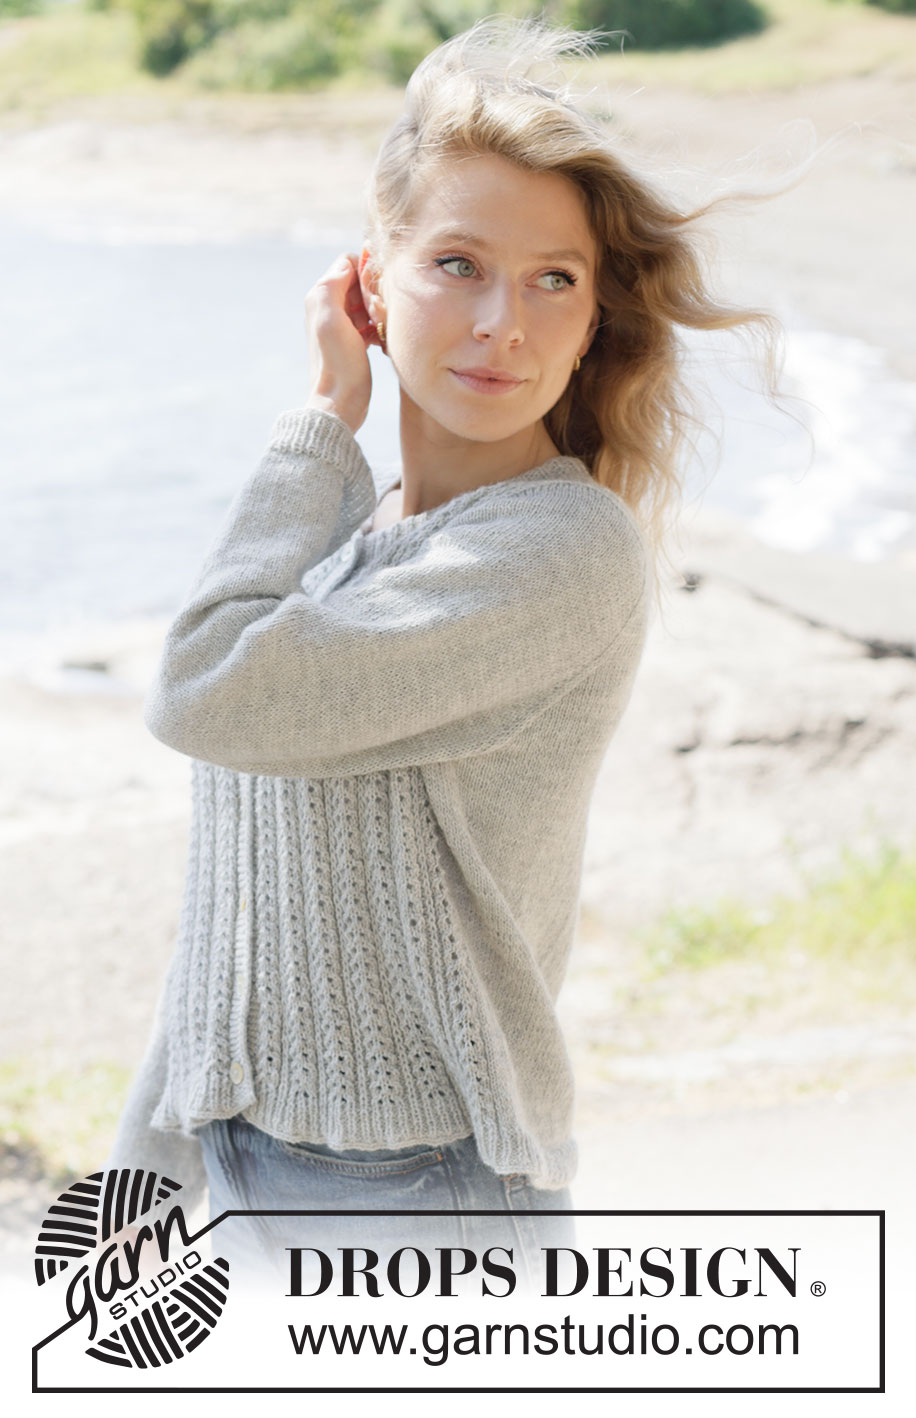
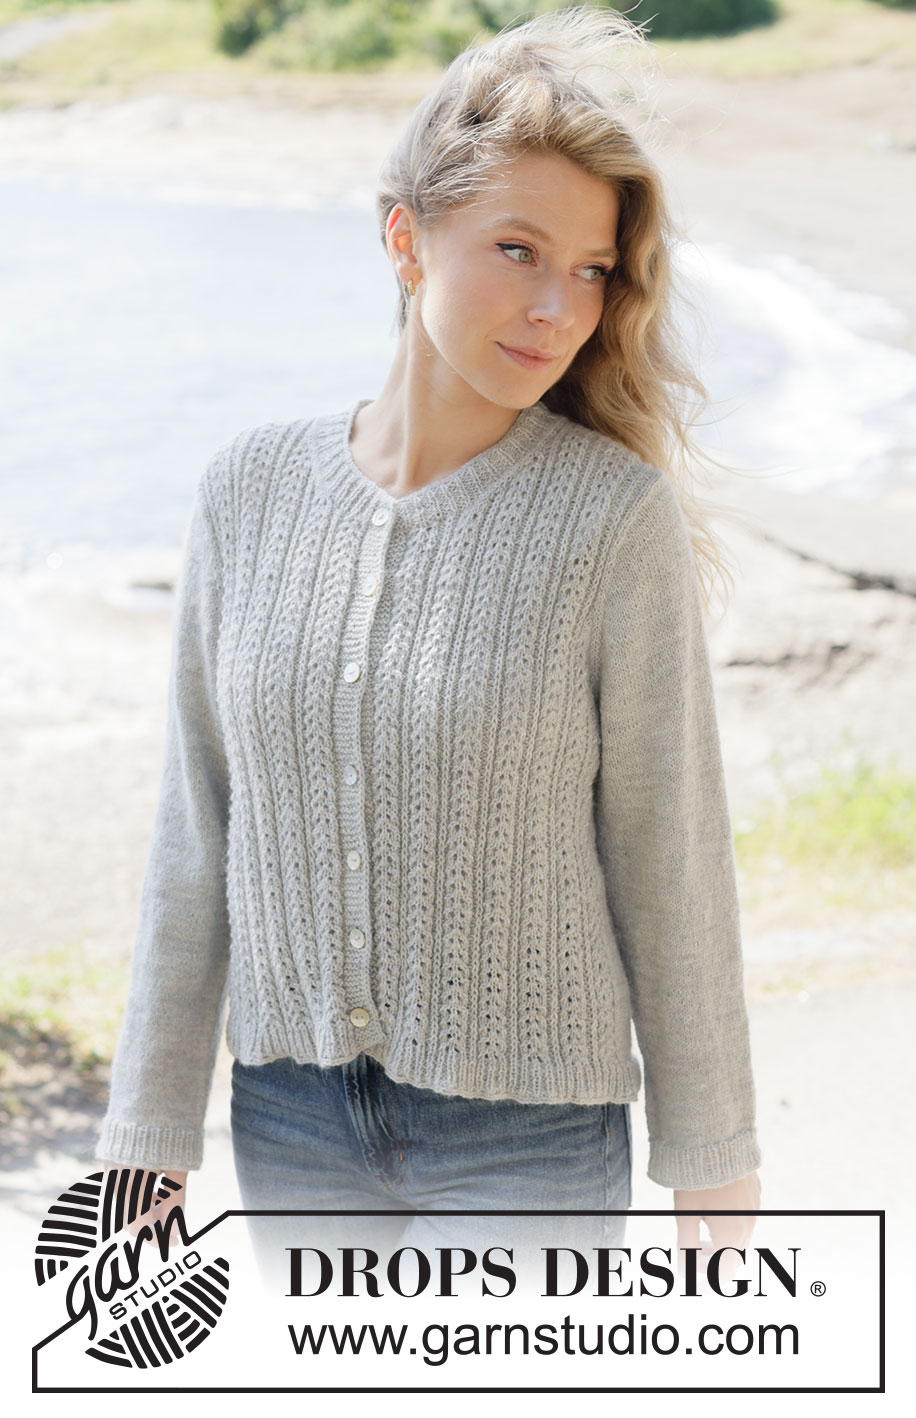
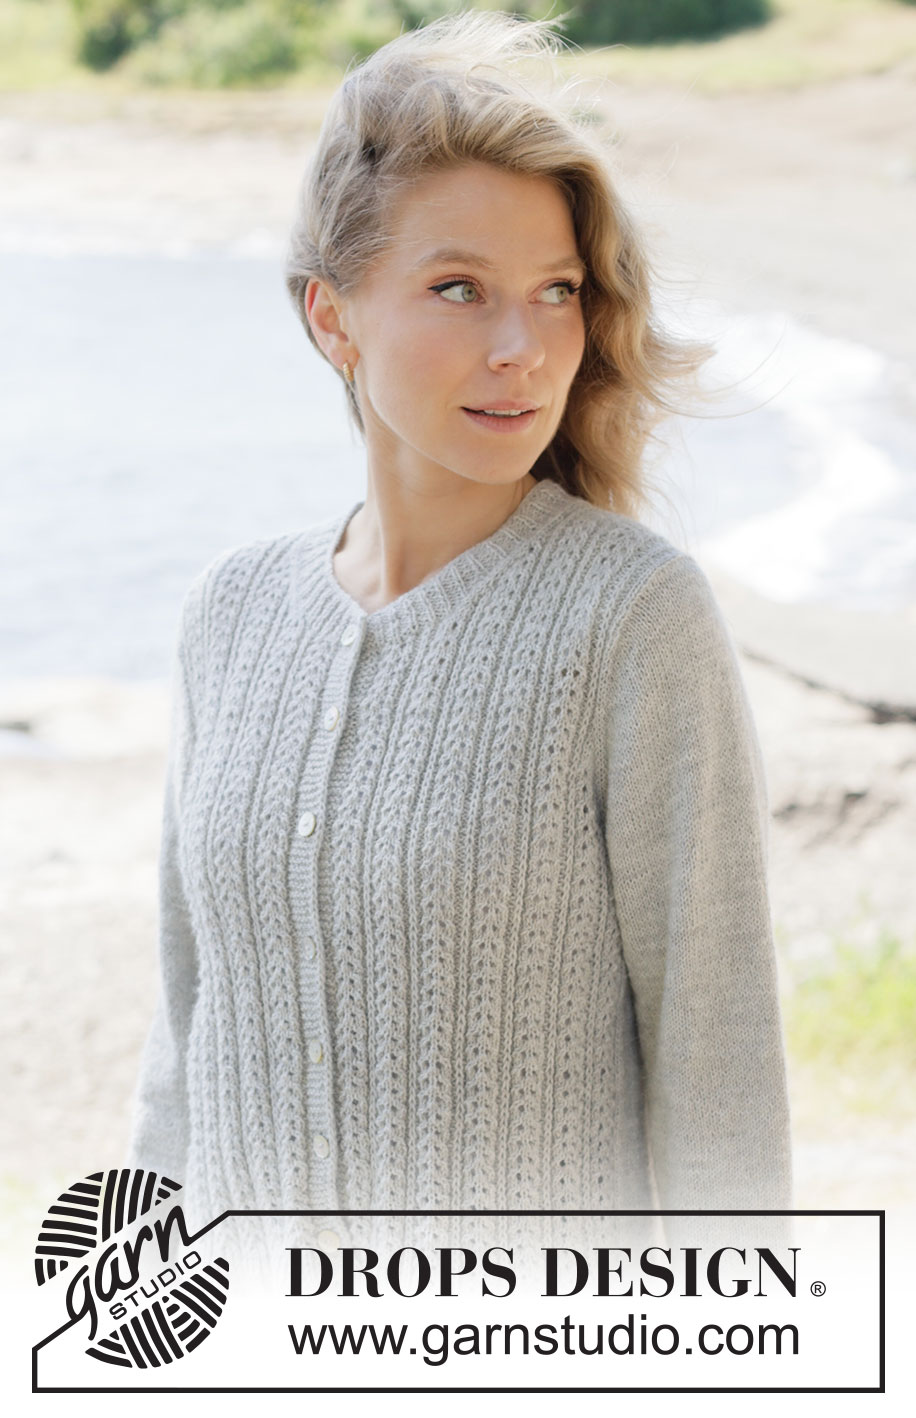
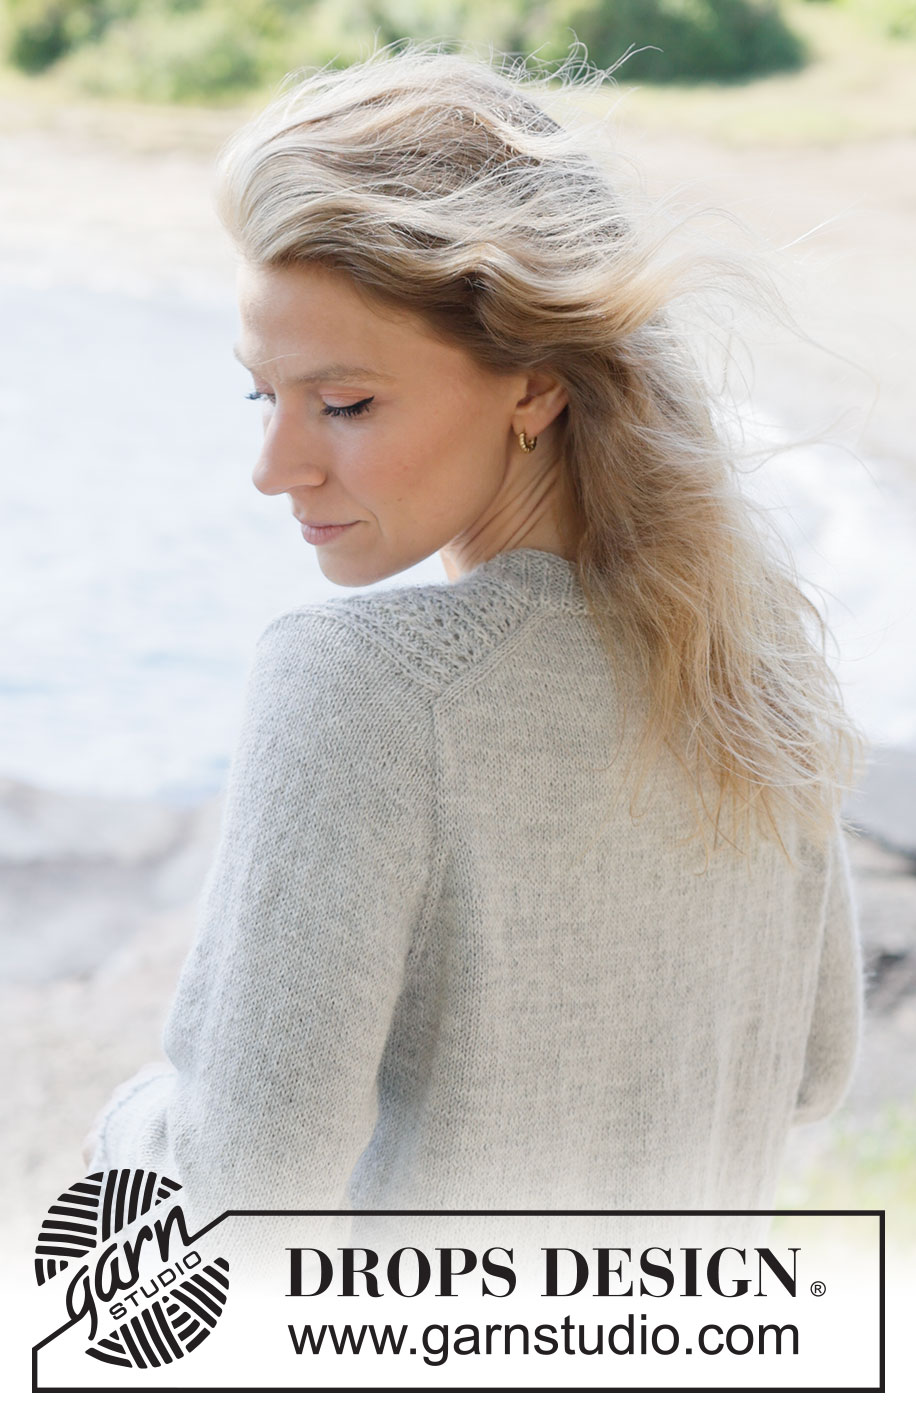
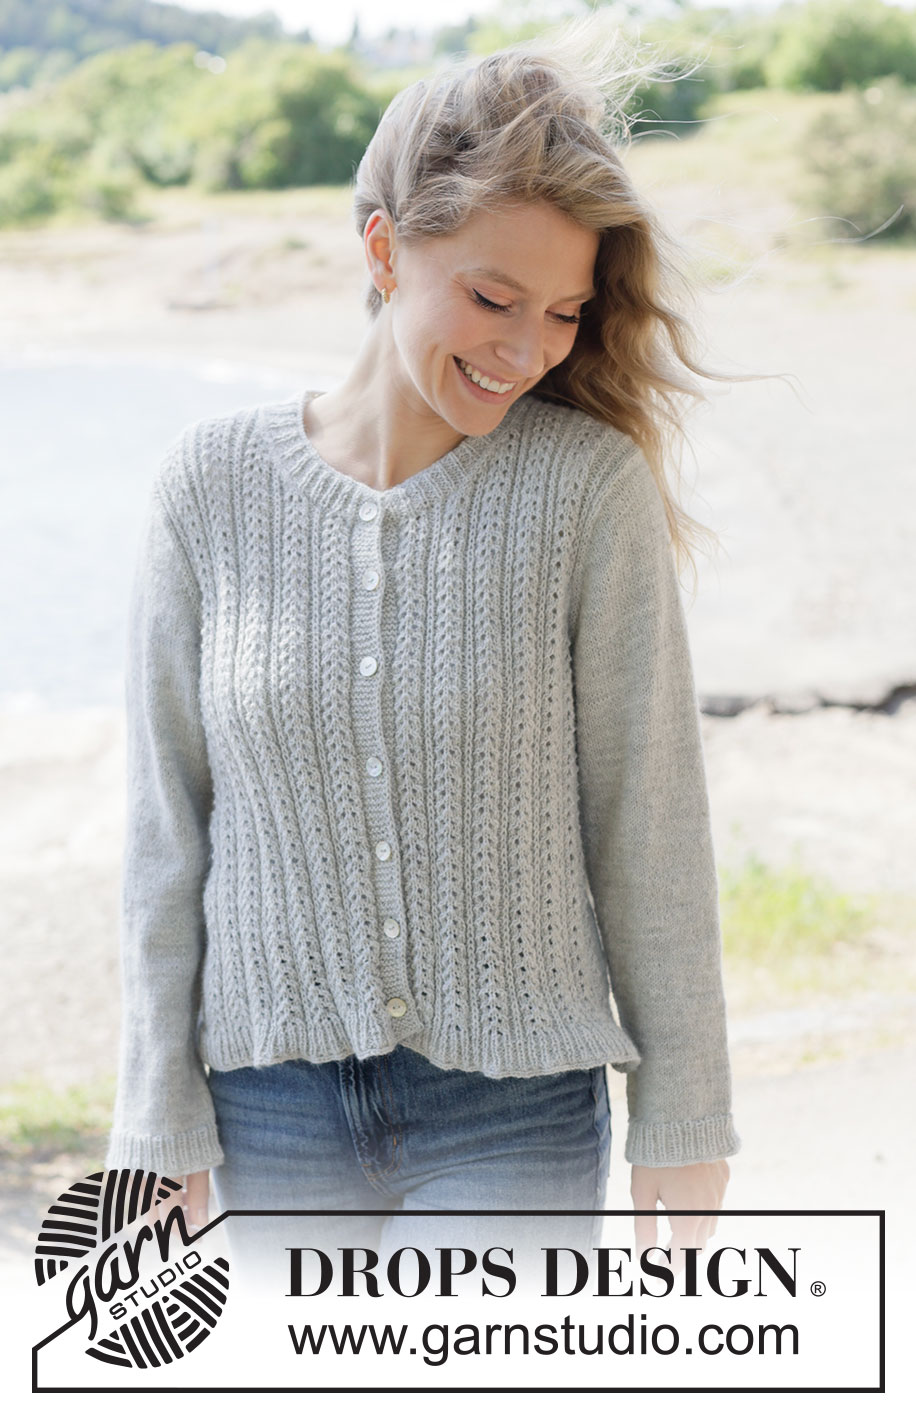
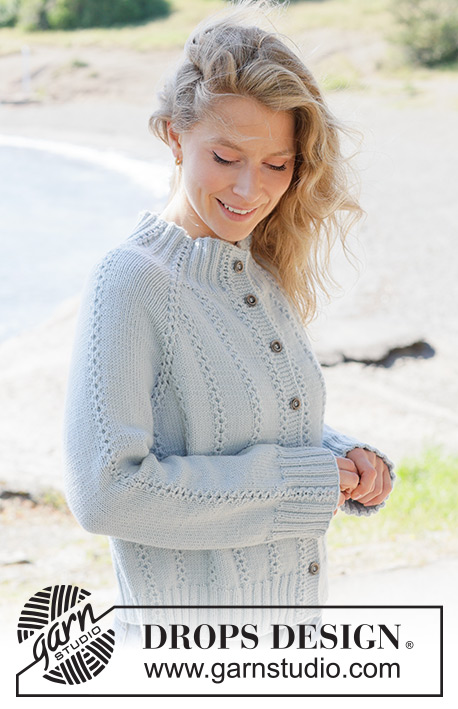
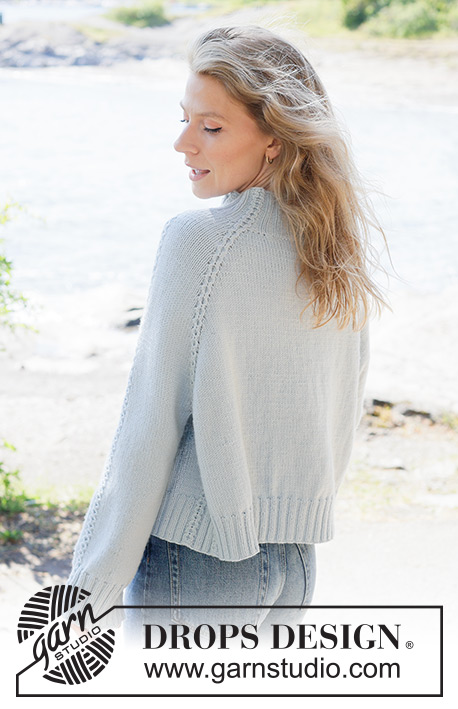
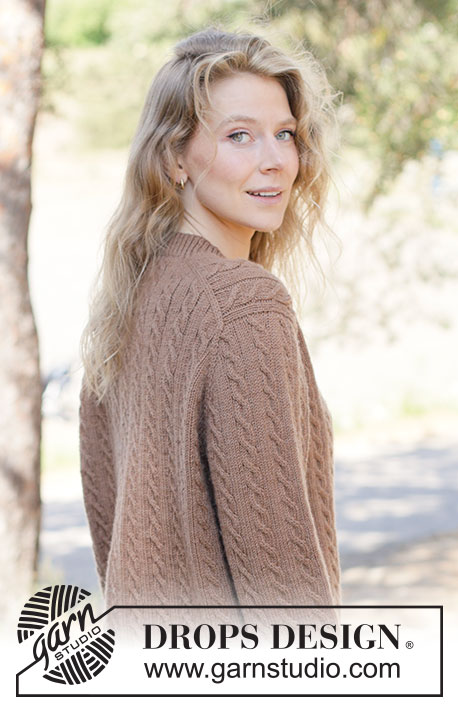
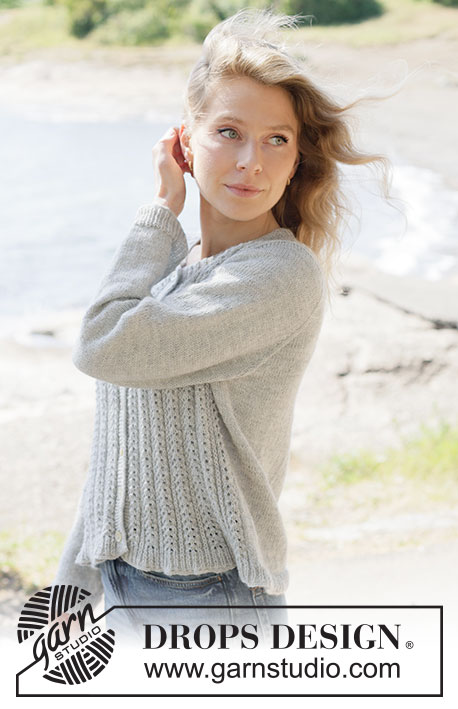
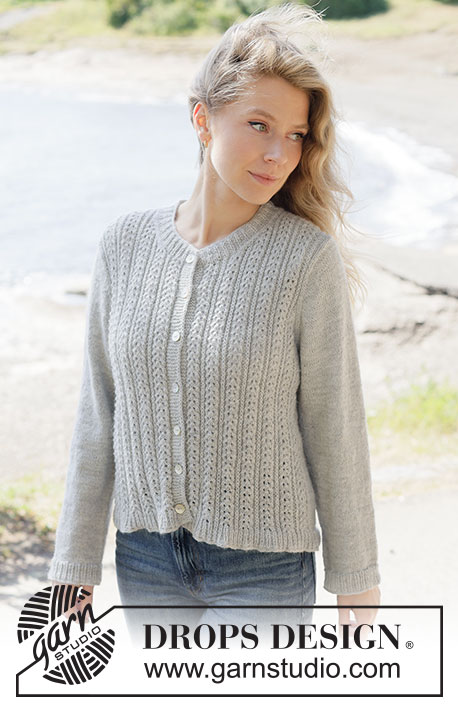
Knitted jacket in DROPS Flora or DROPS Nord. The piece is worked top down with European yoke, lace pattern on front pieces, stocking stitch on back piece and sleeves and bands with I-cord. Sizes XS - XXXL.
DROPS 263-5 |
||||||||||||||||||||||
|
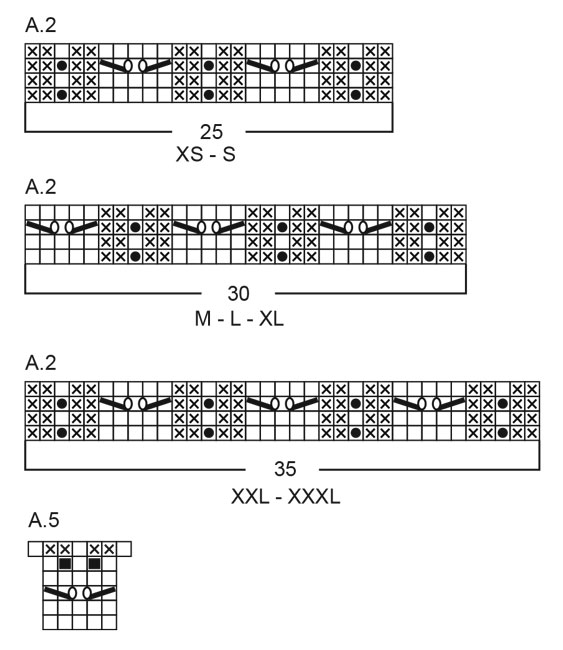
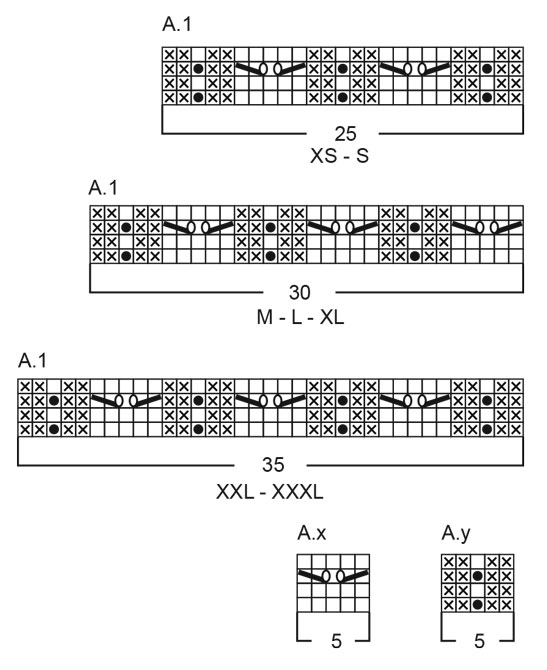
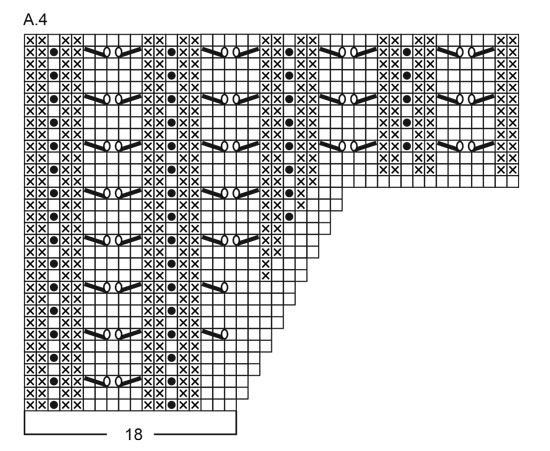
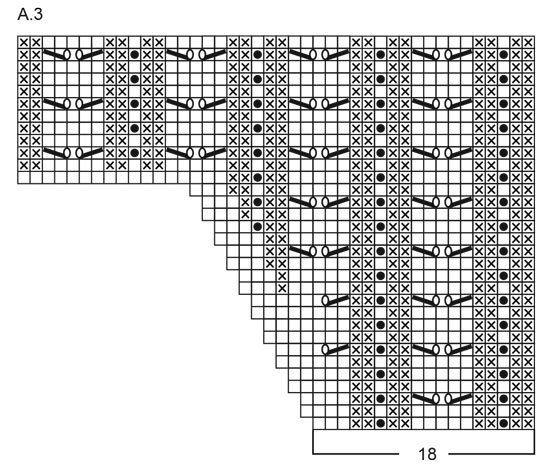
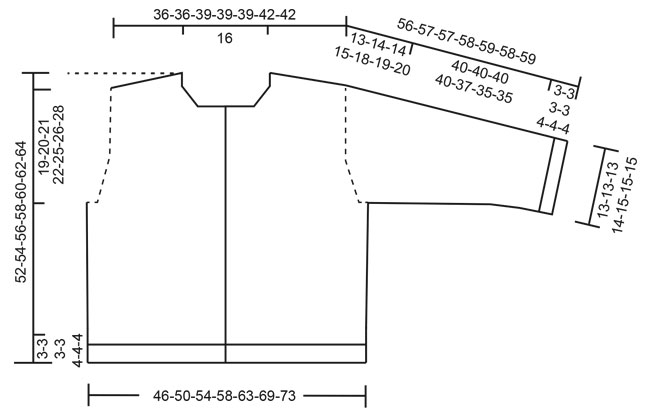
------------------------------------------------------- EXPLANATIONS FOR THE PATTERN: ------------------------------------------------------- GARTER STITCH (worked back and forth): Knit all rows, from both the right and wrong side. 1 ridge in height = knit 2 rows. INCREASE TIP-1: INCREASE 1 STITCH TOWARDS THE LEFT - from RIGHT SIDE: Use left needle to pick up yarn between 2 stitches from row below, pick up yarn from the front and knit in the stitch loop that is on the back of the needle. INCREASE 1 STITCH TOWARDS THE RIGHT - from RIGHT SIDE: Use left needle to pick up yarn between 2 stitches from row below, pick up yarn from the back and knit in the stitch loop that is on the front side of the needle. . INCREASE TIP-2: INCREASE 1 STITCH TOWARDS THE RIGHT - from WRONG SIDE: Use left needle to pick up yarn between 2 stitches from row below, pick up yarn from the back and purl in the stitch loop that is on the front side of the needle. INCREASE 1 STITCH TOWARDS THE LEFT - from WRONG SIDE: Use left needle to pick up yarn between 2 stitches from row below, pick up yarn from the front and purl in the stitch loop that is on the back side of the needle. PATTERN: See diagrams A.1 to A.5. Choose diagram for your size (applies to A.1 and A.2). A.x and A.y show 1 repeat of each pattern-section. The diagrams show the pattern from the right side. The diagrams are read from right to left when working from the right side and left to right when working from the wrong side. BANDS WITH I-CORD: BEGINNING OF ROW: Work the band as follows (7 stitches): Slip 1 stitch purl-wise with yarn in front, knit 1, work 5 garter stitches. END OF ROW: Work the band as follows (7 stitches): Work until there are 7 stitches left on the row, work 5 garter stitches, slip 1 stitch purl-wise with yarn in front, knit 1. Work like this from both the right and wrong side. BUTTONHOLES: Work the buttonholes on the right band (when the garment is worn) from the right side, when there are 5 stitches left on the row as follows: ROW 1 (right side): Make 1 yarn over, knit 2 together, knit 1, slip 1 purl-wise with strand in front, knit 1. ROW 2 (wrong side): Work the band as before, knit the yarn over to leave a hole. The first buttonhole is worked when the piece measures 6-6-7-8-8-7-9 cm from the neckline. Then work 5 buttonholes with 7-7½-7½-7½-7½-8-8 cm between each one. The bottom buttonhole is worked in the transition between the stocking stitch and rib. NOTE: The last buttonhole is worked on the neck. SLEEVE TIP: When knitting up stitches under the sleeve, you can get a small hole in the transition between stitches on the body and sleeve. This hole can be closed by picking up the strand between 2 stitches and working this strand twisted together with the first stitch between body and sleeve. DECREASE TIP: Decrease 1 stitch on each side of the marker thread as follows: Work until there are 3 stitches left before the marker thread, knit 2 together, knit 2 (marker thread sits between these 2 stitches) slip 1 stitch knit-wise, knit 1 and pass the slipped stitch over the knitted stitch (= 2 stitches decreased). ------------------------------------------------------- START THE PIECE HERE: ------------------------------------------------------- JACKET – SHORT OVERVIEW OF THE PIECE. The pattern uses both long and short needles; start with the length which fits the number of stitches and change when necessary. Work according to points 1 – 5. 1 BACK PIECE: Cast on stitches for the back of the neck. Work the back piece back and forth, increasing stitches on each side until the shoulder stitch count has been achieved. The back piece has slightly diagonal shoulder. 2 FRONT PIECE: Start by knitting up stitches along one back shoulder, working downwards and increasing for the neckline. Repeat on the other shoulder. 3 YOKE: Join the front and back pieces, working first 1 front piece, knitting up stitches for the sleeve along the side of the front piece, working the back piece, knitting up stitches for the sleeve along the side of the second front piece, then working this front piece. The yoke is continued back and forth from mid-front. 4 INCREASE FOR BODY AND SLEEVES: While working the yoke, you increase stitches first for the sleeves, then for the sleeves and front pieces and finally for the sleeves, front pieces and back piece. 5 BODY AND SLEEVES: When all the increases are finished and the yoke is the correct length, it is divided for the body and sleeves. The body is continued back and forth while the sleeves wait. Then the sleeves are worked in the round, top down. Stitches are knitted up around the neckline and the neck is worked back and forth to finish. If there is a «0» in your chosen size, skip the information and go straight to the next instruction. BACK PIECE: The piece is worked back and forth. Cast on 44-44-44-44-44-44-44 stitches with circular needle size 3 mm and DROPS Flora or DROPS Nord. ROW 1 (wrong side): Purl. ROW 2 (right side): Read INCREASE TIP-1. Knit 3, increase 1 stitch towards the left, knit until there are 3 stitches left on the row, increase 1 stitch towards the right, knit 3. ROW 3 (wrong side): Read INCREASE TIP-2. Purl 3, increase 1 stitch towards the right, purl until there are 3 stitches left on the row, increase 1 stitch towards the left, purl 3. Work ROWS 2 and 3 a total of 13-13-15-15-15-17-17 times (26-26-30-30-30-34-34 rows worked) = 96-96-104-104-104-112-112 stitches. Remember to maintain the knitting tension. Cut the strand and place the stitches on a thread/stitch holder. . RIGHT FRONT PIECE: Find the right back shoulder as follows: Lay the back piece flat, right side up, with the stitch holder towards you; right side of piece = right shoulder. Start from the right side by the armhole on the right back shoulder and knit up 1 stitch in every row worked inside the outermost stitch, as far as the neckline = 26-26-30-30-30-34-34 shoulder-stitches. Insert 1 marker by the neck. All length-measurements on the front piece are taken from this marker. Purl 1 row from the wrong side and increase 5-5-6-6-6-7-7 stitches evenly spaced = 31-31-36-36-36-41-41 stitches. Continue with PATTERN – read explanation above, working as follows: ROW 1 (right side): Knit 3, work, A.1, knit 3. ROW 2 (wrong side): Purl 3, work A.1, purl 3. Continue this pattern. When the piece measures 3-4-5-6-7-8-8 cm (finishing after a full repeat in height) increase for the neckline as follows: ROW 1 (right side): Knit 3, continue A.1, increase 1 stitch towards the right, knit 3 - remember INCREASE TIP-1. ROW 2 (wrong side): Purl 3, continue A.1 until there are 3 stitches left, purl 3. NOTE: The increased stitches are worked into the pattern as shown in A.3 (only the outermost 18 stitches by the neck are drawn in A.3 to begin with, showing the increases for the neckline and how the pattern continues inside the 3 stocking stitches by the neck). ROW 3 (right side): Knit 3, continue A.1/A.3 until there are 3 stitches left, increase 1 stitch towards the right, knit 3. ROW 4 (wrong side): Purl 3, continue A.3/A.1 until there are 3 stitches left, purl 3. Work ROWS 3 and 4 a total of 8 times (16 rows worked) = 41-41-46-46-46-51-51 stitches. At the end of the next row from the right side, cast on 21 stitches = 62-62-67-67-67-72-72 stitches. Work back from the wrong side, with the first 7 stitches worked according to BANDS WITH I-CORD – read explanation above, and the other stitches worked as before. The increases for the neckline are finished. The piece measures approx. 9-10-11-12-13-14-14 cm from the marker. Some of the neckline will lie on the back piece. Neck-length in front = 8-8-9-10-10-11-11 cm. Neck-length back = 1-2-2-2-3-3-3 cm.. Continue the pattern with 3 stocking stitches by the armhole and 7 band stitches as before until the piece measures 10-11-12-13-14-15-15 cm from the marker (approx. 1 cm from the last increase). Cut the strand and place the stitches on a thread/stitch holder and work the left front piece along the left back shoulder as follows. LEFT FRONT PIECE: Start from the right side by the neck on the left back shoulder and knit up 1 stitch in every row worked, inside the outermost stitch, as far as the armhole = 26-26-30-30-30-34-34 shoulder-stitches. Insert 1 marker by the neck. All length-measurements on the front piece are taken from this marker. Purl 1 row from the wrong side and increase 5-5-6-6-6-7-7 stitches evenly spaced = 31-31-36-36-36-41-41 stitches. Continue with pattern as follows: ROW 1 (right side): Knit 3, work, A.2, knit 3. ROW 2 (wrong side): Purl 3, work A.2, purl 3. Continue this pattern. When the piece measures 3-4-5-6-7-8-8 cm (finishing after a full repeat in height) increase for the neckline as follows: ROW 1 (right side): Remember INCREASE TIP-1. Knit 3, increase 1 stitch towards the left, continue A.2 until there are 3 stitches left, knit 3. ROW 2 (wrong side): Purl 3, continue A.2 until there are 3 stitches left, purl 3. NOTE: The increased stitches are worked into the pattern as shown in A.4 (only the outermost 18 stitches by the neck are included in A.4 to begin with, showing the increases for the neckline and how the pattern continues inside the 3 stocking stitches by the neck). ROW 3 (right side): Knit 3, increase 1 stitch towards the left, continue A.4/A.2 until there are 3 stitches left, knit 3 ROW 4 (wrong side): Purl 3, continue A.2/A.4 until there are 3 stitches left, purl 3. Work ROWS 3 and 4 a total of 8 times (16 rows worked) = 41-41-46-46-46-51-51 stitches. At the end of the next row from the wrong side, cast on 21 stitches = 62-62-67-67-67-72-72 stitches. The increases for the neckline are finished. The piece measures approx. 9-10-11-12-13-14-14 cm from the marker. Some of the neckline will lie on the back piece. Neck-length in front = 8-8-9-10-10-11-11 cm. Neck-length back = 1-2-2-2-3-3-3 cm.. Continue the pattern with 3 stocking stitches by the armhole and 7 band stitches as before until the piece measures 10-11-12-13-14-15-15 cm from the marker finishing with a row from the wrong side. The front and back pieces are now joined and stitches are knitted up for the sleeves. Remember to work the BUTTONHOLES – see explanation above. ROW 1 (right side): Start from the right side with the left front piece: Work the band as before, work pattern until there are 2 stitches left before the end of the front piece, slip 1 stitch, knit 1 and pass the slipped stitch over (1 decreased stitch), insert 1 marker, knit up 26-28-30-34-36-38-38 stitches along the side of the left front piece (= sleeve-stitches, knitted up inside the outermost stitch), insert 1 marker, knit together the first 2 stitches on the back piece (1 decreased stitch), knit until there are 2 stitches left before the end of the back piece, slip 1 stitch, knit 1 and pass the slipped stitch over (1 decreased stitch), insert 1 marker, knit up 26-28-30-34-36-38-38 stitches along the side of the right front piece (= sleeve-stitches, knitted up inside the outermost stitch), insert 1 marker, knit together the first 2 stitches on the right front piece (1 decreased stitch), work pattern until there are 7 stitches left and work the band as before = 268-272-294-302-306-328-328 stitches. ROW 2 (wrong side): Continue the band and pattern as far as the first marker, move the marker onto the right needle, increase 1 stitch towards the right, purl to the next marker, increase 1 stitch towards the left, move the marker onto the right needle, purl to the next marker, move the marker onto the right needle, increase 1 stitch towards the right, purl to the next marker, increase 1 stitch towards the left, move the marker onto the right needle, work pattern until there are 7 stitches left, work the band as before = 272-276-298-306-310-332-332 stitches. ROW 3 (right side): Continue the band and pattern as far as the first marker, move the marker onto the right needle, increase 1 stitch towards the left, knit to the next marker, increase 1 stitch towards the right, move the marker onto the right needle, knit to the next marker, move the marker onto the right needle, increase 1 stitch towards the left, knit to the next marker, increase 1 stitch towards the right, move the marker onto the right needle, work pattern until there are 7 stitches left, work the band as before (4 increased stitches, 1 on each side of both sleeves) = 276-280-302-310-314-336-336 stitches. ROW 4 (wrong side): Work the bands, pattern and purl as before without increasing. Work ROWS 3 and 4 a total of 9-6-6-4-2-0-0 times (18-12-12-8-4-0-0 rows worked). A total of 11-8-8-6-4-2-2 increases in height on the sleeves: 48-44-46-46-44-42-42 stitches on each sleeve, 61-61-66-66-66-71-71 stitches on each front piece and 94-94-102-102-102-110-110 stitches on the back piece = 312-304-326-326-322-336-336 stitches. Now increase on the sleeves and front pieces, increasing 2 stitches inside the markers on the front pieces so there are 2 stitches between the increases on the sleeves and front pieces. Work as follows: ROW 1 (right side): Work the band and pattern as before until there are 2 stitches left on the front piece before the first marker, increase 1 stitch towards the right, knit 2, move the marker onto the right needle, increase 1 stitch towards the left, knit to the next marker, increase 1 stitch towards the right, move the marker onto the right needle, knit to the next marker (no increases on the back piece), move the marker onto the right needle, increase 1 stitch towards the left, knit to the next marker, increase 1 stitch towards the right, move the marker onto the right needle, knit 2, increase 1 stitch towards the left, work pattern until there are 7 stitches left, work the band as before (6 increased stitches, 1 on each side of both sleeves and 1 on each front piece). ROW 2 (wrong side): Work the bands, pattern and purl as before without increasing. Work ROWS 1 and 2 a total of 2-2-2-2-3-4-4 times (4-4-4-4-6-8-8 rows worked). NOTE. The increased stitches are worked into the pattern on the front pieces in the same way as when increasing for the neckline. Make sure you have 2 stocking stitches between the pattern and the sleeve. A total of 13-10-10-9-7-6-6 increases in height on the sleeves and 2-2-2-2-3-4-4 increases in height on the front pieces: 52-48-50-50-50-50-50 sleeve-stitches, 63-63-68-68-69-75-75 stitches on each front piece and 94-94-102-102-102-110-110 stitches on the back piece = 324-316-338-338-340-360-360 stitches. You now increase on the sleeves, front pieces and back piece, increasing 2 stitches inside the markers on the front and back pieces so there are 2 stitches between the increases on the sleeves and the body. Work as follows: ROW 1 (right side): Work the band and pattern as before until there are 2 stitches left on the front piece before the first marker, increase 1 stitch towards the right, knit 2, move the marker onto the right needle, increase 1 stitch towards the left, knit to the next marker, increase 1 stitch towards the right, move the marker onto the right needle, knit 2, increase 1 stitch towards the left, knit until there are 2 stitches left on the back piece before the next marker, increase 1 stitch towards the right, knit 2, move the marker onto the right needle, increase 1 stitch towards the left, knit to the next marker, increase 1 stitch towards the right, move the marker onto the right needle, knit 2, increase 1 stitch towards the left, work pattern until there are 7 stitches left, work the band as before (= 8 increased stitches, 1 on each side of 2 stocking stitches in each transition between the body and sleeves). ROW 2 (wrong side): Work the bands, pattern and purl as before without increasing. Work ROWS 1 and 2 a total of 10-14-15-18-24-26-29 times (20-28-30-36-48-52-58 rows worked). NOTE: The increased stitches are worked into the pattern on the front pieces as before, until there are 62-62-72-72-79-89-89 pattern-stitches inside the band. (The pattern finishes towards the sides differently, depending on the size you are working, i.e., the pattern finishes either with A.x + 2 purled stitches (seen from the right side) or A.y towards the sides. The remaining stitches are worked in stocking stitch. A total of 23-24-25-26-31-32-35 increases in height on the sleeves, 12-16-17-20-27-30-33 increases in height on the front pieces and 10-14-15-18-24-26-29 increases in height on the back piece: 72-76-80-86-98-102-108 sleeve-stitches, 73-77-83-86-93-101-104 stitches on each front piece and 114-122-132-138-150-162-168 stitches on the back piece = 404-428-458-482-532-568-592 stitches. The sleeve measures approx. 13-14-14-15-18-19-20 cm. When the jacket is folded double at the shoulder it measures approx. 18-19-20-22-25-26-28 cm, outermost on the shoulder and down the armhole. Continue working until the piece measures 19-20-21-22-25-26-28 cm, outermost on the shoulder and down the armhole. Now divide for the body and sleeves. DIVIDE FOR BODY AND SLEEVES: Work 73-77-83-86-93-101-104 stitches as before (= front piece), place the next 72-76-80-86-98-102-108 stitches on 1 thread for the sleeve, cast on 6-8-8-12-14-18-22 stitches (mid-under the sleeve), work 114-122-132-138-150-162-168 stocking stitches (= back piece), place the next 72-76-80-86-98-102-108 stitches on 1 thread for the sleeve, cast on 6-8-8-12-14-18-22 stitches (mid-under the sleeve), work the last 73-77-83-86-93-101-104 stitches as before (= front piece). The body and sleeves are finished separately. BODY: = 272-292-314-334-364-400-420 stitches. Continue the bands, pattern and stocking stitch for a further 26-27-28-29-27-28-28 cm. On the next row from the right side, begin the rib, AT THE SAME TIME increase evenly on the row as follows: Change to circular needle size 2.5 mm. Work the 7 band-stitches, rib (purl 2, knit 1) across the next 62-62-72-72-79-89-89 stitches, increasing 12-12-14-14-16-18-18 stitches evenly across these stitches (increase 2 stitches above each row of holes as shown in A.5), work rib (knit 1, purl 2) across the next 134-154-156-176-192-208-228 stitches, increasing 11-12-13-14-16-18-19 stitches evenly across these stitches (finish with knit 1), work rib (purl 2, knit 1) across the next 62-62-72-72-79-89-89 stitches and increase 12-12-14-14-16-18-18 stitches evenly across these stitches (increase 2 stitches above each row of holes as shown in A.5 finishing with purl 2 before the band), work the band as before = 307-328-355-376-412-454-475 stitches. When the rib measures 2½-2½-2½-2½-3½-3½-3½ cm, purl 1 row from the wrong side (bands worked as before), then cast off with knit from the right side. The jacket measures approx. 52-54-56-58-60-62-64 cm from top of shoulder. SLEEVES: Place the 72-76-80-86-98-102-108 sleeve-stitches from one thread on circular needle size 3 mm and knit up 1 stitch in each of the 6-8-8-12-14-18-22 stitches cast on under the sleeve – read SLEEVE TIP = 78-84-88-98-112-120-130 stitches. Insert a marker-thread in the middle of the 6-8-8-12-14-18-22 stitches under the sleeve- the round starts by the marker-thread. Work stocking stitch in the round. AT THE SAME TIME, when the sleeve measures 1 cm from the division, decrease mid-under the sleeve – read DECREASE TIP as follows: Decrease 2 stitches every 2nd round 1-1-1-1-2-3-5 times, then decrease 2 stitches every 5-4-3½-3-2-1½-1½ cm a total of 5-7-8-12-16-18-20 times = 66-68-70-72-76-78-80 stitches. Continue working until the sleeve measures 40-40-40-39-37-35-35 cm from the division. Change to double pointed needles size 2.5 mm. Work rib (knit 1, purl 2), AT THE SAME TIME increase 12-13-14-18-17-18-19 stitches evenly on the first round = 78-81-84-90-93-96-99 stitches. When the rib measures 2½-2½-2½-2½-3½-3½-3½ cm, knit 1 round, then cast off with knit. The sleeve measures approx. 43-43-43-42-41-39-39 cm from the division. NECK: Use circular needle size 2.5 mm. Start from the right side, mid-front, knit up 129 to 141 stitches along the neckline, inside 1 stitch. The stitch count should be divisible by 3 + 1. Work the first row from the wrong side as follows: 7 band-stitches as before, rib (purl 1, knit 2) until there are 8 stitches left, purl 1 and 7 band-stitches as before. From the right side: 7 band-stitches as before, rib (knit 1, purl 2) until there are 8 stitches left, knit 1 and 7 band-stitches as before. Continue this rib for 3-3-3-3-4-4-4 cm - remember to work the last buttonhole over the other on front band stitches when neck edge measures ca 1 cm. Purl 1 row from the wrong side across all stitches, then cast off with knit from the right side. |
||||||||||||||||||||||
Diagram explanations |
||||||||||||||||||||||
|
||||||||||||||||||||||
 |
||||||||||||||||||||||
 |
||||||||||||||||||||||
 |
||||||||||||||||||||||
 |
||||||||||||||||||||||
 |
||||||||||||||||||||||
Have you finished this pattern?Tag your pictures with #dropspattern #icypearlssweater or submit them to the #dropsfan gallery. Do you need help with this pattern?You'll find 39 tutorial videos, a Comments/Questions area and more by visiting the pattern on garnstudio.com. © 1982-2026 DROPS Design A/S. We reserve all rights. This document, including all its sub-sections, has copyrights. Read more about what you can do with our patterns at the bottom of each pattern on our site. |
||||||||||||||||||||||


With over 40 years in knitting and crochet design, DROPS Design offers one of the most extensive collections of free patterns on the internet - translated to 17 languages. As of today we count 325 catalogues and 12298 patterns translated into English (UK/cm). 12298
We work hard to bring you the best knitting and crochet have to offer, inspiration and advice as well as great quality yarns at incredible prices! Would you like to use our patterns for other than personal use? You can read what you are allowed to do in the Copyright text at the bottom of all our patterns. Happy crafting!
Post a comment to pattern DROPS 263-5
We would love to hear what you have to say about this pattern!
If you want to leave a question, please make sure you select the correct category in the form below, to speed up the answering process. Required fields are marked *.