
Popular categories
Looking for a yarn?


Comments / Questions (105)
![]() Gabriella wrote:
Gabriella wrote:
Perché dopo il collo devo spezzare il filo e ripartire dal marcapunto 3. Posso continuare a maglia rasata fino al marcatore 3 partire con gli aumenti ed i ferri accorciati? Mi aiutate? Grazie
01.01.2025 - 22:11DROPS Design answered:
Buonasera Gabriella, le istruzioni sono corrette, deve tagliare il filo e ripartire dal segnapunti 3 . Buon lavoro!
03.01.2025 - 17:39
![]() Lena Lindström wrote:
Lena Lindström wrote:
Det står att vid förkortade varv börjar man vid 3:e markören som är på vä axel men den är ju på hö axel el?? Annars blir ju framsidan längre vilket inte är meningen med förkortade varv?
28.12.2024 - 16:48DROPS Design answered:
Hej, det tredje märket är på vänster axel då man tänker att man har på sig plagget.
07.01.2025 - 18:08
![]() Lena Lindström wrote:
Lena Lindström wrote:
Det står efter Halsringning och RAGLAN att man skall öka på båda sidorna om 4 maskor.Det skall väl stå markörer?Kan misstolkas eftersom man ökar 4 maskor på sista halskantsvarvet...
27.12.2024 - 12:32
![]() Barbara wrote:
Barbara wrote:
Liebes Team, ich verstehe die Zunahme nach der Halsblende für Größe L nicht. Ich habe 96 Maschen auf der Nadel. Nach Anleitung für die Zunahmen (insgesamt 4) komme ich aber nur auf 92 Maschen: 12 + 21 + 25 + 21 + 13 = 92. Wie soll das Strickstück aufgeteilt werden, denn so funktioniert es nicht symmetrisch. Dies ist mir aufgefallen, weil ich nachdem ich alle Markierer gesetzt und die Zunahmen erledigt hatte, nicht 13 Maschen noch zu stricken hatte, sondern eben mehr.
22.12.2024 - 16:34DROPS Design answered:
Liebe Barbara, beachten Sie, daß die Markierer je in einer Masche eingesetzt werden, so wird man in L so haben: (12+1)+1+21+1+(25+2)+1+21+1+(13+1)=96+4=100 Maschen. Viel Spaß beim Stricken!
02.01.2025 - 10:09
![]() Minna Korpela wrote:
Minna Korpela wrote:
Kun kauluksen joustinneule on valmis, ohje on epäselvä jatkon osalta. Jos lisään M kokoisen paidan lisäykset silmukoita pitäisi olla 96, mutta ohjeen mukaan niitä on 7 29 7 29, eli vähemmän kuin 80 silmukkaa kauluksessa. Mitä kohtaa en tässä ymmärrä?
26.11.2024 - 10:36DROPS Design answered:
Hei, työhön lisätään joustinneuleen jälkeen 4 silmukkaa ja tämän jälkeen työssä on 96 silmukkaa.
27.11.2024 - 18:02
![]() Sara wrote:
Sara wrote:
Hei, kan dere hjelpe meg med å forstå dette: «Dvs det økes på bolen på hver 2.omgang og på ermene på hver 4.omgang. Øk på denne måten 18-15-14-16 ganger på bolen (9-7-7-8 ganger på ermene). Det er nå økt totalt 24-27-28-31 ganger på bolen og 15-19-21-23 ganger på ermene.» Betyr det økes 2. runde kun på bol (så 4 masker økt) og 4. runde kun til ermer (så 4 masker økt)? Får det ikke til å stemme med antall økninger som står skrevet i oppskriften?
16.11.2024 - 09:14
![]() Alice Jacov wrote:
Alice Jacov wrote:
Bonjour, Peut on tricoter ce modèle en remplaçant les rang raccourcis par un début simple en augmentant simplement les raglans? Je souhaite faire ce modèle avec des rayures, ne pas faire de rang raccourcis simplifierait beaucoup les choses. Merci d'avance !
30.07.2024 - 21:39
![]() Alice Jacov wrote:
Alice Jacov wrote:
Bonjour, Peut on tricoter ce modèle en remplaçant les rang raccourcis par un début simple en augmentant simplement les raglans? Je souhaite faire ce modèle avec des rayures, ne pas faire de rang raccourcis simplifierait beaucoup les choses. Merci d'avance !
30.07.2024 - 21:36DROPS Design answered:
Bonjour Mme Jacov, vous pouvez ne pas tricoter les rangs raccourcis, l'encolure dos et l'encolure devant seront alors identique, pensez à bien augmenter aux 4 premiers tours après le col pour conserver les mêmes dimensions. Bon tricot!
31.07.2024 - 07:33
![]() Hanna Júlía Hafsteinsdóttir wrote:
Hanna Júlía Hafsteinsdóttir wrote:
Ég er búin að prjóna 2svar sinnum niður fyrir handveg og í bæði skiptin kemur laskalínan öðru megin of langt frá handveg. Er búið að leiðrétta uppskriftina eða er þetta algeng mistök ?
27.06.2024 - 18:49DROPS Design answered:
Blessuð Hanna Júlía. Athugugaðu hvort þú farir ekki örugglega eftir leiðbeiningum í byrjun undir LASKALÍNA og að lykkjufjöldinn passi. Vona að þér gangi vel og þú komist á rétta braut.
28.06.2024 - 21:26
![]() Johanna wrote:
Johanna wrote:
Varför skriver ni inte att man ska ökande innan och efter raglan maskan istället för att krångla till det och skriva ”öka för ärm si och så” och ”öka för fram/bak stycke si och så”? För som jag fattar det så ska man öka på båda sidorna av raglan maskan och jag har gjort fel 5 gånger innan jag förstod vad ni egentligen menade.
05.04.2024 - 06:10DROPS Design answered:
Hej Johanna, det beskriver vi øverst i opskriften under RAGLAN: Alla ökningar görs före/efter 1 maska slätstickning (maskan med markör i).
09.04.2024 - 09:46
|
|
Early Moorning Mist#earlymoorningmistsweater |
|
 |
 |
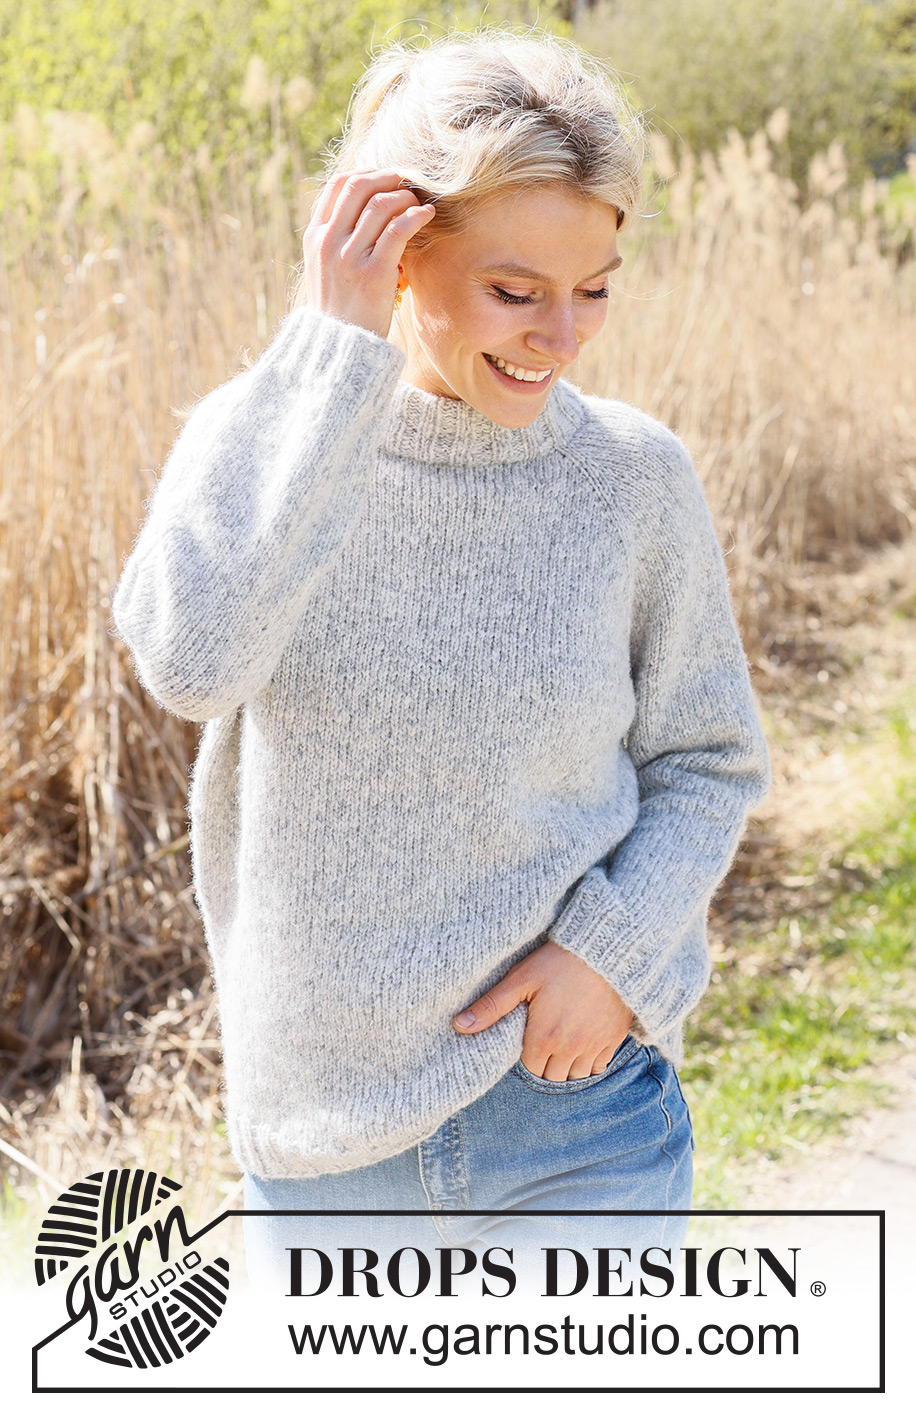
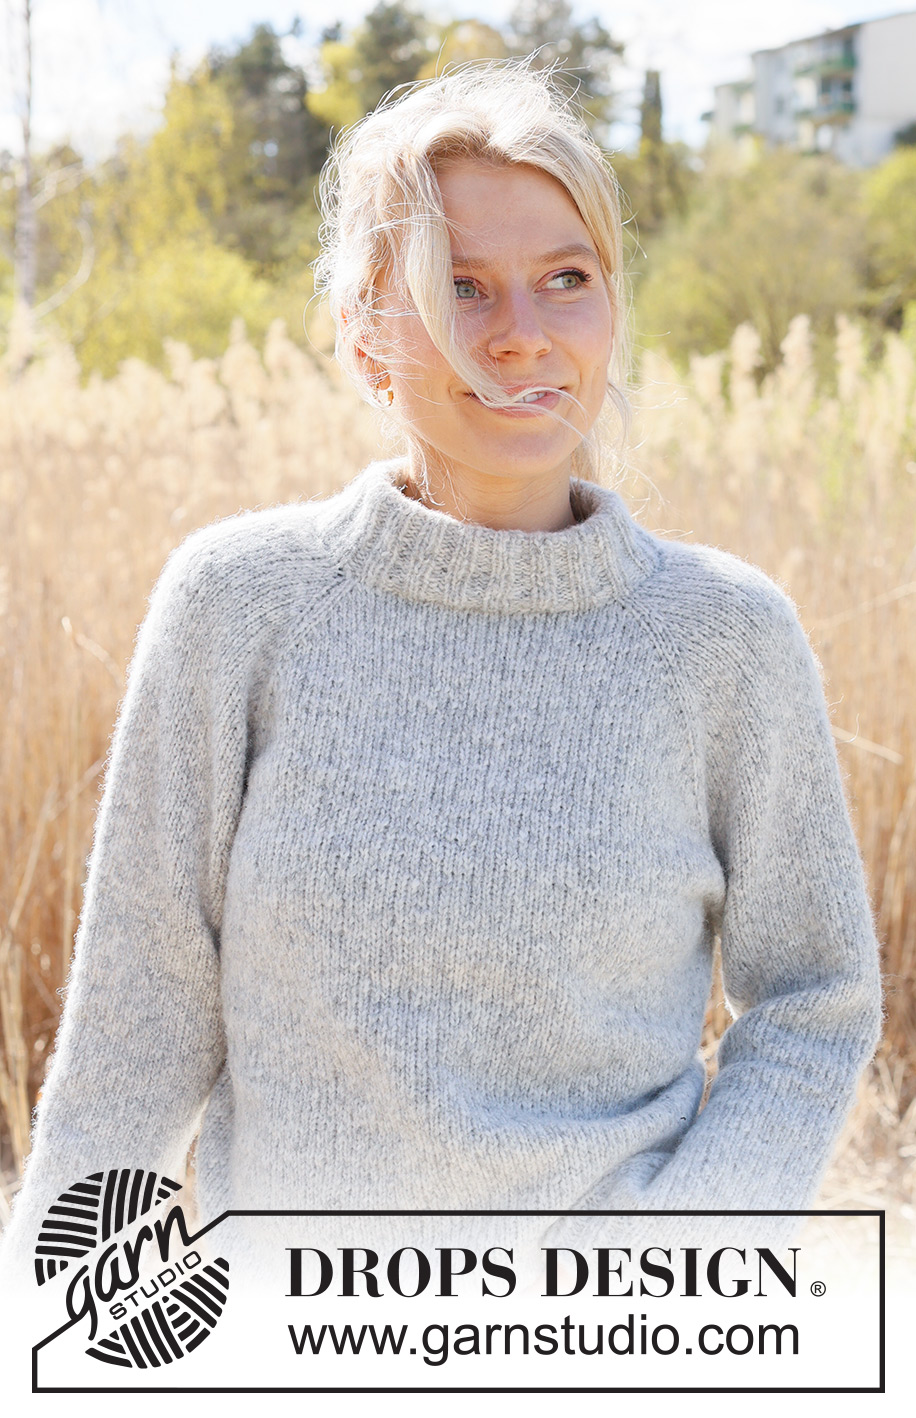
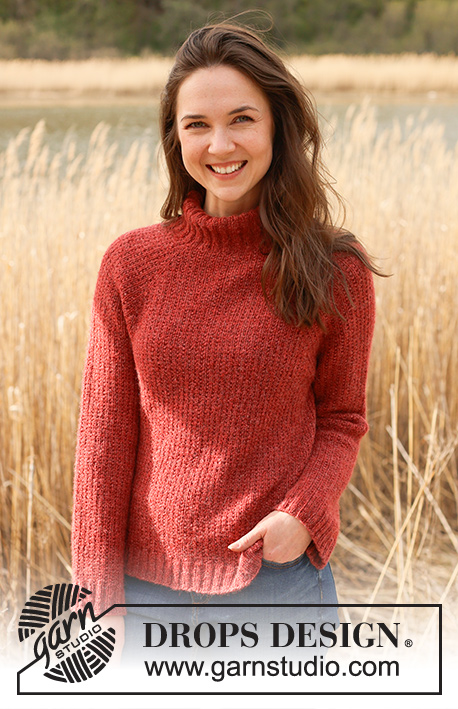
Knitted jumper in DROPS Air. The piece is worked top down with stocking stitch, double neck and raglan. Sizes S - XXXL.
DROPS 236-16 |
|
|
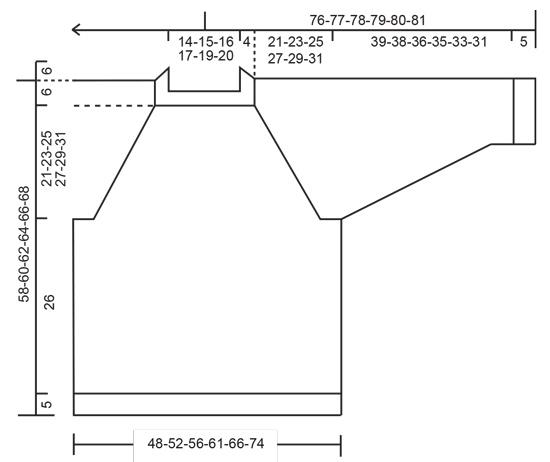
------------------------------------------------------- EXPLANATIONS FOR THE PATTERN: ------------------------------------------------------- RAGLAN: All increases before/after 1 stitch in stocking stitch (the stitch with the marker). Increase for the body before markers 1 and 3 and after markers 2 and 4 when working from the right side/after markers 1 and 3 and before markers 2 and 4 when working from the wrong side. Increase for the sleeves after markers 1 and 3 and before markers 2 and 4 when working from right side / before marker 1 and 3 and after marker 2 and 4 when working from wrong side. Increase 1 stitch by making 1 yarn over. The yarn overs are worked as follows from the wrong side: BEFORE MARKER: Purl the back loop. No hole. AFTER MARKER: Slip the yarn over off the left needle and place it back twisted (insert the left needle from the back when replacing it). Purl the front loop. No hole. The yarn overs are worked as follows from the right side: BEFORE MARKER: Slip the yarn over off the left needle and place it back twisted (insert the left needle from the back when replacing it). Knit the front loop; the stitch twists to the right. No hole. AFTER MARKER: Knit the back loop (the stitch twists to the left). No hole. DECREASE TIP (for sleeves): Start 3 stitches before the marker, knit 2 together, knit 2 (marker sits between these 2 stitches), slip 1 stitch as if to knit, knit 1 and pass the slipped stitch over the knitted stitch. ------------------------------------------------------- START THE PIECE HERE: ------------------------------------------------------- JUMPER – SHORT OVERVIEW OF THE PIECE: The neck and yoke are worked in the round with circular needle, from mid back and top down. The yoke is divided for body and sleeves and the body is continued in the round with circular needle. The sleeves are worked with short circular needle/double pointed needles. DOUBLE NECK: Cast on 88-92-96-100-104-108 stitches with short circular needle size 5 mm and DROPS Air. Change to circular needle size 4 mm. Work rib in the round (knit 2, purl 2) for 13 cm. On the next round insert 4 markers at the same time as you increase 4 stitches on the round as follows – the markers are used when increasing for raglan: Knit 10-12-12-14-14-16 and increase 1 stitch (half back piece), insert marker-1 in the next stitch, knit 21 (sleeve), insert marker-2 in the next stitch, knit 21-23-25-27-29-31 and increase 2 stitches evenly spaced (front piece), insert marker-3 in the next stitch, knit 21 (sleeve), insert marker-4 in the next stitch, knit the last 11-11-13-13-15-15 stitches and increase 1 stitch (half back piece) = 92-96-100-104-108-112 stitches. Cut the strand. NECKLINE: Change to circular needle size 5 mm and work the neckline with short rows AT THE SAME TIME as increasing to raglan as follows: Start from the right side, 2 stitches before marker-3 (left front of neck when the garment is worn). Work stocking stitch, increase to RAGLAN – read description above, on each side of the 4 marker-stitches and until you have worked 2 stitches past marker-2 (right front of neck – 8 stitches increased for raglan). Turn, tighten the strand, work back from the wrong side, increase for raglan to 2 stitches past the beginning of the short rows by marker-3 (8 stitches increased for raglan). Turn, tighten the strand, work back from the right side, increase for raglan to 2 stitches past where you turned last time by marker-2 (8 stitches increased for raglan). Turn, tighten the strand, work back from the wrong side, increase for raglan to 2 stitches past marker-3 (8 stitches increased for raglan). Cut the strand. YOKE: = 124-128-132-136-140-144 stitches. Now work in the round as follows: SIZES S, M, L and XL: Start mid-back, work stocking stitch and increase for raglan on the body and sleeves (on each side of all 4 marker-stitches) every 2nd round 2-8-10-11 times = 140-192-212-224 stitches. Continue to increase but now every 2nd increase is only on the body (4 stitches increased); you are now increasing every 2nd round on the body and every 4th round on the sleeves. Increase like this 18-15-14-16 times on the body (9-7-7-8 times on the sleeves). A total of 24-27-28-31 times on the body and 15-19-21-23 times on the sleeves = 248-280-296-320 stitches. Go to ALL SIZES. SIZES XXL and XXXL: Start mid-back, work stocking stitch and increase for raglan every round on the body 2-6 times and every 2nd round on the sleeves 1-3 times = 152-180 stitches. Then increase on both the body and sleeves every 2nd round (on each side of all 4 marker-stitches) 10-7 times = 232-236 stitches. Continue to increase, but now every 2nd increase is only on the body (4 stitches increased); you are now increasing every 2nd round on the body and every 4th round on the sleeves. Increase like this 18-22 times on the body (9-11 times on the sleeves). A total of 34-39 times on the body and 24-25 times on the sleeves = 340-368 stitches. Go to ALL SIZES. ALL SIZES. = 248-280-296-320-340-368 stitches. Continue working without further increases until the yoke measures 21-23-25-27-29-31 cm measured mid-front after the rib on the neck. Divide for the body and sleeves as follows: Work 37-42-43-48-51-58 stitches (half back piece), place the next 49-57-61-65-67-69 stitches on a thread for the sleeve, cast on 6-6-8-8-10-10 stitches (in side under sleeve), work 75-83-87-95-103-115 stitches (front piece), place the next 49-57-61-65-67-69 stitches on a thread for the sleeve, cast on 6-6-8-8-10-10 stitches (in side under sleeve), work 38-41-44-47-52-57 stitches (half back piece). The body and sleeves are finished separately. The piece is now measured from here! BODY: = 162-178-190-206-226-250 stitches. Continue with stocking stitch in the round for a further 26 cm. Knit 1 round and increase 18-22-22-26-26-34 stitches evenly spaced = 180-200-212-232-252-284 stitches. Change to circular needle size 4 mm. Work rib (knit 2, purl 2) for 5 cm. Cast off a little loosely with knit over knit and purl over purl. The jumper measures approx. 58-60-62-64-66-68 cm from the shoulder down. SLEEVES: Place the 49-57-61-65-67-69 stitches from the thread on the one side of the piece on short circular needle/double pointed needles size 5 mm and knit up 1 stitch in each of the new stitches cast on under the sleeve = 55-63-69-73-77-79 stitches. Insert a marker in the middle of the new stitches under the sleeve; allow the marker to follow your work onwards, it is used when decreasing under the sleeve. Continue with stocking stitch in the round for 4 cm. Now decrease 2 stitches mid-under the sleeve – read DECREASE TIP. Decrease like this every 7-4-3-2½-2-2 cm a total of 5-8-10-11-12-12 times = 45-47-49-51-53-55 stitches. Continue working until the sleeve measures 39-38-36-35-33-31 cm from the division (or to desired length. There is approx. 5 cm left). Knit 1 round and increase 7-5-7-5-7-5 stitches evenly spaced = 52-52-56-56-60-60 stitches. Change to double pointed needles size 4 mm and work rib (knit 2, purl 2) for 5 cm. Loosely cast off with knit over knit and purl over purl. The sleeve measures approx. 44-43-41-40-38-36 cm from the division. Work the other sleeve in the same way. . ASSEMBLY: Fold the neck double to the inside and fasten with a stitch in each raglan-line. |
|
 |
|
Have you finished this pattern?Tag your pictures with #dropspattern #earlymoorningmistsweater or submit them to the #dropsfan gallery. Do you need help with this pattern?You'll find 32 tutorial videos, a Comments/Questions area and more by visiting the pattern on garnstudio.com. © 1982-2026 DROPS Design A/S. We reserve all rights. This document, including all its sub-sections, has copyrights. Read more about what you can do with our patterns at the bottom of each pattern on our site. |
|


With over 40 years in knitting and crochet design, DROPS Design offers one of the most extensive collections of free patterns on the internet - translated to 17 languages. As of today we count 324 catalogues and 12290 patterns translated into English (UK/cm). 12290
We work hard to bring you the best knitting and crochet have to offer, inspiration and advice as well as great quality yarns at incredible prices! Would you like to use our patterns for other than personal use? You can read what you are allowed to do in the Copyright text at the bottom of all our patterns. Happy crafting!
Post a comment to pattern DROPS 236-16
We would love to hear what you have to say about this pattern!
If you want to leave a question, please make sure you select the correct category in the form below, to speed up the answering process. Required fields are marked *.