
Popular categories
Looking for a yarn?


|
|
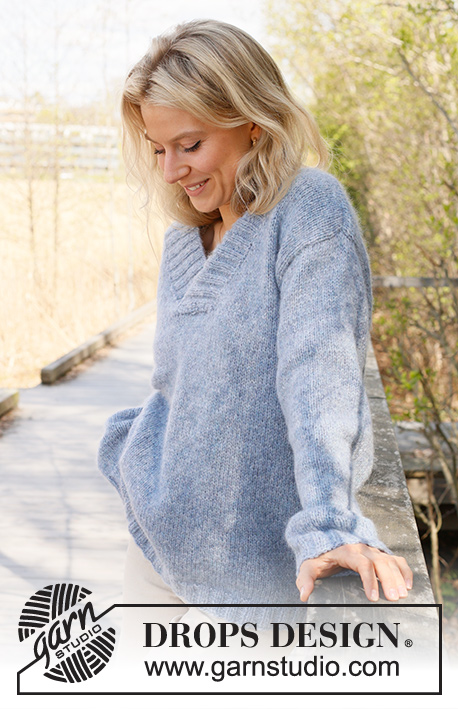
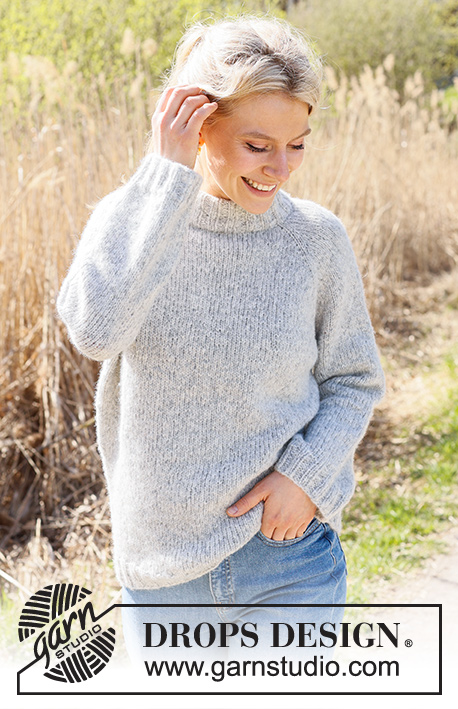
Early Moorning Mist |
|
 |
 |
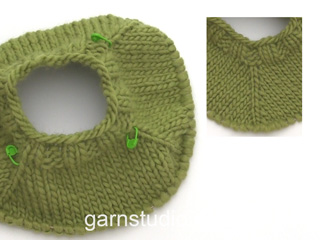
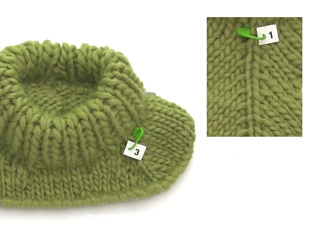
Knitted jumper in DROPS Air. The piece is worked top down with stocking stitch, double neck and raglan. Sizes S - XXXL.
DROPS 236-16 |
|
|
------------------------------------------------------- EXPLANATIONS FOR THE PATTERN: ------------------------------------------------------- RAGLAN: All increases before/after 1 stitch in stocking stitch (the stitch with the marker). Increase for the body before markers 1 and 3 and after markers 2 and 4 when working from the right side/after markers 1 and 3 and before markers 2 and 4 when working from the wrong side. Increase for the sleeves after markers 1 and 3 and before markers 2 and 4 when working from right side / before marker 1 and 3 and after marker 2 and 4 when working from wrong side. Increase 1 stitch by making 1 yarn over. The yarn overs are worked as follows from the wrong side: BEFORE MARKER: Purl the back loop. No hole. AFTER MARKER: Slip the yarn over off the left needle and place it back twisted (insert the left needle from the back when replacing it). Purl the front loop. No hole. The yarn overs are worked as follows from the right side: BEFORE MARKER: Slip the yarn over off the left needle and place it back twisted (insert the left needle from the back when replacing it). Knit the front loop; the stitch twists to the right. No hole. AFTER MARKER: Knit the back loop (the stitch twists to the left). No hole. DECREASE TIP (for sleeves): Start 3 stitches before the marker, knit 2 together, knit 2 (marker sits between these 2 stitches), slip 1 stitch as if to knit, knit 1 and pass the slipped stitch over the knitted stitch. ------------------------------------------------------- START THE PIECE HERE: ------------------------------------------------------- JUMPER – SHORT OVERVIEW OF THE PIECE: The neck and yoke are worked in the round with circular needle, from mid back and top down. The yoke is divided for body and sleeves and the body is continued in the round with circular needle. The sleeves are worked with short circular needle/double pointed needles. DOUBLE NECK: Cast on 88-92-96-100-104-108 stitches with short circular needle size 5 mm and DROPS Air. Change to circular needle size 4 mm. Work rib in the round (knit 2, purl 2) for 13 cm. On the next round insert 4 markers at the same time as you increase 4 stitches on the round as follows – the markers are used when increasing for raglan: Knit 10-12-12-14-14-16 and increase 1 stitch (half back piece), insert marker-1 in the next stitch, knit 21 (sleeve), insert marker-2 in the next stitch, knit 21-23-25-27-29-31 and increase 2 stitches evenly spaced (front piece), insert marker-3 in the next stitch, knit 21 (sleeve), insert marker-4 in the next stitch, knit the last 11-11-13-13-15-15 stitches and increase 1 stitch (half back piece) = 92-96-100-104-108-112 stitches. Cut the strand. NECKLINE: Change to circular needle size 5 mm and work the neckline with short rows AT THE SAME TIME as increasing to raglan as follows: Start from the right side, 2 stitches before marker-3 (left front of neck when the garment is worn). Work stocking stitch, increase to RAGLAN – read description above, on each side of the 4 marker-stitches and until you have worked 2 stitches past marker-2 (right front of neck – 8 stitches increased for raglan). Turn, tighten the strand, work back from the wrong side, increase for raglan to 2 stitches past the beginning of the short rows by marker-3 (8 stitches increased for raglan). Turn, tighten the strand, work back from the right side, increase for raglan to 2 stitches past where you turned last time by marker-2 (8 stitches increased for raglan). Turn, tighten the strand, work back from the wrong side, increase for raglan to 2 stitches past marker-3 (8 stitches increased for raglan). Cut the strand. YOKE: = 124-128-132-136-140-144 stitches. Now work in the round as follows: SIZES S, M, L and XL: Start mid-back, work stocking stitch and increase for raglan on the body and sleeves (on each side of all 4 marker-stitches) every 2nd round 2-8-10-11 times = 140-192-212-224 stitches. Continue to increase but now every 2nd increase is only on the body (4 stitches increased); you are now increasing every 2nd round on the body and every 4th round on the sleeves. Increase like this 18-15-14-16 times on the body (9-7-7-8 times on the sleeves). A total of 24-27-28-31 times on the body and 15-19-21-23 times on the sleeves = 248-280-296-320 stitches. Go to ALL SIZES. SIZES XXL and XXXL: Start mid-back, work stocking stitch and increase for raglan every round on the body 2-6 times and every 2nd round on the sleeves 1-3 times = 152-180 stitches. Then increase on both the body and sleeves every 2nd round (on each side of all 4 marker-stitches) 10-7 times = 232-236 stitches. Continue to increase, but now every 2nd increase is only on the body (4 stitches increased); you are now increasing every 2nd round on the body and every 4th round on the sleeves. Increase like this 18-22 times on the body (9-11 times on the sleeves). A total of 34-39 times on the body and 24-25 times on the sleeves = 340-368 stitches. Go to ALL SIZES. ALL SIZES. = 248-280-296-320-340-368 stitches. Continue working without further increases until the yoke measures 21-23-25-27-29-31 cm measured mid-front after the rib on the neck. Divide for the body and sleeves as follows: Work 37-42-43-48-51-58 stitches (half back piece), place the next 49-57-61-65-67-69 stitches on a thread for the sleeve, cast on 6-6-8-8-10-10 stitches (in side under sleeve), work 75-83-87-95-103-115 stitches (front piece), place the next 49-57-61-65-67-69 stitches on a thread for the sleeve, cast on 6-6-8-8-10-10 stitches (in side under sleeve), work 38-41-44-47-52-57 stitches (half back piece). The body and sleeves are finished separately. The piece is now measured from here! BODY: = 162-178-190-206-226-250 stitches. Continue with stocking stitch in the round for a further 26 cm. Knit 1 round and increase 18-22-22-26-26-34 stitches evenly spaced = 180-200-212-232-252-284 stitches. Change to circular needle size 4 mm. Work rib (knit 2, purl 2) for 5 cm. Cast off a little loosely with knit over knit and purl over purl. The jumper measures approx. 58-60-62-64-66-68 cm from the shoulder down. SLEEVES: Place the 49-57-61-65-67-69 stitches from the thread on the one side of the piece on short circular needle/double pointed needles size 5 mm and knit up 1 stitch in each of the new stitches cast on under the sleeve = 55-63-69-73-77-79 stitches. Insert a marker in the middle of the new stitches under the sleeve; allow the marker to follow your work onwards, it is used when decreasing under the sleeve. Continue with stocking stitch in the round for 4 cm. Now decrease 2 stitches mid-under the sleeve – read DECREASE TIP. Decrease like this every 7-4-3-2½-2-2 cm a total of 5-8-10-11-12-12 times = 45-47-49-51-53-55 stitches. Continue working until the sleeve measures 39-38-36-35-33-31 cm from the division (or to desired length. There is approx. 5 cm left). Knit 1 round and increase 7-5-7-5-7-5 stitches evenly spaced = 52-52-56-56-60-60 stitches. Change to double pointed needles size 4 mm and work rib (knit 2, purl 2) for 5 cm. Loosely cast off with knit over knit and purl over purl. The sleeve measures approx. 44-43-41-40-38-36 cm from the division. Work the other sleeve in the same way. . ASSEMBLY: Fold the neck double to the inside and fasten with a stitch in each raglan-line. |
|

|
|
|
Have you made this or any other of our designs? Tag your pictures in social media with #dropsdesign so we can see them! Do you need help with this pattern?You'll find tutorial videos, a Comments/Questions area and more by visiting the pattern on garnstudio.com. © 1982-2024 DROPS Design A/S. We reserve all rights. This document, including all its sub-sections, has copyrights. Read more about what you can do with our patterns at the bottom of each pattern on our site. |
|


With over 40 years in knitting and crochet design, DROPS Design offers one of the most extensive collections of free patterns on the internet - translated to 17 languages. As of today we count 304 catalogues and 11422 patterns - 11422 of which are translated into English (UK/cm).
We work hard to bring you the best knitting and crochet have to offer, inspiration and advice as well as great quality yarns at incredible prices! Would you like to use our patterns for other than personal use? You can read what you are allowed to do in the Copyright text at the bottom of all our patterns. Happy crafting!
Comments / Questions (76)
Varför skriver ni inte att man ska ökande innan och efter raglan maskan istället för att krångla till det och skriva ”öka för ärm si och så” och ”öka för fram/bak stycke si och så”? För som jag fattar det så ska man öka på båda sidorna av raglan maskan och jag har gjort fel 5 gånger innan jag förstod vad ni egentligen menade.
05.04.2024 - 06:10DROPS Design answered:
Hej Johanna, det beskriver vi øverst i opskriften under RAGLAN: Alla ökningar görs före/efter 1 maska slätstickning (maskan med markör i).
09.04.2024 - 09:46Hola! He visto varias respuestas , pero sigo sin entender, perdón! Estoy en el escote y no entiendo los aumentos. Según entiendo, si voy tejiendo del derecho, los aumentos son antes del marcador 1 y 3, después del marcador 2 y 4. Sin aumentar en mangas y sin tejer la parte de adelante, ya que después se teje al revés. Esto es una vuelta, pero tengo 4 aumentos, no 8 como indica el patrón. Ya que los otros 4 aumentos, se realizan en revés, pero ahí ya estoy dando otra vuelta. Ayuda!
03.04.2024 - 06:26DROPS Design answered:
Hola María José, en el escote aumentas para todas las secciones: las mangas y el cuerpo. Empiezas a trabajar antes del marcapuntos 3 y terminas después del 2 por lo que puedes aumentar a cada lado de todos los marcapuntos y aumentas 8 puntos en total. Aumentas antes del 1 y 3 y después del 2 y 4 para el cuerpo, pero también tienes que aumentar para las mangas después del 1 y 3 y antes del 2 y 4, en la misma fila. Por lo tanto, siempre vas a aumentar a cada lado de todos los marcapuntos, solo que los aumentos a cada lado son parte de una sección de la prenda diferente. Lee la sección RAGLÁN para más información.
07.04.2024 - 23:27Hi again, In the portion after I finish the neckline where it says "Start mid-back, work stockinette stitch and increase for raglan on the body and sleeves (on each side of all 4 marker-stitches) every 2nd round 2-8-10-11 times = 140-192-212-224 stitches." Should I start stockinette stitch from the wrong side or right side? I am asking since the last round was done from the wrong side. Thanks for your help!
23.02.2024 - 03:29DROPS Design answered:
Hi Gloriana, After the short rows for the neckline, you continue working in the round on the yoke. So, yes you work from the right side. Happy knitting!
23.02.2024 - 07:15Hi, in the neckline portion where it says "Turn, tighten the strand, work back from the wrong side, increase for raglan to 2 stitches past marker-3 (8 stitches increased for raglan). Cut the strand." Do i need to work the stitches until i reach 2 stitches past marker 3 or 2 stitches past where i turned last round? Thanks for your help!
22.02.2024 - 03:21DROPS Design answered:
Hi Gloriana, You work to 2 stitches past where you turned the previous time. Happy knitting!
22.02.2024 - 06:35Hi, Sorry that I keep asking about this... while changing to 5mm size needle in the neckline while at the same time doing short rows and increasing for raglan, i now have a number of stitches in the smaller needle still... is this the right way? how can i get all the stitches to 5mm needles if the short rows only go to 2 stitches past the 3rd and 2nd markers? pls help!
14.02.2024 - 04:23DROPS Design answered:
Hi Gloriana, While working the short rows, there will be some stitches which remain on the smaller needle. But these will eventually be worked onto the larger needle as the short rows increase or when you start working the yoke. Hope this helps and happy knitting!
14.02.2024 - 06:32I'm not sure I understand the explanation for the change in 5mm needles. I am asking about this part "Change to circular needle size 5 MM = US 8 and work the neckline with short rows AT THE SAME TIME as increasing to raglan as follows:" I'm not sure how I should change from 4mm to 5mm while doing the short rows and increasing to raglan. Do I change to the bigger needle before or after I cut the thread? Please explain further if you can, as I am new at this. Thanks again!
13.02.2024 - 06:58DROPS Design answered:
Dear Gloria, you will now work the neckline with larger needle, while you can leave the unworked stitches on smaller needle until you have worked all stitches with needle size 5 mm. Happy knitting!
13.02.2024 - 09:03Hi, To switch to 5mm needles in the neckline, do I have to make the switch with a row before cutting the thread? If not, can you please explain how this is done? For reference, I am using circular needles although I don't know if that makes any difference. I would appreciate the help a lot. Thank you.
13.02.2024 - 05:40DROPS Design answered:
Hi Gloriana, You change to size 4 mm needles after casting on with a larger needle size to make the cast-on edge elastic. You change needles while working the first round of rib (the left needle is the 5 mm needle and you work all the rib stitches with the 4 mm needle). This applies for both double pointed and circular needles. Happy knitting!
13.02.2024 - 06:36Après avoir tricoté le colis, on a 1000 mailles pour la taille L. On doit ensuite tricoter l'encolure. Après avoir tricoté l'encolure, je me retrouve avec 124 mailles et non 132 comme il est indiqué pour l'empiècement. Pouvez -vous m'aider s'il vous plaît. Merci.
10.02.2024 - 17:16DROPS Design answered:
Bonjour Mme Lecomte, pendant les 4 rangs de l'encolure, on doit augmenter pour le raglan aussi bien sur l'endroit que sur l'envers, on va donc augmenter 4 fois 8 mailles soit 32 mailles, on a ainsi bien 100+32=132 mailles. Bon tricot!
12.02.2024 - 07:25Bonjour, j'ai recommencé à plusieurs reprises les rangs raccourcis en suivant scrupuleusement les explications pour les augmentations. Malheureusement, il y a toujours des trous au niveau des augmentations de chaque côté de la maille médiane . Pouvez-vous m'aider? Merci beaucoup. Bien cordialement
08.02.2024 - 21:40DROPS Design answered:
Bonjour Mme Bou, cette vidéo montre comment tricoter ces augmentations pendant la rehausse (les rangs raccourcis), elle pourra peut-être vous aider; veillez peut-être aussi à ce que vos jetés ne soient pas trop lâches. Bon tricot!
09.02.2024 - 07:54Hei. Jeg får ikke masketallet på den doble halskanten til å stemme når jeg har strikket 13cm og strikket neste runde der jeg har satt de fire markørene og utvidet med fire masker. Jeg strikker large (96 masker), men etter å ha strikket runden der jeg skal sette markørene inn, utvidet med fire masker og oppsummerer, får jeg det til å bli 92???? Kan der hjelpe? Hva gjør jeg feil?
05.02.2024 - 22:02DROPS Design answered:
Hei Maria, Du setter merkene i masker (ikke mellom masker), så tell riktig antall og sett merket i neste masken. Da får du med de 4 manglende maskene. God fornøyelse!
06.02.2024 - 06:46