
Popular categories
Looking for a yarn?


Comments / Questions (19)
![]() Sally wrote:
Sally wrote:
Hello, I am stuck on the neck/armhole decreases for the back, knitting size XS. I have cast off my 18 middle stitches so I am now starting with 12 stitches for each shoulder. How am I supposed to decrease to end up with 7 stitches per shoulder, if I am decreasing both for the neck (beginning of row) and the armhole (end of row)? Wouldn't I end up with an even number?
02.05.2026 - 05:49DROPS Design answered:
Dear Sally you will now decrease for neck as explained under DECREASE TIP ie always from RS: 5 sts 1 time towards neck, this means at the end of row from RS for right shoulder and at the beg of row from RS for left shoulder. Just remember to continue decrease for armholes if they are not finished yet (at the beg of row from RS for right shoulder/end of row from RS for left shoulder). Happy knitting!
04.05.2026 - 11:17
![]() Vivien wrote:
Vivien wrote:
If I make L Size, how many ball to make it.
26.03.2026 - 11:34DROPS Design answered:
Dear Vivien, you'll find the total amount of yarn required for each size under tab "Pattern" at the top of the pattern page; select L to get all relevant numbers for this size, incl. 400 g DROPS Paris/50 g a ball = 8 balls DROPS Paris are required in size L. Happy knitting!
26.03.2026 - 16:01
![]() Anna wrote:
Anna wrote:
I have just started decreasing for the armholes on the back piece. Just for clarification, when it says to “decrease on each side for a total of 12 times” (I’m knitting a size xs), then that means I knit 6 rows with 2 decreases on each side of the piece, right?
08.06.2025 - 04:36DROPS Design answered:
Dear Anna, you need to decrease 12 times on each side (not 12 stitches). So you work 12 rows with decreases on each side and decrease 12 stitches on each side (or 24 stitches in total). Happy knitting!
08.06.2025 - 15:36
![]() Mayzie wrote:
Mayzie wrote:
Hi ! I'm approaching the shoulders of the front piece. Rather than bind off the neck, the front is placed on a thread. I knit up to the middle stitches, slipped them onto a thread, but now my working yarn is stuck in the middle of the row and I don't know how to continue the row without knitting the shoulders together. how to I finish this row so I can start one of the shoulders?
30.03.2025 - 16:46DROPS Design answered:
Dear Mayzie, you should have worked one shoulder before reaching the neck stitches. You can now work in two ways: 1) you work the neck stitches as you slip them. Therefore, the thread will move forward and reach the second shoulder, which you can now work. From now on, only work this second shoulder (the other shoulder's stitches will be on a separate thread) and, after finishing this shoulder, cut the thread and rejoin at the first shoulder and work this shoulder. 2) You slip the neck stitches to a thread without working them and place the stitches on the second shoulder in another thread. The thread should be at the end of the first shoulder; work this shoulder first. Happy knitting!
30.03.2025 - 19:20
![]() Danubis Perez wrote:
Danubis Perez wrote:
Hola. Yo soy talla L y me dicen que monte 108 ptos , sabiendo que la espalda y el delantero se hacen por separado. El gráfico me dice que para mi talla son 52 cm...no habra un error ?, ya que de acuerdo a la tensión, 108 puntos no corresponden 52 cm. Me podías explicar eso por favor? Igual que para las cenefas de las mangas me parece muchos puntos... no será que los puntos estan mal calculados? Gracias, esperando su pronta respuesta!!
10.03.2025 - 05:00
![]() Alicja wrote:
Alicja wrote:
Dzień dobry, zupełnie nie rozumiem fragmentu dotyczącego tyłu, który zaczyna się od "PRZED DALSZĄ PRACĄ NAD ROBÓTKĄ UWAŻNIE PRZECZYTAĆ DALSZĄ CZĘŚĆ OPISU:" - jakbym nie robila wychodzi mi jedno ramiączko, nie ma dekoltu, mogę prosić o doprecyzowanie jak zamykać na dekolt i ramiona, żeby faktycznie wyszły?
26.01.2025 - 13:43DROPS Design answered:
Witaj Alicjo, Teraz będziesz przerabiać tylko 1 ramię - i zamykać oczka z każdej strony, czyli jednocześnie na formowanie podkroju rękawa i na dekolt. Jak zakończysz 1 ramię, to wykonujesz drugie, tylko zamykasz oczka na dekolt i podkrój rękawa z drugiej strony (aby robótka była symetryczna). Pozdrawiamy!
27.01.2025 - 14:48
![]() JO wrote:
JO wrote:
Hi, Are you including edge stitch in your stitch counts? Or is it separate. Im finding it confusing the way its written.
27.07.2024 - 13:52DROPS Design answered:
Hi Jo, edge stitch is included in stitch count. Happy knitting!
28.07.2024 - 17:57
![]() Veronica wrote:
Veronica wrote:
Hi, on this section for the decreases do I still do the one edge stitch in garter stitch in the beginning and end of each row? “Continue with stockinette stitch and decrease 1 stitch on each side of every row from the right side 12-13-13-15-15-19 times.” Thank you!
27.05.2024 - 05:56DROPS Design answered:
Hi Veronica, When decreasing for the armholes and neck, use Decrease Tip at the top of the page: decrease after 3 stitches at the beginning of the row by knitting 1, slipping 1 stitch and passing the slipped stitch over; decrease at the end of the row by knitting 2 together before the last 3 stitches. So, yes you continue the edge stitches. Happy knitting!
27.05.2024 - 06:38
![]() Amelia wrote:
Amelia wrote:
What are the finished measurements for this piece?
12.03.2024 - 08:59DROPS Design answered:
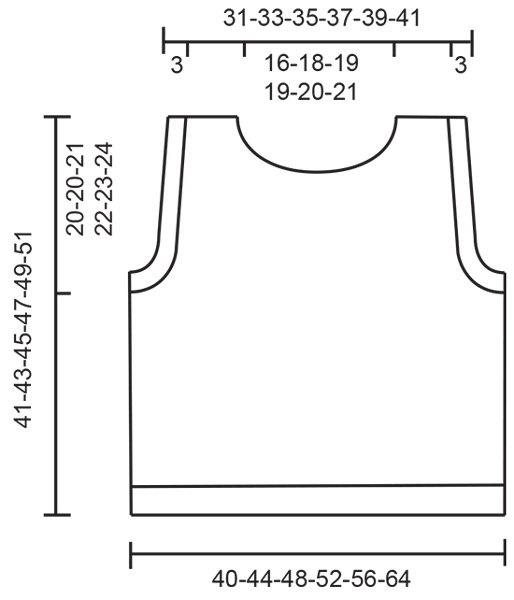
Dear Amelia, you can find the finished measurements of the piece on the schematic drawing below the instructions. I hope this helps. Happy Knitting!
12.03.2024 - 09:57
![]() Sonja wrote:
Sonja wrote:
Nach Abnahme am Ende des Bündchens habe ich mit 84 Maschen weitergestrickt. Nach der entsprechenden Länge dann mit abketten für die Armausschnitte weitergemacht. Dies in Größe M 13 beidseitig (=26 Maschen). Es blieben noch 50 übrig. Dann 20 Maschen für den Halsausschnitt abgegettet. Damit bleiben pro Schulter noch 15 Maschen übrig. Nun habe ich nur noch 9 Maschen übrig, aber es fehlen noch 10cm Länge. Habe ich zuviel abgenommen?
11.06.2023 - 12:39DROPS Design answered:
Liebe Sonja, Maschenanzahl stimmt so, Halsausschnitt beginnt nach 37cm + ca 6 cm Abnahmen (6 Mal in jeder 2. Reihe) sind ca 42,5 cm, es fehlt nur noch 2,5 cm nach der 1. Abnahmen bis Abketten (45 cm) (mit 22 Reihen glatt rechts = 10 cm) - kann das Ihnen helfen?
12.06.2023 - 08:54
|
|
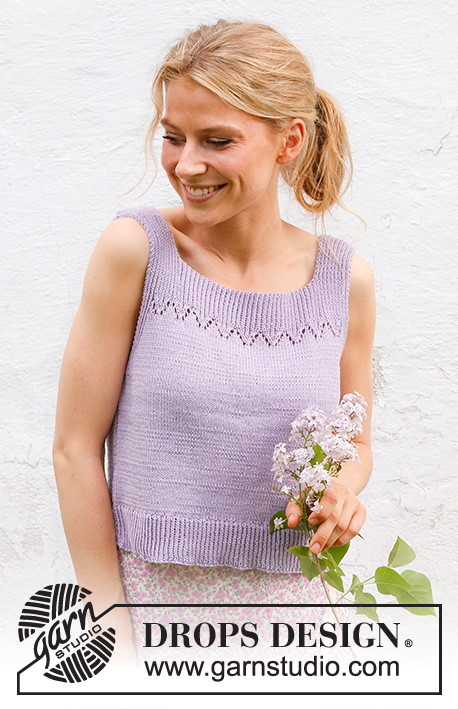
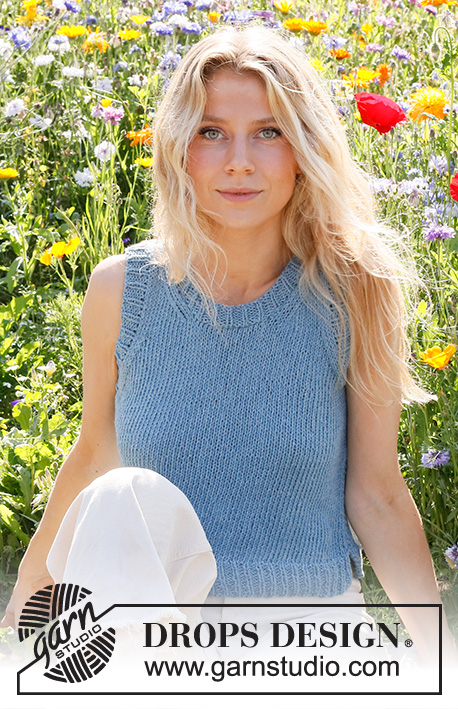
Bayou Belle#bayoubelletop |
|
 |
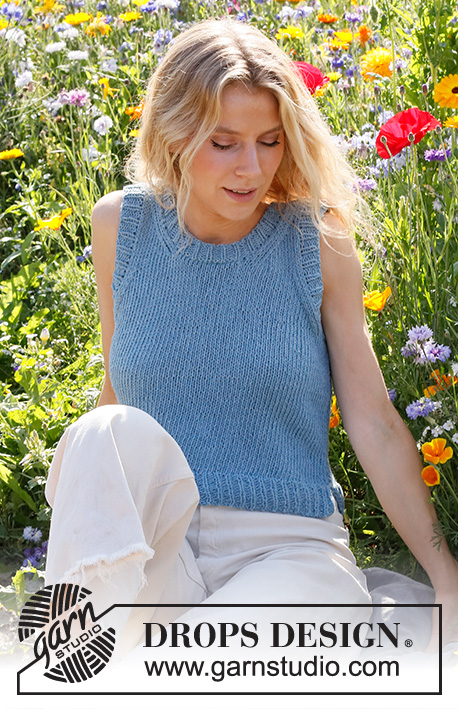 |
Knitted top in DROPS Paris. The piece is worked bottom up, in stocking stitch. Sizes XS - XXL.
DROPS 230-51 |
|
|
------------------------------------------------------- EXPLANATIONS FOR THE PATTERN: ------------------------------------------------------- RIDGE/GARTER STITCH (worked back and forth): Knit all rows. 1 ridge = knit 2 rows. DECREASE TIP (armholes and neck): All decreases are worked from the right side. Decreasing after the first 3 stitches at the beginning of the row: Slip 1 stitch, knit 1 and pass the slipped stitch over the knitted stitch (1 stitch decreased). Decreasing before the last 3 stitches on the row: Knit 2 together (1 stitch decreased). ------------------------------------------------------- START THE PIECE HERE: ------------------------------------------------------- TOP – SHORT OVERVIEW OF THE PIECE: The front and back pieces are worked separately, back and forth with circular needle, bottom up. The pieces are sewn together at the shoulders and the sides. Edges are worked around the armholes and neck to finish. BACK PIECE: Cast on 84-96-102-108-120-132 stitches with circular needle size 4 mm and DROPS Paris. Work rib from the right side as follows: 1 edge stitch in GARTER STITCH – read description above, rib (knit 1, purl 2) until there are 2 stitches left, knit 1 and 1 edge stitch in garter stitch. Work garter stitch over garter stitch, knit over knit and purl over purl for 5 cm - the next row is from the right side. Change to circular needle size 5 mm and work next row from the right side as follows: 1 edge stitch in garter stitch, knit 82-94-100-106-118-130 and decrease 14-20-18-18-22-22 stitches over these stitches, 1 edge stitch in garter stitch = 70-76-84-90-98-110 stitches. Continue with stocking stitch and 1 edge stitch in garter stitch on each side until the piece measures 21-23-24-25-26-27 cm and the next row is from the right side. REMEMBER THE KNITTING TENSION! Cast off 2-2-4-4-6-6 stitches at the beginning of the next 2 rows for the armholes = 66-72-76-82-86-98 stitches. READ THE NEXT SECTION BEFORE CONTINUING. You now decrease for the armholes, but before they are finished you also decrease for the neck. Read DECREASE TIP! Continue with stocking stitch and decrease 1 stitch on each side of every row from the right side 12-13-13-15-15-19 times. AT THE SAME TIME when the piece measures 34-36-37-39-40-42 cm and the next row is from the right side cast off the middle 18-20-20-20-20-22 stitches for the neck. Each shoulder is finished separately. Continue to decrease for the armhole and decrease 1 stitch for the neck on each row from the right side 5-5-6-6-7-7 times - remember DECREASE TIP. When all the decreases for armhole and neck are finished there are 7-8-9-10-11-12 stitches. Work until the piece measures 41-43-45-47-49-51 cm. Cast off with knit from the right side. Work the other shoulder in the same way. FRONT PIECE: Cast on and work in the same way as the back until the piece measures 21-23-24-25-26-27 cm and the next row is from the right side. Cast off 2-2-4-4-6-6 stitches at the beginning of the next 2 rows for the armholes = 66-72-76-82-86-98 stitches. READ THE NEXT SECTION BEFORE CONTINUING. You now decrease for the armholes, but before they are finished you also decrease for the neck. Continue with stocking stitch and decrease 1 stitch on each side of every row from the right side 12-13-13-15-15-19 times. AT THE SAME TIME when the piece measures 28-30-31-33-34-36 cm place the middle 10-12-14-14-16-18 stitches on a thread for the neck. Each shoulder is finished separately. Continue to decrease for the armhole and decrease 1 stitch for the neck on each row from the right side 9 times – remember DECREASE TIP! When all the decreases for armhole and neck are finished there are 7-8-9-10-11-12 stitches. Work until the piece measures 41-43-45-47-49-51 cm. Cast off with knit from the right side. Work the other shoulder in the same way. ASSEMBLY: Sew the shoulder seams. Sew the side seams, leaving a 5 cm split at the bottom. SLEEVE-EDGES: Start at the side seam, from the right side, using circular needle size 4 mm and knit up 75-84-93-96-105-117 stitches around the armhole – the number of stitches must be divisible by 3. Work rib in the round (knit 1, purl 2) for 3 cm. Cast off with knit over knit and purl over purl. Work the other sleeve-edge in the same way. NECK: Start at the shoulder seam, from the right side, using circular needle size 4 mm and knit up 93-102-105-108-111-117 stitches around the neck (including the stitches from the thread in front) - the number of stitches must be divisible by 3. Work rib in the round (knit 1, purl 2) for 3 cm. Cast off with knit over knit and purl over purl. |
|
 |
|
Have you finished this pattern?Tag your pictures with #dropspattern #bayoubelletop or submit them to the #dropsfan gallery. Do you need help with this pattern?You'll find 29 tutorial videos, a Comments/Questions area and more by visiting the pattern on garnstudio.com. © 1982-2026 DROPS Design A/S. We reserve all rights. This document, including all its sub-sections, has copyrights. Read more about what you can do with our patterns at the bottom of each pattern on our site. |
|


With over 40 years in knitting and crochet design, DROPS Design offers one of the most extensive collections of free patterns on the internet - translated to 17 languages. As of today we count 325 catalogues and 12298 patterns translated into English (UK/cm). 12298
We work hard to bring you the best knitting and crochet have to offer, inspiration and advice as well as great quality yarns at incredible prices! Would you like to use our patterns for other than personal use? You can read what you are allowed to do in the Copyright text at the bottom of all our patterns. Happy crafting!
Post a comment to pattern DROPS 230-51
We would love to hear what you have to say about this pattern!
If you want to leave a question, please make sure you select the correct category in the form below, to speed up the answering process. Required fields are marked *.