
Popular categories
Looking for a yarn?


Comments / Questions (23)
![]() Esperanza wrote:
Esperanza wrote:
Al finalizar la espalda, después de separae los hombros. Cierro 15 puntos talla L. Se trabaja los 9 puntos A1, 1 punto orillo y el resto del hombro. Me parece muy poco un cuello con 15 puntos ¿ que hago mal?
22.03.2026 - 01:28DROPS Design answered:
Hola Esperanza, esta chaqueta tiene un cuello bastante estrecho. 15 pts son aprox. 10cm, según la tensión, y puedes ver en el diagrama que el cuello mide 10 cm de ancho en la espalda. El escote-V en el delantero permite ampliar el cuello para que se asiente bien y compensa la estrechez de la parte posterior del cuello.
26.04.2026 - 23:26
![]() Mia wrote:
Mia wrote:
Hallo, een proeflapje in Drops Alpaca Boucle geeft me 15 steken en 22 rijen (10cm op 10 cm). Kan ik dit breipatroon gebruiken en de Kids-Silk laten vallen? Volstaat dan voor maat S enkel 250 gr Drops Alpaca Boucle? Alvast bedankt voor jullie reactie! Ik zou ook graag de split laten vallen en langere mouwen hebben. Dankjewel alvast voor de tips!
10.03.2026 - 20:44DROPS Design answered:
Dag Mia,
Ja, als de stekenverhouding klopt, kun je volstaan met 250 gram DROPS Alpaca Boucle.
11.03.2026 - 08:54
![]() Heidi wrote:
Heidi wrote:
Größe M Rückenteil, Armausschnitte abketten: In der Anleitung steht 2 Maschen je 0 x beidseitig. Stricke ich dann Hin- und Rückreihe aber ohne abzuketten? Oder nehme ich fortlaufend ab = 3 Maschen je 1 x beidseitig, 1 Masche je 2 x beidseitig.
08.11.2025 - 08:59DROPS Design answered:
Liebe Heidi, Letzteres ist richtig, Sie ketten 3 Maschen je 1 x beidseitig ab und dann direkt 1 Masche je 2 x beidseitig. Sie stricken also keine abnahmelosen "Zwischenreihen". Viel Spaß beim Stricken!
09.11.2025 - 23:50
![]() Karin wrote:
Karin wrote:
Jag har ett garn som med stickor 6 ger en stickfasthet på 10cm*10cm ger 13 maskor och 17 varv. Kan jag då använda det garnet och stickor 6 istället för stickor 5,5 enligt detta mönster och 5,5 istället för mönstrets stickor 4,5? Och ska jag sticka storlek S för att få måtten enligt storlek M? Hade velat ha måtten för M men tänker att jag får dem om jag stickar storlek S med mitt garn och stickor 6. Tänker jag rätt?
27.09.2025 - 13:39DROPS Design answered:
Hei Karin. For at oppskriften skal stemme må det brukes et garn som er tilsvarende lik det som er opplyst i oppskriften, og da spesielt den strikkefastheten som er oppgitt. Altså, bruke den pinnestørrelsen du må ha for å få 15 masker i bredden og 17 pinner i høyden med glattstrikk. mvh DROPS Design
13.10.2025 - 11:14
![]() Karin wrote:
Karin wrote:
Vilken storlek av koftan har modellen på sig?
19.09.2025 - 08:53DROPS Design answered:
Hei Karin. Modellen har på seg str. S eller M. Men se på målene på målskissen for å finne dine mål. mvh DROPS Design
22.09.2025 - 13:58
![]() Vibeke Birkeland wrote:
Vibeke Birkeland wrote:
Hva slags tråd anbefales det å sy sammen de enkelte delene med?
17.07.2025 - 19:29DROPS Design answered:
Hei Vibeke. Ville ha brukt begge kvalitetene eller bare Alpaca Bouclé. mvh DROPS Design
04.08.2025 - 10:23
![]() Kristina wrote:
Kristina wrote:
For å felle til V-hals, Str M - blir det riktig at man da feller 2 masker på første pinne fra retten, 0 m på andre p, 1 m på tredje p, 0 m på fjerde p, 2 m på femte p, 0 m på sjette p, 1 m på syvende p, 0 m på åttende p, 2 m på niende p, 0 m på tiende p, 1 m på ellevte p, 0 m på tolvte p, 2 m på trettende p, 0 m på 14,15,16 p og 1 m på 17 p?
04.05.2025 - 01:17DROPS Design answered:
Hej Kristina, til V-hals feller du (indenfor de 9 masker) når arb måler 29 cm således fra retsiden: 1maske på første pind, 1m på 5.pind, 1m på 7.p, 1m på 9.p osv :)
08.05.2025 - 10:46
![]() Radha Korsoski wrote:
Radha Korsoski wrote:
Hej. Jag ska sticka i strl L och har lagt upp 108 maskor. Det ska nu stickas en rätmaska, a1 till det återstår 2 maskor. Det betyder att det blir en vriden maska, en avig maska, en vriden maska och en rätmaska. Dvs en mindre avig maska på Slutet än i resterande mönster a1. Ska det vara så? Hälsningar Radha
29.01.2024 - 22:10
![]() Maria wrote:
Maria wrote:
Desideravo capire qual'è l'ultima maglia del punto fantasia A1 e le prime due maglie sempre del punto fantasia A1. Qual'è il verso del lavoro per intenderci.
23.01.2024 - 20:59DROPS Design answered:
Buongiorno Maria, i diagrammi si leggono dal basso verso l'alto, da destra verso sinistra nei ferri di andata e da sinistra verso destra in quelli di ritorno, nel caso di lavoro in piano. Buon lavoro!
24.01.2024 - 16:44
![]() Annamaria wrote:
Annamaria wrote:
Chiedo ancora. Sostituendo DROPS Alpaca Bouclè utilizzando 2 fili di DROPS Alpaca, dovrò acquistare il doppio del filato? 600 g. di Alpaca al posto di 300 g di Alpaca bouclé?
10.01.2024 - 12:58DROPS Design answered:
Buonasera Annamaria, no, deve fare il conto sul metraggio. Se lavora con 300g di Alpaca Bouclè ad un filo, le serviranno circa 840 m di filo (140 m x 6 gomitoli). Lavorando con 2 capi di Alpaca le serviranno poco più di 10 gomitoli di Alpaca (1680 m / 167 m). Buon lavoro!
10.01.2024 - 16:44
|
|||||||
Soft Journey Cardigan#softjourneycardigan |
|||||||
 |
 |
||||||
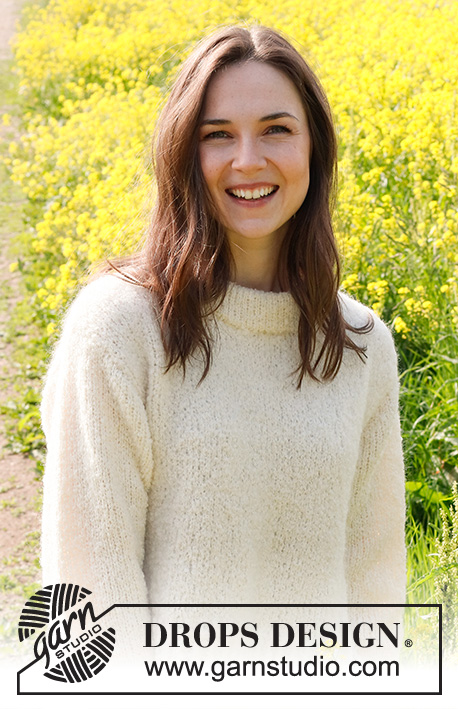
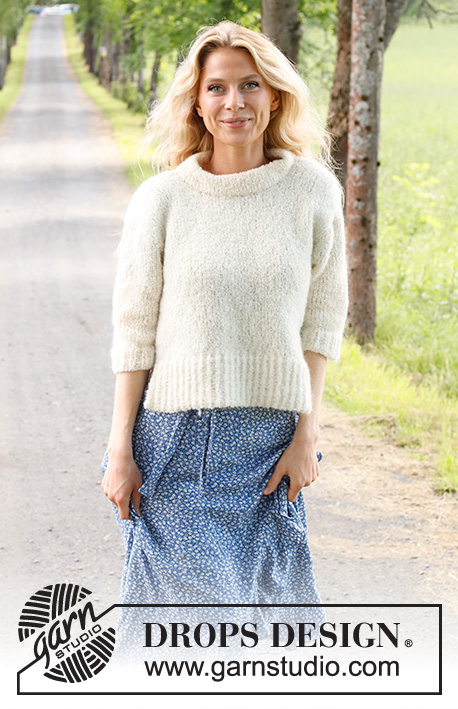
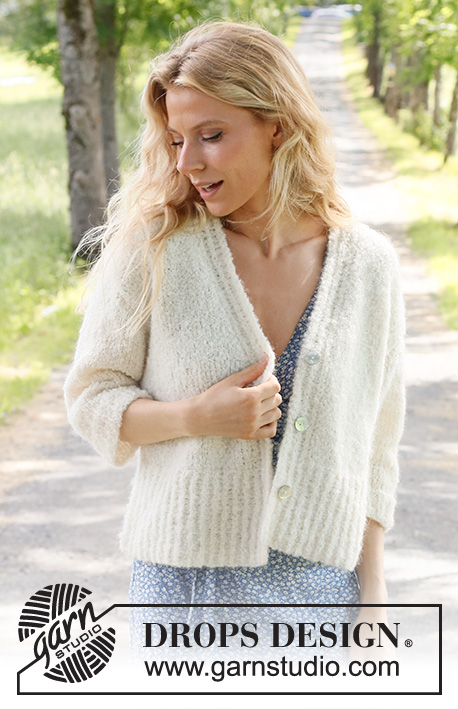
Knitted jacket in DROPS Alpaca Bouclé and DROPS Kid-Silk. The piece is worked bottom up in stocking stitch with split in the sides and ¾-length sleeves. Sizes S - XXXL.
DROPS 230-10 |
|||||||
|
------------------------------------------------------- EXPLANATIONS FOR THE PATTERN: ------------------------------------------------------- RIDGE/GARTER STITCH (worked back and forth): Knit all rows. 1 ridge = knit 2 rows. PATTERN: See diagram A.1. The diagram shows all rows in the pattern from the right side. DECREASE TIP (evenly spaced): To work out how to decrease evenly, count the total number of stitches on needle (e.g. 93 stitches) minus the edge stitches (e.g. 2 stitches) and divide the remaining stitches by the number of decreases to be made (e.g. 23) = 3.9. In this example decrease by knitting together approx. each 3rd and 4th stitch. INCREASE TIP (sleeves): All increases are worked from the right side! Work 1 edge stitch in garter stitch, knit 1, make 1 yarn over, knit until there are 2 stitches left on the row, 1 yarn over, knit 1 and 1 edge stitch in garter stitch. On the next row purl the yarn overs twisted to avoid holes. Then work the new stitches in stocking stitch. BUTTONHOLES: Work the buttonholes on the right band. 1 BUTTONHOLE = knit together the 4th and 5th stitch from the edge and make 1 yarn over. On the next row knit the yarn over to leave a hole. Work buttonholes when the piece measures: S: 8, 18 and 28 cm M: 9, 19 and 29 cm L: 9, 19½ and 30 cm XL: 9, 20 and 31 cm XXL: 10, 21 and 32 cm XXXL: 10, 21½ and 33 cm CASTING-OFF TIP: To avoid the cast-off edge being tight you can cast off with a larger size needle. If the edge is still tight, make 1 yarn over after approx. each 6th stitch at the same time as casting off; the yarn overs are cast off as normal stitches. ------------------------------------------------------- START THE PIECE HERE: ------------------------------------------------------- JACKET – SHORT OVERVIEW OF THE PIECE: The front and back pieces and the sleeves are worked separately, back and forth. All sections are worked bottom up, then sewn together. BACK PIECE: Cast on 93-102-108-120-129-144 stitches (including 1 edge stitch on each side) with circular needle size 4.5 mm and 1 strand of each quality (= 2 strands). Work rib from the right side as follows: 1 edge stitch in GARTER STITCH – read description above, A.1 until there are 2 stitches left, work the first stitch in A.1 so the rib is symmetrical and 1 edge stitch in garter stitch. Continue this rib for 13 cm. On the next row from the right side decrease 22-25-25-29-31-36 stitches evenly spaced – read DECREASE TIP = 71-77-83-91-98-108 stitches. Change to circular needle size 5.5 mm. Work stocking stitch back and forth, at the same time cast on 1 stitch at the end of the next 2 rows (= edge stitches) = 73-79-85-93-100-110 stitches. These edge stitches are worked in garter stitch. REMEMBER THE KNITTING TENSION! When the piece measures 34-35-36-37-38-39 cm, cast off for the armholes at the beginning of each row as follows: 2-3-4-5-5-5 stitches 1 time, 2 stitches 0-0-0-1-2-4 times and 1 stitch 1-2-2-2-2-2 times on each side = 67-69-73-75-78-80 stitches. Continue with stocking stitch and 1 edge stitch in garter stitch on each side. When the piece measures 47-49-51-53-55-57 cm, work pattern as follows: 1 edge stitch in garter stitch, stocking stitch over the next 16-17-19-20-20-21 stitches, work the last stitch in A.1, A.1 over the next 30-30-30-30-33-33 stitches, work the first 2 stitches in A.1, stocking stitch over the next 16-17-19-20-20-21 stitches, 1 edge stitch in garter stitch. Continue this pattern. When the piece measures 52-54-56-58-60-62 cm, cast off the middle 15-15-15-15-18-18 stitches for the neck and finish each shoulder separately = 26-27-29-30-30-31 stitches on the shoulder. Continue working with 9 stitches of pattern towards the neck, 1 edge stitch in garter stitch towards the side and stocking stitch over the other stitches. When the piece measures 54-56-58-60-62-64 cm, cast off. Work the other shoulder in the same way. RIGHT FRONT PIECE: Cast on 51-57-60-66-69-75 stitches (including 1 edge stitch on each side) with circular needle size 4.5 mm and 1 strand of each quality (= 2 strands). Work rib as follows from the right side: 1 edge stitch in garter stitch, A.1 until there are 2 stitches left, work the first stitch in A.1 so the rib is symmetrical and 1 edge stitch in garter stitch. Continue this rib for 13 cm. Remember the BUTTONHOLES on the band – read description above. On the next row from the right side decrease as follows: Work pattern as before over the first 9 stitches, stocking stitch over the next 42-48-51-57-60-66 stitches and decrease 11-14-14-16-16-17 stitches evenly over these stitches, cast on 1 new stitch at the end of the row (= edge stitch) = 41-44-47-51-54-59 stitches. Work back 1 row with pattern. Change to circular needle size 5.5 mm. Continue with 1 edge stitch in garter stitch towards the side, 9 stitches with pattern towards mid-front (= band) and stocking stitch over the other stitches. OVERVIEW OF THE NEXT SECTION: You now continue the pattern at the same time as decreasing for the V-neck and armhole; read the whole section before continuing. V-NECK: When the piece measures 28-29-30-31-32-33 cm, decrease for the V-neck from the right side as follows: Work the first 9 stitches as before, slip 1 stitch as if to knit, knit 1 and pass the slipped stitch over the knitted stitch (= 1 stitch decreased). Decrease like this every 4th row 1 time, every 2nd row 8-7-7-7-7-6 times and every 4th row 3-4-4-4-5-6 times = 12-12-12-12-13-13 stitches decreased for the V-neck. ARMHOLE: Cast off for the armhole as follows when the piece measures 34-35-36-37-38-39 cm, at the beginning of each row from the wrong side: 2-3-4-5-5-5 stitches 1 time, 2 stitches 0-0-0-1-2-4 times and 1 stitch 1-2-2-2-2-2 times. When the V-neck and armhole are finished there are 26-27-29-30-30-31 stitches on the shoulder. Continue working until the piece measures 54-56-58-60-62-64 cm. Cast off. LEFT FRONT PIECE: Cast on 51-57-60-66-69-75 stitches (including 1 edge stitch on each side) with circular needle size 4.5 mm and 1 strand of each quality (= 2 strands). Work rib as follows from the right side: 1 edge stitch in garter stitch, A.1 until there are 2 stitches left, work the first stitch in A.1 so the rib is symmetrical and 1 edge stitch in garter stitch. Continue this rib for 13 cm. On the next row from the right side decrease as follows: 1 edge stitch in garter stitch, stocking stitch over the next 42-48-51-57-60-66 stitches and decrease 11-14-14-16-16-17 stitches evenly over these stitches, work pattern as before over the last 9 stitches. Work back 1 row with pattern and cast on 1 new stitch at the end of the row (= edge stitch) = 41-44-47-51-54-59 stitches. Change to circular needle size 5.5 mm. Continue with 1 edge stitch in garter stitch towards the side, 9 stitches with pattern towards mid-front (= band) and stocking stitch over the other stitches. OVERVIEW OF THE NEXT SECTION: When the piece measures 28-29-30-31-32-33 cm, decrease for the V-neck from the right side as follows: Work until there are 11 stitches left, knit 2 together (= 1 stitch decreased), work to the end of the row as before. Decrease like this every 4th row 1 time, every 2nd row 8-7-7-7-7-6 times and every 4th row 3-4-4-4-5-6 times = 12-12-12-12-13-13 stitches decreased for the V-neck. ARMHOLE: Cast off for the armhole as follows when the piece measures 34-35-36-37-38-39 cm, at the beginning of each row from the right side: 2-3-4-5-5-5 stitches 1 time, 2 stitches 0-0-0-1-2-4 times and 1 stitch 1-2-2-2-2-2 times. When the V-neck and armhole are finished there are 26-27-29-30-30-31 stitches on the shoulder. Continue working until the piece measures 54-56-58-60-62-64 cm. Cast off. SLEEVES: Cast on 54-57-60-66-69-72 stitches (including 1 edge stitch on each side) with circular needle size 4.5 mm and 1 strand of each quality (= 2 strands). Work rib from the right side as follows: 1 edge stitch in garter stitch, A.1 until there are 2 stitches left, work the first stitch in A.1 so the rib is symmetrical and 1 edge stitch in garter stitch. Continue this rib for 5 cm. Knit 1 row from the right side where you decrease 12-13-13-16-16-16 stitches evenly spaced = 42-44-47-50-53-56 stitches. Change to circular needle size 5.5 mm. Work stocking stitch back and forth, with 1 edge stitch in garter stitch on each side. When the sleeve measures 7 cm, increase 1 stitch on each side – read INCREASE TIP. Repeat this increase when the sleeve measures 12-12-11-10-10-9 cm = 46-48-51-54-57-60 stitches. Continue working until the sleeve measures 19-19-16-16-16-12 cm. Now increase in the same way every 2nd row (each row from the right side) 4-4-5-5-6-6 times = 54-56-61-64-69-72 stitches. Continue working until the sleeve measures 28-28-26-26-26-23 cm (shorter measurements in larger sizes due to wider shoulders). Now work the sleeve cap at the beginning of every row on each side as follows: Cast off 2-3-4-5-5-5 stitches 1 time, 3-2-2-2-2-2 stitches 3-4-5-6-6-8 times and 6-7-6-4-6-3 stitches 1 time on both sides = 20-20-21-22-23-24 stitches. Cast off the remaining stitches. The sleeve measures approx. 34-35-34-35-35-35 cm. Work the other sleeve in the same way. ASSEMBLY: Sew the shoulder seams inside the cast-off edge. Sew the sleeves to the body, inside the 1 edge stitch on the body and the cast-off edge on the sleeve cap. Sew the sleeve and side seams in one go, inside the 1 edge stitch and down to the rib. Sew the buttons onto the left band. |
|||||||
Diagram explanations |
|||||||
|
|||||||
 |
|||||||
Have you finished this pattern?Tag your pictures with #dropspattern #softjourneycardigan or submit them to the #dropsfan gallery. Do you need help with this pattern?You'll find 29 tutorial videos, a Comments/Questions area and more by visiting the pattern on garnstudio.com. © 1982-2026 DROPS Design A/S. We reserve all rights. This document, including all its sub-sections, has copyrights. Read more about what you can do with our patterns at the bottom of each pattern on our site. |
|||||||


With over 40 years in knitting and crochet design, DROPS Design offers one of the most extensive collections of free patterns on the internet - translated to 17 languages. As of today we count 324 catalogues and 12290 patterns translated into English (UK/cm). 12290
We work hard to bring you the best knitting and crochet have to offer, inspiration and advice as well as great quality yarns at incredible prices! Would you like to use our patterns for other than personal use? You can read what you are allowed to do in the Copyright text at the bottom of all our patterns. Happy crafting!
Post a comment to pattern DROPS 230-10
We would love to hear what you have to say about this pattern!
If you want to leave a question, please make sure you select the correct category in the form below, to speed up the answering process. Required fields are marked *.