
Popular categories
Looking for a yarn?


Comments / Questions (24)
![]() Gitte Brusgaard wrote:
Gitte Brusgaard wrote:
Jeg kan simpelthen ikke finde ud af de picoter som huen skal afsluttes med. Er der en video som viser det? På forhånd tak
26.10.2021 - 11:21DROPS Design answered:
Hej Gitte. I denna video kan du ser hur man ska göra. Mvh DROPS Design
26.10.2021 - 11:35
![]() Maikki wrote:
Maikki wrote:
Huomasin, että heitto silmukkamäärissä johtuu siitä, että mallineuleen toisella kerroksella on jokaisessa oikein neulotussa raidassa yksi silmukka vähemmän.
18.09.2021 - 15:18
![]() Margaret Tigchelaar wrote:
Margaret Tigchelaar wrote:
Thank you so much! It was the first time I was ever instructed to change from back and forth to round, and I understand now what to do. Thank you also for answering so quickly! I will continue to use and cherish yourdesigns. Enjoy your day! Margaret Tigchelaar
09.09.2021 - 14:46
![]() Margaret Tigchelaar wrote:
Margaret Tigchelaar wrote:
I have just finished Baby 33-10. I had trouble changing from back and forth to round, but I loved the pattern and persisted, but on back and forth with invisible seam. Am I right that the answer above would have solved my problem? I should have kept knitting from the right every row and I would have been all right? I love your patterns, i knit for hospital gift shops. Please answer my query for the next time I use Baby 33-10. Kind regards, Margaret
08.09.2021 - 16:16DROPS Design answered:
Dear Mrs Tigchelaar, diagrams are read from the right towards left on every row when working in the round, when working back and forth, read every odd numbered row = right side rows: from the right towards the left and every even numbered row = wrong side rows: from the left towards the right. Could this help or did I misunderstand your question?
09.09.2021 - 08:21
![]() Maria wrote:
Maria wrote:
Hei, neulon kokoa 1/3, mutta jäin jumiin. Loin aluksi 29 silmukkaa ja neuloin sitten 10 cm mallipiirroksen mukaisesti. Ohjeen mukaan minun pitäisi seuraavaksi päättää kaksi silmukkaa niin että jäljelle jää yhteensä 33. Missä kohtaa olen tehnyt virheen? Jos nyt päätän kaksi silmukkaa, jäljelle jää vain 27? Kiitos avusta!
08.09.2021 - 10:08DROPS Design answered:
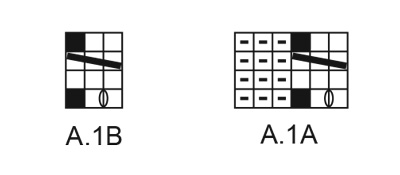
Hei, nämä silmukat päätetään piirroksen A.1 2.kerroksen jälkeen. Piirroksen 2.kerroksella työssä on 35 silmukkaa, joten työhön jää 33 silmukkaa, kun olet päättänyt kyseiset 2 silmukkaa.
13.10.2021 - 18:31
![]() Inger Nordgren wrote:
Inger Nordgren wrote:
Hej. Jag har stickat mittpartiet klart i storlek 6/9 månader, hade 39 maskor på stickan. Plockade upp 31 maskor och skulle förutsätta sticka mönster på mittpartiet varv 3 och sen plocka upp 31 maskor andra sidan. Då skulle jag få 94 m men jag får bara 87 maskor det varvet. Man ska ju sticka ihop 2 maskor och dra 1 över, stämmer det eller jag gör fel. Mvh Inger
14.01.2021 - 20:27DROPS Design answered:
Hei Inger. Nei, du skal ikke strikke 2 masker sammen, men løft 1 maske over som om den skal strikkes rett, strikk 2 rett, løft den løse masken over disse 2 maskene = 1 maske mindre. Da får du det riktige maskeantallet. God Fornøyelse!
25.01.2021 - 11:43
![]() Katrine Fedriksen wrote:
Katrine Fedriksen wrote:
Når jeg legger opp 6 masker under haken så stemmer ikke mønsteret ut, da jeg begynner og slutter med flette? Hva er det jeg misser?
07.01.2021 - 19:11DROPS Design answered:
Hei Kathrine. Kantmaskene vil inngå i mønstret når du begynner å strikke rundt. Når du legger opp de 6 nye maskene på slutten av 3. pinne i A.1, strikk da 1. maske vrang (som er 1. kantmaske) inn i mønstret, fortsett med 4.pinne av diagram A.1. På slutten av omgangen strikker du A.1B (2 masker rett). 2. kantmaske strikker du vrang og denne kantmasken blir en del av de 3 vrangmaskene i diagram A.1A (2 av maskene er 2 av de 6 nye maskene). Strikk så 2 rett (2 første maskene av A.1A), deretter 2 vrang (2 siste av de 6 nye). God Fornøyelse!
15.01.2021 - 10:19
![]() Hilde Danielsen wrote:
Hilde Danielsen wrote:
Strikker i str 2 år. Etter midtpartiet er ferdig skal det strikkes opp 41 masker på hver side av midt partiet som har 45 masker. Det blir 127 masker, men på mønsteret står det 119. A. 1A skal strikkes over de neste 115 maskene? Legg opp 6 masker og det skal bli 125, men får ikke det til å stemme med at midtpartiet er 45+ de 41 som skal plukkes opp. Er et meg som overser noe?
04.12.2020 - 11:01DROPS Design answered:
Hei Hilde. Du avsluttet midtpartiet oppå luen etter 2. pinne i A.1. Nå skal du strikke opp 41 masker langs høyre kant på midtpartiet, deretter strikker du maskene du satte på en hjelpepinne, A.1A og A.1B (og her minsker maskeantallet fra 45 til 37, se 3. pinne i diagram A.1A og A.1B) og så strikker du opp 41 masker langs venstre siden av midtpartiet. 41 masker langs høyre side + 37 masker (over midtpartiet) + 41 masker langs venstre side = 41+37+41 = 119 masker. God Fornøyelse!
09.12.2020 - 14:46
![]() Naïma Elmezouar wrote:
Naïma Elmezouar wrote:
Bonjour J’aime beaucoup le modèle mais incapable d’utiliser les aiguilles circulaires Pourrais je le faire avec de simple aiguilles Merci beaucoup
02.11.2020 - 20:39DROPS Design answered:
Bonjour Mme Emezouar, vous trouverez ici comment adapter un modèle sur aiguilles droites. Bon tricot!
03.11.2020 - 09:11
![]() Trine Pedersen wrote:
Trine Pedersen wrote:
Hej, Når man har strikket masker op på højre kant af midterste parti fra retsiden, og dernæst strikker over maskerne på hjælpepinden, hvordan strikker man så venstre kant op fra retsiden? Jeg kan simpelthen ikke få det til at passe.
29.10.2020 - 11:03DROPS Design answered:
Hej Trine, jo du strikker masker op fra retsiden i højre side fra panden og bagud, strikker op over maskerne bagpå(fra hjælpepinden), fortsætter rundt på venstre side, og samler op bagfra og mod panden på venstre side af det midterste stykke. God fornøjelse!
04.11.2020 - 12:16
|
||||||||||||||||
Warm Smiles#warmsmilesbalaclava |
||||||||||||||||
 |
 |
|||||||||||||||
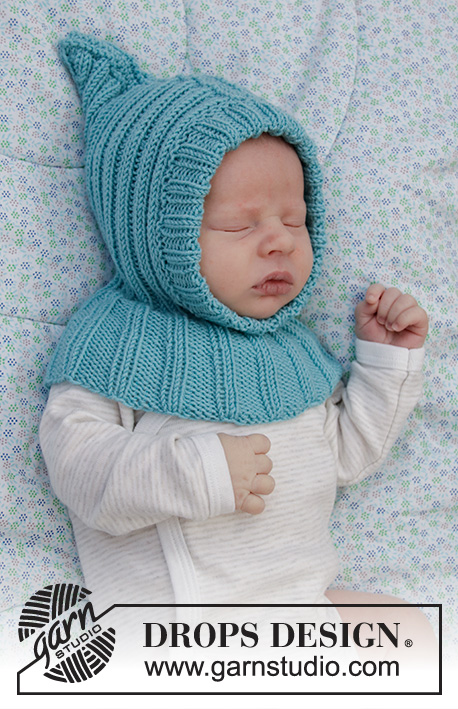
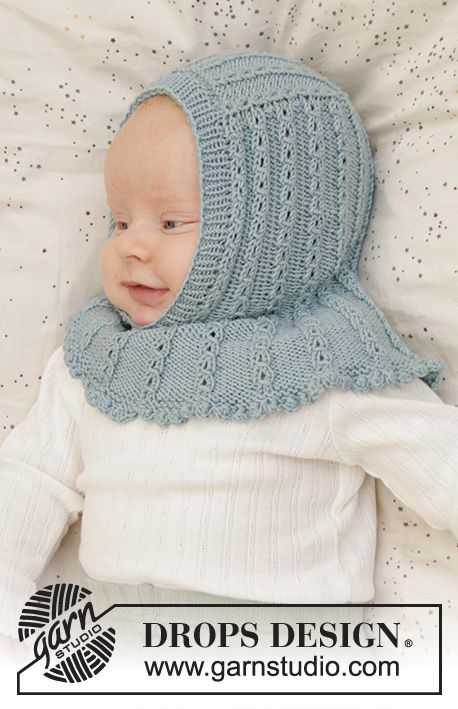
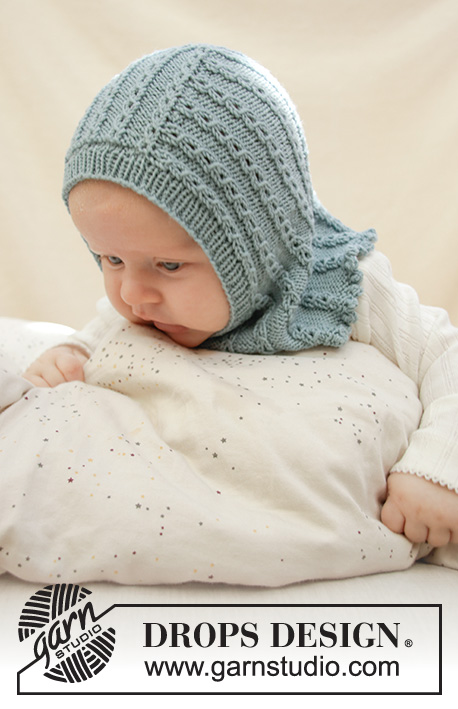
Knitted balaclava with lace pattern for babies in DROPS Baby Merino. Sizes: 0– 2 years
DROPS Baby 33-10 |
||||||||||||||||
|
------------------------------------------------------- EXPLANATIONS FOR THE PATTERN: ------------------------------------------------------- RIDGE/GARTER STITCH (worked back and forth): Knit all rows. 1 ridge in height = Knit 2 rows. RIDGE/GARTER STITCH (worked in the round): 1 ridge in height = 2 rounds; Knit 1 round and purl 1 round. PATTERN: See diagram A.1. The diagram shows all rows in the pattern from the right side. INCREASE TIP: Increase 1 stitch by making 1 yarn over; on the next round purl the yarn over twisted to avoid a hole. The first time you increase, make the 1 yarn over before the purled stitches. The next time you increase, make 1 yarn over after the purled stitches. Continue increasing alternately before and after the purled section. ---------------------------------------------------------- START THE PIECE HERE: ------------------------------------------------------- BALACLAVA – SHORT OVERVIEW OF THE PIECE: The piece is worked back and forth with circular needle from mid-top of head and down to the neck. Then it is worked in the round with double pointed needles/short circular needle. BALACLAVA: Cast on 29-29-34-34 (39) stitches (including 1 edge stitch on each side) with circular needle size 3 mm and Baby Merino. Work 1 RIDGE – see description above. The next row is worked as follows from the right side: 1 edge stitch in garter stitch, work A.1A until there are 3 stitches left on the row (= 5-5-6-6 (7) repeats of 5 stitches), A.1B (= 2 stitches) and finish with 1 edge stitch in garter stitch. Continue this pattern until the piece measures approx. 9-10-11-12 (13) cm and cast off 1 stitch at the beginning and end of this row, making sure you finish after row 2 in A.1 so the last row is from the wrong side = 33-33-39-39 (45) stitches on the needle. Insert 1 marker in the piece to measure from. The middle section on top of the balaclava is now finished. Cut the strand and place the stitches on an extra needle. Start from the right side and knit up 26-31-31-36 (41) stitches along the right edge of the middle section (seen from the right side); make sure you knit up on the inside of the edge stitch, continue the pattern as before over the stitches from the extra needle and knit up 26-31-31-36 (41) stitches along the left side of the middle section (seen from the right side) = 79-89-94-104 (119) stitches. The next row is worked as follows, from the wrong side: 1 edge stitch in garter stitch, A.1B (= 2 stitches – start with row 4 in the diagram so the pattern matches the middle section), work A.1A over the next 75-85-90-100 (115) stitches (= 15-17-18-20 (23) repeats of 5 stitches) and finish with 1 edge stitch in garter stitch. Continue this pattern back and forth until the piece measures approx. 10-11-12-13 (14) cm from the marker; finish after row 2 in A.1. Continue the pattern on the next row but at the end of the row cast on 6 new stitches (mid front under the chin) = 85-95-100-110 (125) stitches on the needle. Insert 1 new marker – THE PIECE IS NOW MEASURED FROM HERE! Now continue in the round with double pointed needles, changing to short circular needle when necessary. Continue the pattern in the round over all stitches. When the piece measures 2½-2½-2½-2½ (3) cm from the new marker, increase all purl 3 sections to purl 4 – read INCREASE TIP = approx. 102-114-120-132 (150) stitches (if you are on a yarn-over round in A.1, the yarn overs are not included in the stitch count). Increase like this every 2 cm a total of 3 times (= 6 purl stitches in each purl section) = approx. 136-152-160-176 (200) stitches. When the piece measures 9-10-11-12 (13) cm from the last marker (or to desired length), work 2 RIDGES – see description above – in the round over all stitches. Then cast off with picot as described below. CAST-OFF EDGE WITH PICOT: Cast off from the right side as follows: Knit 1, (* insert the right needle between the next 2 stitches on the left needle, i.e. between the stitches, not through them, make 1 yarn over, pull the yarn over between the stitches and place it on the left needle *, work from *-* 2 more times so there are 3 new stitches on the left needle. ** Knit the first stitch on the left needle, pass the first stitch on the right needle over the last stitch worked **), work from **-** a total of 5 times and repeat from (-) along the whole edge until there is only 1 stitch on the left needle. Cut the strand and pull it through this last stitch. EDGE AROUND OPENING: Knit up approx. 80 to 90 stitches around the opening in front; i.e. around the face (use a crochet hook when knitting up stitches, as this gives you a neat pick-up edge). Divide the stitches onto double pointed needles. Knit 1 round where you increase evenly to 90-110 stitches. Work rib in the round = knit 1 / purl 1 for 2 cm. Loosely cast off with knit over knit and purl over purl. |
||||||||||||||||
Diagram explanations |
||||||||||||||||
|
||||||||||||||||
 |
||||||||||||||||
Have you finished this pattern?Tag your pictures with #dropspattern #warmsmilesbalaclava or submit them to the #dropsfan gallery. Do you need help with this pattern?You'll find 25 tutorial videos, a Comments/Questions area and more by visiting the pattern on garnstudio.com. © 1982-2026 DROPS Design A/S. We reserve all rights. This document, including all its sub-sections, has copyrights. Read more about what you can do with our patterns at the bottom of each pattern on our site. |
||||||||||||||||


With over 40 years in knitting and crochet design, DROPS Design offers one of the most extensive collections of free patterns on the internet - translated to 17 languages. As of today we count 324 catalogues and 12290 patterns translated into English (UK/cm). 12290
We work hard to bring you the best knitting and crochet have to offer, inspiration and advice as well as great quality yarns at incredible prices! Would you like to use our patterns for other than personal use? You can read what you are allowed to do in the Copyright text at the bottom of all our patterns. Happy crafting!
Post a comment to pattern DROPS Baby 33-10
We would love to hear what you have to say about this pattern!
If you want to leave a question, please make sure you select the correct category in the form below, to speed up the answering process. Required fields are marked *.