
Popular categories
Looking for a yarn?


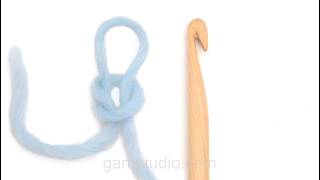
How to make a start loop when beginning a crochet project
BEFORE THE VIDEO STARTS:
Pull out a strand of about 20 cm
THE VIDEO SHOWS:
1. Make a loop by laying the strand end over the strand.
2. Pull the strand from the ball through the loop.
3. This creates a new loop with a visible knot.
4. Put the crochet hook through the loop from the back, so the knot faces away from you, then gently tighten both strands.
5. Gently tighten the strand from the ball so the loop sits around the hook.
Video #1903, listed in: Crochet Videos, Learn to crochet
Our videos do not have sound. We are a worldwide company and our videos are watched by people speaking endless of different languages and many do not understand English. So since there is not a given language for us to use, we instead have written instructions to accompany the video, and then there is no sound to disturb while watching.
You can adjust the speed of this video by clicking on the icon, on the play bar.
You might also like


With over 40 years in knitting and crochet design, DROPS Design offers one of the most extensive collections of free patterns on the internet - translated to 17 languages. As of today we count 325 catalogues and 12298 patterns translated into English (UK/cm).
We work hard to bring you the best knitting and crochet have to offer, inspiration and advice as well as great quality yarns at incredible prices! Would you like to use our patterns for other than personal use? You can read what you are allowed to do in the Copyright text at the bottom of all our patterns. Happy crafting!
Leave a comment or question to this video
Your email address will not be published. Required fields are marked *.