
Popular categories
Looking for a yarn?


Comments / Questions (24)
![]() Myrna Laupland wrote:
Myrna Laupland wrote:
Answer to Query re Drops 218-16: Thank you very much for the quick answer to my question. I really appreciate Drops help whenever I have a problem . I am back knitting on the sweater. Many Thanks
30.07.2023 - 18:20
![]() Myrna Laupland wrote:
Myrna Laupland wrote:
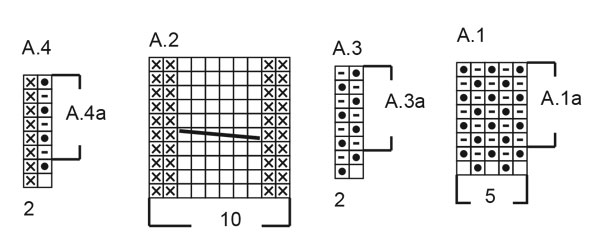
Drops 218-16 Rippling Roses Jacket - I am just starting this pattern and cannot figure out the pattern regarding A.3 There are only 2 stitches for the A.3 chart but it says to work the pattern over 19 stitches (for size S). All sizes show an odd # of stitches to work over. ???? Thanks
29.07.2023 - 07:03DROPS Design answered:
Hi Myrna, work the diagram A.3 over 18 stitches and then work the first stitch in the diagram over 1 remaining stitch. More about reading diagrams SEE HERE. Happy knitting!
29.07.2023 - 11:06
![]() Abby wrote:
Abby wrote:
I'm having trouble with chart A1, I keep ending up with either 7 or 3 stitches instead of 5. Am I reading it wrong? After I slip the stitch, am I supposed to bring the yarn to the back to knit the next stitches? If I do, the yarn over basically disappears. I'm so confused!
25.09.2021 - 03:55DROPS Design answered:
Dear Abby, you should always knit together the yarn over and the stitch that was slipped in the previous row, that way the number of stitches will be correct. Happy Stitching!
27.09.2021 - 03:00
![]() Sylvia Smit wrote:
Sylvia Smit wrote:
Voor de hals moet je 65-85steken opnemen. Dit is incl de steken op de hulpdraden. Voor maat S heb je al 62 steken op de hulpdraden. Hoeveel steken neem je nu op? Gevoelsmatig kom ik op meer dan 85 steken.
24.07.2021 - 11:24DROPS Design answered:
Dag Sylvia,
Ja, dit is inclusief de steken op de hulpdraden. Voor maat S heb je dus in totaal ongeveer 65 steken.
19.08.2021 - 14:17
![]() Poinsot Annie wrote:
Poinsot Annie wrote:
Faut-il rabattre des mailles pour emmanchures car je suis perdue merci
23.07.2021 - 17:08DROPS Design answered:
Bonjour Mme Poinsot, on rabat 5 mailles pour chacune des deux emmanchures lors de la division de l'ouvrage, avant de terminer chaque devant et le dos séparément. On ne rabat pas de mailles supplémentaires lorsque l'on termine chaque côté séparément. Bon tricot!
26.07.2021 - 08:10
![]() Katherine Leue wrote:
Katherine Leue wrote:
Het lukt me niet omdie knoopsgaten te breien inhet engelse patentsteek doordat ik al met omslagen zit? HELP!!!
24.04.2021 - 20:39DROPS Design answered:
Dag Katherine,
Op het moment dat je knoopsgaten maakt brei je in plaats van de Engelse patentsteek, de tweede en derde steek samen en maak je een omslag. Vanaf de vierde steek pak je de patentseek weer op.
25.04.2021 - 17:56
![]() Carina N wrote:
Carina N wrote:
Jag tycker koftan verkar bli väldigt stor. Jag la upp 252 maskor i drops air, enligt storlek XL.. När jag mätte blir 252 maskor cirka 2 meter. Ska den vara så vid?
11.04.2021 - 20:02DROPS Design answered:
Hej Carina, Hvis du har en strikkefasthed på 16 masker på 10 cm (lav en strikkeprøve), så får du 158 cm i glatstrik. MEN da du skal strikke snoninger vil de trække arbejdet sammen til ca 120 cm i omkreds. God fornøjelse!
12.04.2021 - 14:03
![]() Marilyn Braude wrote:
Marilyn Braude wrote:
I am finding this pattern very difficult to read.
05.04.2021 - 12:41DROPS Design answered:
Dear Marilyn, we are sorry, you find this stíle of patternwriting difficult. We suggest that read through the pattern a few times, mark your size, mark (with a different color) the "at the same time" sections, make notes. If you have a particular question, you can ask here, or you can also ask for help (either in person or over the phone) in the store you bought your DROPS yarn from. Happy Knitting!
05.04.2021 - 14:28
![]() Sylvia Smit wrote:
Sylvia Smit wrote:
Bij de beschrijving van het lijf word er 2x 19 steken gebreid. 1x A3 en 1x A1. Moet de 2de ook A3 zijn? Je hebt dan beide zijden gelijk.
15.03.2021 - 11:13DROPS Design answered:
Dag Sylvia,
Ja, dat denk ik ook dat dat A.3 moet zijn. Ik heb het doorgegeven aan de ontwerpafdeling om te controleren, zodat het eventueel gecorrigeerd kan worden.
27.03.2021 - 15:39
![]() Julie wrote:
Julie wrote:
Comment assemble le col drops design modele ai-310 merci
15.12.2020 - 16:03DROPS Design answered:
Bonjour Julie, le col est replié en double sur l'envers, cousez ensuite les mailles rabattues le long des mailles relevées, attention à ne pas trop serrer la couture pour éviter que le col ne soit trop serré et pour qu'il ne rebique pas. Bon assemblage!
15.12.2020 - 16:14
|
||||||||||||||||
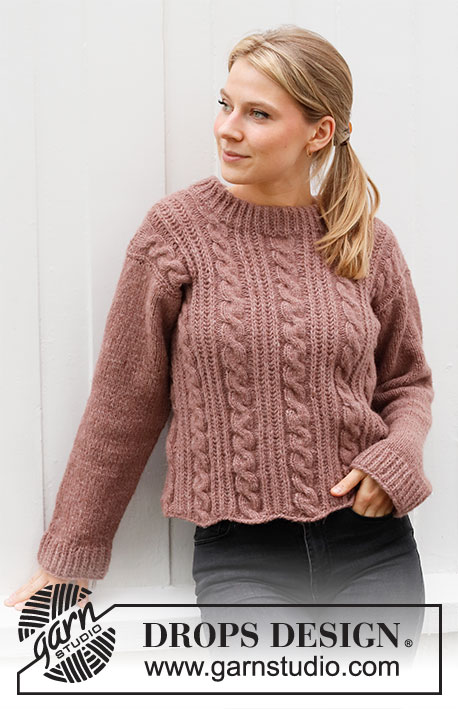
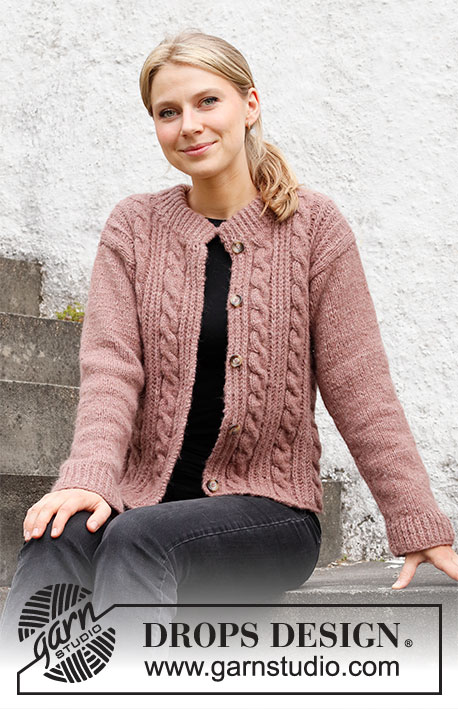
Rippling Roses Jacket#ripplingrosesjacket |
||||||||||||||||
 |
 |
|||||||||||||||
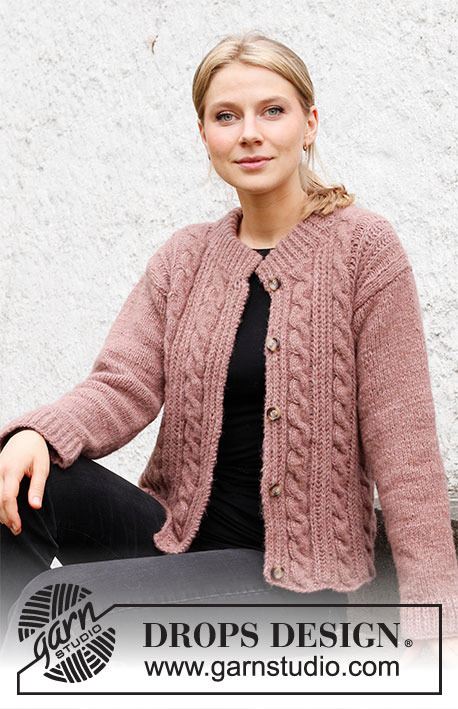
Knitted jacket with cables and English rib stitches in DROPS Air. Sizes S – XXXL.
DROPS 218-16 |
||||||||||||||||
|
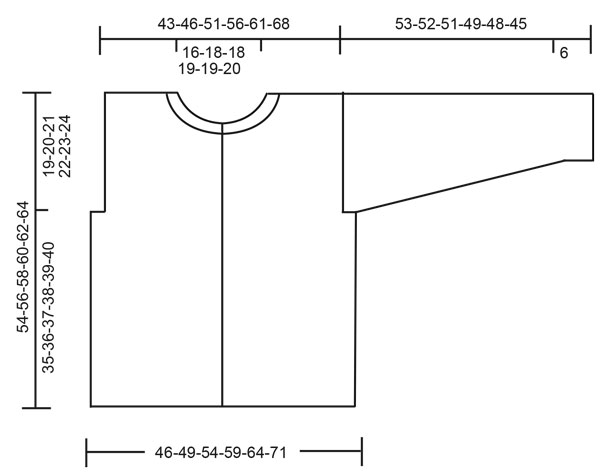
------------------------------------------------------- EXPLANATIONS FOR THE PATTERN: ------------------------------------------------------- RIDGE/GARTER STITCH (worked back and forth): Knit all rows. 1 ridge in height = Knit 2 rows. PATTERN: See diagrams A.1 to A.4. BUTTONHOLES: Work buttonholes on right band. 1 BUTTONHOLE = Knit together the second and third stitch from the edge and make 1 yarn over. On the next row knit the yarn over = hole. Work buttonholes when the piece measures: S: 3, 13, 23, 34, 45 cm M: 3, 14, 25, 36, 47 cm L: 3, 12, 21, 30, 39, 49 cm XL: 3, 12, 21, 31, 41, 51 cm XXL: 3, 13, 23, 33, 43, 53 cm XXXL: 3, 13, 23, 33, 44, 55 cm INCREASE TIP (for sleeves): Increase 1 stitch on each side of the marker thread as follows: Work until there is 1 stitch left before the marker thread, 1 yarn over, work 2 stitches as before (marker thread sits between these 2 stitches), 1 yarn over. On the next round work the yarn overs twisted to avoid holes. ------------------------------------------------------- START THE PIECE HERE: ------------------------------------------------------- JACKET – SHORT OVERVIEW OF THE PIECE: The jacket is worked back and forth with circular needle from mid front and bottom up as far as the armholes, the piece is then divided and each section finished separately. The sleeves are worked in the round with short circular needle/double pointed needles. The neck is worked to finish. BODY: Cast on 200-208-224-252-268-304 stitches with circular needle size 5.5 mm and Air. Purl 1 row from the wrong side. Then work pattern from the right side as follows: 1 edge stitch in GARTER STITCH, * A.1 (= 5 stitches), A.2 (= 10 stitches) *, work from *-* 3-3-3-4-4-5 times, work A.3 over the next 19-23-31-15-23-11 stitches, * A.2, A.1 *, work from *-* 4-4-4-6-6-8 times, A.2, work A.3 over the next 19-23-31-15-23-11 stitches, * A.2, A.1*, work from *-* 3-3-3-4-4-5 times and finish with 1 edge stitch in garter stitch. Continue this pattern; when the first 2 rows in A.1 and A.3 have been worked, repeat A.1a and A.3a onwards. Work BUTTONHOLES on the right band – read description above. Work until the piece measures 35-36-37-38-39-40 cm from the cast-on edge. REMEMBER THE KNITTING TENSION! The next row is worked as follows from the right side: Work the first 53-55-59-66-70-79 stitches, cast off the next 5-5-5-5-5-5 stitches, work the next 84-88-96-110-118-136 stitches, cast off the next 5-5-5-5-5-5 stitches and work the last 53-55-59-66-70-79 stitches. Front and back pieces are finished separately. RIGHT FRONT PIECE: = 53-55-59-66-70-79 stitches. Work A.1, A.2 and A.3 as before, but with 1 edge stitch in garter stitch towards the armhole. When the piece measures 46-48-50-52-54-56 cm, place the first 19-20-20-21-21-22 stitches on a thread for the neck (make sure stitches are worked from wrong side before placed on thread), then cast off for the neck on each row from the right side as follows: 2 stitches 1 time, 1 stitch 3 times = 29-30-34-40-44-52 stitches left on the shoulder. Cast off when the piece measures 54-56-58-60-62-64 cm (19-20-21-22-23-24 cm from the bottom of the armhole). LEFT FRONT PIECE: Work as the right front piece, but reversed; cast off stitches for the neck at the beginning of each row from the wrong side. BACK PIECE: = 84-88-96-110-118-136 stitches. Continue with A.1, A.2 and A.3 as before, but with 1 edge stitch in garter stitch on each side. Continue until the piece measures 52-54-56-58-60-62 cm. Place the middle 24-26-26-28-28-30 stitches on a thread for the neck (make sure stitches are worked from wrong side before placed on thread) and finish each shoulder separately. On the next row cast off 1 stitch towards the neck = 29-30-34-40-44-52 stitches left on the shoulder. Cast off when the piece measures 54-56-58-60-62-64 cm (= 19-20-21-22-23-24 cm from the bottom of the armhole). SLEEVE: Cast on 50-52-54-56-58-60 stitches with double pointed needles size 4.5 mm. Knit 1 round, then work A.4 over all stitches. When the first 2 rounds in A.4 have been worked, repeat A.4a onwards. Continue this pattern until the piece measures 6 cm. Knit 1 round where you decrease 6 stitches evenly spaced = 44-46-48-50-52-54 stitches. Change to double pointed needles size 5.5 mm. Knit 1 round. Insert a marker thread at the beginning of the round (= mid under the sleeve). Work stocking stitch. When the piece measures 8 cm from the cast-on edge, begin to increase mid under the sleeve – read INCREASE TIP. Increase every 5½-5-4½-4-3½-3 cm a total of 8-9-10-10-11-12 times = 60-64-68-70-74-78 stitches. Continue working until the sleeve measures 53-52-51-49-48-45 cm. Cast off. Work the other sleeve in the same way. ASSEMBLY: Sew the shoulder seams. NECK: Using circular needle size 4.5 mm pick up 65 to 85 stitches around the neck (including the stitches from the threads). Make sure the number of stitches is divisible by 2 + 1. Start from right side and work pattern as follows: Work 1 edge stitch in garter stitch, A.4a until there is 1 stitch left (on first round the picked-up stitches are worked without yarn overs) and 1 edge stitch in garter stitch, AT THE SAME TIME decrease 1 stitch in cable in A.2 from thread by knitting 3rd and 4th stitch from cable together. NOTE! A.4a should match the stitches from the threads so the English rib pattern continues up the neck. If necessary adjust the number of stitches between the threads! Continue this pattern until the neck measures 10 cm. Cast off with knit from the right side. ASSEMBLY: Fold the neck double to the wrong side and sew the cast-off edge to the row with the knitted up stitches; the neck is now approx. 5 cm. Sew the neck edge together on both sides. Sew in the sleeves, inside the 1 edge stitch on the front/back pieces. Sew the buttons onto the left band. |
||||||||||||||||
Diagram explanations |
||||||||||||||||
|
||||||||||||||||
 |
||||||||||||||||
 |
||||||||||||||||
Have you finished this pattern?Tag your pictures with #dropspattern #ripplingrosesjacket or submit them to the #dropsfan gallery. Do you need help with this pattern?You'll find 33 tutorial videos, a Comments/Questions area and more by visiting the pattern on garnstudio.com. © 1982-2026 DROPS Design A/S. We reserve all rights. This document, including all its sub-sections, has copyrights. Read more about what you can do with our patterns at the bottom of each pattern on our site. |
||||||||||||||||


With over 40 years in knitting and crochet design, DROPS Design offers one of the most extensive collections of free patterns on the internet - translated to 17 languages. As of today we count 324 catalogues and 12290 patterns translated into English (UK/cm). 12290
We work hard to bring you the best knitting and crochet have to offer, inspiration and advice as well as great quality yarns at incredible prices! Would you like to use our patterns for other than personal use? You can read what you are allowed to do in the Copyright text at the bottom of all our patterns. Happy crafting!
Post a comment to pattern DROPS 218-16
We would love to hear what you have to say about this pattern!
If you want to leave a question, please make sure you select the correct category in the form below, to speed up the answering process. Required fields are marked *.