
Popular categories
Looking for a yarn?


Comments / Questions (174)
![]() Jo B wrote:
Jo B wrote:
Hello, thank you this pattern for this beautiful jumper. Please do you know what size the model is wearing? Many thanks, Jo
02.01.2026 - 10:54DROPS Design answered:
Hi Jo B, the model is wearing the size S or M. Happy knitting!
02.01.2026 - 12:00
![]() Erika wrote:
Erika wrote:
Kunnen er aan het patroon verkorte toeren worden toegevoegd om de hals achter te verhogen?
29.12.2025 - 10:13DROPS Design answered:
Dag Erika,
Dit patroon is ontworpen zonder verhoging aan de achterkant en wordt waarschijnlijk niet meer aangepast. Helaas is het voor ons ook niet mogelijk om patronen naar persoonlijke wensen aan te passen.
30.12.2025 - 20:46
![]() Joelle wrote:
Joelle wrote:
Bonjour... Les laines recommandées perdent elles des poils ? Merci
29.12.2025 - 10:03DROPS Design answered:
Bonjour Joelle, la laine peut toujours être amenée à perdre quelques fibres - retrouvez plus d'infos ici; votre magasin pourra vous conseiller personnellement si besoin, même par mail ou téléphone. Bon tricot!
02.01.2026 - 12:55
![]() Jemma wrote:
Jemma wrote:
Hia when you have to divide after the raglan increases, it says to work the first 34 stitches then place the next 70 on a thread, do we work those stitches before placing on the thread? Also onto which needle do we cast on 6 after placing those sleeve stitches on thread?
27.12.2025 - 19:40DROPS Design answered:
Hi Jemma, you don't work these 70 sts before placing on the thread. You cast on 6 sts on the right needle. This top down construction is shown in the video HERE. Happy knitting!
28.12.2025 - 20:19
![]() Anke wrote:
Anke wrote:
Guten Tag, auf welche Nadelstärke bezieht sich die Maschenprobe?
25.12.2025 - 12:03DROPS Design answered:
Liebe Anke, die Maschenprobe bezieht sich auf die Nadelstärke 5. Bitte beachten Sie, dass es sich dabei nur um eine Orientierungshilfe handelt. Viel Spaß beim Stricken!
28.12.2025 - 11:27
![]() Jana wrote:
Jana wrote:
Hallo zusammen, welche Nadelstärke soll ich denn für die Maschenprobe nehmen? 4 oder 5 mm?
11.12.2025 - 18:55DROPS Design answered:
Liebe Jana, nehmen Sie die Nadeln 5 mm. Viel Spaß beim Stricken!
12.12.2025 - 07:53
![]() Céline Couroux wrote:
Céline Couroux wrote:
Bonjour Au début il faut monter 88 mailles pourtant quand on nous demande de placer les marqueurs pour les raglans (11+11) 20 (manche) 22 ( devant) 20 ( manche) cela ne fait que 84 mailles donc au final avec les augmentations des manches (6/6) et le raglan on arrive 272 mailles et non 276 mailles Pouvez vous m’expliquer Merci
08.12.2025 - 19:08DROPS Design answered:
Bonjour Mme Couroux, notez que les marqueurs doivent tous être placés dans une maille (et pas entre les mailles), ainsi vous aurez en S: 11+1+20+1+22+1+20+1+11=88 mailles. et donc 276 à la find es augmentations. Bon tricot!
09.12.2025 - 08:42
![]() Ariane Krause wrote:
Ariane Krause wrote:
Hallo! Ich möchte gern den Deep Woods Sweater für meine Schwester stricken. Ich brauche allerding eine Gesamtweite von 79 cm ( xxxl hier 69 cm), daher bitte ich um Hilfe beim Umrechnen.. Es wäre sehr schön, wenn das ginge. Liebe Grüße Ariane
04.12.2025 - 19:45DROPS Design answered:
Liebe Frau Krause, leider können wir nicht alle unsere Anleitung nach jeder Anfrage anpassen; fragen Sie mal Ihr DROPS Händler oder ein Strickforum für weitere Hilfe Danke im voraus für Ihr Verständnis. Viel Spaß beim Stricken!
05.12.2025 - 08:53
![]() Rita Keuppens wrote:
Rita Keuppens wrote:
Kan ik dit patroon (en andere) ook verkrijgen in de (ouderwetse) manier , breien van beneden naar boven ? Groetjes
01.12.2025 - 09:53DROPS Design answered:
Hi Rita, all woman sweaters knitted bottom up are available HERE. Happy knitting!
01.12.2025 - 16:55
![]() Lieve wrote:
Lieve wrote:
Kan ik deze trui breien met Alaska Mix?
23.11.2025 - 16:22DROPS Design answered:
Dag Lieve,
Ja, je zou dit patroon ook met 1 draad Alaska kunnen breien. We hebben een artikel op de site staan waarin uitgelegd is hoe je garen kunt vervangen door een ander garen en hoe je dit uitrekent. Zie hier. Maak altijd wel een proeflapje en pas eventueel de naalddikte aan zodat de stekenverhouding overeenkomt met die van het patroon.
24.11.2025 - 20:35
|
|||||||||||||||||||
Deep Woods Sweater#deepwoodssweater |
|||||||||||||||||||
 |
 |
||||||||||||||||||
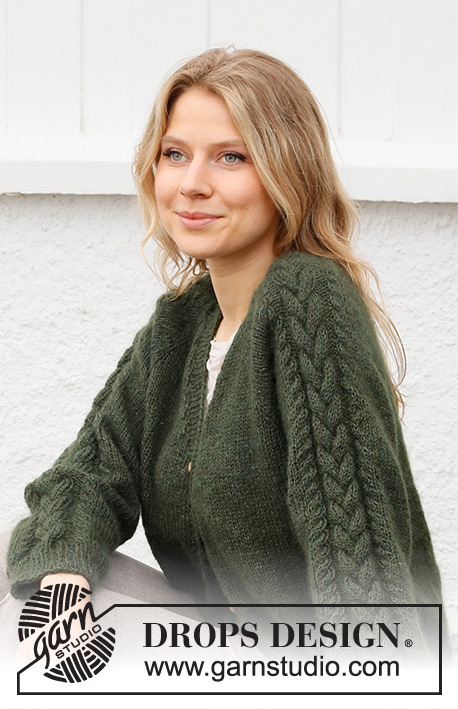
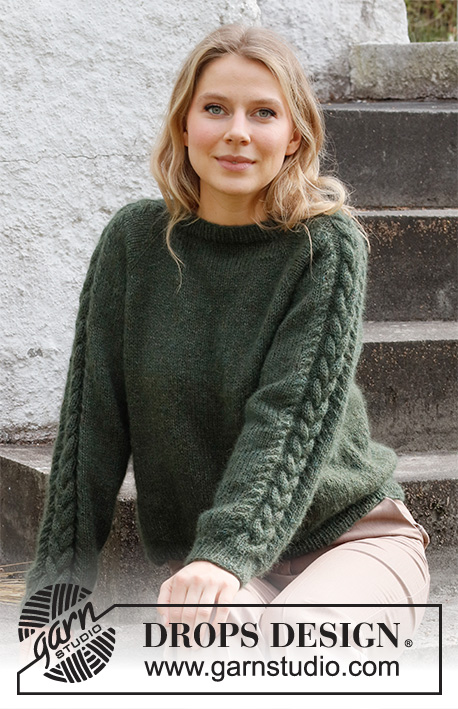
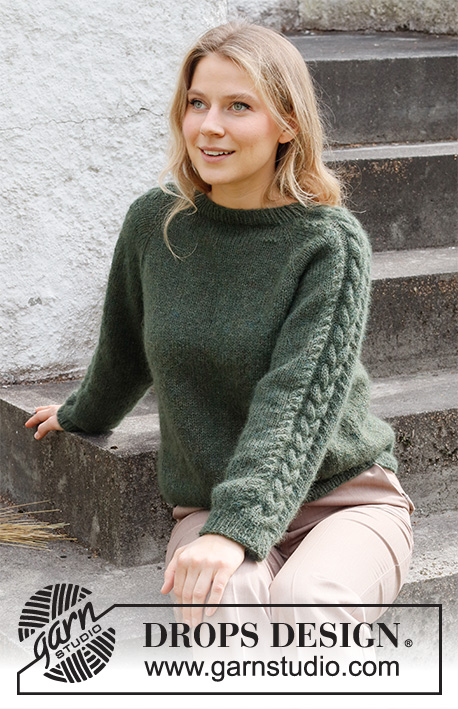
Knitted jumper in DROPS Alpaca and DROPS Kid-Silk. The piece is worked top down with raglan and cables on the sleeves. Sizes S - XXXL.
DROPS 215-5 |
|||||||||||||||||||
|
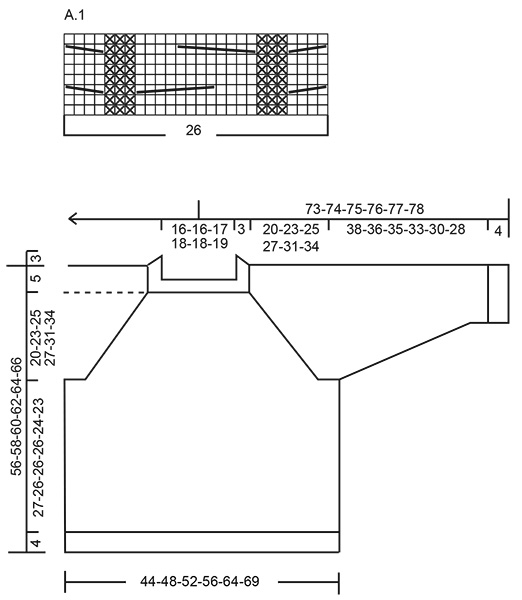
------------------------------------------------------- EXPLANATIONS FOR THE PATTERN: ------------------------------------------------------- PATTERN: See diagram A.1. RAGLAN: Increase 1 stitch on each side of the stitch in stocking stitch (stitch with marker thread) in each transition between body and sleeves (= 8 stitches increased on the round). Increase 1 stitch by making 1 yarn over. On the next round work the yarn overs twisted to avoid holes. Then work the new stitches in stocking stitch. DECREASE TIP (for sleeves): Decrease 1 stitch on either side of the marker thread as follows: Work until there are 3 stitches left before the marker thread, knit 2 together, knit 2 (marker thread sits between these 2 stitches), slip 1 stitch as if to knit, knit 1 and pass the slipped stitch over the knitted stitch. CASTING-OFF TIP: To avoid the cast-off edge being tight you can cast off with a larger size needle. If the edge is still tight, make 1 yarn over after approx. each 4th stitch at the same time as casting off; the yarn overs are cast off as normal stitches. ------------------------------------------------------- START THE PIECE HERE: ------------------------------------------------------- JUMPER – SHORT OVERVIEW OF THE PIECE: The yoke is worked in the round with circular needle from mid-back and top down. AT THE SAME TIME increases are made for raglan. The yoke is divided for body and sleeves and the body continued in the round. The sleeves are worked in the round with short circular needle/double pointed needles, top down. YOKE: Cast on 88-92-96-100-104-108 stitches with circular needle size 4 mm and 1 strand Kid-Silk and 1 strand Alpaca (= 2 strands). Knit 1 round, then work rib (knit 1, purl 1) over all stitches for 3 cm. Change to circular needle size 5 mm and insert 1 marker here. The yoke will now be measured from this marker. Insert 4 marker threads in the piece as follows (without working the stitches): Count 11-12-13-14-15-16 stitches (= half back piece), insert 1 marker thread in the next stitch, count 20 stitches (= sleeve), insert 1 marker thread in the next stitch, count 22-24-26-28-30-32 stitches (= front piece), insert 1 marker thread in the next stitch, count 20 stitches (= sleeve), insert 1 marker thread in the next stitch, there are 11-12-13-14-15-16 stitches left on the round before the first marker thread (= half back piece). Knit 1 round where you increase 6 stitches evenly on both sleeves = 100-104-108-112-116-120 stitches (26 stitches on each sleeve). Then work stocking stitch over the front and back pieces and A.1 (= 26 stitches) over each sleeve, AT THE SAME TIME on the first round, increase to RAGLAN in each transition between body and sleeves – read description above. Increase to raglan every 2nd round a total of 22-25-27-29-33-36 times on both sides of all 4 stitches with marker threads = 276-304-324-344-380-408 stitches. REMEMBER THE KNITTING TENSION! After the last increase to raglan continue working without further increases until the piece measures 20-23-25-27-31-34 cm from the marker. The next round is worked as follows: Work the first 34-38-41-44-49-53 stitches (= half back piece), place the next 70-76-80-84-92-98 stitches on 1 thread for the sleeve and cast on 6-6-6-8-10-12 new stitches on the needle (= in side under the sleeve), work the next 68-76-82-88-98-106 stitches (= front piece), place the next 70-76-80-84-92-98 stitches on 1 thread for the sleeve and cast on 6-6-6-8-10-12 new stitches on the needle (= in side under the sleeve) and work the remaining 34-38-41-44-49-53 stitches (= half back piece). THE PIECE IS NOW MEASURED FROM HERE! BODY: = 148-164-176-192-216-236 stitches. Continue with stocking stitch until the piece measures 27-26-26-26-24-23 cm from the division. Change to circular needle size 4 mm. Work rib (purl 1, knit 1) over all stitches until the rib measures 4 cm. Loosely cast off with knit over knit and purl over purl, read CASTING-OFF TIP. The jumper measures approx. 56-58-60-62-64-66 cm from the shoulder. SLEEVE: Place the 70-76-80-84-92-98 stitches from the thread on the one side of the piece on double pointed needles/short circular needle size 5 mm and knit up 1 stitch in each of the 6-6-6-8-10-12 stitches cast on under the sleeve = 76-82-86-92-102-110 stitches. Insert a marker thread in the middle of the 6-6-6-8-10-12 stitches under the sleeve. Allow the thread to follow your work onwards; it will be used when decreasing under the sleeve. Start at the marker thread and continue with stocking stitch and A.1 in the round. When the piece measures 3 cm from the division, decrease 2 stitches under the sleeve – read DECREASE TIP. Decrease like this every 3½-3-2-1½-1-1 cm a total of 10-11-13-16-19-21 times = 56-60-60-60-64-68 stitches. Continue working until the sleeve measures 38-36-35-33-30-28 cm from the division (or to desired length; shorter measurements in larger sizes due to longer yoke). Work 1 round where you decrease 12 stitches evenly over the stitches in A.1 = 44-48-48-48-52-56 stitches. Change to double pointed needles size 4 mm and work rib (= knit 1, purl 1) for 4 cm. Loosely cast off with knit over knit and purl over purl but to avoid the cast-off edge being tight, use double pointed needles size 5 mm. Work the other sleeve in the same way. |
|||||||||||||||||||
Diagram explanations |
|||||||||||||||||||
|
|||||||||||||||||||
 |
|||||||||||||||||||
Have you finished this pattern?Tag your pictures with #dropspattern #deepwoodssweater or submit them to the #dropsfan gallery. Do you need help with this pattern?You'll find 30 tutorial videos, a Comments/Questions area and more by visiting the pattern on garnstudio.com. © 1982-2026 DROPS Design A/S. We reserve all rights. This document, including all its sub-sections, has copyrights. Read more about what you can do with our patterns at the bottom of each pattern on our site. |
|||||||||||||||||||


With over 40 years in knitting and crochet design, DROPS Design offers one of the most extensive collections of free patterns on the internet - translated to 17 languages. As of today we count 324 catalogues and 12290 patterns translated into English (UK/cm). 12290
We work hard to bring you the best knitting and crochet have to offer, inspiration and advice as well as great quality yarns at incredible prices! Would you like to use our patterns for other than personal use? You can read what you are allowed to do in the Copyright text at the bottom of all our patterns. Happy crafting!
Post a comment to pattern DROPS 215-5
We would love to hear what you have to say about this pattern!
If you want to leave a question, please make sure you select the correct category in the form below, to speed up the answering process. Required fields are marked *.