
Popular categories
Looking for a yarn?


Comments / Questions (27)
![]() Maruschka wrote:
Maruschka wrote:
Met welke wol zou ik deze jurk kunnen breien op de breimachine ( een tussenbreier) ?
29.09.2019 - 09:44DROPS Design answered:
Dag Maruschka,
De patronen op onze website zijn allemaal ontworpen om met de hand te breien. Voor advies over te gebruiken garen met de breimachine, kun je het beste even contact opnemen met het verkooppunt van het garen of de breimachine.
03.10.2019 - 16:25
![]() Margaux wrote:
Margaux wrote:
Bonjour, je suis débutante dans la lecture de diagramme et je ne comprend pas à quoi correspondent les ovales complètement blancs, ils ne sont pas dans la légende. J'imagine qu'il s'agit de jeté mais quel est leur particularité par rapport aux ovales barrés à la verticale ? Merci d'avance pour votre réponse, la richesse et la diversité de votre site !
24.09.2019 - 14:25DROPS Design answered:
Bonjour Margaux, les ovales sont tous des jetés (qu'ils soient barrés ou non) et correspondent au 3ème symbole de la légende = on les tricote normalement pour qu'ils forment des trous. Seuls les ovales noirs (= 4ème symbole) seront des jetés tricotés torse pour éviter des trous. Bon tricot!
24.09.2019 - 14:39
![]() Michèle Stubbé wrote:
Michèle Stubbé wrote:
Dans le modèle r-737 Moo,shine Dance, il y a une erreur : Les diminutions sont trop importantes par rapport au nombre de mailles restantes. 9 x 8m = 72m et 11 x 8m = 88m, soit 160m, alors que 336m - 256m restantes = 80m de diminutions au total (si on diminue de part et d'autre des 4 marqueurs = 8m à chaque rang de diminutions). En fait, pour arriver au même résultat que vous il faut diminuer 9 x 4m et 11 x 4m = 80 m
19.07.2019 - 15:29
![]() Laura Moerland wrote:
Laura Moerland wrote:
Dag, Wordt het patroon gebreid van boven naar onder?
15.06.2019 - 17:49DROPS Design answered:
Dag Laura,
Nee, het patroon begint onderaan bij de rok en je breit naar boven toe. (Dit staat ook in de samenvatting :) )
17.06.2019 - 14:42
![]() Tealea wrote:
Tealea wrote:
Kann es sein, dass es in der Legende ein paar Fehler gibt? Ich vermisse die Symbole für die ersten drei Stellen im Diagramm.
27.04.2019 - 00:32DROPS Design answered:
Liebe Tealea, Diagram sowie Legende sollten richtig sein, welche Symbole vermissen Sie genau? (die 4 ersten Reihen in A.1 werden z.B. glatt rechts gestrickt). Viel Spaß beim stricken!
29.04.2019 - 11:46
![]() Sara Blasingame wrote:
Sara Blasingame wrote:
It looks very pretty classic and very pretty.
03.04.2019 - 06:33
![]() Domi wrote:
Domi wrote:
Cette petite robe me plaît vraiment beaucoup, j'attends avec impatience les explications
28.02.2019 - 10:28
![]() Lena østerling wrote:
Lena østerling wrote:
Kommer den ikke snart ud så man kan begynde af strikke den så den er klar når sommeren starter
14.02.2019 - 12:17
![]() Sabine Fischer wrote:
Sabine Fischer wrote:
Wann kommt die anleitung lg
11.02.2019 - 12:23
![]() Barbara Herr wrote:
Barbara Herr wrote:
Das muss ich haben 👍🏻 Wo find ich diese Anleitung bitte.
23.01.2019 - 14:35
|
|||||||||||||||||||||||||||||||
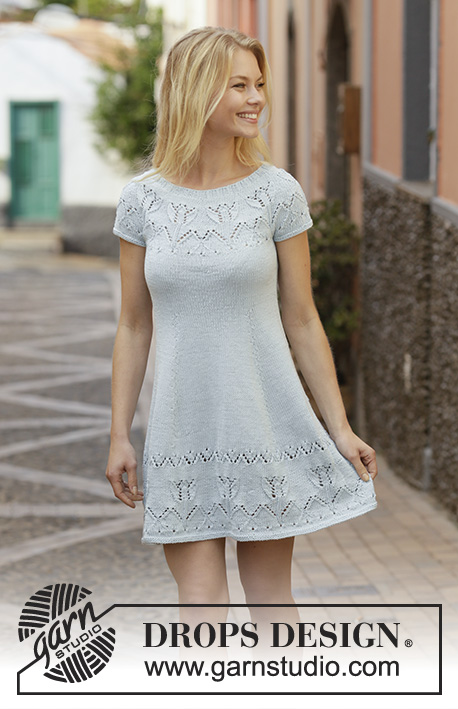
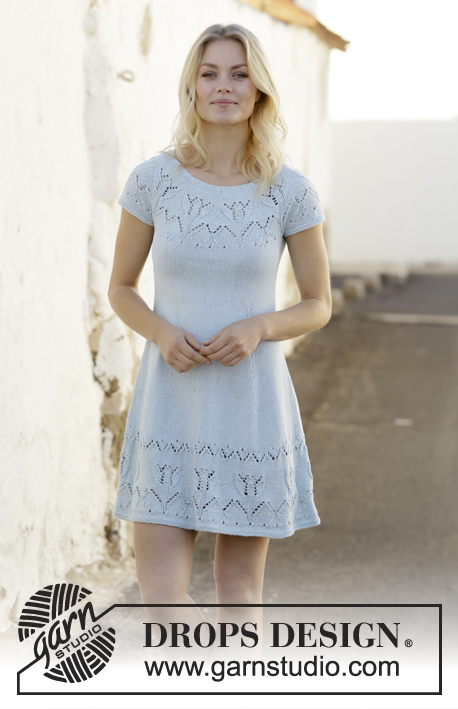
Moonshine Dance#moonshinedancedress |
|||||||||||||||||||||||||||||||
 |
 |
||||||||||||||||||||||||||||||
Knitted dress with round yoke in DROPS Muskat. The piece is worked with lace and tulip pattern. Sizes S - XXXL.
DROPS 199-9 |
|||||||||||||||||||||||||||||||
|
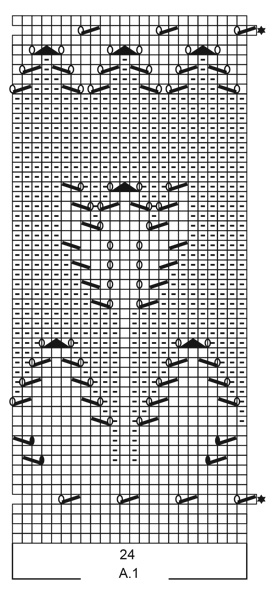
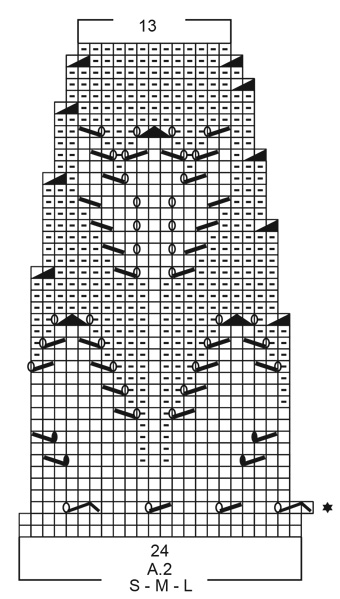
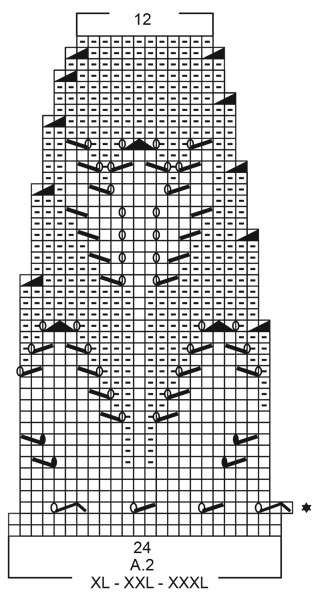
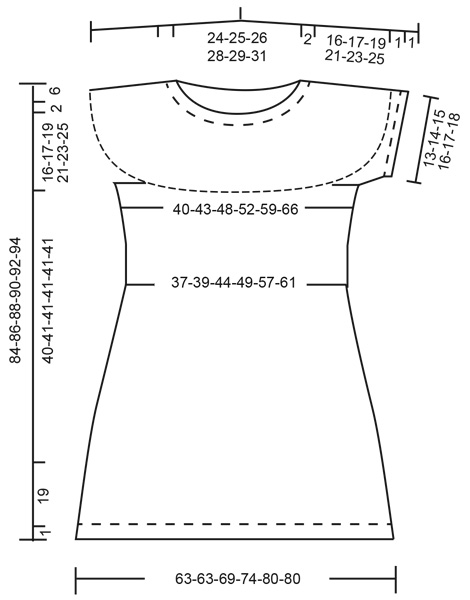
------------------------------------------------------- EXPLANATIONS FOR THE PIECE: ------------------------------------------------------- RIDGE/GARTER STITCH (worked in the round): 1 ridge in height = 2 rounds; Knit 1 round and purl 1 round. PATTERN: See diagrams A.1 and A.2. Choose diagram for your size (applies to A.2). The diagrams show all rows in pattern seen from the right side. DECREASE TIP-1 (for body): Decrease 4 stitches on each decrease-round. Decrease before the marker thread as follows: Work until there are 2 stitches left before marker thread, slip 1 stitch as if to knit, knit 1 and pass the slipped stitch over (= 1 stitch decreased). Repeat at each of the other marker threads (= 4 stitches decreased on round). Decrease after the marker thread as follows: Work as far as the marker thread, knit the next 2 stitches together (= 1 stitch decreased). Repeat at each of the other marker threads (= 4 stitches decreased). Work decreases alternately before and after the marker thread each time you decrease. DECREASE TIP-2 (evenly spaced): To work out how to decrease evenly, count the total number of stitches on the needle (e.g. 252 stitches) and divide by the number of decreases to be made (e.g. 12) = 21. In this example, decrease by knitting together each 20th and 21st stitch. INCREASE TIP-1 (for sides of body): Work until there are 2 stitches left before marker thread, 1 yarn over, knit 4 (marker thread sits in middle of these 4 stitches), 1 yarn over (= 2 stitches increased). On the next round knit the yarn overs twisted to avoid holes. Then work the new stitches in stocking stitch. INCREASE TIP-2 (evenly spaced): To work out how to increase evenly, count the total number of stitches on the needle (e.g. 54 stitches) and divide by the number of increases to be made (e.g. 4) = 13.5. In this example, increase by making 1 yarn over after alternately each 13th and 14th stitch. On the next round work the yarn overs twisted to avoid holes. ------------------------------------------------------- START THE PIECE HERE: ------------------------------------------------------- DRESS - SHORT OVERVIEW OF THE PIECE: The piece is worked in the round with circular needle as far as the yoke. Then the sleeves are worked in the round with double pointed needles before they are placed on same circular needle as the body. The yoke is worked to finish. BODY: Cast on 264-264-288-312-336-336 stitches with circular needle size 3.5 mm and Muskat. Insert a marker thread at the beginning of the round (=mid-back). This thread follows your work upwards. Work 2 RIDGES - read description above. Change to circular needle size 4 mm and work pattern A.1 a total of 11-11-12-13-14-14 times on the round. REMEMBER THE KNITTING TENSION! When A.1 has been completed in height the piece measures approx. 20 cm. Now insert 4 marker threads in the piece as follows: One marker thread is inserted after 29-29-32-34-36-36 stitches, the next marker thread after 74-74-80-88-96-96 new stitches, the next marker thread after 58-58-64-68-72-72 new stitches and the last marker thread after 74-74-80-88-96-96 new stitches. There are 29-29-32-34-36-36 stitches left on round after the last thread. Continue with stocking stitch in the round. AT THE SAME TIME on the first round begin to decrease by each of the 4 marker threads – read DECREASE TIP-1. Decrease (alternately before and after the marker threads) every 2 cm 2-4-3-2-4-9 times and every cm 25-21-23-25-21-11 times (= a total of 27-25-26-27-25-20 decrease-rounds) = 156-164-184-204-236-256 stitches. Remove all the marker threads from the piece, except the marker thread at the beginning of the round. Insert 1 marker thread on both sides of the piece; i.e. one marker thread after the first 39-41-46-51-59-64 stitches and the second marker thread after 78-82-92-102-118-128 new stitches. There are 39-41-46-51-59-64 stitches left on the round after the last marker thread. When the piece measures 49 cm increase 1 stitch on both sides of each marker thread in the sides – read INCREASE TIP-1. Increase like this every 4-3-3-3-3-2 cm a total of 3-4-4-4-4-5 times = 168-180-200-220-252-276 stitches. When the piece measures 60-61-61-61-61-61 cm, work the next round as follows: Work the first 38-41-45-50-57-63 stitches, cast off the next 8-8-10-10-12-12 stitches (= 4-4-5-5-6-6 stitches on each side of marker thread) work the next 76-82-90-100-114-126 stitches, cast off the next 8-8-10-10-12-12 stitches (= 4-4-5-5-6-6 stitches on each side of marker thread) and work the remaining 38-41-45-50-57-63 stitches on the round = 76-82-90-100-114-126 stitches on both front and back pieces (a total of 152-164-180-200-228-252 stitches). Lay the piece to one side and work the sleeves. SLEEVE: Cast on 54-60-62-68-72-76 stitches with double pointed needles size 3.5 mm and Muskat. Work 2 ridges in the round. Knit 1 round where you increase 4 stitches evenly spaced – read INCREASE TIP-2 = 58-64-66-72-76-80 stitches. Change to double pointed needles size 4 mm and work stocking stitch in the round for 1 cm. Now cast off the middle 8-8-10-10-12-12 stitches under the sleeve for armhole (i.e. the first and last 4 stitches on the round) = 50-56-56-62-64-68 stitches. Lay the piece to one side and work the other sleeve in the same way. YOKE: Place sleeves on the same circular needle as the body, where you cast off stitches for the armhole on each side = 252-276-292-324-356-388 stitches. Knit 1 round where you decrease 12-12-12-12-14-12 stitches evenly spaced – read DECREASE TIP-2 = 240-264-280-312-342-376 stitches. Then work the different sizes as follows: Size S: Size S is finished, continue with next paragraph. Size M: Work stocking stitch for 2 cm, then work the next paragraph. In sizes L, XL, XXL and XXXL work stocking stitch for 4-5-7-9 cm, at the same time as you decrease evenly as follows: Size L: Decrease 16 stitches every 2 cm 1 time = 264 stitches. Size XL: Decrease 12 stitches every 2 cm a total of 2 times = 288 stitches. Size XXL: Decrease 18 stitches every 2 cm a total of 3 times = 288 stitches. Size XXXL: Decrease 16 stitches every 2 cm a total of 4 times = 312 stitches. All sizes: Now work pattern A.2 – choose diagram for your size, a total of 10-11-11-12-12-13 times on the round. When A.2 has been completed in height there are 130-143-143-144-144-156 stitches on the round. Purl for 0-0-0-1-1-1 cm, then purl 1 round where you adjust the number of stitches - read DECREASE TIP-2/INCREASE TIP-2, to 132-140-144-148-152-160 stitches. Change to circular needle size 3.5 mm and work rib (knit 2, purl 2) for 2 cm. Cast off with knit over knit and purl over purl. ASSEMBLY: Sew together the opening under the sleeves. |
|||||||||||||||||||||||||||||||
Diagram explanations |
|||||||||||||||||||||||||||||||
|
|||||||||||||||||||||||||||||||
 |
|||||||||||||||||||||||||||||||
 |
|||||||||||||||||||||||||||||||
 |
|||||||||||||||||||||||||||||||
 |
|||||||||||||||||||||||||||||||
Have you finished this pattern?Tag your pictures with #dropspattern #moonshinedancedress or submit them to the #dropsfan gallery. Do you need help with this pattern?You'll find 29 tutorial videos, a Comments/Questions area and more by visiting the pattern on garnstudio.com. © 1982-2026 DROPS Design A/S. We reserve all rights. This document, including all its sub-sections, has copyrights. Read more about what you can do with our patterns at the bottom of each pattern on our site. |
|||||||||||||||||||||||||||||||


With over 40 years in knitting and crochet design, DROPS Design offers one of the most extensive collections of free patterns on the internet - translated to 17 languages. As of today we count 324 catalogues and 12290 patterns translated into English (UK/cm). 12290
We work hard to bring you the best knitting and crochet have to offer, inspiration and advice as well as great quality yarns at incredible prices! Would you like to use our patterns for other than personal use? You can read what you are allowed to do in the Copyright text at the bottom of all our patterns. Happy crafting!
Post a comment to pattern DROPS 199-9
We would love to hear what you have to say about this pattern!
If you want to leave a question, please make sure you select the correct category in the form below, to speed up the answering process. Required fields are marked *.