
Popular categories
Looking for a yarn?


Comments / Questions (24)
![]() Chritiane wrote:
Chritiane wrote:
ù uncorporer les 8 mailles dans les 54 mailles une a la fois toures les 6 /7 mailles ou bien toutes ensemble en une seule fois' merci pour votre reponsene Ch
21.07.2024 - 14:10DROPS Design answered:
Bonjour Christiane, parlez-vous des 54 mailles des manches mises en attente que l'on reprend ensuite pour les tricoter? Les 8 mailles relevées sont à relever dans les 8 mailles que vous avez monté lors de la division de l'empiècement; autrement dit, tricotez comme indiqué dans la photo 18 B) de cette leçon. Bon tricot!
29.07.2024 - 10:35
![]() Paule wrote:
Paule wrote:
Modelle 107/4 ,de nouveau, j ai besoin de votre aide, Avec 224 M, les motifs ne s alignent pas avec les motifs N:3 je trouve que cela n est pas très beau . Est.ce normal? merci beaucoup pour votre conseil. Vos modeles sont très beaux et variès fèlicitations!
05.04.2024 - 09:15DROPS Design answered:
Bonjour Paule, au fur et à mesure des augmentations, les motifs ne seront pas alignés comme dans le diagramme, mais plutôt comme sur la photo, car le nombre d'augmentations est effectué à intervalles réguliers tout le tour, toutefois, vous devez toujours avoir suffisamment de mailles pour y répéter les 8 mailles du diagramme. Bon tricot!
05.04.2024 - 14:55
![]() Paule wrote:
Paule wrote:
Je Je vous remercie par avance jene sais comment commencer mon 2 eme dessin ? tout de suite je passe à la fleche 2 mais alors que sont ces rangs entre fleche 1 et fleche2? Je suis completement perdue!!! Encore merci pour votre reponse
06.02.2024 - 17:09DROPS Design answered:
Bonjour Paule, les diagrammes se lisent de bas en haut, tous les tours de droite à gauche. Les flèches dans le diagramme indiquent les tours où il faut augmenter à intervalles réguliers. Les motifs ne seront pas directement alignés comme dans le diagramme en raison des augmentations mais répétez les 8 mailles de A.2 tout le tour comme dans le diagramme. Bon tricot!
07.02.2024 - 08:10
![]() Rene Bracken wrote:
Rene Bracken wrote:
There are no measurements for the sizes.
27.11.2023 - 00:53DROPS Design answered:
Dear Mrs Bracken, you will find all finished measurements for each size in the chart - they are in cm, convert into inches here>/a>, and read more about sizing here. Happy knitting!
27.11.2023 - 10:13
![]() Chritine wrote:
Chritine wrote:
Comment faire un rajout de cotes ( 2 cm + haut) sur le début de mon modele 197/4 déjà terminé Merci
02.10.2023 - 21:20DROPS Design answered:
Bonjour Christine, vous pouvez utiliser cette technique au niveau du col pour reprendre les côtes et les rallonger à votre convenance. Bon tricot!
03.10.2023 - 07:57
![]() Annick wrote:
Annick wrote:
Pour le pull 197-4 le jacquard se commence après les augmentations A2 ? Taille M Merci d'avance pour l'info
22.06.2023 - 16:20DROPS Design answered:
Bonjour Annick, le diagramme A.2 correspond au jacquard, à chacun des rangs avec une flèche dans A.2, vous allez augmenter à intervalles réguliers comme indiqué dans les explications pour votre taille, soit 32 mailles à la flèche-1 en taille M, puis 24 m à la flèche-2 et ainsi de suite ; dès que les augmentations sont faites, tricotez le tour suivant comme avant en répétant les 8 mailles du diagramme, les motifs ne vont pas se répéter les uns au-dessus des autres comme dans le diagramme, mais vont se répéter tout le tour comme sur la photo. Bon tricot!
22.06.2023 - 17:23
![]() Willeke Van Dolderen wrote:
Willeke Van Dolderen wrote:
Old Mill Pullover: als ik de verhoging voor de hals wil breien moet ik dan ook direct A1 breien met de averechte steken?
14.07.2022 - 16:29DROPS Design answered:
Dag Willeke,
Nee, je breit eerst A.1 dan brei je de verhoging voor de hals in licht eiken in tricotsteek. Als je daarmee klaar bent begin je met de pas. Dus geen A.1 breien in de verkorte naalden voor de verhoging.
17.07.2022 - 11:36
![]() Doris wrote:
Doris wrote:
Warum sind hier Zunahmen für Raglan beschrieben? Ich dachte, es sei eine Rundpasse.
09.07.2021 - 19:43
![]() Doris wrote:
Doris wrote:
Warum sind hier Zunahmen für Raglan beschrieben? Ich dachte, es sei eine Rundpasse.
09.07.2021 - 19:37DROPS Design answered:
Liebe Doris, wenn das Diagram A.2 gestrickt wird, braucht man einige Zunahmen noch, dann wird es 5 bis 15 Mal in jede 2. Runde für die Passe (= Raglan) zugenommen. Viel Spaß beim stricken!
12.07.2021 - 07:08
![]() Rini V Hak wrote:
Rini V Hak wrote:
Mijn boord krult helemaal naar boven.net boven het a1 patroon. Hoe komt dit en wat kan ik er aan doen?
05.12.2020 - 11:46DROPS Design answered:
Dag Rini,
Als de boord te wijd is waardoor hij omkrult, zou je de boord met een dunnere naald kunnen breien. Je kunt de boord ook voorzichtig oppersen met een natte theedoek tussen het werk en het strijkijzer; heel voorzichtig deppen met het strijkijzer. Let er op dat je dit heel voorzichtig doet, anders kun je de textuur vernielen.
06.12.2020 - 13:47
|
||||||||||||||||
Old Mill Pullover#oldmillpullover |
||||||||||||||||
 |
 |
|||||||||||||||
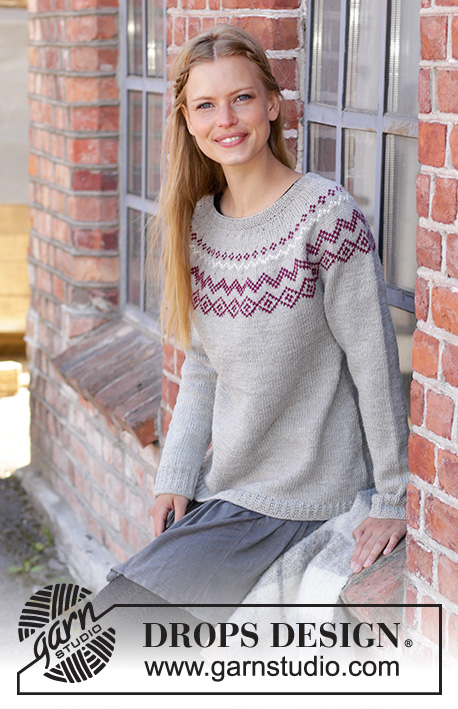
Knitted jumper in DROPS Karisma or DROPS Merino Extra Fine. The piece is worked top down with Nordic pattern. Sizes S - XXXL.
DROPS 197-4 |
||||||||||||||||
|
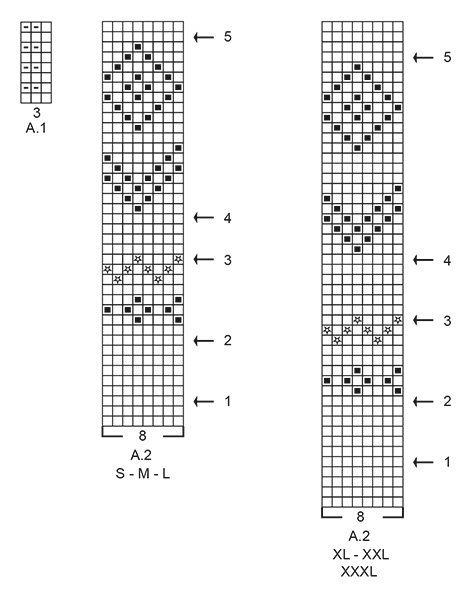
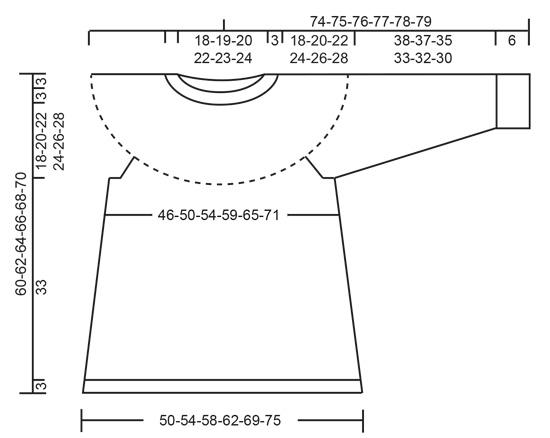
EXPLANATIONS FOR THE PATTERN: ------------------------------------------------------- PATTERN: See diagrams A.1 and A.2. Choose diagram for your size (applies to A.2). The diagrams show all rows in the pattern seen from the right side. INCREASE TIP-1 (evenly spaced): To work out how to increase evenly, count the total number of stitches on the needle (e.g. 99 stitches) and divide by the number of increases to be made (e.g. 29) = 3.4. In this example, increase by making 1 yarn over after alternately each 3rd and 4th stitch (approx.). On the next round knit the yarn overs twisted to avoid holes. ELEVATION (in back of neck): Skip this section if you do not want an elevation. Insert 1 marker at the beginning of the round (mid back). With light oak, knit 16-17-18-19-20-21 stitches past the marker, turn, tighten the strand and purl 32-34-36-38-40-42 stitches. Turn, tighten the strand and knit 48-51-54-57-60-63 stitches, turn, tighten the strand and purl 64-68-72-76-80-84 stitches. Turn, tighten the strand and knit 80-85-90-95-100-105 stitches, turn, tighten the strand and purl 96-102-108-114-120-126 stitches. Turn tighten the strand and knit to mid back. Then work YOKE as described in the text. KNITTING TIP: To avoid the knitting tension becoming tighter when working pattern, it is important that the strands at the back of the piece are not tight. You can use a size larger needle when working pattern if this is a problem. RAGLAN: Increase to raglan on each side of the 4 marker threads as follows: Start 1 stitch before the marker thread, make 1 yarn over, knit 2 (the marker thread sits in the middle of these 2 stitches), make 1 yarn over. On the next round knit the yarn overs twisted to avoid holes. Then work the increased stitches in stocking stitch! INCREASE TIP-2 (for sides of body): Work until there are 3 stitches left before the marker thread, 1 yarn over, knit 6 (the marker thread sits in the middle of these 6 stitches) 1 yarn over (= 2 stitches increased). On the next round knit the yarn overs twisted to avoid holes. Then work the new stitches in stocking stitch. DECREASE TIP (for mid under sleeves): Start 3 stitches before the marker thread, knit 2 together, knit 2 (= the marker thread sits in the middle of these 2 stitches), slip 1 stitch as if to knit, knit 1, pass the slipped stitch over the knitted stitch (= 2 stitches decreased). ------------------------------------------------------- START THE PIECE HERE: ------------------------------------------------------- JUMPER - SHORT OVERVIEW OF THE PIECE: Neck, yoke and body are worked in the round with circular needle, top down. The sleeves are worked in the round with short circular needle/double pointed needles, top down. NECK: Cast on 99-102-108-114-117-123 stitches with short circular needle size 3.5 mm and light oak. Knit 1 round. Then work A.1 in the round until the neck measures 3 cm from the cast-on edge. Knit 1 round where you increase 29-34-36-38-35-37 stitches evenly on round – read INCREASE TIP-1 = 128-136-144-152-152-160 stitches. Change to circular needle size 4 mm and knit 1 round. You can now work an elevation in the back of the neck so that the yoke is slightly higher at the back. This elevation can be left out; the neck is then the same front and back – work ELEVATION – read description above, or go straight to YOKE. YOKE: Read KNITTING TIP! Work A.2 in the round (= 16-17-18-19-19-20 repeats of 8 stitches). AT THE SAME TIME on each round marked with an arrow in A.2 increase evenly on round as described below – read INCREASE TIP-1 and REMEMBER THE KNITTING TENSION! On the round marked with arrow-1 increase 24-32-32-32-40-40 stitches evenly on round = 152-168-176-184-192-200 stitches (there is now room for 19-21-22-23-24-25 repeats of 8 stitches). On the round marked with arrow-2 increase 24-24-24-32-40-40 stitches evenly on round = 176-192-200-216-232-240 stitches (there is now room for 22-24-25-27-29-30 repeats of 8 stitches). On the round marked with arrow-3 increase 24-24-24-32-32-32 stitches evenly on round = 200-216-224-248-264-272 stitches (there is now room for 25-27-28-31-33-34 repeats of 8 stitches). On the round marked with arrow-4 increase 24-24-24-24-24-24 stitches evenly on round = 224-240-248-272-288-296 stitches (there is now room for 28-30-31-34-36-37 repeats of 8 stitches). On the round marked with arrow-5 increase 22-18-18-22-18-10 stitches evenly on round = 246-258-266-294-306-306 stitches. Work A.2 until it is finished. The piece now measures approx. 18-18-18-21-21-21 cm from the cast-on edge mid front. Insert 4 marker threads in the piece as follows (without working the stitches): Insert the first marker thread after the first 40-41-42-47-51-53 stitches (= ½ back piece), 2nd marker thread is inserted after the next 44-48-50-54-52-48 stitches (= sleeve), 3rd marker thread is inserted after the next 79-81-83-93-101-105 stitches (= front piece) and 4th marker thread is inserted after the next 44-48-50-54-52-48 stitches (= sleeve). There are 39-40-41-46-50-52 stitches left after the last marker thread (= ½ back piece). The marker threads will be used when increasing to raglan. Continue in the round with stocking stitch and light oak. AT THE SAME TIME on the next round increase to RAGLAN on each side of the 4 marker threads – read description above = 8 stitches increased. Increase like this every 2nd round a total of 5-8-10-10-12-15 times = 286-322-346-374-402-426 stitches. Continue working without increasing until the piece measures 21-23-25-27-29-31 cm from the cast-on edge mid front. The next round is worked as follows: Work 45-49-52-57-63-68 stitches in stocking stitch (= ½ back piece), place the next 54-64-70-74-76-78 stitches on 1 thread for sleeve, cast on 8-8-10-10-12-14 new stitches on the needle (= in side under sleeve), work 89-97-103-113-125-135 stitches in stocking stitch (= front piece), place the next 54-64-70-74-76-78 stitches on 1 thread for sleeve, cast on 8-8-10-10-12-14 new stitches on the needle (= in side under sleeve) and work the remaining 44-48-51-56-62-67 stitches in stocking stitch (= ½ back piece). Body and sleeves are finished separately. THE PIECE IS NOW MEASURED FROM HERE! BODY: = 194-210-226-246-274-298 stitches. Insert 1 marker thread in each side, i.e. in the middle of the 8-8-10-10-12-14 stitches cast on under the sleeves and allow the marker threads to follow your work onwards. The marker threads will be used when increasing on each side of the body. Continue in the round with stocking stitch and light oak. When the piece measures 4 cm from the division, increase 1 stitch on each side of both marker threads - read INCREASE TIP-2 = 4 stitches increased. Increase like this every 8 cm a total of 4 times in each side = 210-226-242-262-290-314 stitches. Continue working until the piece measures 33 cm from the division in all sizes. Knit 1 round where you increase 33-35-37-41-46-49 stitches evenly on round = 243-261-279-303-336-363 stitches. Change to circular needle size 3.5 mm and work A.1 in the round for 3 cm. Loosely cast off with knit. The jumper measures approx. 60-62-64-66-68-70 cm from the shoulder down. SLEEVE: Place the 54-64-70-74-76-78 stitches from the thread on the one side of the piece on short circular needle or double pointed needles size 4 mm and knit up with light oak 1 stitch in each of the 8-8-10-10-12-14 stitches cast on under the sleeve = 62-72-80-84-88-92 stitches. Insert 1 marker thread in the middle of the 8-8-10-10-12-14 stitches under the sleeve and allow the marker thread to follow your work onwards. The marker thread will be used when decreasing under the sleeve. Start the round by the marker thread and work stocking stitch in the round. When the piece measures 2 cm from the division, decrease 2 stitches mid under sleeve - read DECREASE TIP-1. Decrease like this every 1 cm a total of 0-0-4-6-8-12 times, every 2nd round a total of 3-7-6-12-11-8 times and then every 4-3-2½-0-0-0 cm a total of 7-7-7-0-0-0 times = 42-44-46-48-50-52 stitches. Continue working until the piece measures 38-37-35-33-32-30 cm from the division (shorter measurements in larger sizes due to longer yoke). Knit 1 round where you increase 6-4-5-6-4-5 stitches evenly on round = 48-48-51-54-54-57 stitches. Change to double pointed needles size 3.5 mm and work A.1 in the round (= 16-16-17-18-18-19 repeats of 3 stitches). Continue this pattern until the edge measures 6 cm. Loosely cast off with knit. The sleeve measures approx. 44-43-41-39-38-36 cm from the division. Work the other sleeve in the same way. |
||||||||||||||||
Diagram explanations |
||||||||||||||||
|
||||||||||||||||
 |
||||||||||||||||
 |
||||||||||||||||
Have you finished this pattern?Tag your pictures with #dropspattern #oldmillpullover or submit them to the #dropsfan gallery. Do you need help with this pattern?You'll find 29 tutorial videos, a Comments/Questions area and more by visiting the pattern on garnstudio.com. © 1982-2026 DROPS Design A/S. We reserve all rights. This document, including all its sub-sections, has copyrights. Read more about what you can do with our patterns at the bottom of each pattern on our site. |
||||||||||||||||


With over 40 years in knitting and crochet design, DROPS Design offers one of the most extensive collections of free patterns on the internet - translated to 17 languages. As of today we count 324 catalogues and 12290 patterns translated into English (UK/cm). 12290
We work hard to bring you the best knitting and crochet have to offer, inspiration and advice as well as great quality yarns at incredible prices! Would you like to use our patterns for other than personal use? You can read what you are allowed to do in the Copyright text at the bottom of all our patterns. Happy crafting!
Post a comment to pattern DROPS 197-4
We would love to hear what you have to say about this pattern!
If you want to leave a question, please make sure you select the correct category in the form below, to speed up the answering process. Required fields are marked *.