
Popular categories
Looking for a yarn?


Comments / Questions (30)
![]() Levieux wrote:
Levieux wrote:
Bjr, je ne comprends pourquoi une aiguille circulaire, ce chale ne se travaille pas en rond?
12.07.2018 - 07:59DROPS Design answered:
Bonjour Mme Levieux, tout à fait, le châle se tricote bien en allers et retours, mais pour avoir suffisamment de place pour toutes les mailles, on utilise une aiguille circulaire de 80 cm de long - et il est même recommandé d'en utiliser plusieurs vers la fin pour plus de confort. Bon tricot!
12.07.2018 - 09:17
![]() Hansi Koekkoek wrote:
Hansi Koekkoek wrote:
Het patroon eindigt met 463 steken, maar in de 17e naald van A. 9B moeten er 2 omslagen worden gemaakt. Volgens mij komen er dan nog 60 steken bij - 2 x 15 herhalingen van 12 steken. Het totaal aantal steken zou dan 523 moeten zijn. Klopt dit? Alvast dank voor uw antwoord.
03.07.2018 - 15:04Gerda Santos wrote:
Gostaria de comprar as lãs DROPS AIR?? Como faço?? Qual o site de contato para compra? E os valores ??? Meu endereço Rua: São Pedro , 61 Cabral - Curitiba - Paraná _ Brasil
22.06.2018 - 15:33DROPS Design answered:
Por enquanto, não existe nenhuma loja DROPS no Brasil. Para comprar os nossos fios, clique em lojas que vendem nossos fios para o mundo inteiro e bastará encomendar de uma dessas lojas. Bom Tricô!
25.06.2018 - 16:36
![]() Freres wrote:
Freres wrote:
Bonjour, J'ai commencé le châle et je n'ai pas le même résultat que sur la photo .Même les motifs ne correspondent pas . N'y aurait-il pas un souci avec les explications ? Merci d'avance,
21.06.2018 - 21:32DROPS Design answered:
Bonjour Mme Freres, les diagrammes correspondent bien aux différents motifs du châle. Commencez bien les diagrammes en commençant en bas à droite sur l'endroit et de droite à gauche sur l'endroit (= de gauche à droite sur l'envers) en veillant à bien tricoter à l'endroit sur l'envers les rangs avec un point noir dans A.1A à C. Bon tricot!
22.06.2018 - 08:49
![]() Karin Jensen wrote:
Karin Jensen wrote:
Hej Efter tegnforklaring skal det være omslag Men skal det ikke være dobbelt omslag.
25.05.2018 - 19:54DROPS Design answered:
Hei Karin. Det har du helt rett i - det var en feil i den danske versjonen av oppskriften. Dette er nå blitt rettet. Takk for beskjed og god fornøyelse
30.05.2018 - 11:56
![]() Karin Jensen wrote:
Karin Jensen wrote:
Hej Er klar til at strikke sjalet, i dette lækre garn. Er i tvivl om det skal være dobbelt omslag? Tak!
25.05.2018 - 19:46
![]() Brigitte wrote:
Brigitte wrote:
Liebes DROPS-Team, bei dieser Anleitung findet sich auf der Überblicksseite ein Diamant als Zeichen. Was bedeutet das? (Manchmal findet sich dort auch eine Uhr. Was bedeutet diese?) Ich habe nichts dazu auf der Homepage gefunden. Danke!! :-)
23.05.2018 - 23:52DROPS Design answered:
Liebe Brigitte, Die Modellen mit einem Diamant sind diejenigen, die Sie auf unserer Startseite sehen können. Viel Spaß beim stricken!
24.05.2018 - 09:38Kirsten Mogensen wrote:
Hej, Jeg har forelsket mig i dette sjal, og vil gerne strikke det, men når jeg printer opskriften ud får jeg ikke diagrammerne over hulmønstret.
22.05.2018 - 10:26DROPS Design answered:
Hej Kirsten, jo diagrammerne er nederst i opskriften, du ser dem også på skærmen når du klikker på "skriv ud" God fornøjelse!
30.05.2018 - 15:51
![]() Susanne wrote:
Susanne wrote:
Hur mycket garn går åt om man vill göra sjalen enfärgad?
22.05.2018 - 09:45DROPS Design answered:
Hei Susanne. Vi har dessverre ikke mulighet til å oppgi garnmengde dersom det kun strikkes med en farge. Du kan regne med at det går med litt mindre garn enn hva som er oppgitt sammenlagt til flerfarget. God fornøyelse
24.05.2018 - 09:36
![]() Yvonne wrote:
Yvonne wrote:
Prachtige kleurencombinatie.
17.12.2017 - 16:25
|
|||||||||||||||||||
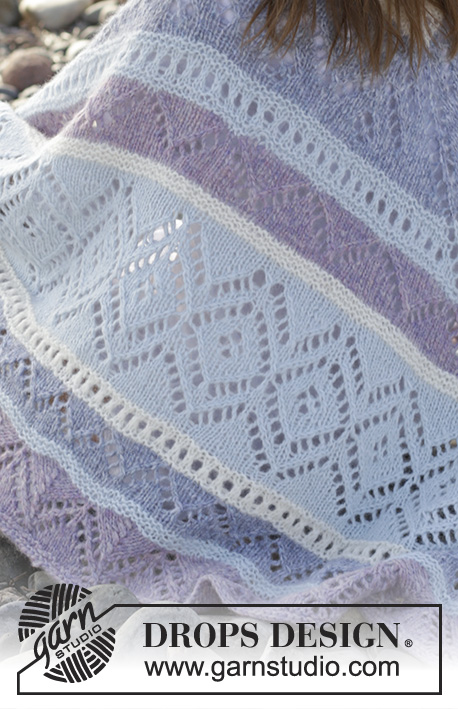
Liljesjal#liljesjal |
|||||||||||||||||||
 |
 |
||||||||||||||||||
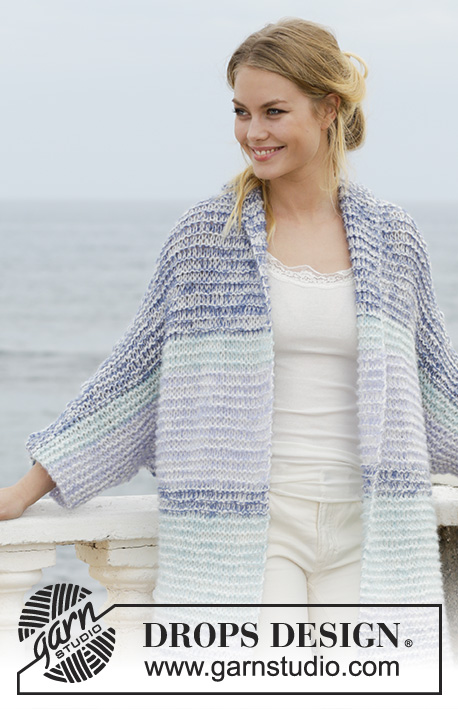
Knitted shawl with stripes and lace pattern, worked top down. The piece is worked in DROPS Air.
DROPS 191-7 |
|||||||||||||||||||
|
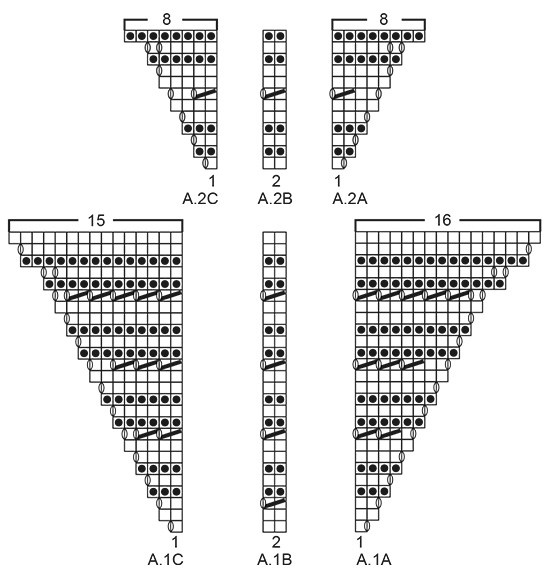
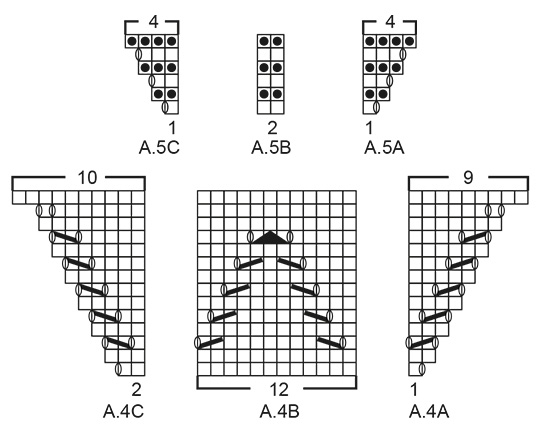
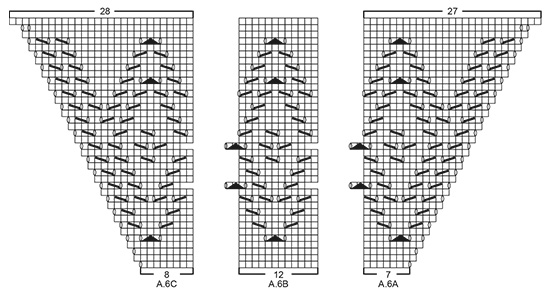
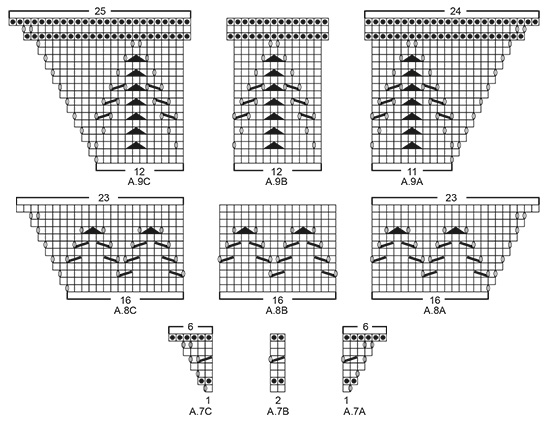
INFORMATION FOR THE PATTERN: RIDGE/GARTER STITCH (worked back and forth): 1 ridge = Knit 2 rows. INCREASE TIP-1: Increase 1 stitch by making 1 yarn over. On the next row knit the yarn over to leave a hole. INCREASE TIP-2 (when increasing evenly spaced): Increase 1 stitch by making 1 yarn over. On the next row work the yarn over twisted to avoid a hole. PATTERN: See diagrams A.1 to A.9. The diagrams show all the rows in the pattern seen from the right side. ---------------------------------------------------------- SHAWL: The shawl is worked top down from mid back. Because of the number of stitches, the shawl is worked back and forth on circular needle, but to have room for all the stitches it is a good idea to divide the stitches between several needles as described in DROPS CIRCULAR NEEDLE. Cast on 9 stitches with circular needle size 5.5 mm and light grey green. Work 1 RIDGE - see description above. Insert a marker in the middle stitch on the row. The next row is worked as follows from the right side: 2 edge stitches in garter stitch, make 1 yarn over – read INCREASE TIP-1, knit 2, make 1 yarn over, work the middle stitch in stocking stitch (= the stitch with the marker), make 1 yarn over, knit 2, make 1 yarn over, finish with 2 edge stitches in garter stitch = 13 stitches. Knit 1 row from the wrong side. Then continue with pattern as described below, with 2 edge stitches in garter stitch in each side and the middle stitch in stocking stitch. REMEMBER THE KNITTING TENSION! Work A.1 as follows: 2 edge stitches in garter stitch, A.1A (= 1 stitch), A.1B (= 2 stitches), A.1C (= 1 stitch), 1 stitch stocking stitch (=middle stitch), A.1A (= 1 stitch), A.1B (= 2 stitches), A.1C (= 1 stitch) and 2 edge stitches in garter stitch. Continue the pattern as shown in the diagrams. AT THE SAME TIME on row 25 in A.1 (the last row from the right side) increase 2 stitches evenly spaced (increase 1 stitch before the middle stitch and 1 stitch after the middle stitch so that there still are the same number of stitches on each side of the middle stitch – read INCREASE TIP-2). When A.1 has been completed, there are 73 stitches on the needle. Change to off white. Work A.2 as follows with off white: 2 edge stitches in garter stitch, A.2A (= 1 stitch), repeat A.2B until there is 1 stitch left before the middle stitch (= 16 repeats of 2 stitches), A.2C (= 1 stitch), 1 stitch stocking stitch (= middle stitch), A.2A (= 1 stitch), repeat A.2B until there are 3 stitches left on the row (= 16 repeats of 2 stitches), A.2C (= 1 stitch) and 2 edge stitches in garter stitch. Continue the pattern as shown in the diagrams. AT THE SAME TIME on row 11 in A.2 (the last row from the right side) increase 6 stitches evenly spaced (increase 3 stitches before the middle stitch and 3 stitches after the middle stitch so that there still are the same number of stitches on each side of the middle stitch). When A.2 has been completed, there are 107 stitches on the needle and the piece measures approx. 21 cm measured along the middle stitch. Change to fog. Work A.3 as follows with fog: 2 edge stitches in garter stitch, A.3A (= 7 stitches), repeat A.3B until there are 8 stitches left before the middle stitch (= 3 repeats of 12 stitches), A.3C (= 8 stitches), 1 stitch stocking stitch (= middle stitch), A.3A (= 7 stitches), repeat A.3B until there are 10 stitches left on the row (= 3 repeats of 12 stitches), A.3C (= 8 stitches) and 2 edge stitches in garter stitch. AT THE SAME TIME on row 25 in A.3 (the last row from the right side) increase 2 stitches evenly spaced (increase 1 stitch before the middle stitch and 1 stitch after the middle stitch). When A.3 has been completed, there are 169 stitches on the needle. Change to light grey green. Work A.2 again in the same way as described above, but with light grey green (there is now room for 40 repeats of A.2B on each side of middle). AT THE SAME TIME on row 11 in A.2 increase 6 stitches evenly spaced (increase 3 stitches before the middle stitch and 3 stitches after the middle stitch). When A.2 has been completed, there are 203 stitches on the needle. Change to purple haze. Work A.4 as follows with purple haze: 2 edge stitches in garter stitch, A.4A (= 1 stitch), repeat A.4B until there are 2 stitches left before the middle stitch (= 8 repeats of 12 stitches), A.4C (= 2 stitches), 1 stitch stocking stitch (= middle stitch), A.4A (= 1 stitch), repeat A.4B until there are 4 stitches left on the row (= 8 repeats of 12 stitches), A.4C (= 2 stitches) and 2 edge stitches in garter stitch. AT THE SAME TIME on row 13 in A.4 (the last row from the right side) increase 2 stitches evenly spaced (increase 1 stitch before the middle stitch and 1 stitch after the middle stitch). When A.4 has been completed, there are 237 stitches on the needle and the piece measures approx. 49 cm measured along the middle stitch. Change to off white. Work A.5 as follows with off white: 2 edge stitches in garter stitch, A.5A (= 1 stitch), repeat A.5B until there is 1 stitch left before the middle stitch (= 57 repeats of 2 stitches), A.5C (= 1 stitch), 1 stitch stocking stitch (= middle stitch), A.5A (= 1 stitch), repeat A.5B until there are 3 stitches left on the row (= 57 repeats of 2 stitches), A.5C (= 1 stitch) and 2 edge stitches in garter stitch. AT THE SAME TIME on row 5 in A.5 (the last row from the right side) increase 2 stitches evenly spaced (increase 1 stitch before the middle stitch and 1 stitch after the middle stitch). When A.5 has been completed, there are 251 stitches on the needle. Change to light grey green. Work A.6 as follows with light grey green: 2 edge stitches in garter stitch, A.6A (= 7 stitches), repeat A.6B until there are 8 stitches left before the middle stitch (= 9 repeats of 12 stitches), A.6C (= 8 stitches), 1 stitch stocking stitch (= middle stitch), A.6A (= 7 stitches), repeat A.6B until there are 10 stitches left on the row (= 9 repeats of 12 stitches), A.6C (= 8 stitches) and 2 edge stitches in garter stitch. AT THE SAME TIME on row 37 in A.6 (the last row from the right side) increase 2 stitches evenly spaced (increase 1 stitch before the middle stitch and 1 stitch after the middle stitch). When A.6 has been completed, there are 333 stitches on the needle and the piece measures approx. 78 cm along the middle stitch. Change to off white. Work A.7 as follows with off white: 2 edge stitches in garter stitch, A.7A (= 1 stitch), repeat A.7B until there is 1 stitch left before the middle stitch (= 81 repeats of 2 stitches), A.7C (= 1 stitch), 1 stitch stocking stitch (= middle stitch), A.7A (= 1 stitch), repeat A.7B until there are 3 stitches left on the row (= 81 repeats of 2 stitches), A.7C (= 1 stitch) and 2 edge stitches in garter stitch. AT THE SAME TIME on row 7 in A.7 (the last row from the right side) increase 4 stitches evenly spaced (increase 2 stitches before the middle stitch and 2 stitches after the middle stitch). When A.7 has been completed, there are 357 stitches on the needle. Change to fog. Work A.8 as follows with fog: 2 edge stitches in garter stitch, A.8A (= 16 stitches), repeat A.8B until there are 16 stitches left before the middle stitch (= 9 repeats of 16 stitches), A.8C (= 16 stitches), 1 stitch stocking stitch (= middle stitch), A.8A (= 16 stitches), repeat A.8B until there are 18 stitches left on the row (= 9 repeats of 16 stitches), A.8C (= 16 stitches) and 2 edge stitches in garter stitch. When A.8 has been completed, there are 385 stitches on the row. Change to light grey green. Work A.5 again in the same way as described earlier in the text, but with light grey green (there is now room for 94 repeats of A.5B on each side of middle). AT THE SAME TIME on row 5 in A.5 (the last row from the right side) increase 14 stitches evenly spaced (increase 7 stitches before the middle stitch and 7 stitches after the middle stitch). When A.5 has been completed, there are 411 stitches on the needle. Change to purple haze. Work A.9 as follows with purple haze: 2 edge stitches in garter stitch, A.9A (= 11 stitches), repeat A.9B until there are 12 stitches left before the middle stitch (= 15 repeats of 12 stitches), A.9C (= 12 stitches), 1 stitch stocking stitch (= middle stitch), A.9A (= 11 stitches), repeat A.9B until there are 14 stitches left on the row (= 15 repeats of 12 stitches), A.9C (= 12 stitches) and 2 edge stitches in garter stitch. When A.9 has been completed, there are 523 stitches on the needle and the piece measures approx. 104 cm along the middle stitch. Loosely cast off with knit from the right side. |
|||||||||||||||||||
Diagram explanations |
|||||||||||||||||||
|
|||||||||||||||||||
 |
|||||||||||||||||||
 |
|||||||||||||||||||
 |
|||||||||||||||||||
 |
|||||||||||||||||||
 |
|||||||||||||||||||
Have you finished this pattern?Tag your pictures with #dropspattern #liljesjal or submit them to the #dropsfan gallery. Do you need help with this pattern?You'll find 21 tutorial videos, a Comments/Questions area and more by visiting the pattern on garnstudio.com. © 1982-2026 DROPS Design A/S. We reserve all rights. This document, including all its sub-sections, has copyrights. Read more about what you can do with our patterns at the bottom of each pattern on our site. |
|||||||||||||||||||


With over 40 years in knitting and crochet design, DROPS Design offers one of the most extensive collections of free patterns on the internet - translated to 17 languages. As of today we count 324 catalogues and 12290 patterns translated into English (UK/cm). 12290
We work hard to bring you the best knitting and crochet have to offer, inspiration and advice as well as great quality yarns at incredible prices! Would you like to use our patterns for other than personal use? You can read what you are allowed to do in the Copyright text at the bottom of all our patterns. Happy crafting!
Post a comment to pattern DROPS 191-7
We would love to hear what you have to say about this pattern!
If you want to leave a question, please make sure you select the correct category in the form below, to speed up the answering process. Required fields are marked *.