
Popular categories
Looking for a yarn?


Comments / Questions (30)
![]() Birte Nielsen wrote:
Birte Nielsen wrote:
Lav 2 omslag mellem 2 masker, på næste pind strikkes det ene omslag, det andet slippes ned (= hul).. jeg har prøvet at tage 2 omslag og på næste pind strikket den ene ret og lad være med at strikke den anden (falde ned) jeg syntes den hul bliver meget stor.. skal den det.. kan I ikke lave en video hvor i laver denne måde.?
11.09.2024 - 10:03DROPS Design answered:
Hei Birthe. Jo, det skal bli et stort hull. Vi har video på det. Klikk på VIDEOER til høyre eller under bildet og se på video: Dobbelt omslag: Stort hul . mvh DROPS Design
16.09.2024 - 07:47
![]() Grace wrote:
Grace wrote:
Hi! So, I've gotten to the beginning of the diagram for this lovely shawl, but I am confused. How have I cast on 9 stitches, increased to 13, and then supposed to follow the diagram if it starts with 4 stitches? Or do the spaces not represent one stitch? Thanks!
27.08.2023 - 01:54DROPS Design answered:
Dear Grace, the first row indicates how the charts are divided in the stitches: 2 edge stitches in garter stitch, A.1A (= 1 stitch), A.1B (= 2 stitches), A.1C (= 1 stitch), 1 stitch stocking stitch (=middle stitch), A.1A (= 1 stitch), A.1B (= 2 stitches), A.1C (= 1 stitch) and 2 edge stitches in garter stitch = 13 stitches. Later on, as you increase on the charts you will also increase the number of stitches on each chart. Remember that you are working charts A.1A, A.1B and A.1C and that you read the charts from bottom to top. You can read more on knitting charts here: https://www.garnstudio.com/lesson.php?id=68&cid=19. Happy knitting!
28.08.2023 - 00:54
![]() Rebekah wrote:
Rebekah wrote:
I am very confused about how to do this pattern. I'm a relatively new knitter when it comes to lacey things. How do I read the diagrams? Do they go across like the first row of A1A then A1B then A1C? I would really love some help with this, please!
24.08.2023 - 04:52DROPS Design answered:
Hi Rebekah, The diagrams are read from bottom up and from right to left from the right side and left to right on the wrong side. In this pattern, you work the diagrams in the order described in the text; the first row in A.1A (after 2 edge stitches and working from right to left), then the first row in A.1B, then A.1C and so on. Working back from the wrong side on row 2 (from left to right) you work the series in reverse; begin with A.1C, then A.1B, A.1A, etc. Hope this helps and happy knitting!
24.08.2023 - 06:43
![]() Natalia wrote:
Natalia wrote:
Czy w tym wzorze na schemacie są same podwójne narzuty?
27.06.2023 - 21:50DROPS Design answered:
Witaj Natalio, tak, tutaj są tylko podwójne narzuty. Włóczka Air jest dosyć puchata, 1 narzut nie byłby zbyt dobrze widoczny. Pozdrawiamy!
28.06.2023 - 09:02
![]() Deni wrote:
Deni wrote:
Hi,can you please explain how to make this"AT THE SAME TIME on row 11 in A.2 (the last row from the right side) increase 6 stitches evenly spaced (increase 3 stitches before the middle stitch and 3 stitches after the middle stitch so that there still are the same number of stitches on each side of the middle stitch)". Thank you.
04.05.2023 - 15:10DROPS Design answered:
Dear Deni, in this lesson we explain how to decrease evenly on a row - make sure to decrease 3 sts on each side of the middle stitch to make the number of stitches matching. Happy knitting!
05.05.2023 - 07:53
![]() Sandra wrote:
Sandra wrote:
Hallo, ganz am Anfang heißt es die Mittelmasche glatt rechts und die 2 Maschen beidseitig der Mittelmasche weiter kraus rechts. Dann soll A1 laut Muster gestrickt werden. Hier wären laut Muster A1a und A1c die Maschen beidseitig der Mittelmasche in der Rückreihe aber links und nicht rechts gestrickt werden. Was ist nin korrekt? Vielen Dank
17.03.2023 - 13:18DROPS Design answered:
Liebe Sandra, also die Maschen von A.1 werden ja links bei den Rückreihen gestrickt, aber es sind 2 krausrechte Maschen am Anfang + am Anfang jeder Reihe gestrickt, und die Mittelmasche wird glattrechts gestrickt, dh: 2 krausrechte Maschen, A.1A, A.1B, A.1C, 1 mittel-Masche glatt rechts, A.1A, A.1B, A.1C, 2 krausrechte Maschen; bei Rückreihen stricken Sie 2 rechts, dann links bis die 2 letzten Maschen und 2 M rechts. Viel Spaß beim stricken!
17.03.2023 - 15:02
![]() Bodil wrote:
Bodil wrote:
A. 2A slutter med 8 masker, men A. 3A starter med 7 masker.? Hvordan passer det. Ved begyndelse af 3. farve.
31.12.2022 - 15:42DROPS Design answered:
Hei Bodil. Designet på sjalet er tegnet slik at de ulike diagrammene skal ikke "stemme" med hverandre i høyden (kun i bredden). Om du ser på nærbildet, ser du at mellom hver farge er det rader kun strikket med rettmasker og rader med kun vrangmasker. mvh DROPS Design
06.01.2023 - 07:47
![]() Melanie wrote:
Melanie wrote:
Bonjour est il possible de faire une vidéo sur le début du diagramme car j’ai du mal à comprendre à partir du rang 4 diagramme A1?
15.10.2022 - 10:16DROPS Design answered:
Bonjour Mélanie, les diagrammes se lisent de bas en haut, sur l'endroit lisez de droite à gauche (A.1A, puis A.1B et terminez par A.1C) et sur l'endroit, lisez les de gauche à droite (A.1C, puis A.1B et terminez par A.1A); le 4ème rang (et tous les rangs sur l'envers avec un point noir se tricotent à l'endroit), tricotez les rangs sur l'envers en cases blanches à l'endroit sur l'endroit ou bien à l'envers sur l'envers. Retrouvez ici plus d'infos sur les diagrammes. Bon tricot!
17.10.2022 - 09:08
![]() Melanie wrote:
Melanie wrote:
Bonjour je souhaiterais faire ce modèle de châle , j’aimerais savoir comment on tricote la maille centrale en jersey? Est ce qu’il faut la tricoter à l’envers sur l’endroit et à l’endroit sur l’envers ou la tricoter à l’endroit sur l’endroit et à l’envers sur l’envers? Merci d’avance
15.10.2022 - 08:28DROPS Design answered:
Bonjour Mélanie, la maille centrale en jersey se tricote à l'endroit sur l'endroit et à l'envers sur l'envers. Bon tricot!
17.10.2022 - 09:03
![]() Nathalie Langlais wrote:
Nathalie Langlais wrote:
Il aurait été bien d'indiquer les nombres de mailles au bout de chaque rangs . Dans la grille A2. On doit arriver à combien de maille au rang no 7?
26.08.2022 - 21:03DROPS Design answered:
Bonjour Mme Langlais, vous augmentez 1 maille tous les 2 rangs (tous les rangs sur l'endroit) dans les diagrammes A.2A et A.2C autrement dit, vous aurez 5 mailles dans A.2A (= 1 jeté, 2 m end, 2 m ens à l'end, 1 jeté) et dans A.2C (2 m ens à l'end, 1 jeté, 2 m end, 1 jeté). Bon tricot!
29.08.2022 - 08:23
|
|||||||||||||||||||
Liljesjal#liljesjal |
|||||||||||||||||||
 |
 |
||||||||||||||||||
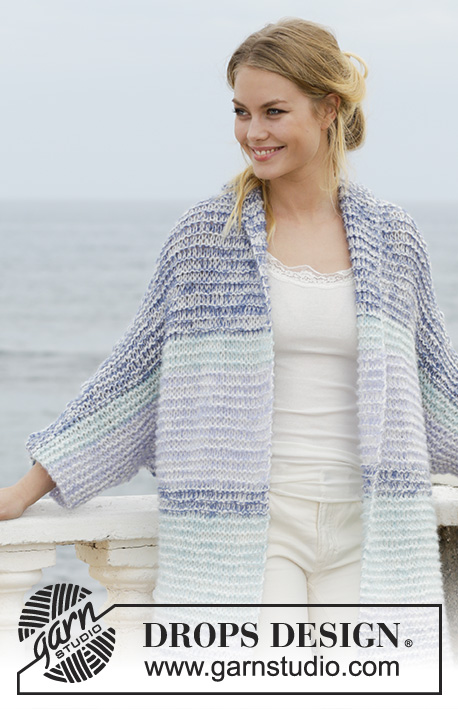
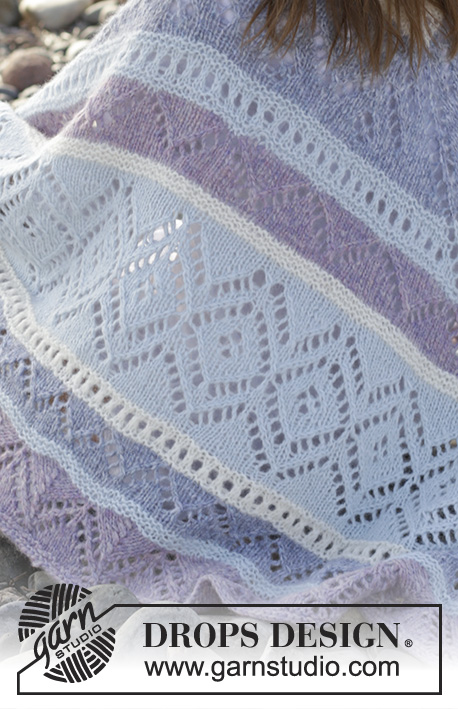
Knitted shawl with stripes and lace pattern, worked top down. The piece is worked in DROPS Air.
DROPS 191-7 |
|||||||||||||||||||
|
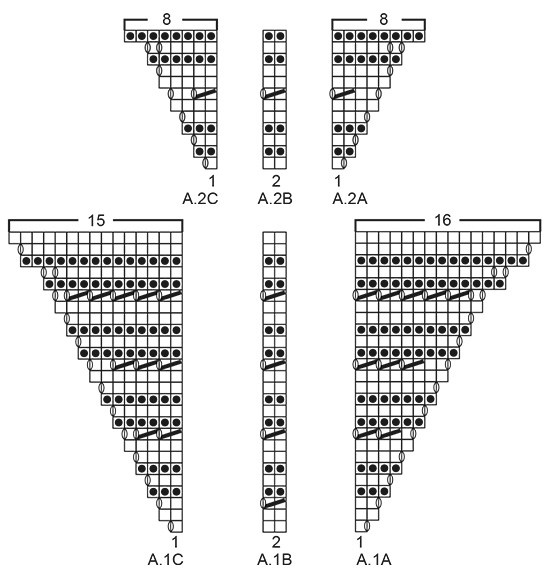
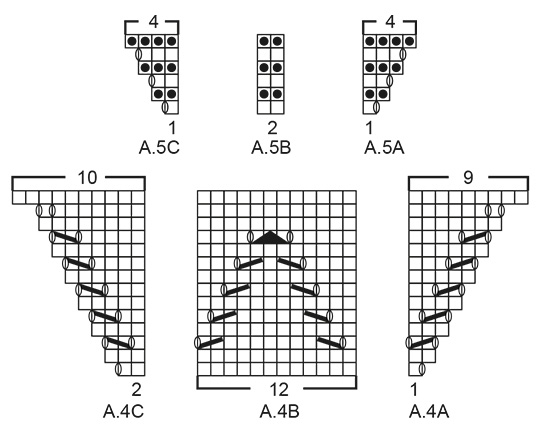
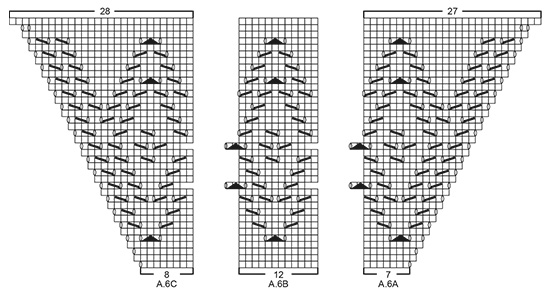
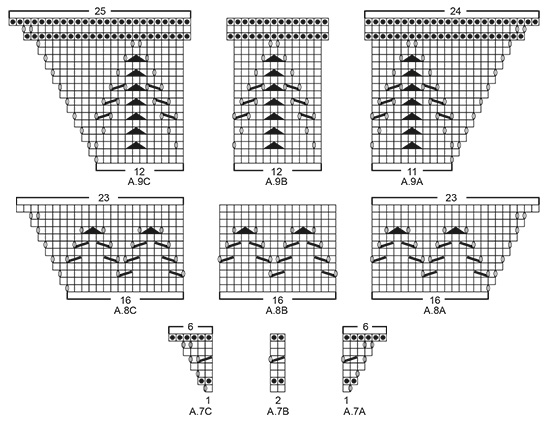
INFORMATION FOR THE PATTERN: RIDGE/GARTER STITCH (worked back and forth): 1 ridge = Knit 2 rows. INCREASE TIP-1: Increase 1 stitch by making 1 yarn over. On the next row knit the yarn over to leave a hole. INCREASE TIP-2 (when increasing evenly spaced): Increase 1 stitch by making 1 yarn over. On the next row work the yarn over twisted to avoid a hole. PATTERN: See diagrams A.1 to A.9. The diagrams show all the rows in the pattern seen from the right side. ---------------------------------------------------------- SHAWL: The shawl is worked top down from mid back. Because of the number of stitches, the shawl is worked back and forth on circular needle, but to have room for all the stitches it is a good idea to divide the stitches between several needles as described in DROPS CIRCULAR NEEDLE. Cast on 9 stitches with circular needle size 5.5 mm and light grey green. Work 1 RIDGE - see description above. Insert a marker in the middle stitch on the row. The next row is worked as follows from the right side: 2 edge stitches in garter stitch, make 1 yarn over – read INCREASE TIP-1, knit 2, make 1 yarn over, work the middle stitch in stocking stitch (= the stitch with the marker), make 1 yarn over, knit 2, make 1 yarn over, finish with 2 edge stitches in garter stitch = 13 stitches. Knit 1 row from the wrong side. Then continue with pattern as described below, with 2 edge stitches in garter stitch in each side and the middle stitch in stocking stitch. REMEMBER THE KNITTING TENSION! Work A.1 as follows: 2 edge stitches in garter stitch, A.1A (= 1 stitch), A.1B (= 2 stitches), A.1C (= 1 stitch), 1 stitch stocking stitch (=middle stitch), A.1A (= 1 stitch), A.1B (= 2 stitches), A.1C (= 1 stitch) and 2 edge stitches in garter stitch. Continue the pattern as shown in the diagrams. AT THE SAME TIME on row 25 in A.1 (the last row from the right side) increase 2 stitches evenly spaced (increase 1 stitch before the middle stitch and 1 stitch after the middle stitch so that there still are the same number of stitches on each side of the middle stitch – read INCREASE TIP-2). When A.1 has been completed, there are 73 stitches on the needle. Change to off white. Work A.2 as follows with off white: 2 edge stitches in garter stitch, A.2A (= 1 stitch), repeat A.2B until there is 1 stitch left before the middle stitch (= 16 repeats of 2 stitches), A.2C (= 1 stitch), 1 stitch stocking stitch (= middle stitch), A.2A (= 1 stitch), repeat A.2B until there are 3 stitches left on the row (= 16 repeats of 2 stitches), A.2C (= 1 stitch) and 2 edge stitches in garter stitch. Continue the pattern as shown in the diagrams. AT THE SAME TIME on row 11 in A.2 (the last row from the right side) increase 6 stitches evenly spaced (increase 3 stitches before the middle stitch and 3 stitches after the middle stitch so that there still are the same number of stitches on each side of the middle stitch). When A.2 has been completed, there are 107 stitches on the needle and the piece measures approx. 21 cm measured along the middle stitch. Change to fog. Work A.3 as follows with fog: 2 edge stitches in garter stitch, A.3A (= 7 stitches), repeat A.3B until there are 8 stitches left before the middle stitch (= 3 repeats of 12 stitches), A.3C (= 8 stitches), 1 stitch stocking stitch (= middle stitch), A.3A (= 7 stitches), repeat A.3B until there are 10 stitches left on the row (= 3 repeats of 12 stitches), A.3C (= 8 stitches) and 2 edge stitches in garter stitch. AT THE SAME TIME on row 25 in A.3 (the last row from the right side) increase 2 stitches evenly spaced (increase 1 stitch before the middle stitch and 1 stitch after the middle stitch). When A.3 has been completed, there are 169 stitches on the needle. Change to light grey green. Work A.2 again in the same way as described above, but with light grey green (there is now room for 40 repeats of A.2B on each side of middle). AT THE SAME TIME on row 11 in A.2 increase 6 stitches evenly spaced (increase 3 stitches before the middle stitch and 3 stitches after the middle stitch). When A.2 has been completed, there are 203 stitches on the needle. Change to purple haze. Work A.4 as follows with purple haze: 2 edge stitches in garter stitch, A.4A (= 1 stitch), repeat A.4B until there are 2 stitches left before the middle stitch (= 8 repeats of 12 stitches), A.4C (= 2 stitches), 1 stitch stocking stitch (= middle stitch), A.4A (= 1 stitch), repeat A.4B until there are 4 stitches left on the row (= 8 repeats of 12 stitches), A.4C (= 2 stitches) and 2 edge stitches in garter stitch. AT THE SAME TIME on row 13 in A.4 (the last row from the right side) increase 2 stitches evenly spaced (increase 1 stitch before the middle stitch and 1 stitch after the middle stitch). When A.4 has been completed, there are 237 stitches on the needle and the piece measures approx. 49 cm measured along the middle stitch. Change to off white. Work A.5 as follows with off white: 2 edge stitches in garter stitch, A.5A (= 1 stitch), repeat A.5B until there is 1 stitch left before the middle stitch (= 57 repeats of 2 stitches), A.5C (= 1 stitch), 1 stitch stocking stitch (= middle stitch), A.5A (= 1 stitch), repeat A.5B until there are 3 stitches left on the row (= 57 repeats of 2 stitches), A.5C (= 1 stitch) and 2 edge stitches in garter stitch. AT THE SAME TIME on row 5 in A.5 (the last row from the right side) increase 2 stitches evenly spaced (increase 1 stitch before the middle stitch and 1 stitch after the middle stitch). When A.5 has been completed, there are 251 stitches on the needle. Change to light grey green. Work A.6 as follows with light grey green: 2 edge stitches in garter stitch, A.6A (= 7 stitches), repeat A.6B until there are 8 stitches left before the middle stitch (= 9 repeats of 12 stitches), A.6C (= 8 stitches), 1 stitch stocking stitch (= middle stitch), A.6A (= 7 stitches), repeat A.6B until there are 10 stitches left on the row (= 9 repeats of 12 stitches), A.6C (= 8 stitches) and 2 edge stitches in garter stitch. AT THE SAME TIME on row 37 in A.6 (the last row from the right side) increase 2 stitches evenly spaced (increase 1 stitch before the middle stitch and 1 stitch after the middle stitch). When A.6 has been completed, there are 333 stitches on the needle and the piece measures approx. 78 cm along the middle stitch. Change to off white. Work A.7 as follows with off white: 2 edge stitches in garter stitch, A.7A (= 1 stitch), repeat A.7B until there is 1 stitch left before the middle stitch (= 81 repeats of 2 stitches), A.7C (= 1 stitch), 1 stitch stocking stitch (= middle stitch), A.7A (= 1 stitch), repeat A.7B until there are 3 stitches left on the row (= 81 repeats of 2 stitches), A.7C (= 1 stitch) and 2 edge stitches in garter stitch. AT THE SAME TIME on row 7 in A.7 (the last row from the right side) increase 4 stitches evenly spaced (increase 2 stitches before the middle stitch and 2 stitches after the middle stitch). When A.7 has been completed, there are 357 stitches on the needle. Change to fog. Work A.8 as follows with fog: 2 edge stitches in garter stitch, A.8A (= 16 stitches), repeat A.8B until there are 16 stitches left before the middle stitch (= 9 repeats of 16 stitches), A.8C (= 16 stitches), 1 stitch stocking stitch (= middle stitch), A.8A (= 16 stitches), repeat A.8B until there are 18 stitches left on the row (= 9 repeats of 16 stitches), A.8C (= 16 stitches) and 2 edge stitches in garter stitch. When A.8 has been completed, there are 385 stitches on the row. Change to light grey green. Work A.5 again in the same way as described earlier in the text, but with light grey green (there is now room for 94 repeats of A.5B on each side of middle). AT THE SAME TIME on row 5 in A.5 (the last row from the right side) increase 14 stitches evenly spaced (increase 7 stitches before the middle stitch and 7 stitches after the middle stitch). When A.5 has been completed, there are 411 stitches on the needle. Change to purple haze. Work A.9 as follows with purple haze: 2 edge stitches in garter stitch, A.9A (= 11 stitches), repeat A.9B until there are 12 stitches left before the middle stitch (= 15 repeats of 12 stitches), A.9C (= 12 stitches), 1 stitch stocking stitch (= middle stitch), A.9A (= 11 stitches), repeat A.9B until there are 14 stitches left on the row (= 15 repeats of 12 stitches), A.9C (= 12 stitches) and 2 edge stitches in garter stitch. When A.9 has been completed, there are 523 stitches on the needle and the piece measures approx. 104 cm along the middle stitch. Loosely cast off with knit from the right side. |
|||||||||||||||||||
Diagram explanations |
|||||||||||||||||||
|
|||||||||||||||||||
 |
|||||||||||||||||||
 |
|||||||||||||||||||
 |
|||||||||||||||||||
 |
|||||||||||||||||||
 |
|||||||||||||||||||
Have you finished this pattern?Tag your pictures with #dropspattern #liljesjal or submit them to the #dropsfan gallery. Do you need help with this pattern?You'll find 21 tutorial videos, a Comments/Questions area and more by visiting the pattern on garnstudio.com. © 1982-2026 DROPS Design A/S. We reserve all rights. This document, including all its sub-sections, has copyrights. Read more about what you can do with our patterns at the bottom of each pattern on our site. |
|||||||||||||||||||


With over 40 years in knitting and crochet design, DROPS Design offers one of the most extensive collections of free patterns on the internet - translated to 17 languages. As of today we count 324 catalogues and 12290 patterns translated into English (UK/cm). 12290
We work hard to bring you the best knitting and crochet have to offer, inspiration and advice as well as great quality yarns at incredible prices! Would you like to use our patterns for other than personal use? You can read what you are allowed to do in the Copyright text at the bottom of all our patterns. Happy crafting!
Post a comment to pattern DROPS 191-7
We would love to hear what you have to say about this pattern!
If you want to leave a question, please make sure you select the correct category in the form below, to speed up the answering process. Required fields are marked *.