
Popular categories
Looking for a yarn?


Comments / Questions (89)
![]() Silvana Garufi wrote:
Silvana Garufi wrote:
Vorrei eseguire questo modello, leggo che sono stati modificati gli schemi ,vorrei sapere come scaricare gli schemi corretti.grazie
18.02.2019 - 18:41DROPS Design answered:
Buongiorno Silvana. Gli schemi che trova nelle spiegazioni online comprendono già le correzioni fatte. Buon lavoro!
18.02.2019 - 19:10
![]() Louise.valentin wrote:
Louise.valentin wrote:
Bonjour je voulais faire votre modelé 187-4 très joli je n'arrive pas a trouver comment faire 146 mailles au 2eme tour cela fait 5 fois que je recommence d'avance merci
29.01.2019 - 18:17DROPS Design answered:
Bonjour Mme Valentin, quelle taille tricotez-vous ? au 2ème tour après les côtes mousse du col, vous devez avoir 142 mailles en XXL pas 146.
05.03.2019 - 12:34
![]() Joan Bengtson wrote:
Joan Bengtson wrote:
Er opskriften ,som den skal være og er diagrammet rettet,som det er trykt på siden?Bare inden jeg går igang?Mvh.
18.01.2019 - 17:46DROPS Design answered:
Hei Joan. Om du trykker på "se rettelser" kan du lese hvilke rettelser som er blitt gjort, og når. Oppskriften er sist rettet 21 desember 2018. God fornøyelse
21.01.2019 - 10:01
![]() SISSOU wrote:
SISSOU wrote:
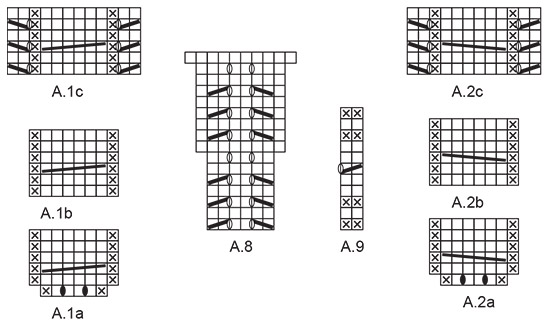
Bonsoir Puis je avoir plus d'explications concernant le diagramme A.8, à quel moment faut-il le tricoter et à quel endroit au juste? Merci
07.01.2019 - 01:01DROPS Design answered:
Bonjour Sissou, A.8 se tricote sous les mailles des manches: quand vous tricotez le dos et le devant après avoir séparé les manches, tricotez A.8 sur les 3 mailles avant le marqueur et les 3 mailles après le marqueur au milieu sous chaque manche. Bon tricot!
07.01.2019 - 12:05
![]() Adelita wrote:
Adelita wrote:
Would just like to know if the eyelet pattern near the cables would be on one side as k2tog , yarn over and on the other side of the cable as sl 1 knit1 pass sl stitch over, yarn over is correct, as this is not mentioned in the pattern.Thanks.
04.01.2019 - 05:48DROPS Design answered:
Dear Adelita, in A.1c and A.2c you start with K2 tog, YO and finish with YO, slip 1 as if to K, K1, psso. Happy knitting!
04.01.2019 - 12:38
![]() Adelita wrote:
Adelita wrote:
The pattern under the heading of RAGLAN paragraph THIRD LINE says Increase 1 stitch on each side of every A.1 and A.2 (= 2 stitches increased on back piece but there is no such diagram given in the pattern. pl also let me know if Increase is to be done on every row or alternate row . THANKS.
02.01.2019 - 07:09DROPS Design answered:
Dear Adelita, with A.1 and A.2 are here meant A.1 a/b and A.2 a/b as explained at the beginning of the pattern. You increase on each side of A.1/A.2 every other round a total of 21-25-27-30-33-36 times. Happy knitting!
02.01.2019 - 11:52
![]() Adelita Jadhav wrote:
Adelita Jadhav wrote:
The diagram is to be read from right to left or left to right?
30.12.2018 - 10:49DROPS Design answered:
Dear Adelita, diagrams are to be read from bottom right to left. Happy crafting!
30.12.2018 - 11:22
![]() Sissou wrote:
Sissou wrote:
Bonsoir peut on faire deux jetés de suite; par exemple A4.b se termine par un jeté et A5 commence par un jeté, dois je faire un ou deux quand ces deux diagrammes se suivent. si oui on fait deux jetés puis je savoir comment les tricoter au rang suivant? merci
27.12.2018 - 23:31DROPS Design answered:
Bonjour Sissou! Dans le diagramme A.4b il y a un jete au debut, donc vous n'avez pas 2 jetes ensemble. Bon tricot!
28.12.2018 - 18:27
![]() Erika wrote:
Erika wrote:
Nelle istruzioni manca il diagramma A.6, non riesco ad andare avanti con il lavoro. Grazie
20.12.2018 - 14:13DROPS Design answered:
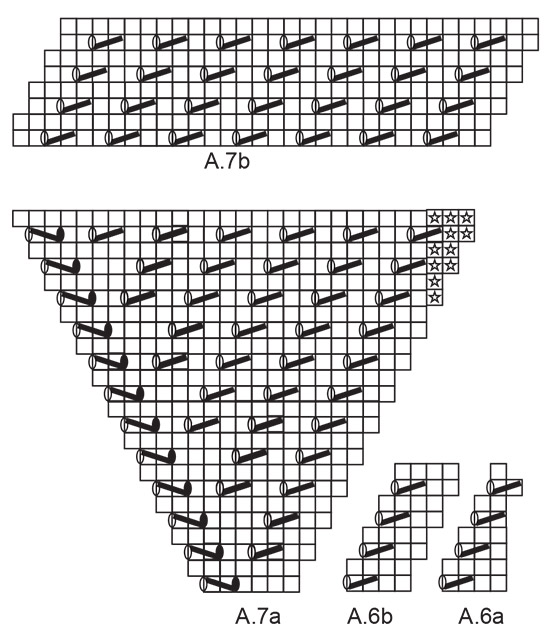
Buongiorno Erika. Abbiamo corretto il testo. I diagrammi da lavorare sono A.6a e A.6b e li trova a destra del diagramma A.7a. Buon lavoro!
20.12.2018 - 17:12
![]() Cauliez wrote:
Cauliez wrote:
Bonjour Une partie des explications me pose probleme. Dans le point fantasie on dit : répéter A4 et A6 en hauteur. Il y a 1 motif de A4a et A6b de moins pour chaque A4 et A6 répété en hauteur. Je n ai pas de A4 et A6... ? Je ne comprends pas ce que je dois repéter en hauteur... Merci beaucoup Sarah
09.12.2018 - 10:49DROPS Design answered:
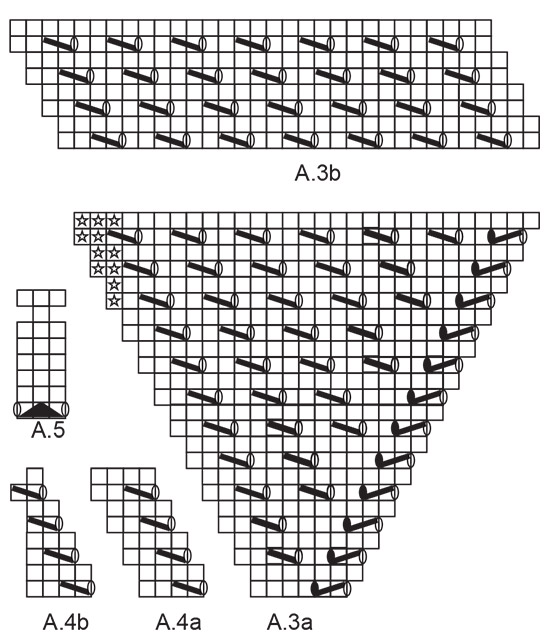
Bonjour Mme Cauliez, vous devez tricoter A.4a et A.4b et A6a/A.6 quelque soit la taille - ces diagrammes sont à répéter en hauteur, et comme il se décalent vers le milieu devant pour rejoindre A.5, on va avoir de moins de moins de mailles en point ajouré car elles sont diminuées dans A.5. Bon tricot!
10.12.2018 - 09:29
|
|||||||||||||||||||||||||||||||
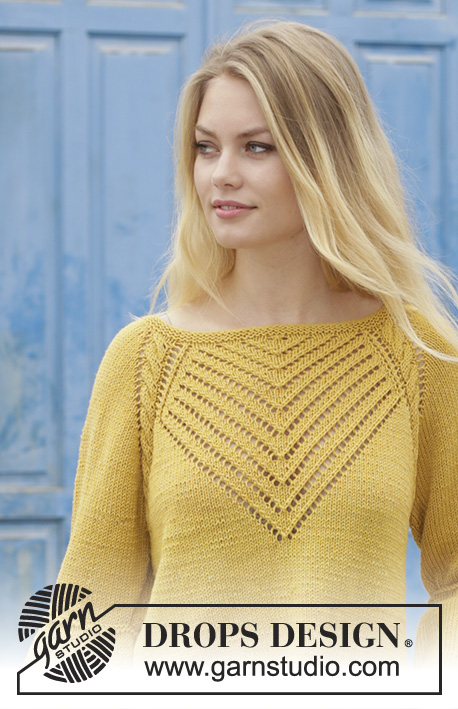
Hello Yellow#helloyellowsweater |
|||||||||||||||||||||||||||||||
 |
 |
||||||||||||||||||||||||||||||
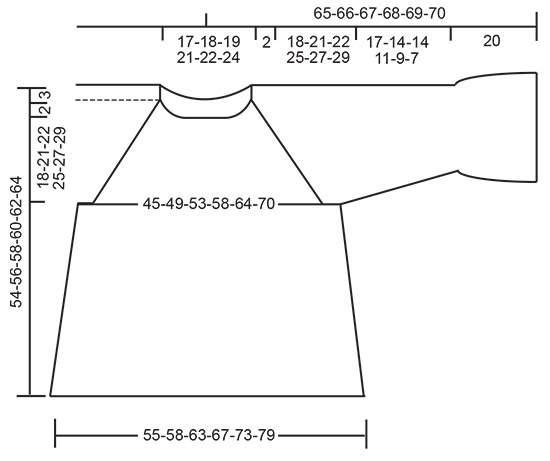
Jumper with cables, lace pattern, raglan and A-shape, knitted top down. Size: S - XXXL Piece is knitted in DROPS Cotton Merino.
DROPS 187-4 |
|||||||||||||||||||||||||||||||
|
INFORMATION FOR PATTERN: GARTER STITCH (worked in the round): 1 ridge = 2 rounds. Knit 1 round and purl 1 round. PATTERN: See diagrams A.1 to A.9. INCREASE TIP: Increase 1 stitch by making 1 yarn over between 2 stitches. On next round work yarn over twisted to avoid holes. DECREASE TIP (applies to sleeves): Decrease 1 stitch on each side of marker thread as follows: Work until 3 stitches remain before marker thread, slip 1 stitch knitwise, knit 1, pass slipped stitch over stitch worked, knit 2 (marker thread is in the middle of these stitches), knit the next 2 stitches together. ---------------------------------------------------------- JUMPER: Yoke and body are worked in the round on circular needle, top down. Work sleeves in the round on double pointed needles/a short circular needle. YOKE: Cast on 92-96-100-108-112-120 stitches on a short circular needle size 4 mm with Cotton Merino. Work 3 ridges in GARTER STITCH - see explanation above. Switch to circular needle size 4.5 mm. Work next round (round begins mid back) as follows: Knit 17-18-19-21-22-24 and increase 1 stitch – read INCREASE TIP (= half back piece), * 1 yarn over, knit 1 *, work from *-* 12 times in total (= 12 stitches increased = sleeve), knit 34-36-38-42-44-48 and increase 3-1-3-1-3-3 stitches evenly (= front piece), work from *-* 12 times in total (= 12 stitches increased = sleeve) and finish by knitting 17-18-19-21-22-24 and increasing 2-0-2-0-2-2 stitches evenly (= half back piece) = 122-122-130-134-142-150 stitches. Knit 1 round, work all yarn overs twisted, they should not make holes. Then work and increase for raglan on next round as follows: Knit 15-15-19-19-19-23, 1 yarn over (= half back piece = 1 stitch increased), A.1a (= 6 stitches), 1 yarn over (= 1 stitch increased), knit 18-18-14-16-20-16, 1 yarn over (= 1 stitch increased), A.2a (= 6 stitches) (= sleeve), A.3a (= 6 stitches, raglan increase is drawn in diagram), A.4a (= 4 stitches) over the next 4-4-8-8-8-12 stitches, A.4b (= 4 stitches), A.5 (= 3 stitches = middle of front piece), A.6a (= 4 stitches), repeat A.6b (= 4 stitches) over the next 4-4-8-8-8-12 stitches. A7a (= 6 stitches, raglan increase is drawn in diagram) (= front piece), A.1a over the next 6 stitches, 1 yarn over (= 1 stitch increased), knit 18-18-14-16-20-16, 1 yarn over (= 1 stitch increased), A.2a over the next 6 stitches (= sleeve), 1 yarn over (= 1 stitch increased) and finish by knitting 16-16-20-20-20-24 (= half back piece) (= 2 stitches increased in every A.1a and A.2a = 8 stitches increased. For raglan: 2 stitches have been increased on each sleeve and back piece and 1 stitch in A.3a and A.7a (= front piece) = 8 stitches increased for raglan = 16 stitches increased on round) = 138-138-146-150-158-166 stitches. Knit the increased yarn overs on each side of A.1 and A.2 on next round to make holes. REMEMBER THE KNITTING TENSION! Now increase for raglan AT THE SAME TIME work pattern, read both sections before continuing: PATTERN: When A.1a and A.2a have been worked 1 time vertically, work A.1b over A.1a and A.2b over A.2a. Repeat diagrams A.1b and A.2b vertically. Eyelet pattern in A.3a, A.4, A.6 and A.7a are displaced towards mid front and meet diagram A.5 (= mid front) where they are decreased together, i.e. there will be fewer and fewer eyelet lines when decreasing in A.5. Repeat diagram A.4 to A.6 vertically. I.e. there will be 1 less repeat of A.4a and A.6b in width for each repeat of A.4 and A.6 in hieight. When A.3a and A.7a have been worked 1 time vertically, work A.3b over A.3a and A.7b over A.7a. Eyelet pattern are decreased in A.5 as before, work the remaining stitches in stocking stitch and pattern as before. When all eyelet lines have been decreased, work in stocking stitch over stitches in A.3, A.5 and A.7. RAGLAN: Now increase for raglan as follows: NOTE! The first 12 increase rounds for raglan are drawn into diagram A.3a and A.7a on front piece but increase on each sleeve and on back piece as follows: Increase 1 stitch on each side of every A.1 and A.2 (= 2 stitches increased on back piece, 2 stitches on each sleeve, 1 stitch increased in A.3a and 1 stitch increased in A.7a = 8 stitches in total increased). Knit the increased stitches to make holes. Increase like this every other round 21-25-27-30-33-36 times in total (the first increase is explained above. When 12 increase rounds have been done in total, A.3a and A.7a have been worked 1 time vertically, increases for raglan is no longer drawn in diagram, so continue increase as on back piece = 8 stitches increased in total on every increase round). When all increases are done there are 298-330-354-382-414-446 stitches on row. Then work A.1c over A.1b and A.2c over A.2b (adjust which round to start on according to pattern, i.e. continue cable as before and work eyelet pattern on each side of every cable). Continue to work until piece measures 20-23-24-27-29-31 cm. Work 1 round while decreasing 2 stitches evenly over every A.1c and A.2c (= 8 stitches decreased in total) = 290-322-346-374-406-438 stitches. Continue working in stocking stitch over A.1c and A.2c. Now divide yoke for body and sleeves as follows: Work 40-44-48-53-59-65 stitches (= half back piece), slip the next 64-72-76-80-84-88 stitches on a stitch holder for sleeve, cast on 8 stitches under sleeve, insert 1 marker in the middle of the new stitches, work 81-89-97-107-119-131 stitches (= front piece), slip the next 64-72-76-80-84-88 stitches on a stitch holder for sleeve, cast on 8 stitches under sleeve, insert 1 marker in the middle of the new stitches and finish with 41-45-49-54-60-66 stitches (= half back piece) = 178-194-210-230-254-278 stitches. Finish body and sleeves separately. Insert 1 marker thread here. NOW MEASURE THE PIECE FROM HERE! BODY: = 178-194-210-230-254-278 stitches. Work A.8 (= 6 stitches) over the middle stitches in the side under each sleeve (= 3 stitches on each side of each marker), work the remaining stitches in pattern and stocking stitch. When lace pattern on front piece is done, continue in stocking stitch with A.8 under each sleeve. When piece measures 31-30-31-30-30-30 cm (there are approx. 218-230-250-266-290-314 stitches on needle) from where body was divided from sleeves, switch to circular needle size 4 mm and work 3 ridges. Cast off. Make sure to avoid a tight cast-off edge, cast off with 1 larger needle size if needed. SLEEVE: Work sleeve in the round on circular needle/double pointed needles. Slip the 64-72-76-80-84-88 stitches from stitch holder in one side of piece on double pointed needles size 4.5 mm and pick in addition up 1 new stitch in each of the 8 stitches cast on under sleeve = 72-80-84-88-92-96 stitches on needle. Insert a marker thread in the middle of the new stitches under the sleeve. Work in stocking stitch in the round. When piece measures 1 cm, decrease 2 stitches mid under sleeve - read DECREASE TIP. Decrease like this every 8th-4th-4th-3rd-2nd-2nd row 6-8-8-8-8-8 times in total = 60-64-68-72-76-80 stitches. When piece measures 17-14-14-11-9-7 cm from where sleeve was divided from body, continue as follows: Work 2 ridges. Work 2 rounds in stocking stitch. Work next round as follows: Work 0-2-1-0-2-1 stitches in stocking stitch, * knit 6, 1 yarn over *, work from *-* until 0-2-1-0-2-1 stitch remains, work 0-2-1-0-2-1 stitch in stocking stitch = 70-74-79-84-88-93 stitches. Work 2 rounds in stocking stitch (always knit yarn overs twisted to avoid holes). Work next round as follows: Work 0-2-1-0-2-1 stitches in stocking stitch, * knit 7, 1 yarn over *, work from *-* until 0-2-1-0-2-1 stitch remains, work 0-2-1-0-2-1 stitch in stocking stitch = 80-84-90-96-100-106 stitches. Work 2 rounds in stocking stitch (always knit yarn overs twisted to avoid holes). Work next round as follows: Work 0-2-1-0-2-1 stitches in stocking stitch, * knit 8, 1 yarn over *, work from *-* until 0-2-1-0-2-1 stitch remains, work 0-2-1-0-2-1 stitch in stocking stitch = 90-94-101-108-112-119 stitches. Continue in the round with stocking stitch until sleeve measures 34-31-31-28-26-24 cm in total from where sleeve was divided from body (knit yarn overs from first round twisted to avoid holes). Switch to circular needle size 4 mm and work A.9 in the round AT THE SAME TIME on first round increase 0-0-1-0-0-1 stitch = 90-94-102-108-112-120 stitches. When A.9 has been worked 1 time vertically, cast off by knitting. Make sure to avoid a tight cast-off edge, cast off with 1 larger needle size if needed. Sleeve measures 37-34-34-31-29-27 cm in total from where sleeve was divided from body. Work the other sleeve the same way. |
|||||||||||||||||||||||||||||||
Diagram explanations |
|||||||||||||||||||||||||||||||
|
|||||||||||||||||||||||||||||||
 |
|||||||||||||||||||||||||||||||
 |
|||||||||||||||||||||||||||||||
 |
|||||||||||||||||||||||||||||||
 |
|||||||||||||||||||||||||||||||
Have you finished this pattern?Tag your pictures with #dropspattern #helloyellowsweater or submit them to the #dropsfan gallery. Do you need help with this pattern?You'll find 24 tutorial videos, a Comments/Questions area and more by visiting the pattern on garnstudio.com. © 1982-2026 DROPS Design A/S. We reserve all rights. This document, including all its sub-sections, has copyrights. Read more about what you can do with our patterns at the bottom of each pattern on our site. |
|||||||||||||||||||||||||||||||


With over 40 years in knitting and crochet design, DROPS Design offers one of the most extensive collections of free patterns on the internet - translated to 17 languages. As of today we count 324 catalogues and 12290 patterns translated into English (UK/cm). 12290
We work hard to bring you the best knitting and crochet have to offer, inspiration and advice as well as great quality yarns at incredible prices! Would you like to use our patterns for other than personal use? You can read what you are allowed to do in the Copyright text at the bottom of all our patterns. Happy crafting!
Post a comment to pattern DROPS 187-4
We would love to hear what you have to say about this pattern!
If you want to leave a question, please make sure you select the correct category in the form below, to speed up the answering process. Required fields are marked *.