
Popular categories
Looking for a yarn?


Comments / Questions (99)
![]() Isabell wrote:
Isabell wrote:
Hei, jeg strikker str.3/4 og har nå gjentatte ganger prøvd å strikke mønsteret, og har måtte tatt opp gang på gang. hvor mange masker skal det være på pinnen etter hver økning??
30.08.2017 - 08:50DROPS Design answered:
Hei Isabell. Når du strikker 1. rad av A.1 skal du ha 88 m og det strikkes slik: 5 masker riller + A.1 11 ganger (=7 m x 11 rapporter) + 1 m + 5 m i riller = 88 m (+11 kast). Så når du starter på 2.rad strikker du over 99 m. Du øker også på rad 3, 4, 7, osv (se tegnet i diagrammet for hver gang du skal øke i A.1). Du øker altså med 11 m på hver rad du ser ikonet for kast (skriv gjerne med i diagrammet hvor mange masker du skal ha etter hver rad med øking). Når du har strikket alle radene i diagrammet har du: 5 m riller + A.1 19 ganger (=19 m x 11 rapporter)+ 1 m + 5 m i riller = 220 m. Se gjerne også på andre sine kommentarer og svar. God Fornøyelse!
30.08.2017 - 11:53
![]() Isabell wrote:
Isabell wrote:
Hei, hvordan strikker man stolpe masker i oppskriften?
20.08.2017 - 23:53DROPS Design answered:
Hei Isabell, Stolpe masken skal strikkes i rille, hvor en rille er 2 pinner, begge strikket rett, når man strikker frem og tilbake. Så på stolpene er alle rad strikket rett. God fornøyelse!
21.08.2017 - 09:50
![]() Cecilie Nilsen wrote:
Cecilie Nilsen wrote:
Dette mønsteret er veldig fint, finnes det til genser også? Kommer det evt en genser i samme mønster?
13.04.2017 - 02:08
![]() Ellen Hagelsteen wrote:
Ellen Hagelsteen wrote:
Jeg strikker dressen i str 3/4 år og er kommet til rad 14 i mønsteret. Etter øking i rad 13 vil det noen steder være 6 m mellom petrol-fargen og noen steder 5. Dermed vil ikke mønsteret stemme. Når jeg også skal øke i rad 15, vil det lille korset i fargen "lys grå" heller ikke passe. Jeg kan ikke forstå annet enn at dette vil forsterke seg i rad 19 og 23 når selve stjernen skal strikkes. Hvordan løser jeg dette?
04.02.2017 - 22:45DROPS Design answered:
Hei Ellen. Ja, det er korrekt, men mönstret skal jo ikke flytte sig, du skal strikke den petrol-farve over de masker som der vises og det samme med det lille kors - her er ogsaa 5 og 6 m imellem hver indtil rk 15 hvor der tages ud i den anden side.
07.02.2017 - 13:52
![]() Birgit wrote:
Birgit wrote:
Hallo, so ein schönes Muster, mein Sohn ist nun leider schon 9 Jahre alt, gibt es die Möglichkeit das Muster als Pullover für Jugendliche und Erwachsene zu erstellen? Das wäre so toll. Ich lieb eure Muster!!
19.01.2017 - 20:25DROPS Design answered:
Liebe Birgit, leider können wir nicht jede Anleitung jeder individueller Wunsch anpassen, lassen Sie sich von anderen ähnlichen Modellen inspirieren und Hilfe könnnen Sie auch von Ihrem DROPS Laden bekommen. Viel Spaß beim stricken!
20.01.2017 - 09:10
![]() Gunlaug Solbakk wrote:
Gunlaug Solbakk wrote:
Hvor mange ganger skal man øke på omgangen, i str. 3/4. Har prøvd å øke etter vêr raport det blei for mange masker. Så prøvde jeg å øke mend 11/ 12 masker som det står i mønstret, ble fortsatt ikke riktig. Håper du kan forklare
13.01.2017 - 13:31DROPS Design answered:
Hej Gunlaug. Du har i alt 88 m paa pinden og strikker: 5 stolpe-m i rille, strikk diag A.1 til det gjenstår 6 m på p (= 11 rapporter à 7 m) = 77 m i A.1, 82 m strikket i alt. Strikk første m i A.1 og avslutt med 5 stolpe-m i rille = i alt 88 m strikket. I og med du öker i förste omgang af A.1 (med et omslag har du efter förste p öket 11 masker og har nu 8 m per gentagelse af A.1 og 99 m i alt paa p.
17.01.2017 - 15:12
![]() Gunlaug Solbakk wrote:
Gunlaug Solbakk wrote:
Hei, har prøvd å strikke dressen i størrelse 3/4 år, får ikke rett antal masker når jeg kommer til omg. 14. Da er det for mange masker. Når jeg så starter på stjernen blir de ikke stående rett over de understående masker ( mønsteret blir forskjøvet) . Hvordan kan jeg få dette til å stemme?
01.01.2017 - 19:39DROPS Design answered:
Hej Gunlaug. Og dit antal masker var korrekt i omg 13? Har du maaske taget for mange m ud i omgangen? Det burde passe om du har öket korrekt. Pröv evt at saette en markör mellem hver gentagelse af mönstret - det hjaelper mig altid naar jeg har mange masker og gentagelser :)
12.01.2017 - 15:12
![]() Kirsten Nystrand wrote:
Kirsten Nystrand wrote:
Hei. Jeg har gjentatte ganger prøvd å få mønsteret til å stemme med antall økninger og antall masker. Jeg må gi opp! Jeg er en erfaren strikker, men drops sitt mønster er ikke enkelt å strikke etter. Jeg skulle ønske at det for hver økning oppgis hvor mange masker det skal være på pinnen. Når mønsteret er ferdig er det, så stemmer det ikke.
29.12.2016 - 12:31
![]() Martje Bertram wrote:
Martje Bertram wrote:
Liebes Drops-Team, ich nochmal... :-) Bei den Zunahmen steht, man soll in der Farbe des Musterstreifens zunehmen. Was ist damit gemeint? In welcher Farbe mache ich die Zunahmen, wenn ich in der Reihe zwischen mehreren Farben wechsele? Vielen Dank im voraus für die Antwort. Viele Grüße
09.12.2016 - 21:50DROPS Design answered:
Liebe Frau Bertram, die Zunahme wird mit der Grundfarbe gestrickt, z.B. bei der 1. und 2. R in A.1 sind die Umschläge mit natur gestrickt. Viel Spaß beim stricken!
12.12.2016 - 09:07
![]() Martje Bertram wrote:
Martje Bertram wrote:
Vielen Dank für die super Erklärung! Jetzt weiß ich wo mein Fehler lag und kann mich dank der schnellen Antwort direkt ans Werk machen! Viele Grüsse Martje
06.12.2016 - 15:42
|
||||||||||||||||
Wild Blueberries#wildblueberriesoverall |
||||||||||||||||
 |
 |
|||||||||||||||
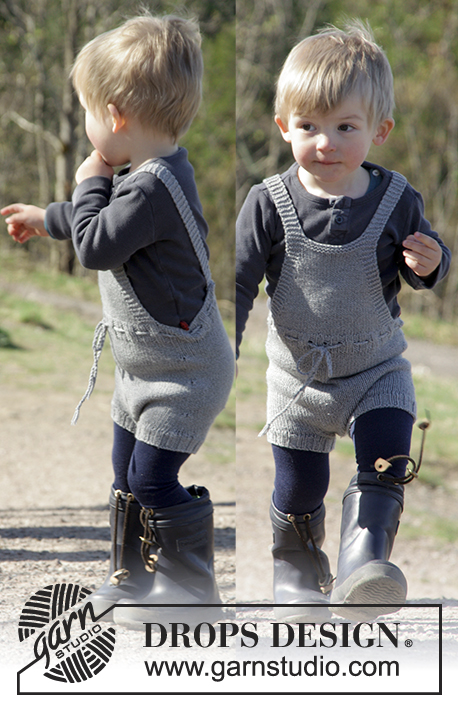
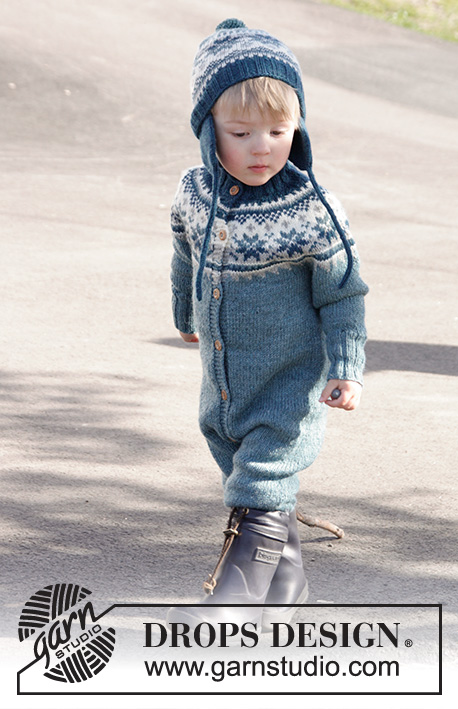
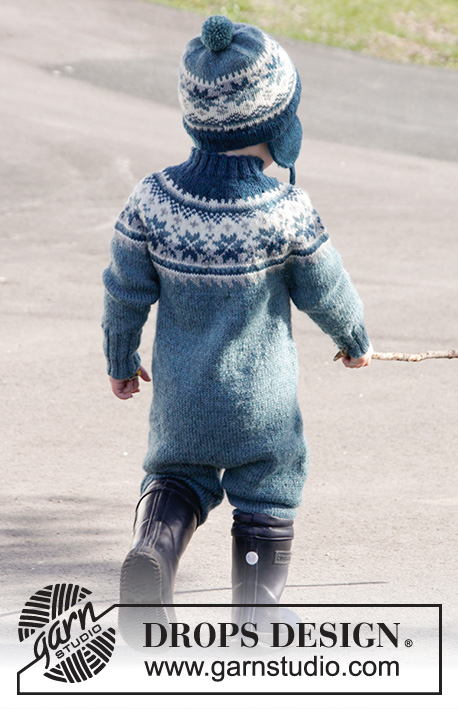
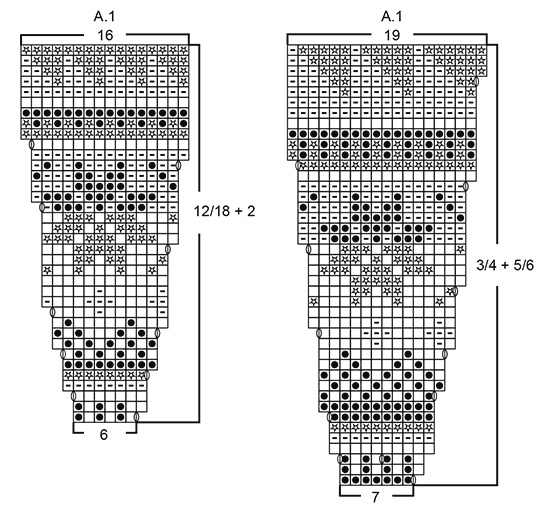
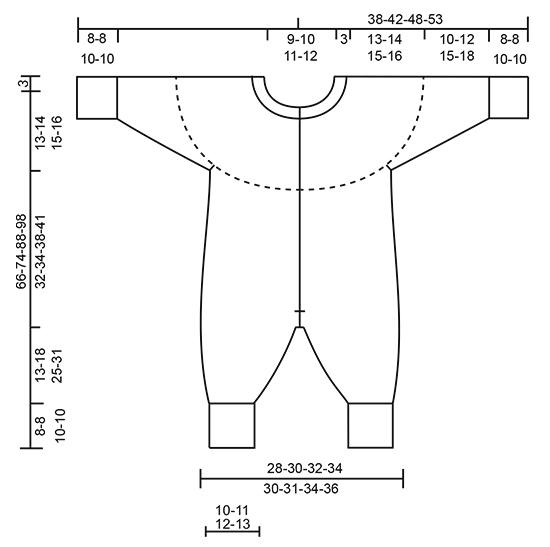
Set of knitted overall worked top down with Nordic pattern and round yoke, plus hat with ear flaps and pompom in DROPS Karisma. Size children 1 - 6 years
DROPS Children 27-1 |
||||||||||||||||
|
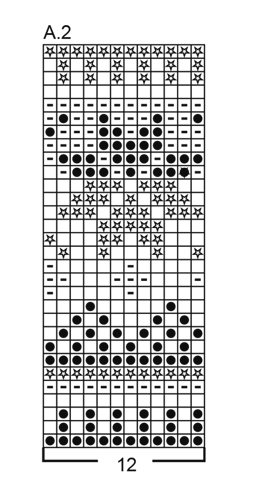
SUIT: GARTER ST (back and forth): K all rows. 1 ridge = 2 rows K. PATTERN: See diagram A.1 - NOTE: Choose diagram for correct size. Work entire pattern in stocking st. KNITTING TIP (applies to bands): On the rows where there are either stripes or pattern border work the colour in the stripes or the base colour of pattern border also over the 5 band sts in each side but do yarn change between band and body (to avoid fastening the yarn on band). DECREASE/INCREASE TIP: To calculate how often dec/inc should be done, use the total no of sts on row (e.g. 84 sts), minus bands (e.g. 10 sts) and divide the remaining sts by no of dec/inc to be done (e.g. 7) = 10.6. I.e. In this example dec by working alternately approx. every 9th and 10th st and 10th and 11th st tog or inc after alternately approx. every 10th and 11th st by making 1 YO (work YO twisted on next row to avoid hole – NOTE: Do not inc/dec over bands). INCREASE TIP-1: Inc 1 st on each side of marker as follows: Beg 2 sts before marker and make 1 YO, work 4 sts (marker is in the middle of these 4 sts), make 1 YO (= 2 sts inc). On next row work YOs twisted to avoid holes. DECREASE TIP-1 (applies to mid under sleeve and on inside of leg): Dec 1 st on each side of marker as follows: Beg 3 sts before marker and K 2 tog, K 2 (marker is between these 2 sts), slip 1 st as if to K, K 1, psso (= 2 sts dec). BUTTONHOLES: Dec for buttonhole on right band (when garment is worn). 1 button hole = beg from WS and K tog second and third st from edge and make 1 YO. On next row K the YO to make a hole. Dec for first buttonhole after 1½-2 cm on neck edge, then dec the next 5-5-6-6 buttonholes every 7½-8-7½-8 cm. ---------------------------------------------------------- SUIT: Worked back and forth on circular needle from mid front. To make it easier to adjust the length of sleeves and legs the suit is worked top down. YOKE: Cast on 84-88-92-96 sts (incl 5 band sts in each side towards mid front) on a short circular needle size 3 mm with petrol. P 1 row from WS. Work next row as follows from RS: 5 band sts in GARTER ST - see explanation above - * K 2, P 2 *, repeat from *-* until 7 sts remain on needle, finish with K 2 and 5 bands sts in garter st. Continue rib like this for 3 cm – remember BUTTONHOLES on right band – see explanation above and finish after 1 row from RS (= neck edge). Switch to circular needle size 4 mm. P 1 row from WS while dec 7-5-4-1 sts evenly - READ DECREASE/INCREASE TIP = 77-83-88-95 sts on needle. Then work an elevation at the back in stocking st as follows: K until 12-13-14-15 sts remain, turn, tighten yarn and P until 12-13-14-15 sts remain in the other side. Turn, tighten yarn and K until 20-22-24-26 sts remain, turn, tighten yarn and P until 20-22-24-26 sts remain in the other side. Turn, tighten yarn and K until 28-31-34-37 sts remain, turn, tighten yarn and P until 28-31-34-37 sts remain in the other side. Turn, tighten yarn and K the rest of row, then P 1 row from WS (work bands in garter st). Work next row as follows from RS: 5 band sts in garter st, work pattern according to diagram A.1 until 6 sts remain on row - NOTE: Choose diagram for correct size (= 11-12-11-12 repetitions of 6-6-7-7 sts), work first st in A.1 (so that pattern beg and ends the same way inside band in each - NOTE: Do not inc in this st) and finish with 5 band sts in garter st. Continue pattern like this and inc as shown in diagram - READ KNITTING TIP AND REMEMBER KNITTING TENSION. When A.1 has been worked = 187-203-220-239 sts on needle. Work 0-1-0-1 cm with green. Piece now measures approx. 13-14-15-16 cm mid front (measured without rib in the neck). Now work piece in stocking st with green. On first row from RS inc now 7-7-10-7 sts evenly (do not inc over bands) = 194-210-230-246 sts. Work next row as follows from WS: Work 29-31-34-36 sts as before, slip the next 42-46-50-54 sts on 1 stitch holder for sleeve (without working them first), cast on 6 new sts on row, work 52-56-62-66 sts (= back piece), slip the next 42-46-50-54 sts on 1 stitch holder for sleeve (without working them first), cast on 6 new sts on row and work 29-31-34-36 sts as before. BODY: = 122-130-142-150 sts. Insert 1 marker 32-34-37-39 sts in from each side (= 58-62-68-72 sts between markers on back piece). NOW MEASURE PIECE FROM HERE! Then continue back and forth in stocking st and 5 band sts in garter st in each side towards mid front - remember BUTTONHOLES on band. When piece measures 10-10-12-12 cm, inc on each side of both markers – READ INCREASE TIP 1 (= 4 sts inc). Repeat inc when piece measures 20-20-24-24 cm = 130-138-150-158 sts. When piece measures 29-31-35-38 cm from armhole, end bands mid front. Cast off the first 3 sts at the beg of the next 2 rows = 124-132-144-152 sts. Then work in stocking st in the round over all sts for approx. 3 cm – piece now measures 32-34-38-41 cm from armhole and 45-48-53-57 cm from mid front (measured without rib in neck). Now divide for legs. LEG: Beg mid front, switch to double pointed needles size 4 mm and work in stocking st in the round over the first 62-66-72-76 sts (keep the remaining 62-66-72-76 sts on circular needle). Insert 1 marker at beg of round = inside of leg. On next round, dec 2 sts on inside of leg - READ DECREASE TIP-1 (= 2 sts dec). Dec like this every round a total of 2-3-3-3 times = 58-60-66-70 sts. Then dec every 4th-5th-7th-9th round a total of 8-7-8-8 times = 42-46-50-54 sts. When leg measures 13-18-25-31 cm, inc 10 sts evenly = 52-56-60-64 sts. Switch to double pointed needles size 3 mm and work rib in the round = K 2/P 2 for 8-8-10-10 cm (or desired length). On next round, inc all 2 P sts to 3 P sts = 65-70-75-80 sts. Then cast off sts with K over K and P over P. Slip sts from circular needle on double pointed needles size 4 mm and work the other leg the same way. Entire suit now measures approx. 66-74-88-98 cm mid front (measured without rib in the neck). SLEEVE: Slip sts from one stitch holder back on double pointed needles size 4 mm, pick up 1 st in each of the 6 sts cast on under sleeve = 48-52-56-60 sts. Insert 1 marker in the middle of the 6 sts (= mid under sleeve). NOW MEASURE PIECE FROM HERE! Work in stocking st in the round with green. When sleeve measures 2-2-1-1 cm, dec 2 sts mid under sleeve - READ DECREASE TIP-1. Repeat dec every 3rd-3rd-4th-4th round a total of 7-9-10-12 times = 34-34-36-36 sts. When sleeve measures 10-12-15-18 cm, inc 6-6-8-8 sts evenly = 40-40-44-44 sts. Switch to double pointed needles size 3 mm and work rib in the round = K 2/P 2 for 8-8-10-10 cm (or desired length). On next round, inc all 2 P sts to 3 P sts = 50-50-55-55 sts. Then cast off sts with K over K and P over P. Work the other sleeve the same way. ASSEMBLY: Place right band over left band and fasten at the bottom with small stitches. Sew the buttons on to the left band. ---------------------------------------------------------- HAT: PATTERN: See diagram A.2. Work entire pattern in stocking st. DECREASE TIP-1: Dec 1 st after every marker as follows: Slip 1 st as if to K, K 1, psso (= 1 st dec). DECREASE TIP-2: Beg 2 sts before marker, K 2 tog, marker, slip 1 st as if to K, K 1, psso (= 2 sts dec). TUBE TIE: Slip the 4 sts tog on 1 double pointed needle size 3 mm. K 1 row, * move all sts to the right side of needle without turning piece, tighten yarn and K over all sts *, repeat from *-* until desired length. ---------------------------------------------------------- HAT: Worked in the round on circular needle from the bottom up, switch to double pointed needles when needed. Cast on 96-112 sts on circular needle size 3 mm with petrol. K 1 round. Then work rib = K 2/P 2 for 3 cm. Switch to circular needle size 3.5 mm and K 1 round while at the same time dec 12-16 sts evenly = 84-96 sts. Then work pattern according to diagram A.2 (= 7-8 repetitions of 12 sts). REMEMBER THE KNITTING TENSION When A.2 has been worked, piece measures approx. 14 cm. Work with green until piece measures 15-17 cm. Now insert 6 markers in piece with 14-16 sts between every marker. On next round dec 1 st after every marker - SEE DECREASE TIP 1 (= 6 sts dec). Dec like this every other round a total of 5 times and then every round 3 times in total = 36-48 sts. On next round K all sts tog 2 by 2, K 1 round and K all sts tog 2 by 2 again = 9-12 sts remain on needle. Cut the yarn and pull it through the remaining sts, tighten tog and fasten. Hat measures approx. 20-22 cm. EAR FLAP: Cast on 40-44 sts with petrol and distribute sts on 2 double pointed needles size 3 mm = 20-22 sts on each needle. Work in stocking st in the round on these 2 needles - NOTE: Tighten yarn in every transition between the 2 needles when working. When ear flap measures 5-6 cm, insert 1 marker in each side. On next round dec 2 sts in each side - SEE DECREASE TIP 2. Dec like this every other round a total of 5-5 times and then every round 4-5 times in total = 4 sts remain on needle. Work TUBE TIE – see explanation above – over the remaining sts until tie measures approx. 20-25 cm. Cut the yarn and pull it through sts, tighten tog and fasten. Knit another ear flap the same way. ASSEMBLY: Place ear flaps approx. 3 cm in under rib on hat and fasten on WS - NOTE: There should be approx. 13-15 cm between ear flaps at the front (= approx. 7-9 cm between ear flaps at the back). Make a pompom with green, 4-5 cm in diameter and fasten pompom at the top of hat. |
||||||||||||||||
Diagram explanations |
||||||||||||||||
|
||||||||||||||||
 |
||||||||||||||||
 |
||||||||||||||||
 |
||||||||||||||||
Have you finished this pattern?Tag your pictures with #dropspattern #wildblueberriesoverall or submit them to the #dropsfan gallery. Do you need help with this pattern?You'll find 40 tutorial videos, a Comments/Questions area and more by visiting the pattern on garnstudio.com. © 1982-2026 DROPS Design A/S. We reserve all rights. This document, including all its sub-sections, has copyrights. Read more about what you can do with our patterns at the bottom of each pattern on our site. |
||||||||||||||||


With over 40 years in knitting and crochet design, DROPS Design offers one of the most extensive collections of free patterns on the internet - translated to 17 languages. As of today we count 324 catalogues and 12290 patterns translated into English (UK/cm). 12290
We work hard to bring you the best knitting and crochet have to offer, inspiration and advice as well as great quality yarns at incredible prices! Would you like to use our patterns for other than personal use? You can read what you are allowed to do in the Copyright text at the bottom of all our patterns. Happy crafting!
Post a comment to pattern DROPS Children 27-1
We would love to hear what you have to say about this pattern!
If you want to leave a question, please make sure you select the correct category in the form below, to speed up the answering process. Required fields are marked *.