
Popular categories
Looking for a yarn?


Comments / Questions (7)
![]() Catherine wrote:
Catherine wrote:
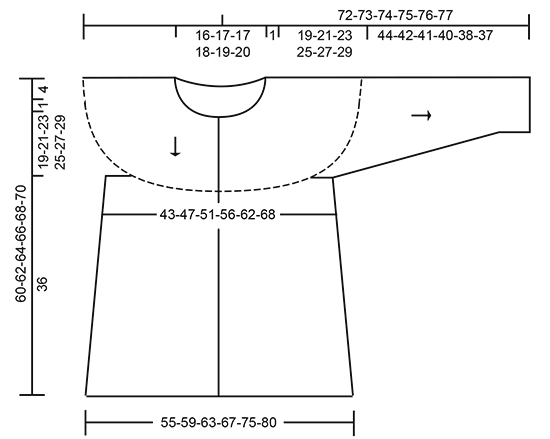
Bonjour Je ne comprends pas cette partie : tricoter A1 jusqu'à ce qu'il reste 6 m. Tricoter la 1ere m de A1 pour que le motif commence et se termine de la même façon. J'ai 115 m dont 10 de bordures. Le motif est sur 12m. Je peux faire 8 fois le motif et il me reste donc 9m à la fin du rang. Pouvez-vous m'expliquer comment faire ? Merci d'avance
27.05.2025 - 17:50DROPS Design answered:
Bonjour Catherine, tricotez vos 115 mailles ainsi: 5 m de bordure devant, 8 x les 12 m de A.1, puis les 8 premières mailles de A.1 et enfin de nouveau la 1ère maille de A.1 (qui sera la même que la 9ème maille, et 5 m de bordure devant = 5+12x8+8+1+5=115. Bon tricot!
28.05.2025 - 08:15
![]() Lisette Madsen wrote:
Lisette Madsen wrote:
Jeg har strikket den med sort baggrund i stedet for lys eg. Sort fremhæver mønsterfarverne meget mere end lys eg og den er blivet rigtig flot.
10.09.2023 - 20:09
![]() Palina wrote:
Palina wrote:
Kan inte förstå hur det blir den totala antal maskor om man stickar upp 2 till på var sida. Sätt de 59-67-73-79-81-83 m från tråden i den ena sida av arb på kort rundst 4 och sticka dessutom upp 1 m i var och en av de 8-8-10-10-12-14 m som lades upp under ärmen på fram- och bakst = 67-75-83-89-93-97 m.
19.06.2021 - 10:19DROPS Design answered:
Hei Palina. Litt usikker på hvor du ser at man skal strikke opp 2 til på hver side. Man setter de 59-67-73-79-81-83 maskene fra tråden i den ene side av arbeidet på liten rundpinne, strikker deretter opp 1 maske i hver av de 8-8-10-10-12-14 maskene som ble lagt opp under ermet på bolen = 67-75-83-89-93-97 masker. mvh DROPS design
21.06.2021 - 11:26
![]() Bodil Riise Bjørnebye wrote:
Bodil Riise Bjørnebye wrote:
Fargene på bildet og fargene i virkeligheten er helt forskjellig. Mye finere på bildet, så jeg ble så skuffet, men strikker likevel med fargene jeg har fått tilsendt.
26.04.2019 - 11:09
![]() Mirja Kraack wrote:
Mirja Kraack wrote:
Hallo, ich habe das Rumpfteil fertig und bin beim Ärmel angelangt, dass ich zu A3 wechseln soll. Irgendwie passt aber weder das Muster noch die Farbe zu dem Foto mit der Jacke. Wie geht's richtig? Viele Grüße Mirja
16.01.2017 - 15:15Laura wrote:
A really pretty & feminine design - love it - please include!
11.06.2016 - 08:03
![]() Ynke wrote:
Ynke wrote:
Beauty!
05.06.2016 - 12:17
|
|||||||||||||||||||||||||||||||
Candy Lane Cardigan#candylanecardigan |
|||||||||||||||||||||||||||||||
|
|
|||||||||||||||||||||||||||||||
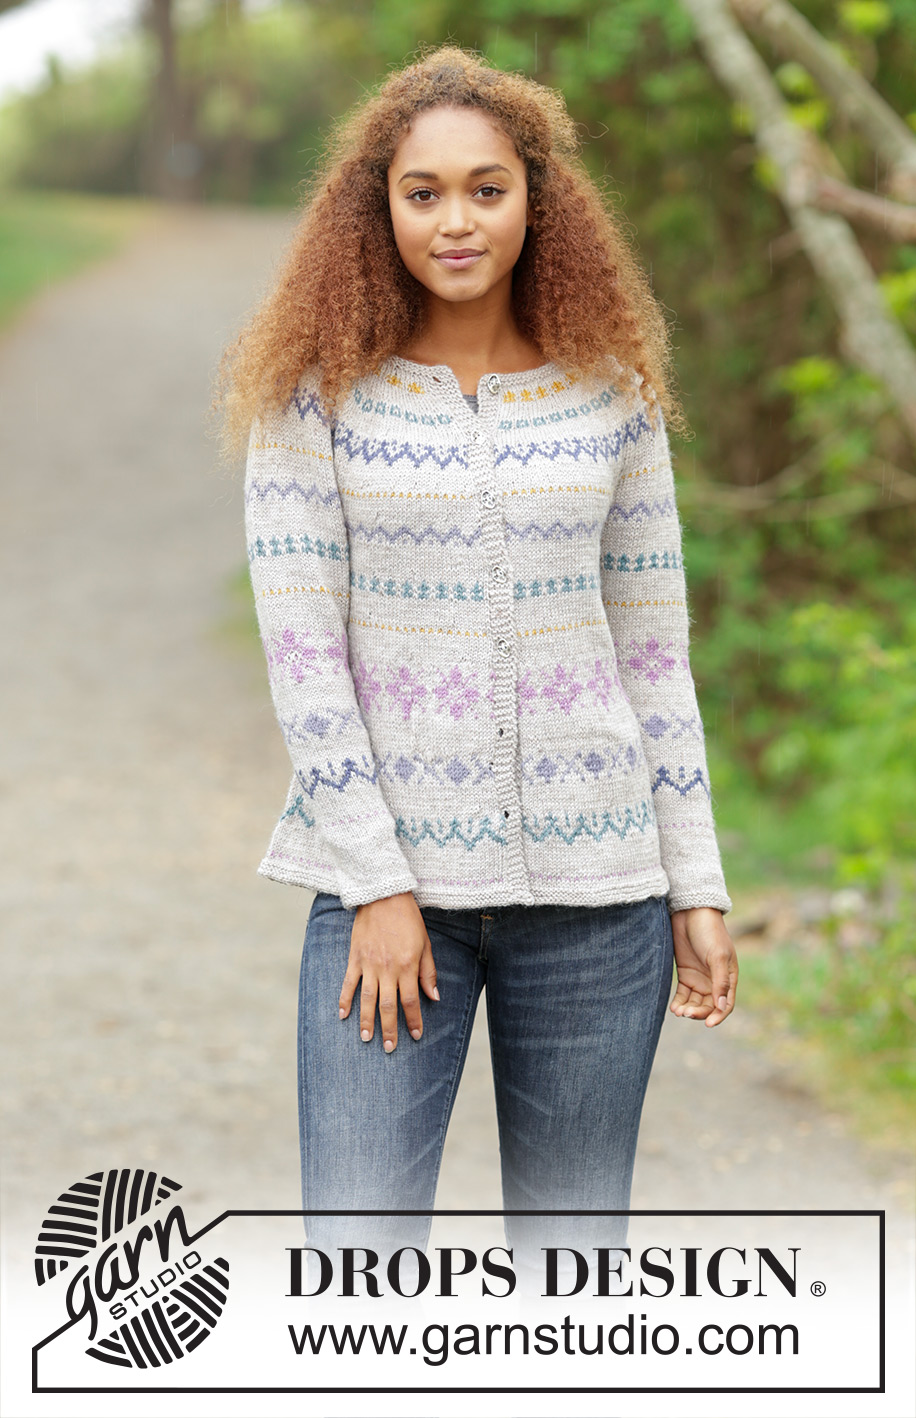
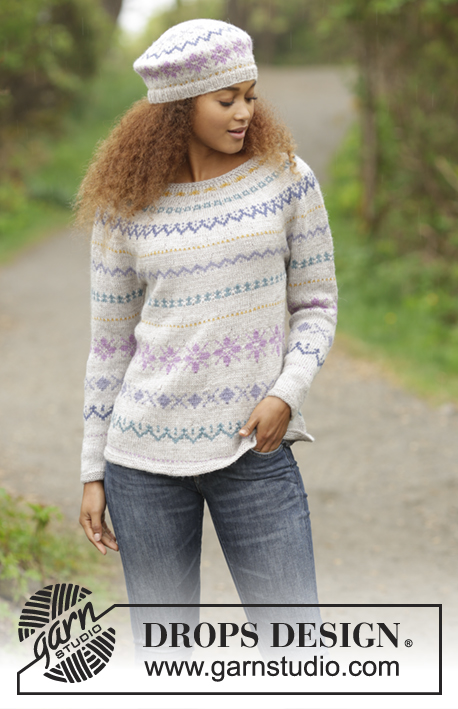
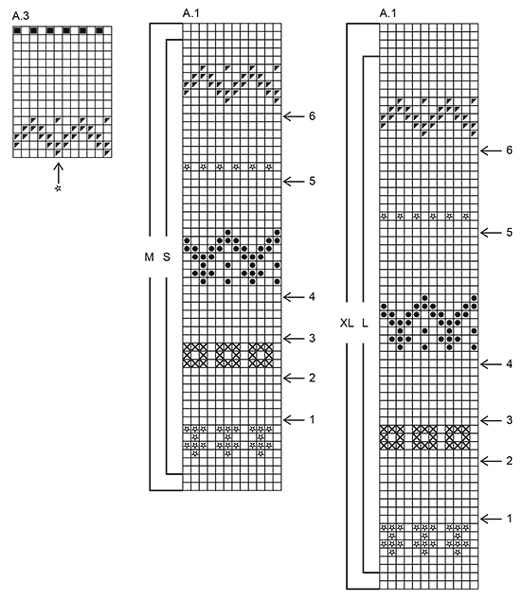
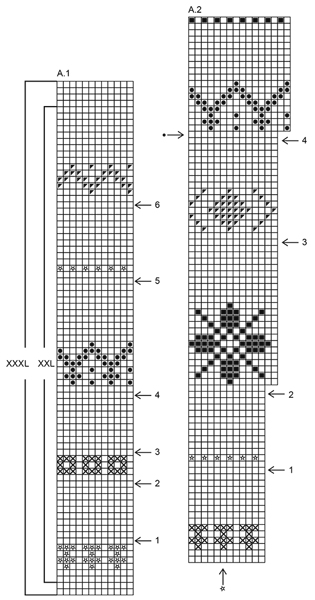
Knitted DROPS jacket with round yoke and pattern border, worked top down in ”Karisma”. Size: S - XXXL.
DROPS 171-6 |
|||||||||||||||||||||||||||||||
|
GARTER ST (back and forth): K all rows. 1 ridge = 2 rows K. GARTER ST (worked in the round): 1 ridge = 2 rounds. * K 1 round and P 1 round *, repeat from *-*. PATTERN: See diagrams A.1 to A.3. Choose diagram for correct size (applies to A.1). Work entire pattern in stocking st. INCREASE TIP (applies to round yoke): To calculate how often inc should be done, use the total no of sts on row (e.g. 86 sts), minus bands (e.g. 10 sts) and divide the remaining sts by no of inc to be done (e.g. 25) = 3.02. I.e. in this example inc after approx. every third st (do not inc over bands). Inc 1 st by making 1 YO, on next row work YO twisted to avoid holes (inc both from RS and WS). KNITTING TIP: If the knitting tension is wrong vertically and the garment is worked to tight, it will be too short and the armhole will be too small - this can be adjusted by working 1 extra row evenly in the sections in one colour. NOTE: If the garment is too loose, it will be too long and the armhole too big, this can be adjusted by working 1 row less in the sections in one colour. DECREASE TIP (applies to mid under sleeve): Beg 3 sts before marker and K 2 tog, K 2 (marker is between these 2 sts), slip 1 st as if to K, K 1, psso (dec sts + the 2 middle sts under sleeve are worked in light oak the entire sleeve). BUTTONHOLES: Dec for buttonhole on right band (when garment is worn). Dec from RS when 3 sts remain on row as follows: Make 1 YO, K the next 2 sts tog, K last st. On next round K the YO to make a hole. Dec for buttonhole on first row from RS after edge in garter st in neck. Then dec the next 6-6-6-7-7-7 buttonholes approx. 8 cm between each. ---------------------------------------------------------- JACKET: Work back and forth on circular needle from mid front, work top down. YOKE: Cast on 86-90-92-96-98-102 sts (incl 5 band sts in each side towards mid front) on circular needle size 3 mm with light oak. Work 2 ridges in GARTER ST - see explanation above. Switch to circular needle size 4 mm, K 1 row from RS while inc 25-25-27-31-33-33 sts evenly - READ INCREASE TIP = 111-115-119-127-131-135 sts - remember BUTTONHOLES on band - see explanation above. For better shape work an elevation in the back of neck as follows: Insert 1 marker mid back. Beg from WS with light oak and P until 13-13-14-15-16-17 sts have been worked past marker (K band), turn, tighten yarn and K 26-26-28-30-32-34. Turn, tighten yarn and P 39-39-42-45-48-51 sts, turn, tighten yarn and K 52-52-56-60-64-68 sts back. Turn, tighten yarn and P 65-65-70-75-80-85 sts, turn, tighten yarn and K 78-78-84-90-96-102 sts back. turn and P the rest of row (K band). Work next row as follows from RS: 5 band sts in garter st, work pattern according to diagram A.1 until 6 sts remain on row (choose diagram for correct size), work first st in A.1 (so that pattern beg and ends the same in each side towards mid front) and finish with 5 band sts in garter st. Continue pattern like this and inc evenly every row marked with arrow in diagram as explained below - READ INCREASE TIP, KNITTING TIP and REMEMBER THE KNITTING TENSION. Arrow-1 Inc 40-42-44-50-56-62 sts = 151-157-163-177-187-197 sts. Arrow-2 Inc 40-42-44-50-56-62 sts = 191-199-207-227-243-259 sts. Arrow-3 Inc 30-36-38-44-48-52 sts = 221-235-245-271-291-311 sts. Arrow-4 Inc 30-34-36-40-44-48 sts = 251-269-281-311-335-359 sts. Arrow-5 Inc 26-30-34-38-38-38 sts = 277-299-315-349-373-397 sts. Arrow-6 Inc 16-24-32-34-34-34 sts = 293-323-347-383-407-431 sts. When A.1 has been worked, piece measures approx. 20-22-24-26-28-30 cm mid front (incl edge in garter st in neck). Work next row as follows from WS with light oak: Work 46-50-53-59-64-69 sts as before (= right front piece), slip the next 59-67-73-79-81-83 sts on 1 stitch holder (= sleeve), cast on 8-8-10-10-12-14 new sts (= in the side), work 83-89-95-107-117-127 sts in stocking st (= back piece), slip the next 59-67-73-79-81-83 sts on 1 stitch holder (= sleeve), cast on 8-8-10-10-12-14 sts (= in the side), work the remaining 46-50-53-59-64-69 sts as before (= left front piece). Finish body and sleeves separately. BODY: = 191-205-221-245-269-293 sts. Insert 1 marker, NOW MEASURE PIECE FROM HERE! On first row (= RS) inc 0-2-2-2-2-2 sts evenly AT THE SAME TIME work as follows: 5 band sts in garter st, work pattern according to diagram A.2 until 6 sts remain on row, work first st in A.2 (so that pattern beg and ends the same in each side towards mid front) and finish with 5 band sts in garter st (do not inc over bands) = 191-207-223-247-271-295 sts. Continue pattern like this and inc evenly every row marked with arrow in diagram as explained below - REMEMBER INCREASE TIP. Arrow-1 Inc 12-10-10-6-6-6 sts = 203-217-233-253-277-301 sts. Arrow-2 Inc 18-18-16-10-14-18 sts = 221-235-249-263-291-319 sts. Arrow-3 Inc 14-14-14-14-14-14 sts = 235-249-263-277-305-333 sts. Arrow-4 Inc 8-10-12-14-18-14 sts = 243-259-275-291-323-347 sts. When diagram A.2 has been worked, continue in stocking st with light oak until finished measurements. When piece measures 34 cm from marker (jacket measures approx. 58-60-62-64-66-68 cm from shoulder), switch to circular needle size 3 mm. Work 3 ridges in garter st (work first row from RS), switch back to needle size 4 mm and LOOSELY cast off with K from RS. Jacket measures approx. 60-62-64-66-68-70 cm from shoulder. SLEEVE: READ ENTIRE SLEEVE BEFORE WORKING (inc row in A.2 does not apply to sleeve)! Worked in the round on a short circular needle, switch to double pointed needles when needed. Slip the 59-67-73-79-81-83 sts from stitch holder in one side of piece on a short circular needle size 4 mm and pick in addition 1 st in each of the 8-8-10-10-12-14 sts cast on under sleeve on body = 67-75-83-89-93-97 sts. Insert 1 marker at beg of round (= mid under sleeve) and 1 marker in the middle st on round (= mid on top of sleeve). Work pattern in the round according to diagram A.2 but on every pattern border count the beg of pattern out from mid st in pattern (see arrow in diagram – mid st in pattern should fit st with marker on top of sleeve). NOTE: The pattern will not fit mid under sleeve - work as much pattern as possible but always work the 4 middle sts mid under sleeve in light oak. AT THE SAME TIME when piece measures 2 cm, dec 2 sts mid under sleeve - READ DECREASE TIP. Dec a total of 13-16-19-21-22-23 times: in Size S: On every 8th round, in size M: On every 6th round, in size L: On every 5th round, in size XL: On every 4th round, in size XXL + XXXL: Alternately on every 3rd and 4th round = 41-43-45-47-49-51 sts. When it has been worked up to arrow with dot marked in A.2, work pattern in the round according to diagram A.3 the same way. After A.3 work in stocking st with light oak until sleeve measures 42-40-39-38-36-35 cm from division under sleeve (or desired length). Switch to double pointed needles size 3 mm and work 3 ridges in GARTER ST in the round - see explanation above. Switch back to double pointed needles size 4 mm and LOOSELY cast off with K. Sleeve measures approx. 44-42-41-40-38-37 cm from division under sleeve. Work the other sleeve the same way. ASSEMBLY: Sew the buttons on to the left band. |
|||||||||||||||||||||||||||||||
Diagram explanations |
|||||||||||||||||||||||||||||||
|
|||||||||||||||||||||||||||||||
 |
|||||||||||||||||||||||||||||||
 |
|||||||||||||||||||||||||||||||
 |
|||||||||||||||||||||||||||||||
Have you finished this pattern?Tag your pictures with #dropspattern #candylanecardigan or submit them to the #dropsfan gallery. Do you need help with this pattern?You'll find 29 tutorial videos, a Comments/Questions area and more by visiting the pattern on garnstudio.com. © 1982-2026 DROPS Design A/S. We reserve all rights. This document, including all its sub-sections, has copyrights. Read more about what you can do with our patterns at the bottom of each pattern on our site. |
|||||||||||||||||||||||||||||||


With over 40 years in knitting and crochet design, DROPS Design offers one of the most extensive collections of free patterns on the internet - translated to 17 languages. As of today we count 324 catalogues and 12291 patterns translated into English (UK/cm). 12291
We work hard to bring you the best knitting and crochet have to offer, inspiration and advice as well as great quality yarns at incredible prices! Would you like to use our patterns for other than personal use? You can read what you are allowed to do in the Copyright text at the bottom of all our patterns. Happy crafting!
Post a comment to pattern DROPS 171-6
We would love to hear what you have to say about this pattern!
If you want to leave a question, please make sure you select the correct category in the form below, to speed up the answering process. Required fields are marked *.