
Popular categories
Looking for a yarn?


Comments / Questions (31)
![]() Lilou wrote:
Lilou wrote:
Rabattre les mailles Bonjour je fais le pull 69-12mais je ne comprends pas , je ne pourrait pas en même temps rabattre, les mailles pour en arriver à 66 M (pour les ( emmanchures) et faire en même temps le changement de fil pour tricoter le point 2. Merci Merci de m'éclairer.
14.09.2025 - 17:13DROPS Design answered:
Bonjour Lilou, les mailles des emmanchures vont se rabattre comme d'habitude, même au 1er rang du point fantaisie-2: rabattez le nombre de mailles indiqué sur le rang concerné, puis terminez le rang comme indiqué dans le point fantaisie (la maille qui reste sur l'aiguille droite après avoir rabattu les mailles de l'emmanchure = la 1ère maille point mousse de ce rang). Bon tricot!
15.09.2025 - 08:35
![]() Anita wrote:
Anita wrote:
Die ersten Abnahmen habe ich verstanden. Aber wo soll ich in der 19. Reihe abnehmen? Vorne , Mitte oder hinten ? Das Diagramm ist wirklich schlecht zu verstehen und M2 gibt es in dem Diagramm nicht, wie du es in deiner vorherigen Antwort geschrieben hast. Kannst du mir bitte die Reihe 19 aufschreiben, wie ich sie Stricken soll? Vielen lieben Dank!!
21.02.2025 - 19:28DROPS Design answered:
Liebe Anita, bei der 19. Reihe stricken Sie so: *2 M rechts, 2 M rechts zusammen (=Abnahme), 1 Umschlag, 1 M abheben, 2 re zusammen, die abgehobene M darüber ziehen, 1 Umschlag* = es sind nur noch 6 Maschen in jedem M.1, von*bis*die ganze Reihe wiederholen; Viel Spaß beim Stricken!
24.02.2025 - 07:52
![]() Anita wrote:
Anita wrote:
Die 2. Frage ist: In der 20. Reihe werden 3 Maschen rechts gestrickt, dann ist eine Lücke und dann wieder 3 Maschen rechts gestrickt… wie stricke ich diese und die folgenden Reihen? Und was bedeutet diese Lücke ?Ich verstehe das nicht 🫣😅… Schön, dass es euch gibt… Dankeschön 🌸😊
20.02.2025 - 20:09DROPS Design answered:
Liebe Anita - siehe unten - es sind Löcher im Diagram da die Maschen werden abgenommen werden, so diese abgenommene Maschen sind nicht mehr auf der Nadel, deshalb gibt es "Löcher" (wegen auch grafische Gründe, damit die Maschen immer übereinander gezeichnet werden). Viel Spaß beim Stricken!
21.02.2025 - 08:24
![]() Anita wrote:
Anita wrote:
Hallo 😄danke !!! Ich habe aber noch 2 Fragen: 1. in der 8. Reihe wird am Anfang der Reihe ein lochmuster gestrickt, dann 3 Maschen rechts und dann 2 Maschen zusammenstricken. … wie geht es dann weiter? … wieder 3 Maschen rechts und 2 Maschen zusammenstricken und zum Schluss 1 lochmuster? Dann habe ich insgesamt 10 Maschen abgenommen? Ich muss Aber insgesamt von 66 auf 50 Maschen kommen. Wie stricke ich diese Reihe???? Dankeschön 😊🌸
20.02.2025 - 20:06DROPS Design answered:
Liebe Anita, das Diagram wiederholen Sie so über alle Maschen, dh die 8 Maschen M.1 stricken Sie 8 Mal in der Breite (mit 1 Randmasche beidseitig), bei der 9. Reihe nehmen Sie 1 Masche am Ende von jedem M.1 ab = 8 Maschen werden abgenommen; bei der 19. Reihe nehmen Sie auch 1 Masche in jedem M.2 ab = 6 M in jedem M.1 x 8 Rapporte + 2 Randmaschen = 50 M übrig. Viel Spaß beim Stricken!
21.02.2025 - 08:23
![]() Anita wrote:
Anita wrote:
Hallo ihr lieben Helferinnen, wie werden die Maschen auf der Rückseite beim Muster M1 gestrickt? … und wie werden die Umschläge auf der Rückseite gestrickt? Vielen dank für die Antwort 😊
20.02.2025 - 11:58DROPS Design answered:
Liebe Anita, die Rückreihen stricken Sie immer links (sie sind in den Diagrammen auch gezeichnet) -so work M.1 glattrechts mit dem Lochmuster gestrickt. Viel Spaßb eim Stricken!
20.02.2025 - 14:45
![]() José wrote:
José wrote:
Hallo, hebben jullie een video van motief 1, het is mij niet duidelijk. Ik heb de bolletjes Paris al een tijdje in huis, ik kom er niet uit en zou graag de trui willen breien. Alvast hartelijk dank.
08.08.2024 - 23:12DROPS Design answered:
Dag José,
Helaas hebben we geen video van specifiek dit telpatroon, maar de steken die daarin gebruikt worden komen heel vaak voor in ajourpatronen. Van 2 steken recht samen breien staat er wel een video bij en van 1 steek afhalen, 1 recht en de afgehaalde steek overhalen ook. De omslagen maak je ervoor en erna. verder kun je de FAQ lezen 'Hoe brei ik volgens een telpatroon.
09.08.2024 - 13:16
![]() Claudia wrote:
Claudia wrote:
Chiedo scusa ma non capisco come fare il motivo 2, potrebbe ripristinare il video che c'era in una vecchia risposta. Grazie.
20.03.2023 - 22:58DROPS Design answered:
Buonasera Claudia, abbiamo segnalato alla casa madre il problema della visualizzazione dei video. Per il motivo 2 deve lavorare il 1° ferro con 2 capi e lavorare 2 maglie a rovescio e poi accavallare la 1° sulla seconda. Sul 2° ferro lavora con 1 capo di filato e deve lavorare singolarmente ogni capo delle maglie precedenti, quindi come se lavorasse 2 maglie in una maglia. Buon lavoro!
23.03.2023 - 20:55
![]() Regine wrote:
Regine wrote:
Bonjour que représente les blancs dans le diagramme M1 ? Faut ils les tricoter ou pas..? Merci pour votre réponse rapidement
05.05.2022 - 17:52DROPS Design answered:
Bonjour Régine, qu'entendez-vous par les "blancs"? Les espaces vides après la dernière maille , partir du 9ème rang, correspond à la maille diminuée à la fin de M.1; et celui entre les 2 séries de 3 mailles, à la maille diminuée au 19ème rang; autrement dit, M.1 se commence sur 8 mailles, on diminue 2 fois 1 maille et il se termine sur 6 mailles. Bon tricot!
06.05.2022 - 07:41
![]() Hester wrote:
Hester wrote:
Bij de mouwen heeft mijn breiwerk na het breien van het gaatjesmotief een hoogte van ca 13 cm i.p.v. de 18 cm die in het patroon staat. Mijn stekenverhouding klopt wel. Zal ik het gaatjesmotief dan nog een stuk doorbreien of klopt die 18 cm niet? In de tekening wordt namelijk al na 20 cm gemeerderd, terwijl dat in het patroon later is. Dus één van beiden moet niet kloppen.
16.06.2021 - 17:05DROPS Design answered:
Dag Hester,
Het zou kunnen dat het gaatjesmotief tijdens het breien wat in elkaar gaat zitten in de hoogte en dat het, als het breiwerk klaar is, nog wat opgespannen moet worden. Je kun het beste je breiwerk meten terwijl je het goed plat neerlegt op een stroef oppervlak, bijvoorbeeld op een stoffen bank. Als de hoogte dan nog erg afwijkt, kun je inderdaad nog een paar naalden door breien in het gaatjesmotief.
Helaas zit er soms wat verschil in cm's met de tekening, je kunt het beste de beschrijving aanhouden.
23.06.2021 - 20:39
![]() Valérie wrote:
Valérie wrote:
Bonjour. Pouvez-vous m'expliquer comment commencer le point fantaisie M1 des manches ? Faut il faire une maille lisière ? Merci
06.02.2021 - 13:03DROPS Design answered:
Bonjour, vous tricotez 1 maille lisse au point mousse, ensuite M1 (7 ou 8 fois, cela depends de votre taille) et 1 maille lisse au point mousse. Bon tricot!
06.02.2021 - 19:05
|
||||||||||
Sun Pearl |
||||||||||
 |
 |
|||||||||
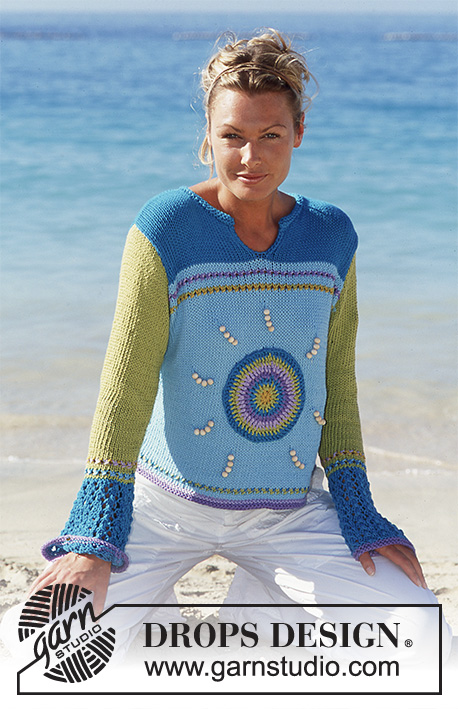
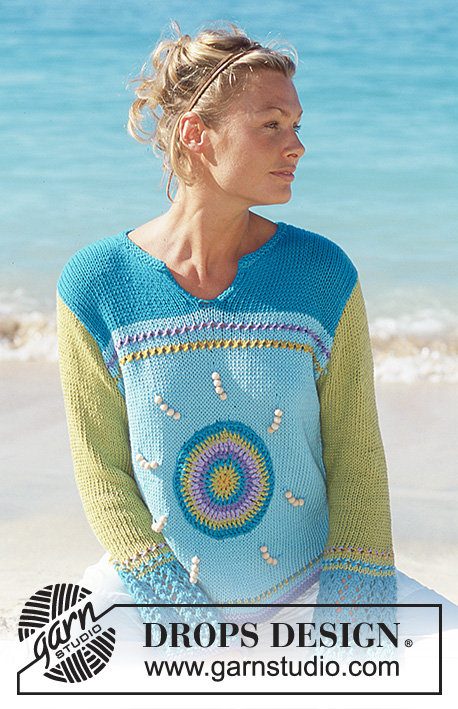
DROPS jumper in "Paris" with crochet sun, pearls and lace patterned cuffs.
DROPS 69-12 |
||||||||||
|
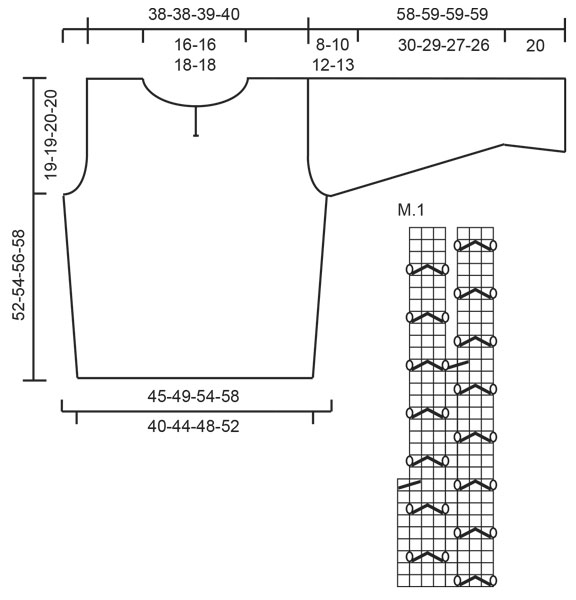
Ridges (Back and forth on needle): 1 ridge of garter st = 2 rows. 1st row K, 2nd row K. Pattern: 1st row of the pattern is worked on WS with 2 strands as follows: 1 st garter st, * P 2, lift the first st over the second *, repeat from *-* until 1st remains which is worked in garter st. All sts are worked tog 2 by 2 exept the 2 edge sts and all sts are with double yarn. 2nd row is worked on RS with 1 strand as follows: Change back to the strand that was on row before the 1st row of the pattern. Now all sts are separated again by working both of the strands in each st as K. Make sure that the same colour is used in the first of each of the double sts. Diagram M.1 shows the lace pattern for the cuffs. The pattern in the diagram is seen from RS. Front piece: Cast on 70-76-84-90 sts (incl 1 edge st in each side) on needle size 4.5 mm with medium lilac. Work 1 ridge, change to pale lilac and work 1 more ridge. Change to needle size 5 mm and pale turquoise. Continue with stocking st. Remember knitting tension! After 3 rows change to 1 strand dark turquoise + 1 strand pistachio. Work pattern - see description above. Continue with stocking st and pale turquoise. When piece measures 7 cm, inc in each side: 1 st 4-5-5-5 times, every 5th-5th-5th-5th cm = 78-86-94-100 sts. Read the entire description before continuing! Armhole: When piece measures 33-35-36-38 cm cast off for armhole in each side every 2nd row: 3 sts 1-1-1-1 time, 2 sts 1-2-3-4 times and 1 st 2-4-5-5 times = 64-64-66-68 sts. Pattern: At the same time when piece measures 34-36-37-39 cm change to 1 strand mustard and 1 strand pistachio. Work pattern, then work 2 rows with pale turquoise before changing to 1 strand pale lilac and 1 strand medium lilac. Work pattern M.1 again. After pattern work 2 rows with pale turquoise. Change to dark turquoise and work stocking st to full length. Neck: At the same time when piece measures 39-41-42-44 cm work 1 row P across middle 2 sts. The next row, divide piece in two mid front for the slit and complete each part separately. Put half the sts on a thread, the remaining sts are worked in stocking st with 1 st garter st towards split. When piece measures 46-48-49-51 cm cast off the 6 sts towards neck. Continue to cast off towards neck every 2nd row: 2 sts 2-2-2-2 times and 1 st 4-4-5-5 times. Cast off remaining 18-18-18-19 sts on shoulder when piece measures 52-54-56-58 cm. Place sts from the thread back on needle and work these upwards, casting off for neck on opposite side. Back piece: Cast on and work as for front piece. Cast off for armholes as for front piece and continue working until piece measures 50-52-54-56 cm. Now cast off middle 26-26-28-28 sts for neck. Continue by casting off 1 st on next row towards neck = 18-18-18-19 sts remaining for each shoulder. Cast off when piece measures 52-54-56-58 cm. Sleeve: Cast on 58-58-66-66 sts (incl 1 edge st in each side) on needle size 4.5 mm with medium lilac. Work 1 ridge, change to needle size 5 mm and dark turquoise and work lace pattern M.1 upwards. After M.1 piece measures approx.18 cm and there are 44-44-50-50 sts on needle. Change to pistachio and work 2 rows stocking st. Change to 1 strand pale turquoise + 1 strand dark turquoise and work Pattern. After Pattern work 2 more rows with pistachio. Change to 1 strand mustard + 1 strand pale lilac, work Pattern. Continue with pistachio and stocking st to full length. At the same time after Pattern and piece measures approx 22 cm, continue to inc in each side: 1 st 8-8-7-7 times, every 3.5th cm = 60-60-64-64 sts. When sleeve measures 50-49-47-46 cm cast off for sleeve cap in each side, every 2nd row: 3 sts 1-1-1-1 time, 2 sts 4-3-3-2 times, 1 st 1-3-6-8 times, continue by casting off 2 sts until piece measures 58-59-59-59 cm. Cast off remaining sts. Assembly: Sew shoulder seams. Pick up approx. 68 - 78 sts round neck on needle size 4.5 mm with dark turquoise. Work 2 ridges, cast off. Sew in sleeves. Sew sleeve and side seams in one inside 1 edge st. Crochet sun: Crochet with mustard on hook size 4.5, work a row with 5 ch, put them in a ring with 1 sl st. Continue to crochet tr as follows – 1st tr on each row is replaced by 2 ch. 1st round: Crochet 9 tr around the ring. 2nd round: Change to pistachio and crochet 2 tr in each tr from previous round = 18 tr. 3rd round: Change to dark turquoise and crochet as follows: * 1 tr in first tr, 2 tr in next tr *, repeat from *-* for remainder of row = 27 tr. 4th round: Change to medium lilac and crochet as follows: * 1 tr, 2 tr in next tr, 1 tr *, repeat from *-* to end of row = 36 tr. 5th round: Change to pale lilac and crochet as follows: * 1 tr, 2 tr in next tr, 2 tr *, repeat from *-* to end of row = 45 tr. 6th round: Change to pistachio and crochet as follows: * 1 tr, 2 tr in next tr, 3 tr *, repeat from *-* to end of row = 54 tr. 7th round: Change to dark turquoise and crochet as follows: * 1 tr, 2 tr in next tr, 4 tr*, repeat from *-* = 63 tr. The sun now has a diameter of approx. 16 cm. Fasten in the middle of pale turquoise section on front piece. Sun beams: One beam = thread 4 pearls on to a pale turquoise strand. Fasten the beam on to jumper by threading the two strand ends in to the knitting and tie tog on WS. Fasten 8 beams around the sun. |
||||||||||
Diagram explanations |
||||||||||
|
||||||||||
 |
||||||||||
Have you finished this pattern?Tag your pictures with #dropspattern or submit them to the #dropsfan gallery. Do you need help with this pattern?You'll find 29 tutorial videos, a Comments/Questions area and more by visiting the pattern on garnstudio.com. © 1982-2026 DROPS Design A/S. We reserve all rights. This document, including all its sub-sections, has copyrights. Read more about what you can do with our patterns at the bottom of each pattern on our site. |
||||||||||


With over 40 years in knitting and crochet design, DROPS Design offers one of the most extensive collections of free patterns on the internet - translated to 17 languages. As of today we count 324 catalogues and 12290 patterns translated into English (UK/cm). 12290
We work hard to bring you the best knitting and crochet have to offer, inspiration and advice as well as great quality yarns at incredible prices! Would you like to use our patterns for other than personal use? You can read what you are allowed to do in the Copyright text at the bottom of all our patterns. Happy crafting!
Post a comment to pattern DROPS 69-12
We would love to hear what you have to say about this pattern!
If you want to leave a question, please make sure you select the correct category in the form below, to speed up the answering process. Required fields are marked *.