
Popular categories
Looking for a yarn?


Comments / Questions (266)
![]() Sakura wrote:
Sakura wrote:
Nu kan det godt være jeg spørger dumt, men hvilken størrelse knapper skal jeg købe til det her projekt?
03.02.2026 - 03:40DROPS Design answered:
Hej, de knapper vi bruger er 25 mm :)
04.02.2026 - 13:41
![]() KC wrote:
KC wrote:
Working on the Shawl Collar, the directions say to inc 1 st in each of the middle 14 P-sections seen from RS, I understand from a previous question, the P-section are the columns of Purls this means that: 1* we should inc 1 stitch only in the purl columns, 2* instead of knit 2 Sts (from the WS) we now knit 3 Sts? so the rib will become in the neck k2p3 (RS) or p2k3(WS)? Please help, I am arriving to this point and the explanation is a bit difficult to understand. All the best and good day
02.02.2026 - 16:28DROPS Design answered:
Dear KC, you should increase the P sections seen from RS, so you will work seen from RS: still K2,P2 before, then K2, P3, and K2, P2 to the end - seen from RS when collar will be folded you will see P2, K3. Happy knitting!
27.02.2026 - 17:16
![]() Agnete Meiniche wrote:
Agnete Meiniche wrote:
Der står at der skal strikkes mønster fra 1 til 4 , men der mangler mønster 4 vh Agnete Meiniche
24.01.2026 - 06:22DROPS Design answered:
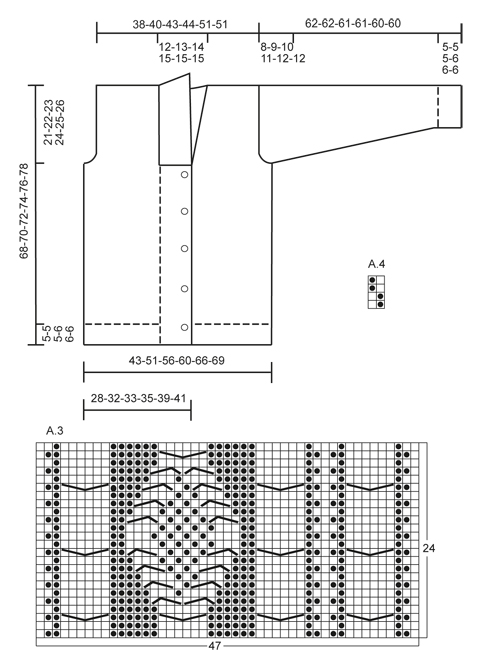
Hei Agnete. Nei, diagram A.4 ser du under ermet på målskissen (lite diagram i forhold til de andre diagrammene i oppskriften). mvh DROPS Design
30.01.2026 - 13:20
![]() Pam Clingerman wrote:
Pam Clingerman wrote:
Am I missing something? I have A1, A2, A3, patterns but no A4. Please enlighten me, I'm confused.
17.01.2026 - 01:48DROPS Design answered:
Dear Mrs Clingerman, you will find diagram A.4 over diagram A.3, just on the right side of measurement chart, it's a small diagram drawn over 2 sts and 4 rows. Happy knitting!
19.01.2026 - 08:20
![]() Nelda Girardi wrote:
Nelda Girardi wrote:
Vorrei sapere se possibile utilizzare il cotone per il modello li-014 e se si quale mi consigliate Grazie
13.04.2025 - 22:02DROPS Design answered:
Buonasera Nelda, può provare con Muskat o Cotton Light o anche Belle o Cotton Merino. Buon lavoro!
16.04.2025 - 22:50
![]() Reina wrote:
Reina wrote:
I am making L size and starting with back piece. I just finished ribbing part and instruction said need to decrease evenly. Since I have 168 sts and need to decrease 24 it seems like I need to decrease every 7 sts. However, since I am beginner, I only know k2tog or p2tog. Should I knit p and k together to decrease? Or even though it’s not perfectly distributed, should I do k2tog and p2tog to decrease?
04.03.2025 - 02:41DROPS Design answered:
Hi Reina, On the last row from the wrong side you purl all stitches (apart from the edge stitches in garter stitch). So, yes, you decrease as you say every 7th stitch by purling 2 together. Happy knitting!
04.03.2025 - 06:35
![]() Roseline wrote:
Roseline wrote:
Bonjour, Merci pour votre réponse. Je tricote bien les rangs raccourcis à chaque 3ème rang du motif, mais malgré cela, la différence est présente. Peut-être est-ce lié à la tension de mon fil.. Merci pour vos explications.
27.01.2025 - 13:54
![]() Roseline wrote:
Roseline wrote:
Bonjour à vous, Le patron indique qu'il faut commencer la boutonnière à 16cm. Or le bord au point mousse est plus resserré que le motif fantaisie. Je me demande s'il faut donc mesurer 16cm dans le point mousse où s'il faut ouvrir la boutonnière lorsque le motif fait 16cm ? Merci pour votre réponse.
26.01.2025 - 13:25DROPS Design answered:
Bonjour Roseline, n'oubliez pas de tricoter les rangs raccourcis pour compenser la différence de hauteur point mousse/point fantaisie - mesurez le long de la bordure devant (à la transition entre le point mousse et le point fantaisie). Bon tricot!
27.01.2025 - 09:36
![]() Yoann wrote:
Yoann wrote:
Bonjour ! J'ai terminé de tricoter le dos en taille L, mais je crois que la personne pour qui je réalise ce modèle serait davantage à l'aise avec une taille XL pour les deux morceaux devant. J'ai souvent trioté des modèles de Drops mais n'ai jamais modifé ces derniers. Est-ce possible ou cela nécessite-il de nombreuses modifications ? Je vous remercie d'avance.
21.01.2025 - 18:46DROPS Design answered:
Bonjour Yoann, il y a effectivement une différence entre ces 2 tailles, vous pouvez consulter les explications pour comparer et voir ces différences, il peut être plus simple de le recommencer dans la bonne taille (attention la quantité de laine nécessaire sera aussi différente) pour avoir les bonnes dimensions sans avoir à tout recalculer pour ajuster. Bon tricot!
22.01.2025 - 08:57
![]() Isabel Cesena wrote:
Isabel Cesena wrote:
Hola buen día. Este patrón tiene holgura, como de cuantos centímetros sería? Mi pregunta va encaminada a elegir la talla adecuada pero que no quede justa o muy grande. Gracias. Saludos desde México.
22.07.2024 - 22:20DROPS Design answered:
Hola Isabel, puedes ver las medidas de la prenda en el esquema de medidas, en cm, para cada talla. Según las medidas deseadas puedes ver si el tamaño de la prenda sería muy ceñido o más suelto una talla más o menos de la habitual. Aquí tienes una lección sobre cómo interpretar este esquema: https://www.garnstudio.com/lesson.php?id=24&cid=23.
27.07.2024 - 19:44
|
||||||||||||||||
Rambling Man#ramblingmancardigan |
||||||||||||||||
 |
 |
|||||||||||||||
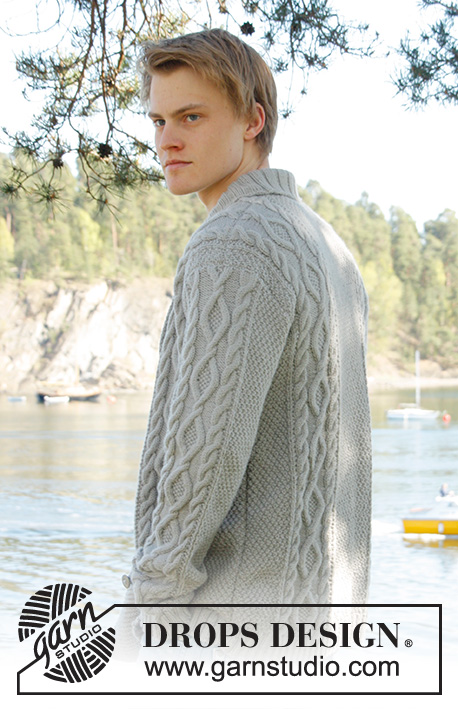
Men's knitted jacket in DROPS Lima, with cable pattern and shawl collar. Size: S - XXXL.
DROPS Extra 0-850 |
||||||||||||||||
|
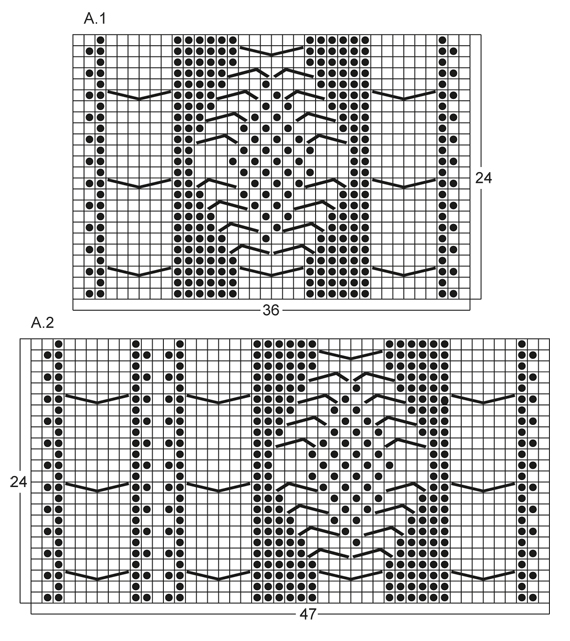
KNITTING TIPS: This design is written with button holes on right front edge, if you wish standard button holes for men, you can make the button holes on left front edge. GARTER ST (back and forth on needle): K all rows. NOTE: All edge sts are worked in garter st. PATTERN: See diagram A.1 to A.4, diagrams show all rows in 1 pattern repetition from RS. SHORT ROWS: RIGHT FRONT PIECE: Work 1 short row on row 3 of every pattern repetition vertically until finished measurements as follows: On 3rd row in pattern (= RS), work 26-26-26-26-30-30 band sts, turn and K back. Then work over all sts on row as before. LEFT FRONT PIECE: Work 1 short row on row 2 of every pattern repetition vertically until finished measurements as follows: On 2nd row in pattern (= WS), work 26-26-26-26-30-30 band sts, turn and K back. Then work over all sts on row as before. BUTTON HOLES: Cast off for 5 button holes from RS on right band. 1 BUTTON HOLE = cast off 7th and 8th st from mid front and cast on 2 new sts on next row over these sts. Cast off for button holes when piece measures: SIZE S: 14, 22, 30, 38 and 46 cm SIZE M: 15, 23, 31, 39 and 47 cm SIZE L: 16, 24, 32, 40 and 48 cm SIZE XL: 17, 25, 33, 41 and 49 cm SIZE XXL: 18, 26, 34, 42 and 50 cm SIZE XXXL: 19, 27, 35, 43 and 51 cm INCREASE TIP: Inc 1 st by making 1 YO, on next row work YO twisted (i.e. work in back loop of st instead front) to avoid holes. ---------------------------------------------------------- BACK PIECE: Worked back and forth on needle. Cast on 136-156-168-180-196-204 sts (incl 1 edge st in each side) on circular needle size 3.5 mm with Lima. Work rib as follows (1st row = RS): 1 edge st in GARTER ST - see explanation above, * K 2, P 2 *, repeat from *-*, finish with K 2 and 1 edge st in garter st. Continue to work like this until rib measures 5-5-5-6-6-6 cm. On last row from WS, P while AT THE SAME TIME dec 20-22-24-26-26-26 sts evenly = 116-134-144-154-170-178 sts. Then switch to needle size 4 mm and work next row from RS as follows: 1 edge st in garter st, 8-16-20-24-20-24 sts in A.4, work A.1 one time in size S - XL, work A.2 one time in size XXL and XXXL, 26-28-30-32-34-34 sts in A.4, then work A.1 one time in size S - XL, work A.3 one time in size XXL and XXXL, finish with 8-16-20-24-20-24 sts in A.4 and 1 edge st in garter st. REMEMBER THE KNITTING TENSION! Continue to work like this until piece measures 47-48-49-50-51-52 cm. Then cast off for armholes at the beg of every row in each side as follows: Cast off 3 sts 0-1-1-2-2-2 times, 2 sts 1-1-1-2-2-2 times, 1 st 4-7-9-8-4-8 times = 104-110-116-118-142-142 sts. Continue with pattern as before until piece measures 66-68-70-72-74-76 cm. Now cast off the middle 20-22-24-26-28-28 sts for neck and finish each part separately. Cast off 2 sts on next row from neck = 40-42-44-44-55-55 sts remain on shoulder. Continue with pattern as before. When piece measures 68-70-72-74-76-78 cm, loosely cast off sts with K over K and P over P. RIGHT FRONT PIECE: Worked back and forth on needle. Cast on 83-91-95-99-111-115 sts (incl 1 edge st in the side) on circular needle size 3.5 mm with Lima. Work rib as follows (1st row = RS): 26-26-26-26-30-30 sts in garter st (= band sts), * K 2, P 2 *, repeat from *-*, finish with 1 edge st in garter st. Continue with rib and band sts in garter st until rib measures 5-5-5-6-6-6 cm. On last row from WS, P over all sts in rib while AT THE SAME TIME dec 12-12-12-12-13-13 sts evenly (do not dec over band sts) = 71-79-83-87-98-102 sts. Then switch to needle size 4 mm and work next row from RS as follows: 26-26-26-26-30-30 band sts, work A.1 one time in size S - XL, work A.3 one time in size XXL and XXXL, 8-16-20-24-20-24 sts in A.4 and 1 edge in garter st. On next row from RS (= 3rd row in pattern) work SHORT ROWS - read explanation above. Continue with pattern and band sts at the front - while AT THE SAME TIME work 1 short row on 3rd row in every pattern repetition vertically until finished measurement. When piece measures 14-15-16-17-18-19 cm, cast off for BUTTON HOLES on right band - see explanation above! Continue to work until piece measures 47-48-49-50-51-52 cm. Then cast off at beg of next row from RS as follows: Cast off the first 25-25-25-25-29-29 sts, insert a marker (this marks where to beg the knit up for collar), work the rest of row. Then cast off for armhole on every row from WS as follows: 3 sts 0-1-1-2-2-2 times, 2 sts 1-1-1-2-2-2 times, 1 st 4-7-9-8-4-8 times = 40-42-44-44-55-55 sts remain on shoulder. Continue with pattern as before. When piece measures 68-70-72-74-76-78 cm, loosely cast off sts with K over K and P over P. LEFT FRONT PIECE: Cast on and work rib as on right front piece but reversed (i.e. * P 2, K 2 *, repeat from *-*) with 26-26-26-26-30-30 band sts in garter st. Continue to work until rib measures 5-5-5-6-6-6 cm. On last row from WS, P over all sts in rib while AT THE SAME TIME dec 12-12-12-12-13-13 sts evenly (do not dec over band sts) = 71-79-83-87-98-102 sts. Then switch to needle size 4 mm and work next row from RS as follows: 1 edge st in garter st, 8-16-20-24-20-24 sts in A.4, work A.1 one time in size S - XL, work A.2 one time in size XXL and XXXL, 26-26-26-26-30-30 band sts in garter st. On next row from WS (= 2nd row in pattern) work SHORT ROWS - read explanation above. Continue to work the same way as on right front piece but without button holes. SLEEVE: Worked back and forth on needle. Cast on 74-78-82-86-90-90 sts (incl 1 edge st in each side) on circular needle size 3.5 mm with Lima. Work rib as follows (1st row = RS): 1 edge st in garter st, * K 2, P 2 *, repeat from *-* and finish with 1 edge st in garter st. Continue to work like this until rib measures 5-5-5-6-6-6 cm. On last row from WS, P while AT THE SAME TIME dec 12-14-16-18-18-18 sts evenly = 62-64-66-68-72-72 sts. Then switch to needle size 4 mm and work next row from RS as follows: 1 edge st in garter st, 12-13-14-15-17-17 sts in A.4, work A.1 one time, 12-13-14-15-17-17 sts in A.4, finish with 1 edge st in garter st. AT THE SAME TIME when piece measures 6 cm, inc 1 st inside 1 edge st in each side - Read INCREASE TIP above. NOTE: Work the inc sts in A.4. Repeat inc every 3½-3-2½-2½-2½-2½ cm a total of 14-15-16-17-16-17 times = 90-94-98-102-104-106 sts. Continue until piece measures 54-53-51-50-48-48 cm (shorter measurements in the larger sizes because of longer sleeve cap and broader shoulder width), cast off at beg of every row in each side: 3 sts 1-1-1-2-2-2 times, 2 sts 1-1-2-2-2-2 times and 1 st 2-2-3-3-4-4 times. Then cast off 2 sts in each side until piece measures 61-61-60-60-59-59 cm, then cast off 3 sts 2 times in each side. When piece measures approx. 62-62-61-61-60-60 cm, loosely cast off sts with K over K and P over P. ASSEMBLY: Sew shoulder seams and sew in sleeves inside 1 edge st. Sew sleeve and side seams in one inside 1 edge st. Sew buttons on to left front piece, approx. 2½ cm from last K st in pattern. SHAWL COLLAR: Knit up sts from RS inside 1 edge st on circular needle size 3.5 mm. Start mid front at marker on right front piece as follows: Knit up approx. 60-70 sts up to shoulder, then 30-40 sts along the neck and 60-70 sts down along left front piece until marker = 150-180 sts. K 1 row from WS while AT THE SAME TIME adjusting no of sts to 144-148-156-164-172-180. Then work rib on next row from RS as follows: 1 sts in garter st, * K 2, P 2 *, repeat from *-* and finish with K 2 and 1 st in garter st. Continue like this until collar measures approx. 5-5-5-6-6-6 cm. Now inc 1 st in each of the middle 14-14-14-16-16-16 P-sections seen from RS (= back of neck) = 158-162-170-180-188-196 sts. Continue until collar measures approx. 12-12-12-12-14-14 cm, then loosely cast off with K over K and P over P. Fasten collar with stitches at the bottom in each side towards band from WS (so that the seam is not visible from RS) – sew edge to edge to avoid a chunky seam. |
||||||||||||||||
Diagram explanations |
||||||||||||||||
|
||||||||||||||||
 |
||||||||||||||||
 |
||||||||||||||||
Have you finished this pattern?Tag your pictures with #dropspattern #ramblingmancardigan or submit them to the #dropsfan gallery. Do you need help with this pattern?You'll find 23 tutorial videos, a Comments/Questions area and more by visiting the pattern on garnstudio.com. © 1982-2026 DROPS Design A/S. We reserve all rights. This document, including all its sub-sections, has copyrights. Read more about what you can do with our patterns at the bottom of each pattern on our site. |
||||||||||||||||


With over 40 years in knitting and crochet design, DROPS Design offers one of the most extensive collections of free patterns on the internet - translated to 17 languages. As of today we count 324 catalogues and 12290 patterns translated into English (UK/cm). 12290
We work hard to bring you the best knitting and crochet have to offer, inspiration and advice as well as great quality yarns at incredible prices! Would you like to use our patterns for other than personal use? You can read what you are allowed to do in the Copyright text at the bottom of all our patterns. Happy crafting!
Post a comment to pattern DROPS Extra 0-850
We would love to hear what you have to say about this pattern!
If you want to leave a question, please make sure you select the correct category in the form below, to speed up the answering process. Required fields are marked *.