
Popular categories
Looking for a yarn?


Comments / Questions (70)
![]() Lieke wrote:
Lieke wrote:
Waarom wordt er geminderd na de boord, het is ook een behoorlijk aantal steken ook?
29.03.2019 - 23:32DROPS Design answered:
Dag Lieke,
Het ontwerp van dit model is zo dat de boord ongeveer dezelfde wijdte heeft van het kledingstuk. Doordat de boordsteek samentrekt in de breedte wordt er gemeerderd vlak na de boordsteek.
31.03.2019 - 11:35
![]() Hilde wrote:
Hilde wrote:
Dank voor uw antwoord maar ik bedoelde juist dat meestal het boord juist met opzet iets strakker is maar in dit model niet. Ik ga toch eerst maar breien zonder extra steken, verder is het namelijk precies het model dat ik zocht.
20.02.2019 - 17:26
![]() Hilde wrote:
Hilde wrote:
Hartelijk dank voor uw antwoord. Ik heb nog een vraag: waarom worden in dit model zoveel extra steken voor het boord opgezet en daarna afgekant? Ik ben bang dat het gaat lubberen.
16.02.2019 - 11:28DROPS Design answered:
Dag Hilde,
Het ontwerp van dit model is zo dat de boord ongeveer dezelfde wijdte heeft van het kledingstuk. Door de boordsteek trekt de boord samen in de breedte en daarom wordt er gemeerderd vlak na de boordsteek.
17.02.2019 - 19:27
![]() Hilde wrote:
Hilde wrote:
Ik wil deze trui liever breien met boordpatroon 2r 2a. Moet ik dan hetzelfde aantal steken opzetten en minderen bij de overgang naar tricotsteek?
11.02.2019 - 12:39DROPS Design answered:
Dag Hilde,
Je zet dan een meervoud van 4 steken op en je mindert inderdaad steken in de eerste naald tricotsteek (net als in het patroon)
13.02.2019 - 11:20
![]() Marina wrote:
Marina wrote:
Quanti gomitoli o grammi servono per la taglia xxl? Grazie.
03.12.2018 - 11:50DROPS Design answered:
Buongiorno Marina. Trova l'indicazione del filato necessario, all'inizio del testo. Per la taglia XXL, servono 850 g di Lima. Buon lavoro!
03.12.2018 - 11:54
![]() Asli wrote:
Asli wrote:
Hi, I'm knitting both sleeves in the flat . I have reached the double seed section: Can you help me how to translate this to the flat version? "AT THE SAME TIME bind off 6 sts mid under sleeve (bind off 3 sts on each side of marker)." How do I bind off mid under sleeve while in the flat? Thanks!
14.05.2018 - 21:41DROPS Design answered:
Dear Asli, bind off now 3 sts at the beg of next 2 rows (= 3 sts at the beg of RS row + 3 sts at the beg of WS row) and continue now as explained for your size (sleeve cap is worked back and forth in the pattern). Happy knitting!
15.05.2018 - 08:32Nada wrote:
Hi there,the begining of the sleeve is with circular needle as the begining of the body? when sleeve reach75 cm i will continue with circular or double pointed needle?
02.02.2018 - 13:47DROPS Design answered:
Dear Nada, sleeves are worked first in the round with double pointed needles then back and foth on double pointed needles or on circular needle (your choice). Happy knitting!
02.02.2018 - 15:27
![]() Ivan Bentzen wrote:
Ivan Bentzen wrote:
Hej, i opskriften angiver I at dobbelt perlestrik består af 1 ret, 1 vrang, etc., men så vidt jeg kan se består dobbelt perlestrik af 2 masker af gangen?
23.10.2017 - 06:44DROPS Design answered:
Hei Ivan. I denne oppskriften er det dobbelt perlestrikk i HØYDEN, se beskrivelsen i oppskriften. (Dobbelt perlestrikk kan også være i bredden og både i bredden og høyden). God Fornøysele!
23.10.2017 - 14:10
![]() Rocío wrote:
Rocío wrote:
Buenas tardes: He hecho otros jerseys de hombre y, la talla M mida de contorno en torno a 50cm., ¿cambiar talla en este patrón? ¿debo hacer la talla XL? En la foto parece que queda holgado. Estoy confunida, ¿puede usted Ayudarme? GRacias☺
04.11.2016 - 17:52DROPS Design answered:
Hola Rocio. Las medidas dependen del modelo de jersey. Este modelo es más ajustado, pero, por ejemplo, el 134/5 es un modelo más amplio y la medida del pecho para la talla M es de 50 cm.
09.11.2016 - 19:30Kim Angus wrote:
Hi, What does at the beg of each row each side mean? Does it mean at the beg and end of a row or just the beg of each row? Each side I interrupt as the front then the back however it could mean each side of the sleeve (the edges) Thanks Kim
07.08.2016 - 14:46DROPS Design answered:
Dear Mrs Angus, at the beg of row in each side means at the beg of next row from RS + at the beg of next row from WS, ie when you are casting off 2 sts 1 time on each side, you will have to cast off 2 sts at the beg of next row from RS, turn and cast off 2 sts at the beg of next row from WS (= 2 sts cast off in each side). Happy knitting!
08.08.2016 - 09:57
|
|
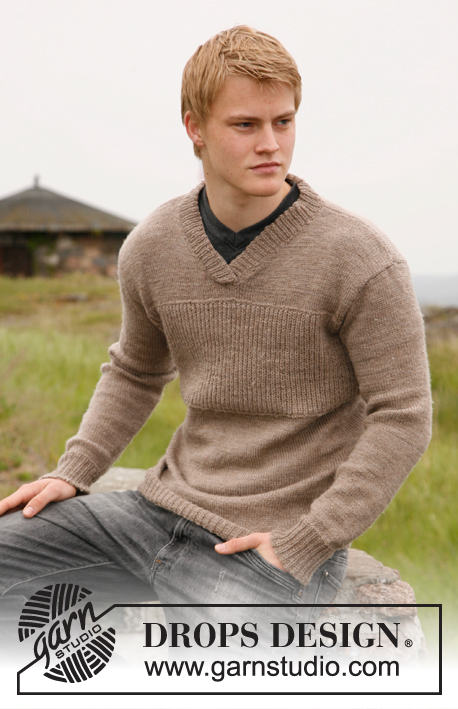
Twilight#twilightsweater |
|
|
|
|
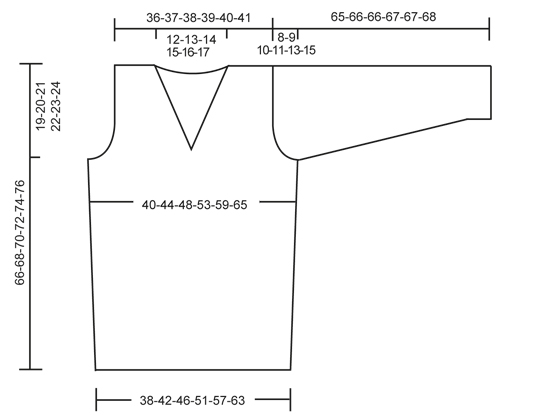
Men's knitted jumper with yoke in moss st and v-neck, in DROPS Lima. Size S-XXXL.
DROPS 135-39 |
|
|
DOUBLE MOSS ST: Row 1 (= from RS): * K 1, P 1 *, repeat from *-*. Row 2 (= from WS): K over K and P over P. Row 3 (= from RS): * P 1, K 1 *, repeat from *-*. Row 4 (= from WS): P over P and K over K. -------------------------------------------------------- BODY: Worked in the round on circular needle. Cast on 213-234-255-288-318-351 sts on circular needle size 3.5 mm with Lima. Work rib K 1/P 2. When piece measures 4 cm, work 1 round in stocking st while AT THE SAME TIME dec 53-58-63-72-78-87 sts evenly (dec by K tog approx. every 3rd and 4th st) = 160-176-192-216-240-264 sts. Insert 2 markers in the piece; at the beg of round and after 80-88-96-108-120-132 sts (marks the sides). Switch to circular needle size 4 mm. Then work stocking st in the round. REMEMBER THE KNITTING TENSION! When piece measures 15 cm, inc 1 st on each side of every marker by working 1 YO. On next round K YO twisted (i.e. work in back loop of st instead of front) to avoid holes. Repeat inc when piece measures 25 cm = 168-184-200-224-248-272 sts. When piece measures 47-48-49-50-51-52 cm, work DOUBLE MOSS ST - see explanation above - while AT THE SAME TIME casting off 6 sts in each side for armholes (cast off 3 sts on each side of every marker). Finish each part separately. BACK PIECE: = 78-86-94-106-118-130 sts (1st row = WS). Continue DOUBLE MOSS ST while AT THE SAME TIME casting off for armholes at beg of row in each side as follows: 2 sts 0-1-2-4-6-8 times and 1 st 1-2-3-4-5-6 times = 76-78-80-82-84-86 sts. When piece measures 64-66-68-70-72-74 cm, cast off the middle 24-26-28-30-32-34 sts for neck and finish each shoulder separately. Then dec 1 st on next row from neck (dec by working the outermost 2 sts towards the neck tog) = 25 sts remain on shoulder in all sizes. Cast off when piece measures 66-68-70-72-74-76 cm. FRONT PIECE: = 78-86-94-106-118-130 sts (1st row = WS). Work double moss st and cast off for armholes as on back piece while AT THE SAME TIME when 5 cm in moss st vertically have been worked, cast off the middle 2 sts for neck on next row from RS and finish each shoulder separately. Then dec by working the outermost 2 sts towards the neck tog (work them tog so that they fit the pattern) at beg of every row from neck a total of 12-13-14-15-16-17 times. When all dec are done, 25 sts remain on shoulder in all sizes. Cast off when piece measures 66-68-70-72-74-76 cm. SLEEVE: Worked in the round on double pointed needles. Cast on 63-66-69-72-75-78 sts on double pointed needles size 3.5 mm with Lima. Work rib K 1/P 2. When piece measures 4 cm, K 1 round while AT THE SAME TIME dec 15-16-17-18-19-20 sts evenly (dec by K tog approx. every 3rd and 4th st) = 48-50-52-54-56-58 sts. Switch to double pointed needles size 4 mm. Insert a marker at the beg of the round. Then work in stocking st. When piece measures 8 cm, inc 1 st on each side of marker. Repeat inc every 5-4½-3½-3-2½-2½ cm a total of 10-11-13-15-17-18 times = 68-72-78-84-90-94 sts. When piece measures 57-57-56-56-54-53 cm (NOTE! Shorter measurements in the larger sizes because of longer sleeve cap and broader shoulder width) work double moss st over all sts while AT THE SAME TIME casting off 6 sts mid under sleeve (cast off 3 sts on each side of marker). Then work back and forth on circular needle. Continue to cast off for sleeve cap at beg of row in each side as follows: 2 sts 3-3-4-4-4-3 times and then 1 st 3-4-4-5-8-13 times. Then cast off 2 sts in each side until piece measures 64-65-65-66-66-67 cm. Then cast off 3 sts 1 time in each side. Cast off. Piece measures 65-66-66-67-67-68 cm. ASSEMBLY: Sew the shoulder seams. Sew in the sleeves. NECK EDGE: Worked back and forth on circular needle from mid front of neck. Knit up 92-98-104-110-118-124 sts around the neck edge on circular needle size 3.5 mm, beg mid front. K 1 row from WS while AT THE SAME TIME inc 37-37-40-43-47-50 sts evenly (inc with 1 YO between approx. every 3rd and 4th st and sometimes closer). On next row work the YOs twisted. On next row from RS work rib as follows: 1 st in garter st, * K 1, P 2 *, repeat from *-* until 2 sts remain, finish with K 1 and 1 st in garter st. Continue like this and loosely cast off with K over K and P over P when rib measures 3.5 cm. Place right part of neck edge over the left part and fasten both edges with a couple of neat little sts at the bottom. |
|
 |
|
Have you finished this pattern?Tag your pictures with #dropspattern #twilightsweater or submit them to the #dropsfan gallery. Do you need help with this pattern?You'll find 12 tutorial videos, a Comments/Questions area and more by visiting the pattern on garnstudio.com. © 1982-2026 DROPS Design A/S. We reserve all rights. This document, including all its sub-sections, has copyrights. Read more about what you can do with our patterns at the bottom of each pattern on our site. |


With over 40 years in knitting and crochet design, DROPS Design offers one of the most extensive collections of free patterns on the internet - translated to 17 languages. As of today we count 324 catalogues and 12290 patterns translated into English (UK/cm). 12290
We work hard to bring you the best knitting and crochet have to offer, inspiration and advice as well as great quality yarns at incredible prices! Would you like to use our patterns for other than personal use? You can read what you are allowed to do in the Copyright text at the bottom of all our patterns. Happy crafting!
Post a comment to pattern DROPS 135-39
We would love to hear what you have to say about this pattern!
If you want to leave a question, please make sure you select the correct category in the form below, to speed up the answering process. Required fields are marked *.