
Popular categories
Looking for a yarn?


Comments / Questions (46)
Patricia wrote:
Necesito ayuda!!!! Durante las vueltas cortas que punto se realiza xq en la foto no se ven las vueltas cortas y si se sigue el patron y las vueltas cortas es hasta el segundo mp queda cortado el dibujo!!! Aguardo respuesta gracias!!!!
23.09.2015 - 19:58DROPS Design answered:
Hola Patricia. El patrón es correcto, es decir se trabajan al mismo tiempo las trenzas y las vtas acortadas. Te recomiendo hacer una muestra de M.1 con vtas acortadas antes de comenzar el chaleco
29.09.2015 - 11:12
![]() Francesca wrote:
Francesca wrote:
I just finished to knit it and it turned out so nice!
21.09.2013 - 22:30
![]() Brenda wrote:
Brenda wrote:
The spacing between the buttonholes doesn't seem to be even in the L & XL sizes although even in the other sizes. Should it be 7-16-25-34 and not 7-16-24-33 ? as there are 9cm between all of them except between 16-24 which is 8cm. Thanks
21.01.2013 - 18:55
![]() Tina wrote:
Tina wrote:
I just finished and used Alaska in dark red. Looks really nice!!!! Thanks a lot for the pattern and all your brilliant ideas!
17.01.2013 - 15:59
![]() Kira wrote:
Kira wrote:
Ich habe die Wolle online bestellt. Ich möchte nur noch gerne wissen, ob die Zöpfe nur dann auf die Nadeln gelegt werden wenn die Reihe voll gestrickt wird oder auch wenn sie verkürzt ist. Das wäre eine große Hilfe, danke.
13.01.2013 - 11:18DROPS Design answered:
Liebe Kira, das ist kein Problem, auch unsere Onlineshops geben Auskunft bei Strickproblemen!
14.01.2013 - 11:32
![]() Kira wrote:
Kira wrote:
Das Muster wird dannja unregelmäßig. Das heißt das zB passiert, dass wegen der kürzesten Reihe gar keine Zöpfe gestrickt werden oder mal nur ein halber? M1 hat ja eine Sequenz von 3 Hin und Rückreihen, die verkürzten Reihen sind aber 4, oder?
10.01.2013 - 07:05DROPS Design answered:
Liebe Kira, darf ich Sie nun bitten, sich für weitere individuelle Strickhilfe an den Laden zu wenden, in dem Sie die Wolle gekauft haben? Wir haben die Anleitung mehrmals geprüft und sie ist korrekt.
10.01.2013 - 13:54
![]() Kira wrote:
Kira wrote:
Hallo, bitte helft mir nocheinmal: mir ist nicht klar wie M1 in den verkürzten Reihen gestrickt wird, die haben ja insgesamt nur 33 und 15Maschen und M1 beginnt nach 12. Zähle ich die verkürzten Reihen im Muster mit?
05.01.2013 - 00:00DROPS Design answered:
Hallo Kira, stricken Sie bitte wie beschrieben bis zur ersten Markierung. Das ist zwar schon im Muster M1 aber noch vor der Verzopfung, an dieser Stelle kann also gut gewendet werden.
07.01.2013 - 09:24
![]() Kira wrote:
Kira wrote:
Ah danke und noch eine kurze frage, nach dem anschlagen steht:"und 2 re. über alle M. stricken": heißt das 2 Reihen re?
04.01.2013 - 08:13DROPS Design answered:
Liebe Kira, ja das sollte heissen 2 R re. Es ist nun korrigiert.
04.01.2013 - 10:25
![]() Kira wrote:
Kira wrote:
Passe: nach 15 Maschen Markierung usw. Heißt das ich stricke nocmal eine Reihe rechte Maschen oder kommen gleic die verkürzten Reihen? Und die verkürzten Reihen auch kraus rechts?
02.01.2013 - 12:42DROPS Design answered:
Liebe Kira, über die Passe wird im beschriebenen Muster gestrickt und GLEICHZEITIG die verkürzten Reihen. Die Beschreibung zu „VERKÜRZTE REIHEN“ beginnt ja mit „2 R. über alle M…“ also wird nicht sofort die verkürzte R gestrickt. Gutes Gelingen!
03.01.2013 - 10:49
![]() Sophie wrote:
Sophie wrote:
Bonjour, Je voudrais vous acheter de la laine pour réaliser ce modèle, mais je souhaiterais faire des manches longues : quel poids de laine supplémentaire faut-il que j'achète ? Cordialement, Sophie
02.01.2013 - 11:11DROPS Design answered:
Bonjour Sophie, en fonction du style de manches que vous voudrez, de la taille, etc.. la quantité de fil changera. Vous pouvez vous aider d'un modèle analogue et demander conseil à votre magasin DROPS. Bon tricot !
02.01.2013 - 11:43
|
|||||||||||||||||||
Milady#miladyvest |
|||||||||||||||||||
 |
 |
||||||||||||||||||
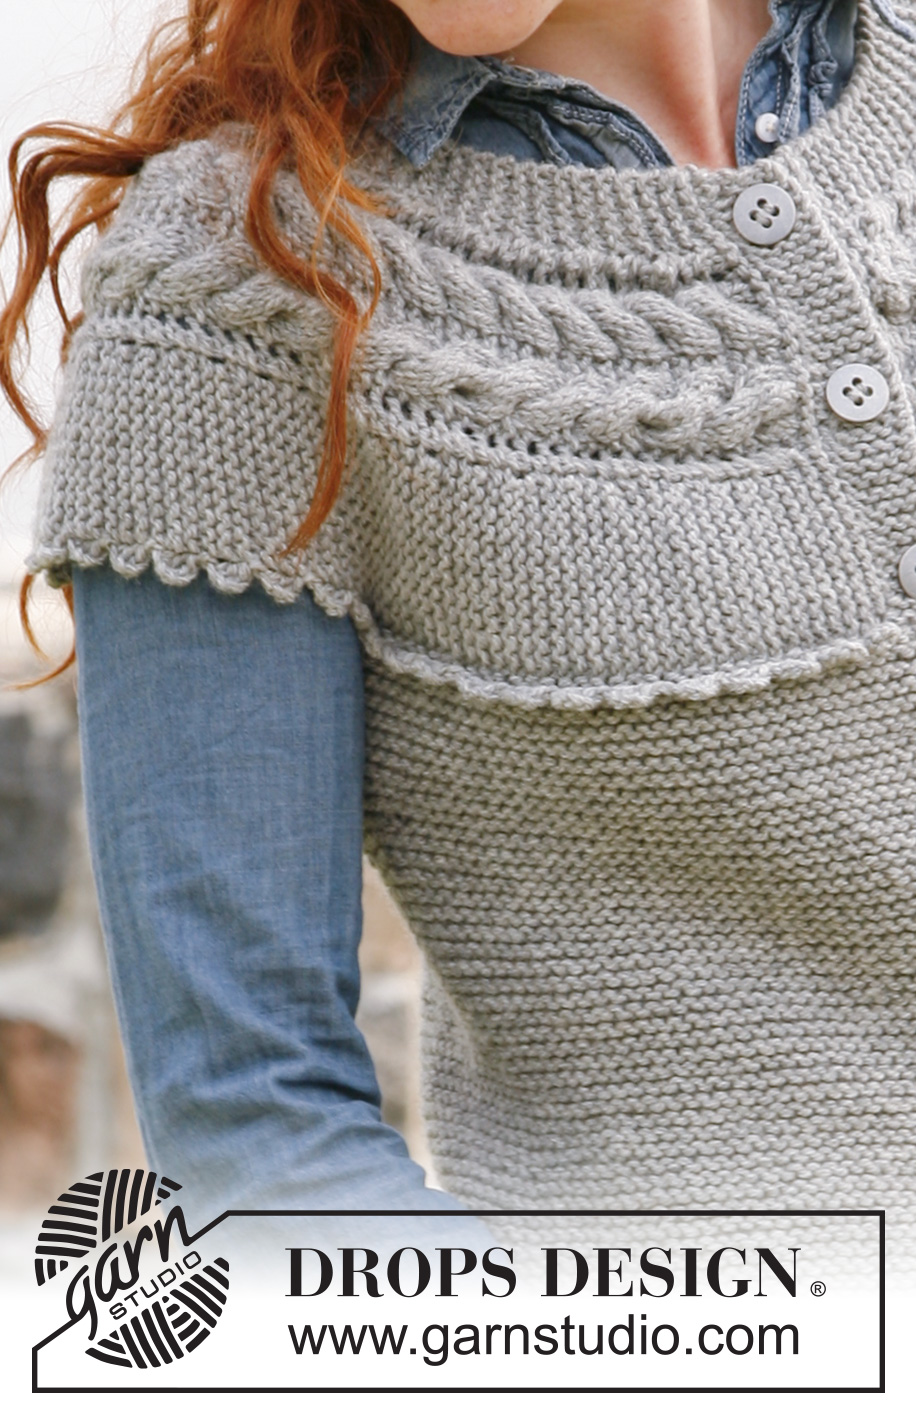
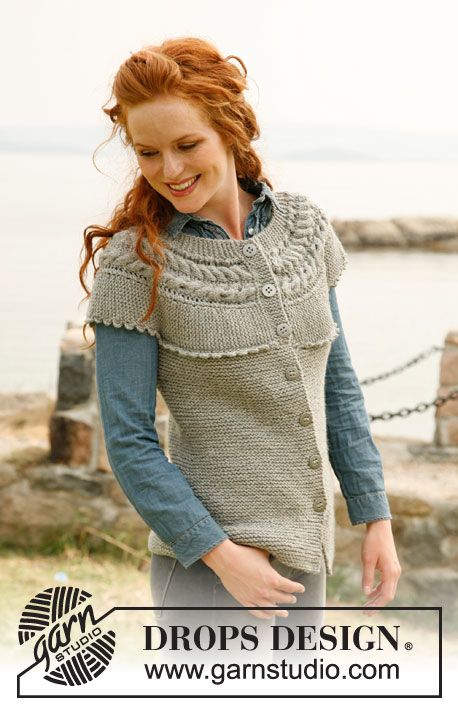
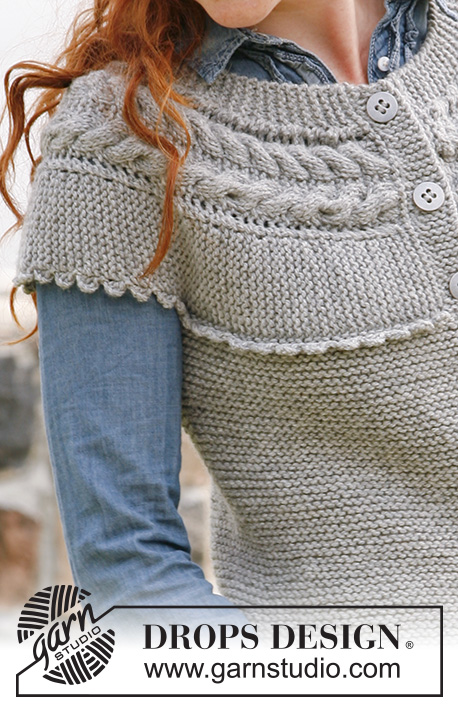
Knitted DROPS vest with yoke worked across with cables, short rows and crochet border in ”Nepal”. Size: S to XXXL
DROPS 133-3 |
|||||||||||||||||||
|
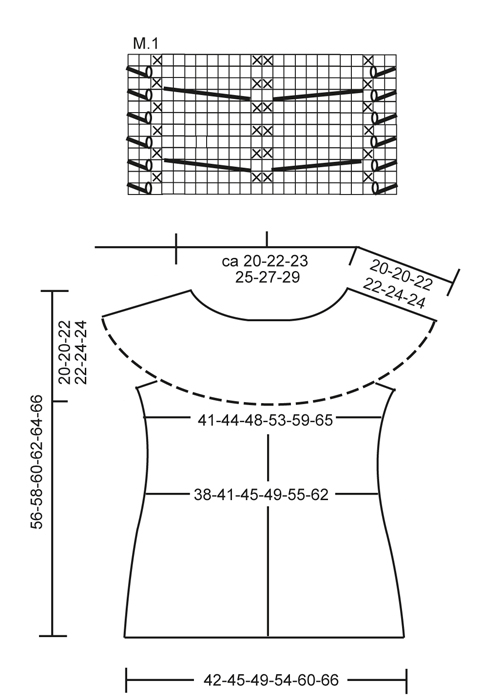
GARTER ST (back and forth on needle): K all rows. GARTER ST (in the round on circular needle): 1 ridge = 2 rounds: * K 1 round and P 1 round *, repeat from *-*. SHORT ROWS: To make the yoke wider at the bottom, work more rows over the bottom sts than the upper sts. This is done as follows: * Work 2 rows over all sts, work until 2nd marker, turn, tighten thread and work back, work until 1st marker, turn, tighten thread and work back *, repeat from *-*, i.e. 1 repetition = 2 rows at the top and 6 rows at the bottom. PATTERN: See diagram M.1. Diagram shows 1 repetition of pattern in breadth (= 24 sts), the diagram shows pattern from RS. MEASURING TIP: Measure when piece is flat, it is important not to stretch the piece when measuring. DECREASE TIP: Work until 2 sts remain before marker, K 2 tog, slip 1 st as if to K, K 1, psso. INCREASE TIP: Work until 1 st remains before marker, make 1 YO, work 2 sts (marker is between these 2 sts), make 1 more YO. On next row work YOs twisted to avoid holes (i.e. work in back loop of st instead of front). BUTTON HOLES: Cast off for button holes on right band from WS. 1 BUTTON HOLE = K tog third and fourth st from mid front and make 1 YO. Cast off for button holes when piece measures: SIZE S and M: 6, 14, 22 and 30 cm. SIZE L and XL: 7, 16, 24 and 33 cm. Size XXL and XXXL: 8, 17, 26 and 35 cm. ---------------------------------------------------------- YOKE: Worked back and forth on needle, worked sideways from mid front. LOOSELY cast on 34-34-37-37-40-40 sts on needle size 5 mm with Nepal. K 2 rows over all sts (1st row beg from bottom edge from RS). Work next row as follows (from RS): K 12-12-14-14-16-16, K 2 tog, 1 YO, K 1, K 2 sts in each of the next 4 sts (= K 8), K 2, K 2 in each of the next 4 sts (= K 8), K 1, 1 YO, slip 1 st as if to K, K 1, psso, K 6-6-7-7-8-8 = 42-42-45-45-48-48 sts. Work next row (from WS) as follows: K 6-6-7-7-8-8, P 2, K 1, P 8, K 2, P 8, K 1, P 2 and K 12-12-14-14-16-16. Insert 2 markers in the piece as follows (from RS): 1st marker after 15-15-17-17-19-19 sts and 2nd marker after a total of 33-33-35-35-37-37 sts, 9-9-10-10-11-11 sts remain at the top after 2nd marker. Then work SHORT ROWS – see explanation above and PATTERN as follows: 12-12-14-14-16-16 sts in GARTER ST – see explanation above, diagram M.1 over the next 24 sts and 6-6-7-7-8-8 sts in garter st. REMEMBER THE KNITTING TENSION! Work until piece measures approx. 120-128-138-150-162-174 cm at bottom edge – SEE MEASURING TIP – finish after 2 rows have been worked on all sts. Work next row as follows (from RS): K 15-15-17-17-19-19, K the next 8 sts tog 2 by 2, K 2, K the next 8 sts tog 2 by 2, K 9-9-10-10-11-11 = 34-34-37-37-40-40 sts. K 1 row over all sts, then cast off all sts with K from RS. Piece measures approx. 122-130-140-152-164-176 cm at bottom edge. INSERTING MARKERS: Remove the markers in the piece and insert 4 new markers as follows: Place piece flat on a table and measure along the longest side. Insert 1st MARKER after 18½-20-21½-24-26½-29½ cm, 2nd MARKER 24-25-27-28-29-29 cm from first, 3rd MARKER 37-40-43-48-53-59 cm from second and 4th MARKER 24-25-27-28-29-29 cm from third, approx. 18½-20-21½-24-26½-29½ cm remain after last marker. BODY: Worked back and forth on circular needle, top down. Cast on 5 sts with Nepal on circular needle size 5 mm (= band), then knit up 1 st in every ridge (1 ridge = 2 rows in garter st) at bottom edge of yoke until 1st marker (= approx. 30 to 49 sts on left front piece), cast on 6-6-8-8-10-10 new sts (= under sleeve), skip to 2nd marker, knit up 1 st in every ridge until 3rd marker (= approx. 60 to 98 sts on back piece), cast on 6-6-8-8-10-10 new sts (= under sleeve), skip to 4th marker, knit up 1 st in every ridge the rest of yoke (= approx. 30 to 49 sts on right front piece), cast on 5 new sts at end of row (= band). K 1 row from WS while at the same time evenly adjusting no of sts to 150-160-174-190-210-232 (do not dec/inc over band sts). Insert 2 markers in the piece; 40-42-46-50-55-60 sts in from each side (= 70-76-82-90-100-112 sts between markers on back piece). NOW MEASURE PIECE FROM HERE! Now work garter st over all sts. REMEMBER THE KNITTING TENSION! When piece measures 4 cm, dec 1 st on each side of markers in the side - READ DECREASE TIP! Repeat dec every 4 cm a total of 3 times = 138-148-162-178-198-220 sts. AT THE SAME TIME when piece measures 6-6-7-7-8-8 cm, cast off for BUTTON HOLES on right front band - see explanation above! When piece measures 20 cm, inc 1 st on each side of markers in the side - READ INCREASE TIP! Repeat inc every 4 cm a total of 4 times = 154-164-178-194-214-236 sts. When piece measures 36-38-38-40-40-42 cm, loosely cast off. LEFT FRONT BAND: Knit up from RS, 1 st in each of the 5 sts cast on for band in the left side on needle size 5 mm. Work in garter st until band is approx. 2 cm shorter than yoke (band needs to be stretched a little when fastened), cast off. Sew band to yoke, edge to edge. RIGHT FRONT BAND: Knit as left front band but when band measures 1 cm, cast off for 1 button hole over the other holes, repeat cast off for button hole when band measures 9-9-10-10-11-11 cm and when only 4 rows remain before band is cast off. CROCHET BORDER: Crochet an edge in bottom st in garter st along yoke (i.e. in same st that was knit up for body). Hold piece with neck opening towards you, work with 1 thread Nepal on hook size 4.5 mm – start mid front as follows: 1 dc in first st on inside of band, * 5 ch, 1 tr on first ch, skip approx. 1.5 cm, 1 dc *, repeat from *-* until last st before band in the other side. Steam the crochet border well to make it fold nicely downwards. ASSEMBLY: Sew on buttons. |
|||||||||||||||||||
Diagram explanations |
|||||||||||||||||||
|
|||||||||||||||||||
 |
|||||||||||||||||||
Have you finished this pattern?Tag your pictures with #dropspattern #miladyvest or submit them to the #dropsfan gallery. Do you need help with this pattern?You'll find 15 tutorial videos, a Comments/Questions area and more by visiting the pattern on garnstudio.com. © 1982-2026 DROPS Design A/S. We reserve all rights. This document, including all its sub-sections, has copyrights. Read more about what you can do with our patterns at the bottom of each pattern on our site. |
|||||||||||||||||||


With over 40 years in knitting and crochet design, DROPS Design offers one of the most extensive collections of free patterns on the internet - translated to 17 languages. As of today we count 324 catalogues and 12290 patterns translated into English (UK/cm). 12290
We work hard to bring you the best knitting and crochet have to offer, inspiration and advice as well as great quality yarns at incredible prices! Would you like to use our patterns for other than personal use? You can read what you are allowed to do in the Copyright text at the bottom of all our patterns. Happy crafting!
Post a comment to pattern DROPS 133-3
We would love to hear what you have to say about this pattern!
If you want to leave a question, please make sure you select the correct category in the form below, to speed up the answering process. Required fields are marked *.