Comments / Questions (44)
![]() Yana wrote:
Yana wrote:
I love the look of this but don't understand the pattern, I'm still pretty new to knitting. I read the DROPS pattern guide but it didn't answer my question. Assembly says only to sew on sleeves, but to create back and front pieces separately. Does =23 for the left front piece mean begin knitting at 23rd stitch of body piece? I'm not sure how this works, please provide a bit more detail.
03.10.2022 - 19:59DROPS Design answered:
Hi Yana, The body is worked as one piece as far as the armholes, then stitches are cast off and the back and front pieces finished separately. The 23 for the front piece is the number of stitches after the armhole has been started, then you continue to decrease for the armhole (as on the back piece) until you have 18 stitches left on the shoulder. Hope this helps and happy knitting!.
04.10.2022 - 06:50
![]() Jacqueline G'styr wrote:
Jacqueline G'styr wrote:
Je n'arrive pas à comprendre comment augmenter les mailles du col. Je serai très heureuse que vous puissiez m'aider
29.04.2022 - 20:25DROPS Design answered:
Bonjour Mme G'styr, placez d'abord un marqueur après les 33-45 mailles en comptant à partir du milieu dos, au rang suivant sur l'endroit vous allez augmenter le nombre de mailles envers (cf vidéo), autrement dit, vous tricoterez en côtes 3 m end, 3 m env jusqu'au marqueur puis en côtes 3 m end, 4 m env après le marqueur. Augmentez ensuite dans les sections endroit pour avoir des côtes 4 m end, 4 m env après le marqueur, puis 4 m end, 5 m env et enfin 5 m end, 5 m env (les côtes sont toujours à 3 m end, 3 m env avant le marqueur). Bon tricot!
02.05.2022 - 07:55
![]() Ingrid Lauryssens wrote:
Ingrid Lauryssens wrote:
Bij de sjaalkraag, moet ik op het eind van de naald dan de 21 st er gewoon bijzetten?
04.10.2021 - 12:16DROPS Design answered:
Dag Ingrid,
Ja, die kun je er gewoon bij opzetten aan het eind van de naald. Aan het eind wordt de kraag midden achter samen genaaid en daarna aan de halslijn van het achterpand genaaid.
07.10.2021 - 11:20
![]() Inne Vekemans wrote:
Inne Vekemans wrote:
Hoi, ik ben aan de voorbies/kraag aan het breien maar ik snap niet goed als ik de 5 steken moet meerderen in de 33 steken middenachter hoe ik die dan moet breien. Het is een boordsteek van 3 rechts/3 averechts maar als ik die steken meerder heb ik dat patroon toch niet meer? Alvast bedankt Inne
11.06.2020 - 19:15
![]() Ecinda wrote:
Ecinda wrote:
Strikket denne ensfarget, (i sort Paris), for flere år siden. Den er blitt ett av mine favorittplagg og er stadig i bruk. Enkel, rask og morsom å strikke. Veldig anvendelig. Holder godt på fasongen. Anbefales.
24.05.2020 - 09:31
![]() Bogusia wrote:
Bogusia wrote:
Moim zdaniem nie tylko będzie to widać, ale też rękaw nie będzie układał się tak jak należy, bo nie zgodzi się liczba zamkniętych oczek i na korpusie będą tworzyć się buły. Decyzja odnośnie korekty wzoru należy oczywiście do Państwa. Ja na szczęście jestem chwilę przed formowaniem główki rękawa i zamknę 8 oczek, tak jak w korpusie. Pozdrawiam
30.04.2020 - 08:39DROPS Design answered:
Dziękuję Bogusiu! Pozdrawiamy!
30.04.2020 - 09:07
![]() Bogusia wrote:
Bogusia wrote:
Witam serdecznie. Dlaczego w rękawie na podkrój pachy należy zamknąć tylko 6 oczek? Czy nie powinno być 8, tak jak w korpusie? Pozdrawiam
29.04.2020 - 18:26DROPS Design answered:
Witaj Bogusiu! Nie martwiłabym się tym, nie będzie tego widać, chociaż faktycznie w nowych wzorach ta liczba oczek jest zawsze taka sama. Zadam pytanie, jeśli zajdzie potrzeba zostanie wprowadzona korekta do wzoru. Pozdrawiamy!
29.04.2020 - 20:48
![]() Vekemans Inne wrote:
Vekemans Inne wrote:
Kan dit patroon met gewone breinaalden worden gemaakt ipv rondbreinaalden?
10.04.2020 - 12:04DROPS Design answered:
Dag Inne,
Het is in Noorwegen gebruikelijk om met rondbreinaalden te breien, maar deze kan inderdaad ook wel op rechte naalden gebreid worden. Het patroon moet dan wel een beetje aangepast worden. We hebben hiervoor een uitleg gemaakt en deze vindt je hier.
13.04.2020 - 10:35
![]() Jessica Metscher wrote:
Jessica Metscher wrote:
Goedenmiddag, Ik ben nu bij de mouw aangekomen om te breien. Maar ik snap niet helemaal hoe ik deze in de rondte kan breien. Ik gebruik een rondbreinaald van 40 cm, maar zelfs daar kan ik niet op rondbreien. Ik hoop dat u mij verder kan helpen? Met vriendelijke groet, Jessica Metscher
08.09.2017 - 15:00DROPS Design answered:
Hallo Jessica, Als je een grotere rondbreinaald hebt, kun je de magic loop (magische lus) toepassen. In deze video wordt uitgelegd hoe je dat doet.
13.09.2017 - 15:30Sylvia wrote:
When this pattern will be translated into Polish?
15.08.2017 - 19:39DROPS Design answered:
Dear Sylvia, the pattern will be ready by the end of this week. Kind regards from DROPS Design
15.08.2017 - 20:30
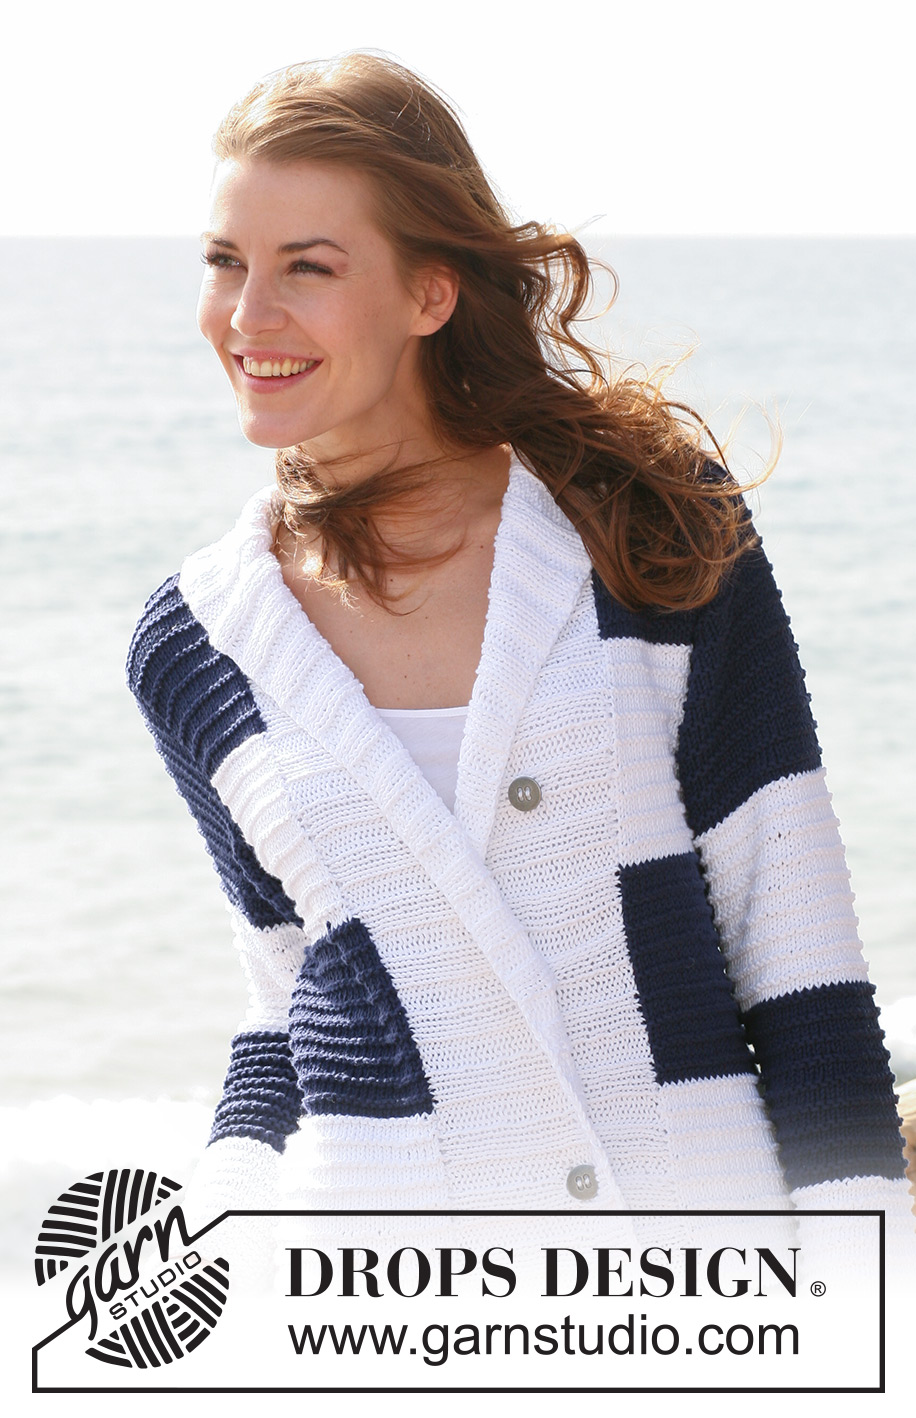
Weekend by the Sea#weekendbytheseacardigan |
|||||||
 |
 |
||||||
Knitted DROPS jacket in stripy pattern with collar and wide front bands in ”Paris”. Size S - XXXL.
DROPS 120-16 |
|||||||
|
GARTER ST (back and forth on needle): K all rows. PATTERN: See diagram M.1. Diagram shows the pattern from RS. Every 4th row is K from WS. STRIPES: * 12.5-13-13-13.5-14-14.5 cm white, 12.5-13-13-13.5-14-14.5 cm navy blue *, repeat from *-* until finished measurements. INCREASING TIP (applies to collar): Inc 1 st by making 1 YO. On next row K/P YO into back of loop to avoid a hole. GARTER ST (in the round): K1 round, P 1 round. BUTTONHOLES: Make buttonholes on right front band. 1 buttonhole = cast off 1 st and cast on 1 new st on next row. Work row as follows from RS (= from bottom edge): work the first 30-30-30-36-36-36 sts as before, cast off 1 st for buttonhole. Place the remaining 3-3-3-4-4-4 buttonholes with approx 14/15 cm between each, and work remaining sts on row. -------------------------------------------------------- -------------------------------------------------------- BODY PIECE: Worked back and forth on circular needle from mid front. Cast on 136-148-168-176-202-222 sts on circular needle size 4.5 mm with white. Work 4 rows GARTER ST - see above (first row = RS). Change to circular needle size 5 mm and continue in M.1, AT THE SAME TIME work STRIPES - see above. REMEMBER THE KNITTING TENSION! AT THE SAME TIME when piece measures 12-12-12-14-16-18 cm insert 2 markers in piece, 27-30-35-37-43-48 sts in from each side (back piece = 82-88-98-102-116-126 sts). Now dec 1 st each side of both markers (= 4 dec sts), and repeat the dec on every 14-14-10.5-10-10-10 cm a total of 3-3-4-4-4-4 times = 124-136-152-160-186-206 sts, piece now measures approx 40-40-44-44-46-48 cm. When piece measures 56-57-58-59-60-61 cm cast off 8 sts each side (i.e. 4 sts each side of marker) and complete each piece separately. BACK PIECE: = 68-74-82-86-100-110 sts. Cast off to shape the armhole each side at beg of every row: 3 sts 0-0-1-1-2-3 times, 2 sts 1-2-2-2-3-3 times and 1 st 1-1-1-2-3-4 times = 62-64-66-68-70-72 sts. Continue in M.1 and stripes as before. When piece measures 74-76-78-80-82-84 cm cast off the middle 26-26-26-26-28-28 sts for neck and complete each shoulder separately. Cast off 1 st on neckline on next row = 17-18-19-20-20-21 sts left on shoulder. Cast off when piece measures 76-78-80-82-84-86 cm. LEFT FRONT PIECE: = 20-23-27-29-35-40 sts. Cast off for armhole at the side as described for back piece = 17-18-19-20-20-21 sts left on shoulder. Continue in M.1 and stripes as before and cast off when piece measures 76-78-80-82-84-86 cm. RIGHT FRONT PIECE: Like left front piece, but mirrored. SLEEVE: Worked in the round on double pointed needles. READ ALL OF THIS SECTION BEFORE BEG! Cast on 40-42-44-46-48-50 sts on double pointed needles size 4.5 mm with white. Work 10 rows GARTER ST - see above. Insert a marker at beg of round. Change to double pointed needles size 5 mm and continue in M.1. AT THE SAME TIME when piece measures 8-8-8-8-10-10 cm inc 1 st each side of marker, repeat the inc on every 4-3.5-3-3-2-2 cm a total of 10-11-12-13-15-16 times = 60-64-68-72-78-82 sts. AT THE SAME TIME when piece measures 14-14-14-14-14.5-14.5 cm change to navy blue, continue until piece measures 28-28-28-28-29-29 cm, change back to white and continue until piece measures 42-42-42-42-43.5-43.5 cm, change back to navy blue and now complete piece in blue. AT THE SAME TIME when piece measures 47-47-46-46-44-42 cm - NOTE! Less for the larger sizes because of longer sleeve and wider shoulder – cast off 6 sts mid under sleeve (= 3 sts each side of marker) and now complete piece back and forth on needle. Cast off for sleeve cap each side at beg of every row: 2 sts 2-2-3-3-4-4 times, 1 st 1-1-1-1-1-2 times, then 2 sts each side until piece measures 55-55-56-56-57-57 cm, now cast off 3 sts each side 1 time and cast off remaining sts. Piece measures approx 56-56-57-57-58-58 cm. ASSEMBLY: Sew shoulder seams. RIGHT FRONT BAND/COLLAR: Beg at bottom of right front piece and pick up from RS approx 147-153-159-165-165-171 sts (divisible by 6 + 3) inside 1 edge st along right front piece on circular needle size 4.5 mm with white, in addition cast on 21-21-21-21-27-27 sts at the end of row (= towards mid back) = approx 168-174-180-186-192-198 sts on needle (total number of sts should be divisible by 6). K 1 row from WS and continue as follows from RS: 3 garter sts, rib K3/P3 until 3 sts remain, work these in garter st. Continue in rib like this. When front band/collar measures 3 cm insert a marker 33-33-39-39-45-45 sts from mid back. On next row from RS inc 1 st in each P-section on these 33-33-39-39-45-45 sts (= 5-5-6-6-7-7 inc sts) – see INCREASING TIP – do this to make collar wide enough round neckline. When front band/collar measures 6 cm inc in the same way in each K-section (= 5-5-6-6-7-7 inc sts). Repeat the inc in each P-section when front band/collar measures 9 cm and in each K-section when front band/collar measures 12 cm. When front band/collar measures 14-14-14-14-16-16 cm make 3-3-3-4-4-4 BUTTONHOLES - see above! Cast off with K over K, P over P and garter st over garter st when front band/collar measures 16-16-16-16-18-18 cm. LEFT FRONT BAND/COLLAR: Like right front band, but mirrored, i.e. first row with rib worked as follows from RS (= from mid back): 3 garter sts, * P3/K3 *, repeat from *-* until 3 sts remain, work these in garter st. ASSEMBLY: Set in sleeves. Sew collar tog mid back – sew in outer loops of sts, and sew collar to neckline. When folding collar towards RS there will be 6 garter sts mid back with K5 each side. Sew buttons on left front band. |
|||||||
Diagram explanations |
|||||||
|
|||||||
 |
|||||||
Have you finished this pattern?Tag your pictures with #dropspattern #weekendbytheseacardigan or submit them to the #dropsfan gallery. Do you need help with this pattern?You'll find 25 tutorial videos, a Comments/Questions area and more by visiting the pattern on garnstudio.com. © 1982-2026 DROPS Design A/S. We reserve all rights. This document, including all its sub-sections, has copyrights. Read more about what you can do with our patterns at the bottom of each pattern on our site. |
|||||||


Post a comment to pattern DROPS 120-16
We would love to hear what you have to say about this pattern!
If you want to leave a question, please make sure you select the correct category in the form below, to speed up the answering process. Required fields are marked *.