DROPS Paris
DROPS Paris
100% Cotton
from 1.60 $ /50g
Get the yarn to make this pattern from 35.20$.

The yarn cost is calculated from the pattern’s smallest size and the yarn’s cheapest product type. Looking for an even better price? You might find it on the DROPS Deals!

DROPS SS24

Weekend by the Sea

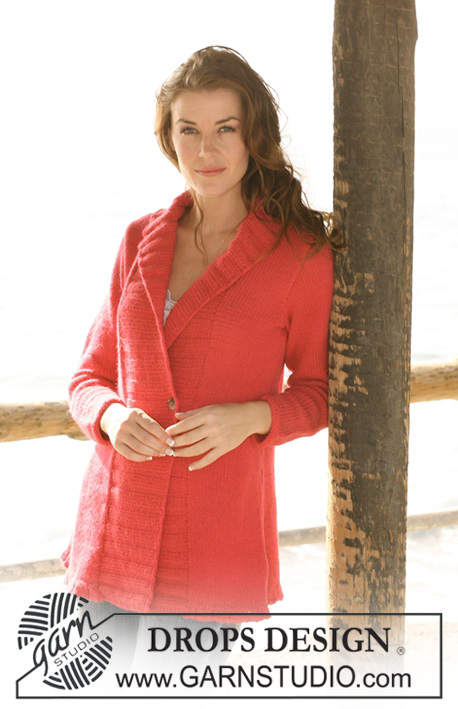
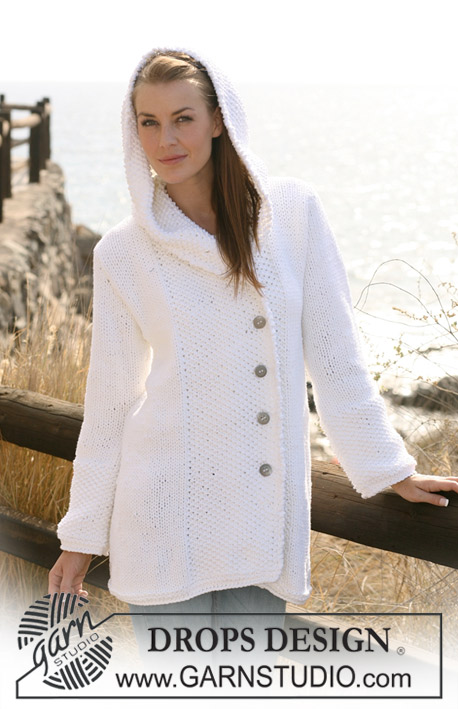
Knitted DROPS jacket in stripy pattern with collar and wide front bands in ”Paris”. Size S - XXXL.

DROPS 120-16
DROPS design: Pattern no W-389
--------------------------------------------------------
Size: S - M - L - XL - XXL - XXXL
Finished measurements:
Bust: 90-96-106-110-128-138 cm / 35½"-37¾"-41¾"-43⅜"-50⅜"-54¼"
Full length: 76-78-80-82-84-86 cm / 30"-30¾"-31½"-32¼"-33"-33⅞"

Materials: DROPS PARIS from Garnstudio
color no 16, white: 700-800-850-950-1050-1050 g
color no 28, navy blue: 400-450-500-550-600-650 g

DROPS CIRCULAR NEEDLE (80 cm / 32") and DOUBLE POINTED NEEDLES size 5 mm / US 8 - or size needed to get 17 sts x 22 rows in stockinette st = 10 x 10 cm / 4" x 4".
DROPS CIRCULAR NEEDLE (80 cm / 32") size 4.5 mm/US 7 – for garter st and rib.
DROPS DOUBLE POINTED NEEDLES size 4.5 mm / US 7 - for garter st.

DROPS Metal buttons, no 542: 3-3-3-4-4-4 pcs.

-------------------------------------------------------

Alternative Yarn – See how to change yarns here
Yarn Groups A to F – Use the same pattern and change the yarn here
Yarn usage using an alternative yarn – Use our yarn converter here

-------------------------------------------------------

DROPS Paris
DROPS Paris
100% Cotton
from 1.60 $ /50g
Get the yarn to make this pattern from 35.20$.

The yarn cost is calculated from the pattern’s smallest size and the yarn’s cheapest product type. Looking for an even better price? You might find it on the DROPS Deals!

Pattern instructions

NOTE: This pattern is written in American English. All measurements in charts are in cm. For conversion from inches to cm - click here. There are different terms for crocheting in American and British English. If this pattern includes crochet, click for "crochet terms" here. For this pattern in British English, please click here.
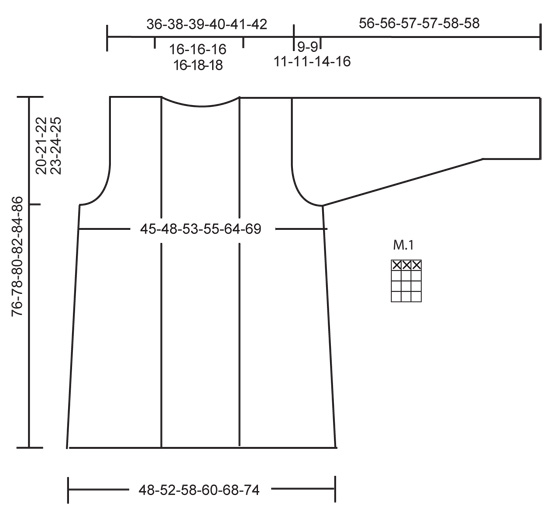
GARTER ST (back and forth on needle): K all rows.

PATTERN:
See diagram M.1. Diagram shows the pattern from RS. Every 4th row is K from WS.

STRIPES:
* 12.5-13-13-13.5-14-14.5 cm / 4⅞"-5⅛"-5⅛"-5¼"-5½"-5¾" white,
12.5-13-13-13.5-14-14.5 cm / 4⅞"-5⅛"-5⅛"-5¼"-5½"-5¾" navy blue *,
repeat from *-* until finished measurements.

INCREASING TIP (applies to collar):
Inc 1 st by making 1 YO. On next row K/P YO into back of loop to avoid a hole.

GARTER ST (in the round): K1 round, P 1 round.

BUTTONHOLES:
Make buttonholes on right front band.
1 buttonhole = bind off 1 st and cast on 1 new st on next row. Work row as follows from RS (= from bottom edge): work the first 30-30-30-36-36-36 sts as before, bind off 1 st for buttonhole. Place the remaining 3-3-3-4-4-4 buttonholes with approx 14-15 cm / 5½"-6" between each, and work remaining sts on row.
--------------------------------------------------------
--------------------------------------------------------

BODY PIECE:
Worked back and forth on circular needle from mid front. Cast on 136-148-168-176-202-222 sts on circular needle size 4.5 mm / US 7 with white. Work 4 rows GARTER ST - see above (first row = RS). Change to circular needle size 5 mm / US 8 and continue in M.1, AT THE SAME TIME work STRIPES - see above. REMEMBER THE GAUGE! AT THE SAME TIME when piece measures 12-12-12-14-16-18 cm / 4¾"-4¾"-4¾"-5½"-6¼"-7" insert 2 markers in piece, 27-30-35-37-43-48 sts in from each side (back piece = 82-88-98-102-116-126 sts). Now dec 1 st each side of both markers (= 4 dec sts), and repeat the dec on every 14-14-10.5-10-10-10 cm / 5½"-5½"-4¼"-4"-4"-4" a total of 3-3-4-4-4-4 times = 124-136-152-160-186-206 sts, piece now measures approx 40-40-44-44-46-48 cm / 15¾"-15¾"-17¼"-17¼"-18"-19". When piece measures 56-57-58-59-60-61 cm / 22"-22½"-22¾"-23¼"-23⅝"-24" bind off 8 sts each side (i.e. 4 sts each side of marker) and complete each piece separately.

BACK PIECE:
= 68-74-82-86-100-110 sts. Bind off to shape the armhole each side at beg of every row: 3 sts 0-0-1-1-2-3 times, 2 sts 1-2-2-2-3-3 times and 1 st 1-1-1-2-3-4 times = 62-64-66-68-70-72 sts. Continue in M.1 and stripes as before. When piece measures 74-76-78-80-82-84 cm / 29⅛"-30"-30¾"-31½"-32¼"-33" bind off the middle 26-26-26-26-28-28 sts for neck and complete each shoulder separately. Bind off 1 st on neckline on next row = 17-18-19-20-20-21 sts left on shoulder. Bind off when piece measures 76-78-80-82-84-86 cm / 30"-30¾"-31½"-32¼"-33"-33⅞".

LEFT FRONT PIECE:
= 20-23-27-29-35-40 sts. Bind off for armhole at the side as described for back piece = 17-18-19-20-20-21 sts left on shoulder. Continue in M.1 and stripes as before and bind off when piece measures 76-78-80-82-84-86 cm / 30"-30¾"-31½"-32¼"-33"-33⅞".

RIGHT FRONT PIECE:
Like left front piece, but mirrored.

SLEEVE:
Worked in the round on double pointed needles.
READ ALL OF THIS SECTION BEFORE BEG! Cast on 40-42-44-46-48-50 sts on double pointed needles size 4.5 mm / US 7 with white. Work 10 rows GARTER ST - see above. Insert a marker at beg of round. Change to double pointed needles size 5 mm / US 8 and continue in M.1. AT THE SAME TIME when piece measures 8-8-8-8-10-10 cm / 3⅛"-3⅛"-3⅛"-3⅛"-4"-4" inc 1 st each side of marker, repeat the inc on every 4-3.5-3-3-2-2 cm / 1½"-1¼"-1⅛"-1⅛"-¾"-¾" a total of 10-11-12-13-15-16 times = 60-64-68-72-78-82 sts. AT THE SAME TIME when piece measures 14-14-14-14-14.5-14.5 cm / 5½"-5½"-5½"-5½"-5¾"-5¾" change to navy blue, continue until piece measures 28-28-28-28-29-29 cm / 11"-11"-11"-11"-11⅜"-11⅜", change back to white and continue until piece measures 42-42-42-42-43.5-43.5 cm / 16½"-16½"-16½"-16½"-17⅛"-17⅛", change back to navy blue and now complete piece in blue. AT THE SAME TIME when piece measures 47-47-46-46-44-42 cm / 18½-"18½"-18"-18"-17¼"-16½" - NOTE! Less for the larger sizes because of longer sleeve and wider shoulder – bind off 6 sts mid under sleeve (= 3 sts each side of marker) and now complete piece back and forth on needle. Bind off for sleeve cap each side at beg of every row: 2 sts 2-2-3-3-4-4 times, 1 st 1-1-1-1-1-2 times, then 2 sts each side until piece measures 55-55-56-56-57-57 cm / 21⅝"-21⅝"-22"-22"-22½"-22½", now bind off 3 sts each side 1 time and bind off remaining sts. Piece measures approx 56-56-57-57-58-58 cm / 22"-22"-22½"-22½"-22¾"-22¾".

ASSEMBLY:
Sew shoulder seams.

RIGHT FRONT BAND/COLLAR:
Beg at bottom of right front piece and pick up from RS approx 147-153-159-165-165-171 sts (divisible by 6 + 3) inside 1 edge st along right front piece on circular needle size 4.5 mm / US 7 with white, in addition cast on 21-21-21-21-27-27 sts at the end of row (= towards mid back) = approx 168-174-180-186-192-198 sts on needle (total number of sts should be divisible by 6). K 1 row from WS and continue as follows from RS: 3 garter sts, rib K3/P3 until 3 sts remain, work these in garter st. Continue in rib like this. When front band/collar measures 3 cm / 1⅛" insert a marker 33-33-39-39-45-45 sts from mid back. On next row from RS inc 1 st in each P-section on these 33-33-39-39-45-45 sts (= 5-5-6-6-7-7 inc sts) – see INCREASING TIP – do this to make collar wide enough round neckline. When front band/collar measures 6 cm / 2⅜" inc in the same way in each K-section (= 5-5-6-6-7-7 inc sts). Repeat the inc in each P-section when front band/collar measures 9 cm / 3½" and in each K-section when front band/collar measures 12 cm / 4¾".
When front band/collar measures 14-14-14-14-16-16 cm / 5½"-5½"-5½"-5½"-6¼"-6¼" make 3-3-3-4-4-4 BUTTONHOLES - see above! bind off with K over K, P over P and garter st over garter st when front band/collar measures 16-16-16-16-18-18 cm /6¼"-6¼"-6¼"-6¼"-7"-7".

LEFT FRONT BAND/COLLAR:
Like right front band, but mirrored, i.e. first row with rib worked as follows from RS (= from mid back): 3 garter sts, * P3/K3 *, repeat from *-* until 3 sts remain, work these in garter st.

ASSEMBLY:
Set in sleeves. Sew collar tog mid back – sew in outer loops of sts, and sew collar to neckline. When folding collar towards RS there will be 6 garter sts mid back with K5 each side. Sew buttons on left front band.

Diagram

All measurements in charts are in cm.

symbols = K from WS, P from RS
symbols = K from RS, P from WS
diagram

Each of our patterns has specific tutorial videos to help you.

Do you have a question? See a list of frequently asked questions (FAQ)

Knitting tension is what determines the final measurements of your work, and is usually measured per 10 x 10 cm. It is provided like so: number of stitches in width x number of rows in height - eg: 19 stitches x 26 rows = 10 x 10 cm.

The knitting tension is very individual; some people knit/crochet loosely while others work tightly. You adjust the knitting tension with the needle size, which is why the suggested needle size only serve as a guide! You need to adjust this (up or down) to ensure that YOUR knitting tension matches the knitting tension provided in the pattern. If you work with a different knitting tension than provided you will have a different yarn consumption, and your work will have different measurements than what the pattern suggests.

The knitting tension also determines which yarns can replace each other. As long as you achieve the same knitting tension you can replace one yarn with another.

See DROPS lesson: How to measure your tension/gauge

See DROPS video: How to make a gauge tension swatch

The required amount of yarn is provided in grams, eg: 450 g. To calculate how many balls you’ll need you first need to know how many grams are in 1 ball (25g, 50g or 100g). This information is available if you click on the individual yarn quality on our pages. Divide the amount required with the amount of each ball. For example, if each ball is 50g (the most common amount), the calculation will be as follows: 450 / 50 = 9 balls.

The important thing when changing from one yarn to another is that the knitting/crochet tension remains the same. This is so that the measurements of the finished piece will be the same as on the sketch provided. It is easier to achieve the same knitting tension using yarns from the same yarn group. It is also possible to work with multiple strands of a thinner yarn to achieve the knitting tension of a thicker one. Please try our yarn converter. We recommend you to always work a test swatch.

Please NOTE: when changing yarn the garment might have a different look and feel to the garment in the photo, due to individual properties and qualities of each yarn.

See DROPS lesson: Can I use a different yarn than the one mentioned in the pattern?

All our yarns are categorised into yarn groups (from A to F) according to thickness and knitting tension – group A contains the thinnest yarns and group F the thickest. This makes it easier for you to find alternative yarns to our patterns, should you wish to switch yarn. All yarns within the same group have a similar knitting tension and can easily replace each other. However, different yarn qualities have different structures and properties which will give the finished work a unique look and feel.

Click here for an overview of the yarns in each yarn group

At the top of all our patterns you’ll find a link to our yarn converter, which is a helpful tool should you wish to use a different yarn than suggested. By filling in the yarn quality you wish to replace, the amount (in your size) and number of strands, the converter will present good alternative yarns with the same knitting tension. Additionally it will tell you how much you’ll require in the new qualities and whether you’ll need to work with multiple strands. Most skeins are 50g (some are 25g or 100g).

If the pattern is worked with multiple colours, every colour will have to be converted separately. Similarly, if the pattern is worked with several strands of different yarns (for example 1 strand Alpaca and 1 strand Kid-Silk) you will have to find alternatives for each, individually.

Click here to see our yarn converter

Since different yarns have different qualities and textures we have chosen to keep the original yarn in our patterns. However, you can easily find options among our available qualities by using our yarn converter, or simply pick a yarn from the same yarn group.

It is possible that some retailers still have discontinued yarns in stock, or that someone has a few skeins at home that they would like to find patterns for.

The yarn converter will provide both alternative yarn as well as required amount in the new quality.

If you think it's hard to decide what size to make, it can be a good idea to measure a garment you own already and like the size of. Then you can pick the size by comparing those measures with the ones available in the pattern's size chart.

You'll find the size chart at the bottom of the pattern.

See DROPS lesson: How to read size chart

The needle size provided in the pattern serves only as a guide, the important thing is to follow the knitting tension. And since knitting tension is very individual, you will have to adjust the needle size to ensure that YOUR tension is the same as in the pattern – maybe you’ll have to adjust 1, or even 2 needle sizes, up or down to achieve the correct tension. For this, we recommend that you work test swatches.

Should you work with a different knitting tension than the one provided, the measurements of the finished garment might deviate from the measurement sketch.

See DROPS lesson: How to measure your tension/gauge

See DROPS video: How to make a gauge tension swatch

Working a garment top-down provides more flexibility and room for personal adjustment. For example it is easier to try the garment on while working, as well as making adjustments to length of yoke and shoulder caps.

The instructions are carefully explaining every step, in the correct order. Diagrams are adjusted to the knitting direction and are worked as usual.

The diagram depicts all rows/rounds, and every stitch seen from the right side. It is read from bottom to top, from right to left. 1 square = 1 stitch.

When working back and forth, every other row is worked from the right side and every other row is worked from the wrong side. When working from the wrong side, the diagram will have to be worked reversed: from left to right, knit stitches are purled, purl stitches are knit etc.

When working in the round every round is worked from the right side and the diagram are worked from right to left on all rounds.

See DROPS lesson: How to read knitting diagrams

The diagram depicts all rows/rounds, and every stitch seen from the right side. It is worked from bottom to top, from right to left.

When working back and forth every other row is worked from the right side: from right to left and every other row is worked from the wrong side: from left to right.

When working in the round, every row in the diagram are worked from the right side, from right to left.

When working a circular diagram you start in the middle and work your way outwards, counter clockwise, row by row.

The rows usually start with a given number of chain stitches (equivalent to the height of the following stitch), this will either be depicted in the diagram or explained in the pattern.

See DROPS lesson: How to read crochet diagrams

Instructions for working several diagrams after each other on the same row/round, will often be written like so: “work A.1, A.2, A.3 a total of 0-0-2-3-4 times". This means you work A.1 once, then A.2 is worked once, and A.3 is repeated (in width) the number of times provided for your size – in this case like so: S = 0 times, M = 0 times, L=2 times, XL= 3 times and XXL = 4 times.

The diagrams are worked as usual: begin with the first row in A.1, then work the first row in A.2 etc.

See DROPS lesson: How to read knitting diagrams

See DROPS lesson: How to read crochet diagrams

The total width of the garment (from wrist-to-wrist) will be larger in the larger sizes, despite the actual sleeves being shorter. The larger sizes have longer sleeve caps and wider shoulders, so there will be a good fit in all sizes.

The measurement sketch/schematic drawing provides information regarding the full length of the garment. If it’s a jumper or a jacket the length is measured from the highest point on the shoulder (usually closest to the neckline), and straight down to the bottom of the garment. It is NOT measured from the tip of shoulder. Similarly, the length of yoke is measured from the highest point on the shoulder and down to where yoke is split into body and sleeves.

See DROPS lesson: How to read a schematic drawing

Diagrams are often repeated on the round or in height. 1 repeat is the diagram the way it appears in the pattern. If it says to work 5 repeats of A.1 in the round, then you work A.1 a total of 5 times after/next to each other in the round. If it says to work 2 repeats of A.1 vertically/in height you work the entire diagram once, then begin again at the start and work the entire diagram one more time.

Chain stitches are slightly narrower than other stitches and to avoid working the cast-on edge too tight, we simply chain more stitches to begin with. The stitch count will be adjusted on the following row to fit the pattern and measurement sketch.

The rib edge is more elastic and will contract slightly compared to, for example, stocking stitch. By increasing before the rib edge, you avoid a visible difference in width between the rib edge and the rest of the body.

It’s very easy to cast off too tightly, and by making yarn overs while casting off (and simultaneously casting these off) you avoid a too tight cast off edge.

See DROPS video: How to bind off with yarn overs (yo)

To achieve an even increase (or decrease) you can increase on, for example: every 3rd and 4th row alternately, like so: work 2 rows and increase on the 3rd row, work 3 rows and increase on the 4th. Repeat this until the increase is complete.

See DROPS lesson: Increase or decrease 1 st on every 3rd and 4th row alternately

Should you prefer to work in the round instead of back and forth, you may of course adjust the pattern. You’ll need to add steeks mid-front (usually 5 stitches), and follow the instructions. When you would normally turn and work from the wrong side, simply work across the steek and continue in the round. At the end you’ll cut the piece open, pick up stitches to work bands, and cover the cut edges.

See DROPS video: How to knit steeks and cut open

Should you prefer to work back and forth instead of in the round, you may of course adjust the pattern so you work the pieces separately and then assemble them at the end. Divide the stitches for the body in 2, add 1 edge stitch in each side (for sewing) and work the front and back pieces separately.

See DROPS lesson: Can I adapt a pattern for circular needles into straight needles?

Pattern repeats can vary slightly in the different sizes, in order to get the correct proportions. If you’re not working the exact same size as the garment in the photo, yours might deviate slightly. This has been carefully developed and adjusted so that the complete impression of the garment is the same in all sizes.

Make sure to follow instructions and diagrams for your size!

If you have found a pattern you like which is available in women’s size it’s not very difficult to convert it to men’s size. The biggest difference will be the length of sleeves and body. Start working on the women size that you think would fit across the chest. The additional length will be worked right before you cast off for the armhole/sleeve cap. If the pattern is worked top-down you can add the length right after the armhole or before the first decrease on sleeve.

Regarding additional yarn amount, this will depend on how much length you add, but it is better with a skein too many than too few.

All yarns will have excess fibres (from production) that might come off as lint or shedding. Brushed yarns (ie hairier yarns) have more of these loose, excess fibres, causing more shedding.

Shedding also depends on what is worn under or over the garment, and whether this pulls at the yarn fibres. It’s therefore not possible to guarantee that there will be no shedding

Below are some tips on how to get the best result when working with hairier yarns:

1. When the garment is finished (before you wash it) shake it vigorously so the looser hairs come off. NOTE: do NOT use a lint roller, brush or any method that pulls at the yarn.

2. Place the garment in a plastic bag and put it in your freezer - the temperature will cause the fibres to become less attached to each other, and excess fibres will come off easier.

3. Leave in the freezer for a few hours before taking it out and shaking it again.

4. Wash the garment according to the instructions on the yarn label.

Pilling is a natural process that happens to even the most exclusive of fibers. It's a natural sign of wear and tear that is hard to avoid, and that is most visible in high friction areas of your garment like a sweater's arms and cuffs.

You can make your garment look as new by removing the pilling, using a fabric comb or a pill/lint remover.

Still can't find the answer you need? Then scroll down and leave your question so one of our experts can try to help you. This will be done normally within 5 to 10 working days.
In the meantime, you can read the questions and answers that others have left to this pattern or join the DROPS Workshop on Facebook to get help from fellow knitters/crocheters!

You might also like...

Post a comment to pattern DROPS 120-16

We would love to hear what you have to say about this pattern!

If you want to leave a question, please make sure you select the correct category in the form below, to speed up the answering process. Required fields are marked *.

Comments / Questions (44)

country flag Yana wrote:

I love the look of this but don't understand the pattern, I'm still pretty new to knitting. I read the DROPS pattern guide but it didn't answer my question. Assembly says only to sew on sleeves, but to create back and front pieces separately. Does =23 for the left front piece mean begin knitting at 23rd stitch of body piece? I'm not sure how this works, please provide a bit more detail.

03.10.2022 - 19:59

DROPS Design answered:

Hi Yana, The body is worked as one piece as far as the armholes, then stitches are cast off and the back and front pieces finished separately. The 23 for the front piece is the number of stitches after the armhole has been started, then you continue to decrease for the armhole (as on the back piece) until you have 18 stitches left on the shoulder. Hope this helps and happy knitting!.

04.10.2022 - 06:50

country flag Jacqueline G'styr wrote:

Je n'arrive pas à comprendre comment augmenter les mailles du col. Je serai très heureuse que vous puissiez m'aider

29.04.2022 - 20:25

DROPS Design answered:

Bonjour Mme G'styr, placez d'abord un marqueur après les 33-45 mailles en comptant à partir du milieu dos, au rang suivant sur l'endroit vous allez augmenter le nombre de mailles envers (cf vidéo), autrement dit, vous tricoterez en côtes 3 m end, 3 m env jusqu'au marqueur puis en côtes 3 m end, 4 m env après le marqueur. Augmentez ensuite dans les sections endroit pour avoir des côtes 4 m end, 4 m env après le marqueur, puis 4 m end, 5 m env et enfin 5 m end, 5 m env (les côtes sont toujours à 3 m end, 3 m env avant le marqueur). Bon tricot!

02.05.2022 - 07:55

country flag Ingrid Lauryssens wrote:

Bij de sjaalkraag, moet ik op het eind van de naald dan de 21 st er gewoon bijzetten?

04.10.2021 - 12:16

DROPS Design answered:

Dag Ingrid,

Ja, die kun je er gewoon bij opzetten aan het eind van de naald. Aan het eind wordt de kraag midden achter samen genaaid en daarna aan de halslijn van het achterpand genaaid.

07.10.2021 - 11:20

country flag Inne Vekemans wrote:

Hoi, ik ben aan de voorbies/kraag aan het breien maar ik snap niet goed als ik de 5 steken moet meerderen in de 33 steken middenachter hoe ik die dan moet breien. Het is een boordsteek van 3 rechts/3 averechts maar als ik die steken meerder heb ik dat patroon toch niet meer? Alvast bedankt Inne

11.06.2020 - 19:15

country flag Ecinda wrote:

Strikket denne ensfarget, (i sort Paris), for flere år siden. Den er blitt ett av mine favorittplagg og er stadig i bruk. Enkel, rask og morsom å strikke. Veldig anvendelig. Holder godt på fasongen. Anbefales.

24.05.2020 - 09:31

country flag Bogusia wrote:

Moim zdaniem nie tylko będzie to widać, ale też rękaw nie będzie układał się tak jak należy, bo nie zgodzi się liczba zamkniętych oczek i na korpusie będą tworzyć się buły. Decyzja odnośnie korekty wzoru należy oczywiście do Państwa. Ja na szczęście jestem chwilę przed formowaniem główki rękawa i zamknę 8 oczek, tak jak w korpusie. Pozdrawiam

30.04.2020 - 08:39

DROPS Design answered:

Dziękuję Bogusiu! Pozdrawiamy!

30.04.2020 - 09:07

country flag Bogusia wrote:

Witam serdecznie. Dlaczego w rękawie na podkrój pachy należy zamknąć tylko 6 oczek? Czy nie powinno być 8, tak jak w korpusie? Pozdrawiam

29.04.2020 - 18:26

DROPS Design answered:

Witaj Bogusiu! Nie martwiłabym się tym, nie będzie tego widać, chociaż faktycznie w nowych wzorach ta liczba oczek jest zawsze taka sama. Zadam pytanie, jeśli zajdzie potrzeba zostanie wprowadzona korekta do wzoru. Pozdrawiamy!

29.04.2020 - 20:48

country flag Vekemans Inne wrote:

Kan dit patroon met gewone breinaalden worden gemaakt ipv rondbreinaalden?

10.04.2020 - 12:04

DROPS Design answered:

Dag Inne,

Het is in Noorwegen gebruikelijk om met rondbreinaalden te breien, maar deze kan inderdaad ook wel op rechte naalden gebreid worden. Het patroon moet dan wel een beetje aangepast worden. We hebben hiervoor een uitleg gemaakt en deze vindt je hier.

13.04.2020 - 10:35

country flag Jessica Metscher wrote:

Goedenmiddag, Ik ben nu bij de mouw aangekomen om te breien. Maar ik snap niet helemaal hoe ik deze in de rondte kan breien. Ik gebruik een rondbreinaald van 40 cm, maar zelfs daar kan ik niet op rondbreien. Ik hoop dat u mij verder kan helpen? Met vriendelijke groet, Jessica Metscher

08.09.2017 - 15:00

DROPS Design answered:

Hallo Jessica, Als je een grotere rondbreinaald hebt, kun je de magic loop (magische lus) toepassen. In deze video wordt uitgelegd hoe je dat doet.

13.09.2017 - 15:30

Sylvia wrote:

When this pattern will be translated into Polish?

15.08.2017 - 19:39

DROPS Design answered:

Dear Sylvia, the pattern will be ready by the end of this week. Kind regards from DROPS Design

15.08.2017 - 20:30