
Popular categories
Looking for a yarn?


Comments / Questions (10)
![]() Dorthe Brogaard wrote:
Dorthe Brogaard wrote:
Hvilken størrelse er brugt til bamsen? Mvh Dorthe
18.02.2026 - 11:06DROPS Design answered:
Hei Dorthe. Tipper det er den minste str.mvh DROPS Design
23.02.2026 - 15:24
![]() Ingrid wrote:
Ingrid wrote:
Warum steht in der Anleitung, man soll M4 in beige ( Farbe 17) stricken? Auf dem Foto wurde doch natürlich (Farbe 02) für den oberen Teil des Jäckchens bzw Ärmel verwendet.
20.04.2020 - 09:46DROPS Design answered:
Liebe Ingrid, M.4 muss in Natur gestrickt werden, die Anleitung wird korrigiert, danke für den Hinweis. Viel Spaß beim stricken!
20.04.2020 - 10:59
![]() Karin wrote:
Karin wrote:
Hvordan får man mønsteret til at passe med M.3 efter der er taget ind til 135 m og mønsteret fylder 12 m. Det går jo ikke op i de 135 (133) m...?
10.02.2019 - 18:26DROPS Design answered:
Hei Karin. Strikk M.3 over 132 masker (=11 rapporter) og strikk den første masken av M.3 over den siste masken før kantmasken. Da blir jakken lik på begge sider av stolpene. God fornøyelse
11.02.2019 - 07:50
![]() Margit Thor wrote:
Margit Thor wrote:
Hvordan kan mønsteret i den perlestrikket kant komme til at passe med mønsteret i M1, når anttalet af masker er ulige?
19.07.2017 - 12:46DROPS Design answered:
Hej, da må du sørge for at det perlestrikkede i mønsteret, starter med den maske du er kommet til efter den perlestrikkede kant. God fornøjelse!
09.08.2017 - 15:06
![]() Dorthe Lorentzen wrote:
Dorthe Lorentzen wrote:
Jeg vil også meget gerne havde den på dansk, hvordan man laver knuden. Især hvad man gør bagefter, på næste pind, skal man så ikke slå nye masker op igen, så maske antalet passer. Vh Dorthe Lorentzen
13.10.2016 - 13:26DROPS Design answered:
Hej Dorte. Diagrambeskrivelsen er paa dansk. Du strikker de 3 masker saadan, 3 vr sm, 3 r sm, 3 vr sm. Dvs, du strikker de 3 m sammen tre gange (for og bag i maskerne), saa du faar en knude, men ogsaa 3 nye masker over. Maskeantallet forbliver det samme.
13.10.2016 - 15:12Tamara Von Mappe wrote:
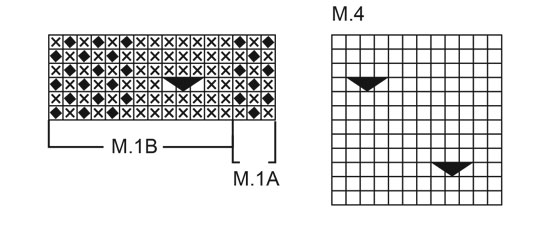
Buenas tardes, estoy comenzando el patrón en la talla 1/3 meses. La duda es la siguiente, cuando se comienza el diagrama, 1 pto orillo M1A (3ptos) M1B (13 ptos), sobre 137 ptos, no coincide M1B, faltarían 6 ptos para completar la secuencia, un total de 11 veces y terminar con M1A y pto orillo. No sé si me explico bien Agradezco la ayuda
02.08.2016 - 23:10DROPS Design answered:
Hola Tamara. El diagrama M.1B se repite 10 veces y se trabajan los 6 primeros pts del diagrama antes de continuar con M.1A. De este modo conseguimos tener el dibujo simétrico en ambos delanteros.
05.08.2016 - 20:20
![]() Wieke wrote:
Wieke wrote:
Telpatroon M4 is niet vertaald.= 1 knute. Graag uitleg over hoe deze steek te breien.
30.11.2013 - 21:09DROPS Design answered:
Hoi Wieke. De Nederlandse verklaring van de symbolen in de teltekeningen staan onderaan dit patroon, en ze staan in dezelfde verticale volgorde als de symbolen naast de teltekening. Zie onder VERTALING SYMBOLEN TELTEKENING: Dit is standaard op alle oudere patronen totdat ik dat handmatig heb aangepast. Dit patroon is inmiddels ook aangepast.
02.12.2013 - 12:48
![]() Lilli Wolff wrote:
Lilli Wolff wrote:
Jeg tror I glemte at oversætte noget af diagrammet. en del af det er stadig på Norsk. Cheers
03.10.2010 - 01:50
![]() DROPS Design wrote:
DROPS Design wrote:
= 1 knut. Dessa 3 m stickas så här utan att de släpps av vänster st: 3 am tills, 3 rm tills och 3 am tills. Släpp sen av m från vänster st.
22.01.2009 - 08:18
![]() Päivi Höglund wrote:
Päivi Höglund wrote:
Kan ni vänligen berätta, hur man gör "knute" på svenska, jag får inte helt rätt uppfanning om norska beskrivning. Tack i förhand.
21.01.2009 - 21:07
|
|||||||||||||||||||||||||
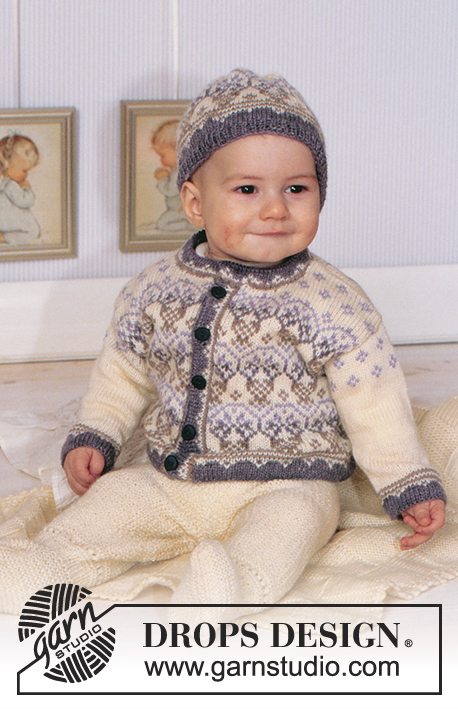
Little Ben#littlebenjacket |
|||||||||||||||||||||||||
|
|
|||||||||||||||||||||||||
Jacket with pattern border in BabyMerino.
DROPS Baby 11-8 |
|||||||||||||||||||||||||
|
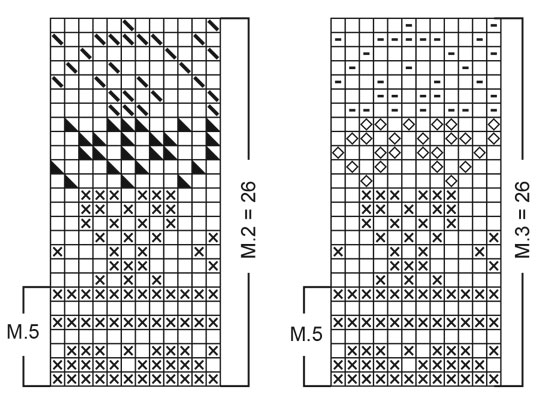
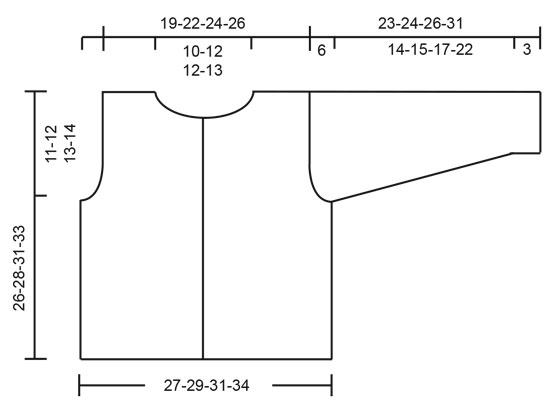
Knitting tension: 25 sts x 34 rows on needle size 2.5 mm in stocking sts = 10 x 10 cm. Garter sts (back and forth on needle: knit all rows. Moss sts: 1st row: *K1, P1*, repeat from *-*. 2nd row: P over K, K over P. Repeat 2nd row. Pattern: See diagrams M.1 to M.5. The diagrams are seen from the RS. ---------------------------------------------------------------------- Back and front piece: The jacket is knitted back and forth on circular needle from mid front. Cast on 145-158-171-184 sts (incl 1 edge sts each side towards mid front) on needle size 2 mm with beige. Knit 7 rows moss sts – see explanation above - with 1 edge st each side in garter sts (1st row = WS). Change to needle size 2.5 mm and knit next row as follows from RS: 1 edge st, M.1A (= 3 sts), M.1B over the next 137-150-163-176 sts, M.1A (= 3 sts) and 1 edge st. Note! Make sure that the sts in moss sts in M.1 sit over the moss sts in border. Continue in pattern like this. Read all of the following section before knitting it! When piece measures approx 11-12-13-14 cm – adjust to after 1 full repeat of M.1 – knit M.2 (M.3) with 1 edge st each side in garter sts. At the same time dec 10-11-12-13 sts evenly on the first row in pattern by K tog the 2 middle sts in each section in moss sts = 135-147-159-171 sts. After M.1 (M.2) continue in M.4 with off-white until finished measurements (1st row = RS). At the same time when piece measures 15-16-18-19 cm knit next row as follows from the RS: knit 31-34-37-40 sts (front piece), cast off 6 sts for armhole, knit 61-67-73-79 sts (= back piece), cast off 6 sts for armhole, knit 31-34-37-40 sts (= front piece). Now finish each piece separately. Left front piece: = 31-34-37-40 sts. Dec for armhole on every other row as follows: 2 sts 1 time and 1 st 4-3-4-4 times = 25-29-31-34 sts. When piece measures 21-23-26-28 cm cast off 6-7-8-9 sts mid front for neck and dec to shape the neckline on every other row: 2 sts 2-3-3-3 times and 1 st 3-2-2-2 times = 12-14-15-17 sts left on shoulder. Cast off remaining sts when piece measures 26-28-31-33 cm. Right front piece: = 31-34-37-40 sts. Knit as left front piece, but mirrored. Back piece: = 61-67-73-79 sts. Cast off for armholes as described for front piece = 49-57-61-67 sts. When piece measures 25-27-30-32 cm cast off the middle 23-27-29-31 sts for neck and dec 1 st on neckline on next row = 12-14-15-17 sts left on each shoulder. Cast off remaining sts when piece measures 26-28-31-33 cm. Sleeve: Cast on 44-44-50-50 sts (incl 1 edge st each side) on pointed needles size 2 mm with beige. Knit 7 rows in moss sts (1st row = WS). Change to needle size 2.5 mm, knit 1 row in stocking sts and continue in M.5. After M.5 knit 2 rows stocking sts in off-white and finish the piece in M.4. At the same time when piece measures 3 cm inc 1 st each side a total of 7-9-8-11 times as follows: Size 1/3 months: on every 7th row Size 6/9 months: on every 5th and 6th row alternately Size 12/18 months: on every 7th row Size 24 months: on every 7th row = 58-62-66-72 sts. Note! Incorporate the inc sts in pattern as you go along. When piece measures 17-18-20-25 cm dec for sleeve cap each side on every other row as follows: 3 sts 2 times, 2 sts 2-2-3-3 times, 1 st 3-2-1-1 times, 2 sts 2-3-3-2 times and then 3 sts each side until piece measures 23-24-26-31 cm. Cast off remaining sts. Assembly: Sew shoulder seams. Left front edge: Pick up approx 58 to 73 sts along left front edge with beige on needle size 2 mm and knit 1 row in stocking sts. Change to off-white and knit 1 row in stocking sts. Change back to beige and knit 7 rows in moss sts. Cast off with K over K and P over P. Right front edge: Knit as left front edge but after 3 rows in moss sts make 4 buttonholes evenly distributed – the bottom one approx 1 cm from the edge and the top one 4-5 cm from the top, take into account that there will be a buttonhole on neckline as well. 1 buttonhole = cast off 2 sts and cast on 2 new sts on the return row. Neckline: Pick up approx 66-84 sts round the neck (also over the front edges) on needle size 2 mm with beige. Change to off-white and knit 1 row in stocking sts. Change back to beige and knit 7 rows in moss sts. At the same time after 3 rows in moss sts make a buttonhole over the others on front edge. Cast off with K over K and P over P. Sew sleeve seams inside 1 edge st. Set in sleeves and sew on buttons. Crochet borders: Crochet along bottom edges on body and sleeves and round the neck on crochet hook size 2.5 mm with beige as follows: 1 dc in first st, *ch 3, 1 tr in first ch from hook, skip 2 sts, 1 dc in next st*, repeat from *-*. |
|||||||||||||||||||||||||
Diagram explanations |
|||||||||||||||||||||||||
|
|||||||||||||||||||||||||
 |
|||||||||||||||||||||||||
 |
|||||||||||||||||||||||||
 |
|||||||||||||||||||||||||
Have you finished this pattern?Tag your pictures with #dropspattern #littlebenjacket or submit them to the #dropsfan gallery. Do you need help with this pattern?You'll find 23 tutorial videos, a Comments/Questions area and more by visiting the pattern on garnstudio.com. © 1982-2026 DROPS Design A/S. We reserve all rights. This document, including all its sub-sections, has copyrights. Read more about what you can do with our patterns at the bottom of each pattern on our site. |
|||||||||||||||||||||||||


With over 40 years in knitting and crochet design, DROPS Design offers one of the most extensive collections of free patterns on the internet - translated to 17 languages. As of today we count 324 catalogues and 12290 patterns translated into English (UK/cm). 12290
We work hard to bring you the best knitting and crochet have to offer, inspiration and advice as well as great quality yarns at incredible prices! Would you like to use our patterns for other than personal use? You can read what you are allowed to do in the Copyright text at the bottom of all our patterns. Happy crafting!
Post a comment to pattern DROPS Baby 11-8
We would love to hear what you have to say about this pattern!
If you want to leave a question, please make sure you select the correct category in the form below, to speed up the answering process. Required fields are marked *.