
Popular categories
Looking for a yarn?


Comments / Questions (27)
![]() Dsev wrote:
Dsev wrote:
Bonjour DROPS Design, je suis toujours impressionnée par tout ce que vous faites pour rendre le tricotage agréable et facile en mettant à notre disposition des explications claires, des séquences de vidéo, etc. Je présente mes félicitations à toute l'équipe de Drops Design. Demeurez toujours inspirés. Merci.
05.02.2021 - 13:03
![]() Monika wrote:
Monika wrote:
Lieben Dank für die Antwort, habe es inzwischen auch herausgefunden was gemeint ist durch eine andere Anleitung. Ich hätte da noch mal eine Frage. Ist es möglich das ihr mehr Anleitungen macht die man ganz normal stricken kann, also von unten nach oben. Von oben nach unten stricken klappt nie bei mir. Bei euren Anleitungen sind auch sehr oft die Ärmel zu eng. Bei Größe XXL und XXXL reichen 21 cm überhaupt nicht, da sind 24 cm angebracht sonst sind sie zu eng.
18.07.2017 - 20:40DROPS Design answered:
Liebe Monika, wenn Sie Hilfe mit einer Anleitung brauchen (auch von oben nach unten), schreiben Sie gerne Ihre Frage hier, so können wir Ihnen weiter helfen. Am Ende jedes Modell finden Sie eine Maßskizze mit allen Maßen in jeder Größe, so können Sie auch nach Ihren eigenen Geschmack anpassen. Viel Spaß beim stricken!
19.07.2017 - 09:03
![]() Monika wrote:
Monika wrote:
Meine Frage kann gelöscht werden, ich weiß jetzt wie das gemeint ist.
16.07.2017 - 19:01
![]() Monika wrote:
Monika wrote:
Hallo, in der Anleitung steht das man "in jeder li.-Partie 1 M. abn. " soll. Was bedeutet das? Soll man da nur in der Rückreihe abnehmen oder wie ist das gemeint? Das ist das einzige was ich nicht verstehe an der Anleitung.
14.07.2017 - 18:42DROPS Design answered:
Liebe Monika, Sie nehmen bei einer Hinreihe ab, und in jede Stelle wo Sie linke Maschen stricken, werden Sie 2 M li zs stricken (von der Vorderseite gesehen), dh 18 M werden insgesamt abgenommen. Viel Spaß beim stricken!
17.07.2017 - 08:02
![]() Charmain wrote:
Charmain wrote:
That didnt really help at all, Ive already started to knit the sweater so I know what size im making, what I wanted to know was where to take the measurements while im knitting. While hanging do I measure the front band or from the middle back so I know when to do my button holes and decreases. The diagram doesnt account for the different sizing of the stitches. The garter stitch is shorter than the lace pattern and stockinette stitch.
15.09.2015 - 17:52DROPS Design answered:
Dear Charmain, sorry for misunderstanding. Measurements have to be done along mid back so that jacket will not be longer when worn. Happy knitting!
16.09.2015 - 10:01
![]() Charmain wrote:
Charmain wrote:
Where do you take your measurements, from the front band or the middle back?
15.09.2015 - 04:24DROPS Design answered:
Dear Charmain, please click here to read more about measurements chart. Happy knitting!
15.09.2015 - 09:59
![]() Charmain wrote:
Charmain wrote:
I was wondering if you repeat the pattern p4,k2,p4 on the WS as well as the RS. The pic looks like you do stockinette stitch instead (k4,p2,k4) on the WS. Love the look of the sweater so far (about 3.5in).
26.08.2015 - 20:26DROPS Design answered:
Dear Mrs Charmain, when you work P4, K2, P4 from RS you work K4, P2, K4 from RS, ie work K over K and P over P. Happy knitting!
27.08.2015 - 09:31
![]() Sara wrote:
Sara wrote:
Skjønte ikke helt dette med halsfellingen. Når jeg strikker fra høyre, skal jeg strikke stolpemaskene, 2vr, 2r, 1vr og deretter felle? Da blir det maskene fra hullmønsteret som forsvinner. På bildet ser det ut som at det er partiet ved siden av stolpen som blir smalere.
21.05.2013 - 13:20DROPS Design answered:
Det er rigtigt hvad du siger. Partiet med hullmönstret bliver smallere. Du feller ikke i stolpen/kragen men i M.1 delen efter vrpartiet (2 vr + 1 r + 2 vr)og stolpen.
23.05.2013 - 15:09
![]() Sara wrote:
Sara wrote:
Skjønte ikke helt dette med halsfellingen. Skal jeg strikke stolpemaskene, 2vr, 2r, 1vr og deretter felle? Da blir det maskene fra hullmønsteret som forsvinner. På bildet ser det ut som at det er partiet ved siden av stolpen som blir smalere.
21.05.2013 - 13:07
![]() Elise wrote:
Elise wrote:
Den er fin!!!
06.02.2008 - 16:02
|
|||||||
DROPS 107-10 |
|||||||
|
|
|||||||
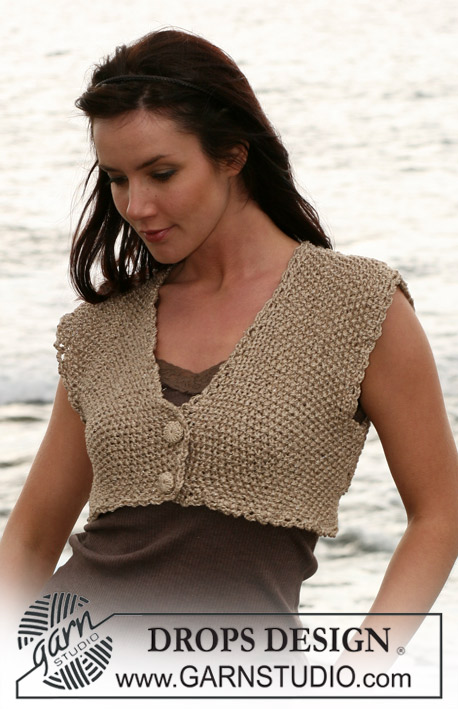
DROPS jacket in lace pattern in “Cotton Viscose” and “Safran”. Size S – XXXL
DROPS 107-10 |
|||||||
|
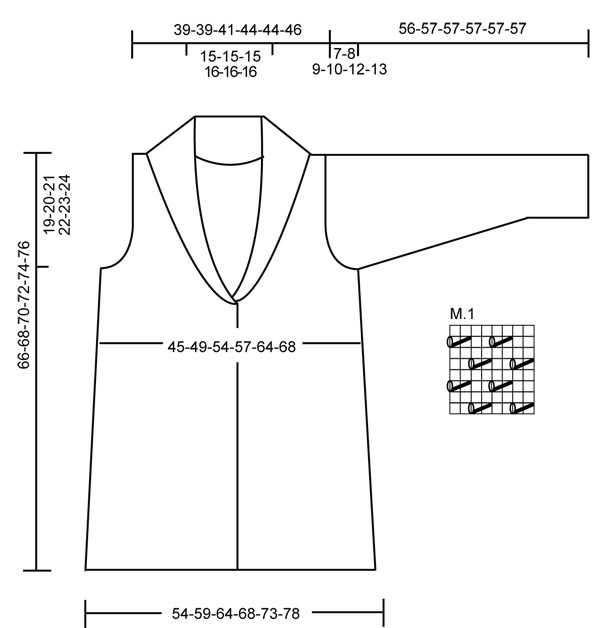
Measuring tip: Because of the weight of the yarn, all measurements should be made whilst the garment is hanging, otherwise it will be too long when worn. Garter st, back and forth on needle: K all rows. Pattern: See M.1. The diagram is seen from the RS. Decreasing tip-1 (applies to neckline): Make all dec from RS! Dec as follows before/after front band + 2-2-2-3-3-3 P sts, K2, and 1-1-1-2-2-2 P sts: P3 tog. Decreasing tip-2 (applies to armhole): Make all dec from RS! Dec as follows before/after 1-1-1-2-2-2 sts: P3 tog. Buttonholes: Make buttonholes on right front band. 1 buttonhole = cast off 3rd and 4th st from mid front, cast on 2 new sts on return row. Make buttonholes when piece measures: Size S: 26 and 34 cm. Size M: 28 and 36 cm. Size L: 29 and 37 cm. Size XL: 31 and 39 cm. Size XXL: 32 and 40 cm. Size XXXL: 34 and 42 cm. Front and back piece: Worked back and forth on circular needle from mid front. Loosely cast on 206-222-238-256-272-288 sts on needle size 5 mm with 1 thread of each quality. Insert a marker after 57-61-65-70-74-78 sts from each side (back piece = 92-100-108-116-124-132 sts). Work 8 rows garter st – see explanation above – and continue as follows from the RS: 8 garter sts (= front band), *P 4-4-4-5-5-5, K 2, P 4-4-4-5-5-5, M.1 on the next 12-14-16-16-18-20 sts*, repeat from *-* a total of 3 times, ), *P 4-4-4-5-5-5, K 2, P 4-4-4-5-5-5, M.1 on the next 14-16-18-18-20-22 sts*, repeat from *-* a total of 2 times, *P 4-4-4-5-5-5, K 2, P 4-4-4-5-5-5, M.1 on the next 12-14-16-16-18-20 sts*, repeat from *-* a total of 3 times, and finish row with P 4-4-4-5-5-5, K 2, P 4-4-4-5-5-5 and 8 garter sts (= front band). Continue in pattern like this. Remember the knitting tension! Remember buttonholes on right front band – see above. At the same time when piece measures15 cm dec 1 st in each P-section (= 18 dec per row) – see Measuring tip. Repeat this dec when piece measures 35 cm = 170-186-202-220-236-252 sts. When piece measures 36-38-39-41-42-44 cm inc 1 st for collar inside 1 front band st each side on every 1.5 cm a total of 18-18-20-20-22-22 times – work inc sts in garter st. At the same time when piece measures 41-43-44-46-47-49 cm dec to shape the neckline each side inside front band sts + 2-2-2-3-3-3 P sts, K2 and 1-1-1-2-2-2 P sts - see Decreasing tip-2: 2 sts on every 3 cm a total of 7-7-7-8-8-8 times. At the same time when piece measures 47-48-49-50-51-52 cm dec 1 st on each side of both markers at sides and now complete front and back pieces separately. Back piece: = 74-82-90-98-106-114 sts. Dec to shape the armhole inside 1-1-1-2-2-2 sts each side on every other row – see Decreasing tip-2: 2 sts 2-4-5-6-8-9 times = 66-66-70-74-74-78 sts. Continue until piece measures 64-66-68-70-72-74 cm and now cast off the middle 24-24-24-26-26-26 sts for neck. Dec 1 st on neckline on next row = 20-20-22-23-23-25 sts left on each shoulder. Cast off loosely when piece measures 66-68-70-72-74-76 cm. Left front piece: Dec for armhole as described for back piece, at the same time continue inc for collar and dec for neckline. After all dec and inc are complete there are 46-46-50-51-53-55 sts left on row. Continue until piece measures 66-68-70-72-74-76 cm and now cast off the outermost 20-20-22-23-23-25 sts for shoulder = 26-26-28-28-30-30 sts on collar. Continue on collar sts with shortened rows as follows from mid front: *work 1 row garter st on all sts, turn and work return row, work garter st on the first 13-13-14-14-15-15 sts, turn and work return row*, repeat from *-* until collar measures 7.5-7.5-7.5-8-8-8 cm (measured on the shorter side). Cast off loosely. Right front piece: Like left front piece, but mirrored. Sleeve: Cast on 46-48-50-52-54-56 sts (includes 1 edge st each side) on needle size 5 mm with 1 thread of each quality. Work 8 rows garter st. Continue as follows from the RS: 1 edge st, *P4, K2*, repeat from *-* 2 times, P4, M.1 on the next 12-14-16-18-20-22 sts, *P4, K2*, repeat from *-* 2 times and finish row with P4 and 1 edge st. When piece measures 8-8-8-8-8-10 cm inc 1 st each side on every 6-5.5-4.5-4-3.5-2.5 cm a total of 7-8-9-10-11-12 times = 60-64-68-72-76-80 sts. P inc sts from RS and K from WS. When piece measures 49-49-48-47-45-44 cm (less on the larger sizes because of longer sleeve cap and wider shoulder) cast off 3 sts each side and dec to shape the sleeve cap each side on every other row: 2 sts 3 times, 1 st 0-1-2-3-5-6 times, then 2 sts each side until piece measures 55-56-56-56-56-56 cm, dec 3 sts each side 1 time and cast off remaining sts. Sleeve measures approx 56-57-57-57-57-57 cm. Assembly: Sew shoulder seams. Set in sleeves. Sew sleeve seams inside 1 edge st. Sew tog collar mid back and sew collar to neckline. Sew on buttons. |
|||||||
Diagram explanations |
|||||||
|
|||||||
 |
|||||||
Have you finished this pattern?Tag your pictures with #dropspattern or submit them to the #dropsfan gallery. Do you need help with this pattern?You'll find 24 tutorial videos, a Comments/Questions area and more by visiting the pattern on garnstudio.com. © 1982-2026 DROPS Design A/S. We reserve all rights. This document, including all its sub-sections, has copyrights. Read more about what you can do with our patterns at the bottom of each pattern on our site. |
|||||||


With over 40 years in knitting and crochet design, DROPS Design offers one of the most extensive collections of free patterns on the internet - translated to 17 languages. As of today we count 324 catalogues and 12290 patterns translated into English (UK/cm). 12290
We work hard to bring you the best knitting and crochet have to offer, inspiration and advice as well as great quality yarns at incredible prices! Would you like to use our patterns for other than personal use? You can read what you are allowed to do in the Copyright text at the bottom of all our patterns. Happy crafting!
Post a comment to pattern DROPS 107-10
We would love to hear what you have to say about this pattern!
If you want to leave a question, please make sure you select the correct category in the form below, to speed up the answering process. Required fields are marked *.