
Popular categories
Looking for a yarn?


Comments / Questions (72)
![]() Astrid Sandgathe-Heinen wrote:
Astrid Sandgathe-Heinen wrote:
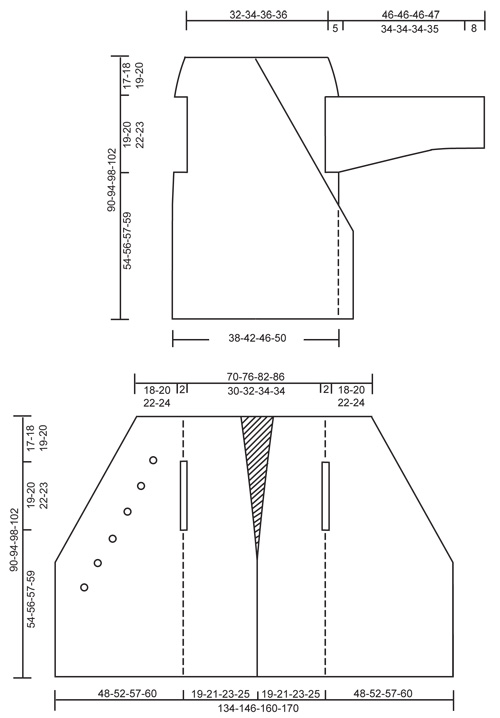
Bij het model 96-12 is een rugbreede van 38 tot maximaal 50cm (maat xxl) aangegeven. Ik heb maat M/L nodig en denk dat 42cm krapp zou zijn? Graag een inschatting Groeten, Astrid
18.03.2025 - 12:47DROPS Design answered:
Dag Astric,
Het beste kun je even vergelijken met een kledingstuk dat goed zit en daar de maat van opnemen. Vervolgens kies je de maat met de afmetingen in de tekening die het meest in de buurt komt.
18.03.2025 - 20:03
![]() Astrid Sandgathe-Heinen wrote:
Astrid Sandgathe-Heinen wrote:
Eine Frage: bei dem Model 96-12 ist die Rückenbreite mit 42 cm für die Größe M/L angegeben. Ist das nicht sehr schmal bemessen? Mit freundlichen Grüßen Astrid Sandgathe
18.03.2025 - 12:34DROPS Design answered:
Liebe Frau Sandgathe-Heinen, so wurde dieses Modell gestrickt, schauen Sie mal die untere Maßskizze: 21 cm für jedes halbes Rückenteil und 52 cm für jedes Vorderteil (unten gemessen). Viel Spaß beim Stricken!
18.03.2025 - 16:26
![]() Chiara wrote:
Chiara wrote:
Salve, non mi è chiara la lunghezza del retro del cappotto. Rimane lungo come davanti, all'altezza ginocchia o è più corto, tipo mezza coscia? Grazie
23.02.2025 - 00:12DROPS Design answered:
Buonasera Chiara, per le misure finali può fare riferimento allo schema in fondo alla pagina. Buon lavoro!
24.02.2025 - 00:21
![]() Dorota wrote:
Dorota wrote:
Mam97 cm obwodu w biuście i 112 cm obwód w biodrach. Zastanawiam się, który rozmiar wybrać by wyglądem byłby jak na modelu, nie zbyt oversize ale też nie odpięty. Myślę nad XL.? Proszę o poradę
23.01.2025 - 17:40DROPS Design answered:
Witaj Doroto, zobacz kurs DROPS TUTAJ. Pamiętaj, że w tym swetrze zawsze możesz regulować jego szerokość przez odpowiednie umiejscowienie guzików, gdyby okazał się za wąski guziki mogą być przyszyte bliżej brzegu. Powodzenia!
24.01.2025 - 11:12
![]() CeeJay wrote:
CeeJay wrote:
Hi there, Would you please confirm the bust size for XXL? My reading of it is 100cm or approximately 36.5 inches which doesn't seem correct. My bust around 127cm or 63.5 cm based on your pattern measurement methodology. Many thanks for your assistance 🙂
23.01.2024 - 18:21DROPS Design answered:
Dear CeeJay, correct, the back piece will be here 50 cm in width (piece flat) in larger size, so 100 cm around when piece is done. Happy knitting!
24.01.2024 - 08:21
![]() Susanne wrote:
Susanne wrote:
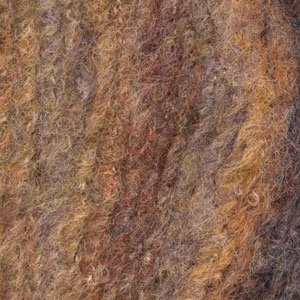
Hallo liebes Team, würde gerne die Wolle für die Strickjacke "Ummantelung" bestellen. Highlander gibt es leider nicht mehr, eine Garnalternative wär Polaris. Die empfohlene Nadelstärke ist 12. Muss die Maschenzahl dafür umgerechnet werden? Und wäre Highlander einfach oder doppelt gestrickt gewesen? Vielen Dank für die Antwort Mit Grüßen Susanne
02.04.2023 - 12:48DROPS Design answered:
Liebe Susanne, für Highlander können Sie die Garne der Garngruppe E verwenden, Polaris gehört zu Gruppe F und sollte daher nicht verwendet werden - Highlander wird in dieser Anleitung nur mit 1 Faden verstrickt. Vergleichbar mit Polaris ist Snow. Benutzen Sie am besten einfach den Garnumrechner, dann bekommen Sie angezeigt, wie viel Garn Sie benötigen. Viel Spaß beim Stricken!
06.04.2023 - 09:14
![]() Svea wrote:
Svea wrote:
Auf Seite 2 habe ich ein Verständnisproblem: "gleichzeitig nach 2 Krausrippen über alle Maschen bei jeder 3. Reihe 1 Masche aufnehmen." Was soll das "über alle Maschen" die Jacke wird doch glatt gestrickt?
26.10.2021 - 13:50DROPS Design answered:
Liebe Svea, die Anleitung wurde sprachlich überarbeitet und nun sollte es klarer sein, was gemeint ist. Wenn Sie trotzdem noch Fragen haben, melden Sie sich gerne wieder! Viel Spaß beim Stricken!
26.10.2021 - 22:56
![]() Ilaria wrote:
Ilaria wrote:
Buongiorno, ho un dubbio sul segno da inserire (mi riferisco alla taglia M/L), se il primo ferro è il dritto del lavoro e sto eseguendo il “davanti sinistro e dietro” per rimanere 17 maglie per il dietro, il segno lo devo mettere dopo 17 maglie, non dopo 21 come riportato. Grazie per il vostro preziosissimo lavoro.
30.12.2020 - 16:18DROPS Design answered:
Buongiorno Ilaria, la disposizione del segnapunti è corretta, il modello non è simmetrico. Buon lavoro!
30.12.2020 - 16:25
![]() Aliye Ferda Kunt wrote:
Aliye Ferda Kunt wrote:
Up side of the 2. Schema represents skirt of this model. 🙄
14.10.2020 - 10:24
![]() Christiane wrote:
Christiane wrote:
Je ne comprends pas l'échantillon vis-à-vis du schéma. L'échantillon est de 12 m pour 10 cm. Or le bas du vêtement fini doit mesurer 134 cm en taille S alors qu'il y a 67 m pour une moitié du vêtement, ce qui donne 66x2 = 132 m (2 mailles lisière) donc 132:12 =11 soit 110 cm et non 134 cm. Une différence de 24 cm, c'est quand même beaucoup.
18.03.2020 - 19:07DROPS Design answered:
Bonjour Christiane, la construction de la veste n'est pas "linéaire" dans le sens où on ne la tricote pas de bas en haut directement, on va faire des augmentations qui va donner un tricot légèrement de biais et non droit, ainsi, si votre échantillon est juste et que vous conservez bien la même tension, vous obtiendrez les mesures indiquées dans le schéma. Les mesures sont prises ouvrage terminé et posé à plat, pas dans le sens du tricot. Bon tricot!
19.03.2020 - 09:38
|
|
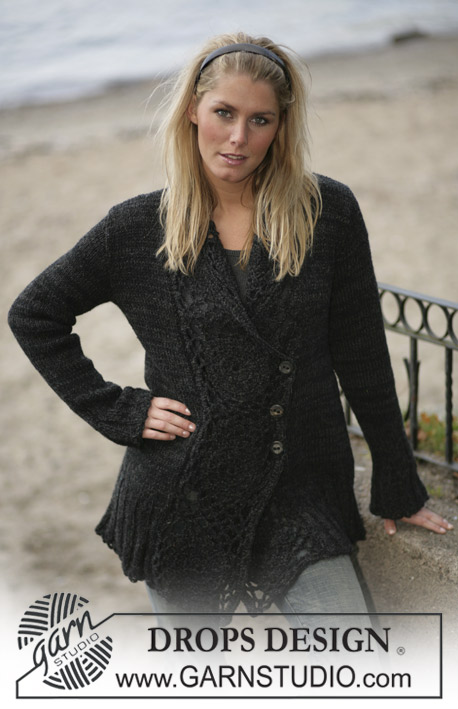
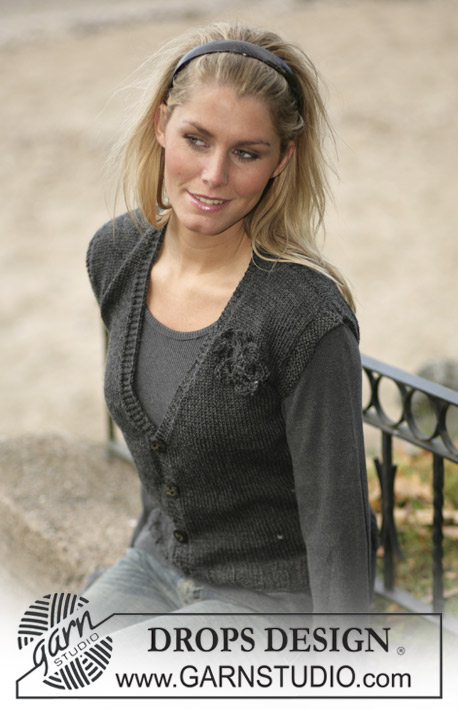
Grey Moon Jacket#greymoonjacket |
|
|
|
|
DROPS Long jacket with ¾ sleeves
DROPS 96-12 |
|
|
Knitting tension: 12 sts x 17 rows on needle size 8mm in stocking stitch = 10 x 10 cm Garter sts (back and forth on needle): knit all rows. Increasing tips: Inc inside 1 edge st on front piece and inside 2 edge sts on back piece. Inc by making a yo and knit into back of yo on the returning row (to avoid making a hole). Knit inc sts in stocking sts. Measurements tips: Because of the weight of the yarn, make all measurements whilst the pieces are hanging. Left front + back piece: Because of the number of sts the jacket is knitted back and forth on circular needles. The jacket is knitted from top down. Loosely cast on 35-38-41-43 sts on needle size 8 mm with Highlander and knit 4 rows garter sts (1st row = RS). At the same time insert a marking thread after the first 19-21-23-25 sts on left front (= 16-17-18-18 sts left on row towards back piece) - let the marking thread follow the piece as you progress. Read all of the following section before continuing! Continue in stocking sts, but with the 1st st on the right side of piece (= mid front) and the first 2 sts on the left side of piece (= mid back) in garter sts. Inc for sloping front: At the same time after the 4 rows in garter sts inc towards mid front on every 3rd row a total of 29-31-34-35 times – see Increasing tips. Inc mid back: At the same time when piece measures 17-13-11-8 cm – see Measurement tips – inc 1 st mid back on every 17-13-11-8 cm a total of 3-4-5-7 times – see Increasing tips. Armhole: At the same time when piece measures 17-18-19-20 cm cast off 1 st on both sides of the marking thread and continue knitting each piece separately – continue inc. as described above. When front piece and back piece measures 36-38-41-43 cm put all sts back on the same needle and cast on 2 new sts over the 2 sts cast off for armhole. Continue with inc as before. After all inc are complete = 67-73-80-85 sts on needle. When piece measures approx 89-93-97-101 cm (or desired length) – see Measurement tips – knit 1 row from the WS and cast off. Right front + back piece: Cast on and knit as left front + back piece, but mirrored. Sleeve: Knitted back and forth on circular needle. Cast on 28-30-32-34 sts (incl 1 edge st each side) on needle size 8 mm with Highlander. Knit 4 rows garter sts and continue in stocking sts. When sleeve measures 8 cm inc 1 st each side on every 6-6-5-5 cm a total of 6-6-7-7 times = 40-42-46-48 sts. When sleeve measures 43-43-43-44 cm dec for sleeve cap on every other row: 3 sts 2 times. Cast off remaining sts when sleeve measures approx 46-46-46-47 cm. Assembly: Sew left and right back pieces tog mid back – sew in the outer loop of the outermost st ( = 4 garter sts mid back). Sew sleeve seams inside 1 edge st and sew in sleeves. Crochet border: Crochet a border along the whole opening of the jacket and round the sleeve edges with crochet hook size 7 and Highlander as follows: 1 dc in first st, *2 ch, skip approx 2 - 2.5 cm, 1 dc in next st*, repeat from *-* and finish with 2 ch and 1 sl st in first dc from beginning of round – make sure the border is even and neither wavy nor too tight. Buttons: Sew on buttons on left front piece. Place the top button in line with the upper edge of the armhole approx 9-10-11-12 cm from the armhole towards mid front. Place the remaining buttons parallel with the sloping front edge – see measurement chart. There should be approx 7 to 10 cm between each button. Use the ch-loops in the crochet border as buttonholes. Crochet a buttonhole loop (approx 5-6 ch) and place this on the inside of the right front piece and sew on a button at the top of the left front edge to keep the jacket in place – try on the jacket for placing of the buttonhole loop and button. |
|
 |
|
Have you finished this pattern?Tag your pictures with #dropspattern #greymoonjacket or submit them to the #dropsfan gallery. Do you need help with this pattern?You'll find 22 tutorial videos, a Comments/Questions area and more by visiting the pattern on garnstudio.com. © 1982-2026 DROPS Design A/S. We reserve all rights. This document, including all its sub-sections, has copyrights. Read more about what you can do with our patterns at the bottom of each pattern on our site. |


With over 40 years in knitting and crochet design, DROPS Design offers one of the most extensive collections of free patterns on the internet - translated to 17 languages. As of today we count 324 catalogues and 12290 patterns translated into English (UK/cm). 12290
We work hard to bring you the best knitting and crochet have to offer, inspiration and advice as well as great quality yarns at incredible prices! Would you like to use our patterns for other than personal use? You can read what you are allowed to do in the Copyright text at the bottom of all our patterns. Happy crafting!
Post a comment to pattern DROPS 96-12
We would love to hear what you have to say about this pattern!
If you want to leave a question, please make sure you select the correct category in the form below, to speed up the answering process. Required fields are marked *.