
Popular categories
Looking for a yarn?


Comments / Questions (11)
![]() Dagmar wrote:
Dagmar wrote:
Ich möchte die Jacke mit einer dünneren Wolle stricken und habe aufgrund der Maschenprobe errechnet, dass ich dann die Maschenzahlen der Größe XL machen müsste um ein S zu bekommen. Ist das einfach so umzusetzen oder muss ich dabei noch was beachten?
18.10.2018 - 06:32DROPS Design answered:
Liebe Dagmar, leider können wir nicht jede Anleitung nach jeder Anfrage anpassen, nehmen Sie bitte Kontakt mit dem Laden auf, wo Sie Ihre Wolle gekauft haben. Viel Spaß beim stricken!
18.10.2018 - 09:41
![]() Gloria Sanders wrote:
Gloria Sanders wrote:
I would like to make this jacket,but not with triple the yarn. What yarn is suitable as a single strand for this sweater? Would it be a worsted weight or dk weight? So many patterns call for 2 and 3 strands of yarns and I prefer only working with one strand. It would be nice to also print out the yarn option for using one yarn variety also,for all of those patterns. It also becomes too costly! Thank you for taking the time to answer this question. It is very much appreciated!
30.08.2015 - 00:34DROPS Design answered:
Dear Mrs Sanders, please click here for alternatives between groups, and remember your DROPS store will always help you with tips & advices, you can contact either per mail or telephone. Happy knitting!
31.08.2015 - 10:59
![]() Barbara wrote:
Barbara wrote:
Hallo, na welke steek moet ik meerderen bij het rechtervoorpand? Het meerderen start direct in de 2e nld maar als ik na de eerste steek meerder begint het werk lelijk te trekken ( ben nu op ca. 6 cm hoogte). Graag uw advies..dank!
17.06.2015 - 22:02DROPS Design answered:
Hoi Barbara. Je kan meerderen zoals je het zelf het mooiste vindt. Je kan bijvoorbeeld meerderen met een omslag tussen de 1e en 2e st middenvoor en deze verdraait breien in de volgende nld - of je kan de meerdering doen door nieuwe st op te zetten langs het middenvoor.
18.06.2015 - 15:26
![]() Josefine wrote:
Josefine wrote:
Liebes DROPS-Team, die Jacke ist sehr schön geworden. Nur die Häkellange bereitet mir Probleme. Sie wellt sich tatsächlich sehr (so wie die Strickstücke vorher auch bereits schon). Wie kann ich das verhindern?
09.01.2015 - 14:53DROPS Design answered:
Sie können die Jacke anfeuchten und auf einer geeigneten Unterlage mit Stecknadeln feststecken und trocknen lassen, dann sollte sich das Einrollen geben. Wenn sich der Häkelrand nach oben und unten wellt, haben Sie ihn vielleicht zu dicht gehäkelt, d.h. dann müssten Sie ggf ab und zu eine M mehr überspringen, oder, falls er sich sehr wellt, eine kleinere Nadel verwenden.
11.01.2015 - 16:05
![]() Dagmar wrote:
Dagmar wrote:
Hallo,in der Anleitung für das rechte Vorderteil steht :"danach alle 4.Ndl"...und für den Kragen steht auch "alle 4.Ndl"..sind dort die Reihen gemeint ?Nicht die Nadeln ?Müßte die Abkürzung Ndl. eigentlich R für Reihe heißen ?Viele Grüße,vennlige hilser fra tyskland
27.01.2013 - 21:50DROPS Design answered:
Liebe Dagmar, das stimmt genau, es müsste R (Reihe) heissen. Leider sind unsere älteren Anleitungen noch so übersetzt.
29.01.2013 - 08:16
![]() Heidi wrote:
Heidi wrote:
Hva skal man gjøre med kragen? Den skal jo bare felles av på en tråd, men så ser jeg ikke hva man skal gjøre ved montering? Noen som skal hjelpe her
03.12.2012 - 22:03DROPS Design answered:
Du syr m fra kragen sammen. Se under montering: "sy kragen sammen midt bak med maskesting og sy kragen fast til bakstk med sømmen ut mot retten."
04.12.2012 - 15:04
![]() Susanne wrote:
Susanne wrote:
Vilken härlig kofta! Den skulle kunna bli en sommarfavorit.
19.02.2006 - 09:37
![]() annemarie wrote:
annemarie wrote:
Jeg elsker at hækle! Denne smukke jakke må jeg lave!
05.01.2006 - 12:52tulla wrote:
Denne var fin!Den kan jeg tenke meg å strikke.
04.01.2006 - 15:02
![]() Anne Engen wrote:
Anne Engen wrote:
Kjempefin fassong, og utrolig fin farge!! Denne skal jeg strikke!
03.01.2006 - 23:04
|
|
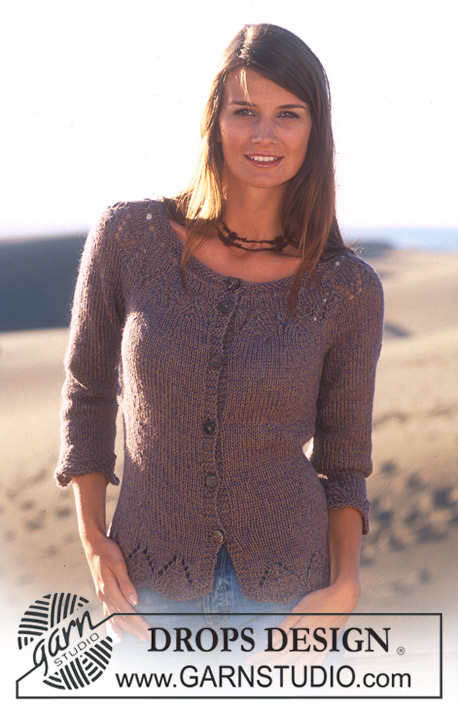
DROPS 95-5 |
|
|
|
|
DROPS Jacket in 3 threads Alpaca and Belt in Paris and Cotton Viscose
DROPS 95-5 |
|
|
Knitting tension: 13 sts x 16 rows with 3 threads Alpaca in stocking stitch on needle size 7mm = 10 x 10 cm Decreasing tips (applies to armhole): Decrease within 4 sts from the right side. Dec as follows after 4 sts: slip 1 st as if to knit, K1, psso. Dec as follows before 4 sts: K2 tog. Back piece: Cast on 52-58-64-70-79 sts (inclusive of 1 edge st each side, edge sts are knitted in garter st throughout) on needle size 7 with 1 thread of each colour (= 3 threads). Knit stocking sts. When piece measures 12 cm inc 1 st each side on every 9 cm a total of 3 times = 58-64-70-76-84 sts. When piece measures 37-38-39-40-41 cm cast off 3-4-5-6-7 sts each side for armhole, and dec 1 st each side – see Decreasing tips above – on every 4th row a total of 3-4-5-6-8 times = 46-48-50-52-54 sts. When piece measures 54-56-58-60-62 cm cast off the middle 16-16-16-18-18 sts for neck = 15-16-17-17-18 sts left on each shoulder. Cast off when piece measures 56-58-60-62-64 cm. Right Front: Cast on 6-9-12-15-19 sts (inclusive of 1 edge st at side) with 1 thread of each colour. Read all of the following section before continuing: Continue in stocking st and inc towards mid front on every other row as follows: 4 sts 1 time, 3 sts 1 time, 2 sts 3 times and 1 st 7 times. Now inc on every 4th row: 1 st 3 times. At the same time when piece measures 10 cm inc at side as described for back piece. After all inc have been made there are 32-35-38-41-45 sts on row and piece measures approx 30 cm. Collar: When piece measures 35 cm inc 1 st for collar mid front on every 4th row a total of 4 times. Armhole: At the same time when piece measures 37-38-39-40-41 cm dec for armhole as described for back piece. After all decreases and increases have been made for armhole and collar there are 30-31-32-33-34 sts on needle. When piece measures 56-58-60-62-64 cm cast off 15-16-17-17-18 sts towards side for shoulder = 15-15-15-16-16 sts left for collar. Continue over these sts as follows: *4 rows over all sts, 2 rows over only the 10 sts towards mid front*, repeat from *-* until collar measures 6-6-6-7-7 cm. Put sts on thread. Left front piece: As right front piece, but mirrored. Sleeve: Cast 30-32-34-36-38 sts (inclusive of 1 seam st each side) on needle size 7 with 1 thread in each colour (= 3 threads). Knit 3 rows stocking sts, knit 1 row from wrong side and continue in stocking sts. When sleeve measures 10 cm, inc 1 st each side on every 5-4-4-3.5-3 cm a total of 8-9-9-10-11 times = 46-50-52-56-60 sts. When piece measures 48-47-46-44-43 cm cast off for sleeve cap each side on every other row as follows: 3 sts 1 time, 2 sts 2 times, 1 st 0-1-2-3-4 times, and then 2 sts each side until piece measures 54 cm, now dec 3 sts each side and cast off remaining sts when sleeve measures approx 56 cm. Assembly: Sew shoulder seams. Sew collar together mid back by joining sts from threads and sew collar to back piece. Crochet border round the opening: Start mid back. Using crochet hook size 7 and Snow crochet as follows: 1 dc in first st, *3 ch, 1 tr in first ch, skip 2 sts, 1 dc in next st*, repeat from *-* round the whole jacket and finish with 1 sl st in first st from beginning of round. Crochet a similar border round sleeve edges. NB! The border should be even and not wavy. Sew sleeve and side seams within 1 edge st. Set in sleeves. Sew on buttons – the top one should be 1 cm below the start of increases for collar and the 2nd one 8-10 cm below the 1st. Use crochet border as buttonholes. BELT: Measurements: approx 8 x 90 cm Materials: Paris 100g colour no 44, brown and use Cotton Viscose 50 g colour no 23, brown Drops crochet hook size 6 mm Drops wooden button, no. 536, 2 pcs BELT: Crochet 4 ch using crochet hook size 6 with 1 thread of Paris and 1 thread of Cotton Viscose and form a ring with a sl st. 1st row: 4 ch (equals 1 tr + 1 ch), 1 tr in ring, *1 tr, 1 ch and 1 tr (= 1 tr-group) in ring*, repeat from *-* one more time, turn the piece 2nd row: 3 ch (equals 1 tr), 1 tr - 1 ch and 1 tr (= 1 tr-group) in ch in first tr-group, *1 tr - 1 ch and 1 tr (= 1 tr-group) in next tr-group*, repeat from *-* one more time and finish with 1 tr in 3rd ch from beginning of previous row, turn the piece. Insert a marking thread and measure piece from this point from now on! 3rd row: 4 ch (equals 1 tr + 1 ch), 1 tr - 1 ch and 1 tr in ch in first tr-group, *1 tr - 1 ch and 1 tr in ch in next tr-group*, repeat from *-* one more time and finish with 1 t - 1 ch and 1 tr in 3rd ch from beginning of previous row = 4 tr-groups + 1 tr, turn the piece. 4th row: 4 ch, 1 tr - 1 ch and 1 tr in ch in first tr-group, *1 tr - 1 ch and 1 tr in ch in next tr-group*, repeat from *-* two more times, turn the piece. Repeat 4th row until piece measures approx 90 cm, or desired length. Now crochet as follows: 1st row 3 ch, *1 tr in ch in first tr-group, but don’t make last yo and pull through (= 2 sts on hook), crochet 1 tr in gap before next tr-group, and now pull yarn through all 3 sts on hook*, repeat from *-* a total of 4 times, but the 4th time, crochet tr in 3rd ch from beginning of previous row, turn the piece 2nd row: 3 ch, crochet 1 tr between the first 2 tr but don’t make last yo and pull through (= 2 sts on hook), crochet 1 tr between the next 2 tr and now pull yarn through all 3 sts on hook, 1 tr in next gap but don’t make last yo and pull through (= 2 sts on hook), 1 tr between the next 2 tr and now pull yarn through all 3 sts on hook, finish with 1 tr in 3rd ch from beginning of previous row, turn the piece 3rd row: 3 ch, 1 tr between the 2 middle tr, 1 tr in 3rd ch from beginning of previous row, turn the piece Crochet 3 ch and 1 sl st in 3rd ch from beginning of previous row. Cut the thread. Sew 2 buttons on one side of belt, try on the belt and see photo for positioning. Use gap between tr’s as buttonholes. |
|
 |
|
Have you finished this pattern?Tag your pictures with #dropspattern or submit them to the #dropsfan gallery. Do you need help with this pattern?You'll find 23 tutorial videos, a Comments/Questions area and more by visiting the pattern on garnstudio.com. © 1982-2026 DROPS Design A/S. We reserve all rights. This document, including all its sub-sections, has copyrights. Read more about what you can do with our patterns at the bottom of each pattern on our site. |


With over 40 years in knitting and crochet design, DROPS Design offers one of the most extensive collections of free patterns on the internet - translated to 17 languages. As of today we count 324 catalogues and 12290 patterns translated into English (UK/cm). 12290
We work hard to bring you the best knitting and crochet have to offer, inspiration and advice as well as great quality yarns at incredible prices! Would you like to use our patterns for other than personal use? You can read what you are allowed to do in the Copyright text at the bottom of all our patterns. Happy crafting!
Post a comment to pattern DROPS 95-5
We would love to hear what you have to say about this pattern!
If you want to leave a question, please make sure you select the correct category in the form below, to speed up the answering process. Required fields are marked *.