
Popular categories
Looking for a yarn?


Comments / Questions (60)
![]() Lisette Parent wrote:
Lisette Parent wrote:
Bonjour, j’adore votre site, je suis en train de faire le modèle Cool Solace , et je ne comprends pas tellement ,je suis à faire la grandeur M , j’ai 195 mailles et le motif M1 est en chiffres pairs disant sur 12 mailles, alors quand j’arrive sur la fin du rang ,il me reste 3 mailles ,je ne comprend pas vraiment .Est ce qu’il a quelque chose que je ne fais pas correct ou s’il a erreur sur le patron.Merci de bien vouloir me contacter..Merci
30.04.2026 - 17:25
![]() Ingrid wrote:
Ingrid wrote:
Hoe kan ik dit patroon in maat XL breien? Ik heb de buste wijdte net iets groter nodig dan L. Lengte mag kort blijven
25.04.2026 - 23:25DROPS Design answered:
Dag Ingrid,
Dit is een wat ouder patroon en helaas niet beschikbaar in maat XL.
27.04.2026 - 18:16
![]() Ledoux Nathalie wrote:
Ledoux Nathalie wrote:
Explication du diagramme rang 23 merci
25.04.2026 - 18:19DROPS Design answered:
Bonjour Mme Ledoux, en tout début de rang, tricotez la 1ère maille à l'endroit, puis, à la fin de chaque M.2 tricotez la dernière maille ensemble à l'endroit avec la 1ère maille du M.2 suivant (= c'est maintenant la dernière maille du 1er M.2) et faites 1 jeté (= la 1ère maille du M.2 suivant), continuez ainsi: tricotez toujours la dernière maille de chaque M.2 avec la 1ère du M.2 suivant; en fin de rang, terminez par 1 m end (sans le motif ajouré). Bon tricot!
27.04.2026 - 08:49
![]() Fifi Coco wrote:
Fifi Coco wrote:
J'ai 207m -2 pour les lisières ce qui fait 205÷12m du motif M1, j'ai 1 maille en trop,où dois-je la mettre?
01.03.2026 - 14:55DROPS Design answered:
Bonjour Fifi Coco, tricotez simplement l'avant-dernière maille comme la 1ère de M.1, ainsi, le motif sera symétrique. Autrement dit tricotez ainsi: 1 m lis, répétez les 12 m de M.1 jusqu'à ce qu'il reste 2 m (= 17 fois au total), tricotez la 1ère m de M.1 et 1 m lisière. Bon tricot!
02.03.2026 - 10:23
![]() Jutta wrote:
Jutta wrote:
Hallo zusammen, Müssten bei dem Modell die Rückreihen Nicht links gestrickt werden? Sonst wird ja das ganze Top kraus rechts? Vielen Dank
22.02.2026 - 19:47DROPS Design answered:
Liebe Jutta, die Angabe "re" im Diagramm ist etwas ungenau - es ist glatt rechts gemeint. D.h. die Rück-Reihen stricken Sie links. Das wird noch verbessert. Viel Spaß beim Stricken!
23.02.2026 - 09:06
![]() Ingrid wrote:
Ingrid wrote:
Jag förstår inte riktigt mönstret. Som jag ser det är det mosstickning 5-8 maskor mitt fram. På mönstret står det 1 räta och 1avig. Det ser för lite ut för en knappkant. Lite missvisande att nedanför mossbeskrivningen står det lägg upp 195 maskor och sticka M1 med en kantm i var sida. Jag får inte ihop det???
19.01.2026 - 18:47
![]() Ingrid wrote:
Ingrid wrote:
Hur vet jag vilken storlek jag behöver? Finns ingen storleksbeskrivning. Jag har kollat stockfastigheten så den stämmer. Men är osäker på medium eller large
12.01.2026 - 10:28DROPS Design answered:
Hei Ingrid. Jo, målskissen til vesten finner du nederst på siden. mvh DROPS Design
12.01.2026 - 12:01
![]() Benita wrote:
Benita wrote:
Hej! Finns de mönster på hur man gör armar till denna? Så de blir en kofta.
20.05.2025 - 11:09DROPS Design answered:
Hej Benita. Nej, denna finns dessvärre inte som kofta, men vi har flera andra mönster på koftor i DROPS Muskat, kanske du hittar en annan du gillar. Mvh DROPS Design
20.05.2025 - 12:09
![]() Liette wrote:
Liette wrote:
Bonjour, est-ce possible de voir le dos du chandail.. Merci beaucoup, Liettel
07.05.2025 - 04:07DROPS Design answered:
Bonjour Liette, nous n'avons pas de photos du dos de ce modèle, il se tricote de la même façon que les devants pour le point ajouré, mais on a une encolure plus haute pour le dos. Bon tricot!
07.05.2025 - 09:24
![]() Dorte Dencher Dyrmose wrote:
Dorte Dencher Dyrmose wrote:
Halløj Skal starte på Cool Solace. Hvordan får I mønster til at passe med maskeanatal. Jeg slår 207 masker op. Det giver rapporten 17 gange, så er der 3 masker tilbage, 2 til kantmasker. Øøøøøh hvad med den sidste maske ? Hvor kan jegse svaret ? Med venlig hilsen Dorte Dencher Dyrmose
22.04.2025 - 06:12DROPS Design answered:
Hej Dorte, du strikker 1 kantm, M.1 12m 17 gange= 204, 1.maske i M.1 (så det bliver ens på hver side af midt foran og 1 kantm.
30.04.2025 - 13:09
|
|||||||||||||
Cool Solace |
|||||||||||||
|
|
|||||||||||||
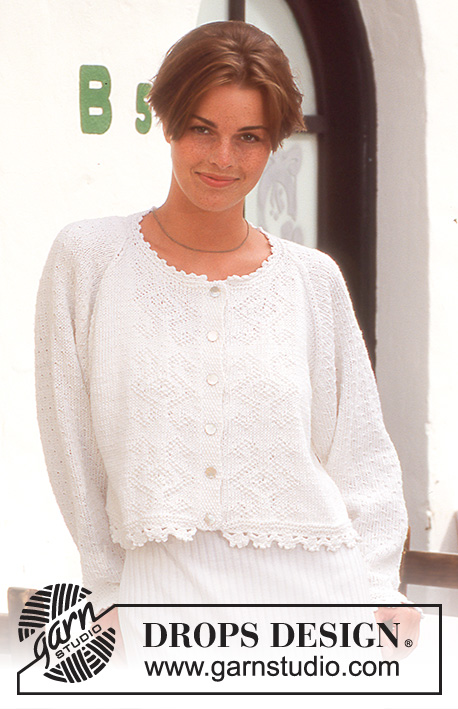
DROPS Waistcoat in Muskat with lace pattern
DROPS 46-8 |
|||||||||||||
|
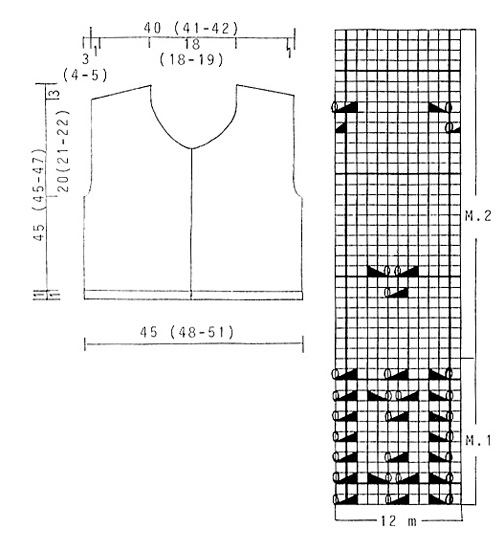
Knitting tension: 20 sts x 26 rows on needle size 4 mm and stocking sts = 10 x 10 cm. Ridge (back and forth on needle): 1 ridge = 2 rows. 1st row: K, 2nd row: K. Pattern: See diagram (1 diagram = 1 pattern repeat). The diagrams are seen from the RS. Moss stitch: 1st row: K1, P1. 2nd row: K over P and P over K. Repeat 1st and 2nd row. Body: Knit waistcoat back and forth on circular needles. Cast on 183 (195-207) sts (incl 2 edge sts) on circular needle sizes 4 mm with grey and knit 1 ridge. Then knit M.1 with 1 edge st on each side mid front. Remember knitting tension. When piece measures 19 (19-19) cm – adjust to full repeat of M.1 – knit M.2 with 1 edge st on each side mid front. At the same time when piece measures 22 (21-22) cm knit next row as follows: 44 (47-50) sts front piece, cast off 4 sts for armhole, 87 (93-99) sts back piece, cast off 4 sts for armhole, 44 (47-50) sts front piece. Complete each piece separately. Front piece: = 44 (47-50) sts. Continuing cast off for armhole on every other row within 2 edge sts which are knit in ridge until complete measurement: 2 sts 2 (2-3) times, 1 st 1 (3-3) time = 39 (40-41) sts. When piece measures 29 (29-31) cm cast off for neck on every other row: 4 (4-5) sts 1 times, 3 sts 2 times, 2 sts 1 times, 1 st 5 times and then on every 4th row: 1 st 2 times. At the same time when piece measures 42 (42-44) cm cast off for shoulders from armhole towards neckline on every other row: 5 (6-6) sts 1 time, 5 (5-5) sts 3 times. After cast off at neckline and shoulder cast off remaining sts. Piece measures approx 45 (45-47) cm. Back piece: = 87 (93-99) sts. Continuing cast of for armhole like front piece = 77 (79-81) sts. When piece measures 42 (42-44) cm cast off for shoulder from armhole at neckline on every other row: 5 (6-6) sts 1 times, 5 (5-5) sts 3 times. At the same time when piece measures 43 (43-45) cm cast off middle 33 (33-35) sts for neck and dec 2 sts on each side to shape the neckline on next row. After dec for neckline and shoulder cast off remaining sts. Piece measures approx 45 (45-47) cm. Assembly: Sew shoulder seam. Pick up approx 66-72 sts along left front piece on circular needle size 2.5 mm with grey and knit 2.5 mm moss stitch back and forth on needle, cast off. Repeat along right front piece, but after 1 cm knit 5 buttonholes evenly on row - 1 buttonhole = cast off 2 sts and cast on 2 new sts over cast off sts on next row. Pick up approx 126-130 sts round neckline on double pointed needles size 2.5 mm with grey and knit 1 ridge back and forth on needle, cast off. Now crochet an edge along bottom edge of body and around neckline with white and crochet hook size 3.5 mm as follows: 1 dc, * crochet 3 ch , 1 tr in first ch, skip 2 sts and crochet 1 dc on next st *, repeat from *-*. Continuing, crochet a row of dc (approx 95 dc) with grey and crochet hook size 3.5 mm round armhole, change to white and crochet an edge like bottom edge of body and neck. Sew in buttons. |
|||||||||||||
Diagram explanations |
|||||||||||||
|
|||||||||||||
 |
|||||||||||||
Have you finished this pattern?Tag your pictures with #dropspattern or submit them to the #dropsfan gallery. Do you need help with this pattern?You'll find 24 tutorial videos, a Comments/Questions area and more by visiting the pattern on garnstudio.com. © 1982-2026 DROPS Design A/S. We reserve all rights. This document, including all its sub-sections, has copyrights. Read more about what you can do with our patterns at the bottom of each pattern on our site. |
|||||||||||||


With over 40 years in knitting and crochet design, DROPS Design offers one of the most extensive collections of free patterns on the internet - translated to 17 languages. As of today we count 324 catalogues and 12290 patterns translated into English (UK/cm). 12290
We work hard to bring you the best knitting and crochet have to offer, inspiration and advice as well as great quality yarns at incredible prices! Would you like to use our patterns for other than personal use? You can read what you are allowed to do in the Copyright text at the bottom of all our patterns. Happy crafting!
Post a comment to pattern DROPS 46-8
We would love to hear what you have to say about this pattern!
If you want to leave a question, please make sure you select the correct category in the form below, to speed up the answering process. Required fields are marked *.