
Popular categories
Looking for a yarn?


Comments / Questions (17)
![]() Inge wrote:
Inge wrote:
Hej. I flg. opskriften skal ryg & forstykke og ærmer strikkes hver for sig., efter alle udtagninger til raglan er lavet. Er det korrekt at der skal strikkes frem og tilbage? Skal mønster A2 fortsætte for og bag, hvilket vil sige 9 masker (fra forstykke) til A2, 6 masker som er taget ud, 9 masker A2 (fra ryg), i alt 24 masker under hvert ærme? Vh Inge
12.02.2026 - 10:24DROPS Design answered:
Hei Inga. Etter deling til ryg & forstykke og ærmer, skal ryg & forstykke strikkes rundt i glatstrikk og A.2 som før, og ærmene settes på 1 tråd og strikkes senere. Det legges opp 6-6-10-10-14-14 nye masker op på pinden (= i siden midt under ærmet) x 2. mvh DROPS Design
13.02.2026 - 11:14
![]() Leigh wrote:
Leigh wrote:
Hi, i'm just starting and i've worked the neck up until the end of the A2 section, do i now work A1 again or continue on with just the A2? Thanks so much! Leigh.
17.09.2025 - 14:24DROPS Design answered:
Dear Leigh, you work the rows in A.1 once and then repeat only A.2 over the stitches in A.1. You will continue repeating A.2 up to the body section. Happy knitting!
22.09.2025 - 01:09
![]() Conny wrote:
Conny wrote:
Er det muligt at strikke denne model i Drops Muskat. Jeg tåler ikke uld (det klør) og vil derfor gerne strikke i en bomulds kvalitet. Er dog lidt bange for, at garnet er for blankt til denne model. Har i et bedre forslag til garn. Pft tak! Conny
17.09.2025 - 08:22DROPS Design answered:
Hi, DROPS Belle may be ok. Happy knitting!
17.09.2025 - 09:47
![]() Stéphanie wrote:
Stéphanie wrote:
Pour le bas du corps et des manches, quand il faut introduire les augmentations : 1/ quelle technique d’augmentation utiliser? 2/ comment les répartir ? Entre les côtes sans les positionner au milieu de 2 mailles end ou envers?(donc soit avant une paire soit après)? Merci ! ☺️
07.09.2025 - 21:41DROPS Design answered:
Bonjour Stéphanie, utilisez la calculette pour savoir comment répartir les augmentations (utilisez le nombre de mailles entre les A.1/A.2); veillez à ce que les mailles de A.2 tombent juste directement après A.1. Bon tricot!
11.09.2025 - 11:08
![]() Kristina wrote:
Kristina wrote:
Jag ska börja lägg upp maskorna för ärmarna på en tråd. De 56 maskorna som ska läggas upp, är det de maskor som är mellan raglan? När jag räknar från första maskan efter raglan till nästa raglan får jag 59, men det kan ju vara felstickat av mig.
16.08.2025 - 17:38DROPS Design answered:
Hej Kristina. Jag förstår inte helt var du är, du sätter 62-66-70-78-78-82 maskor (beroende på vilken storlek du gör) på en tråd till ärm, och lägger upp 6-6-10-10-14-14 (beroende på storlek) nya maskor på varvet (= i sidan mitt under ärmen). Mvh DROPS Design
28.08.2025 - 14:15
![]() Tina östin wrote:
Tina östin wrote:
Någon tröja jag stickat var det beskrivning på förhöjning nacke och nu hittar jag inte den beskrivningen. Jag behöver längre ryggdel generellt. Tacksam för hjälp. MVH TÖ
08.07.2025 - 09:02DROPS Design answered:
Hej Tina. Här är ett exempel på en tröja med förhöjning i nacken; mönster 205-18. Mvh DROPS Design
08.07.2025 - 10:43
![]() Frau Butsch wrote:
Frau Butsch wrote:
Hallo liebes Drops Team, ich bin jetzt am Teilen der Arbeit für Ärmel, Vorder- und Rückenteil. Was ich nicht verstehe sind die Maschen, die ich nach dem Arm zunehmen soll. Wie muß ich danach weiter stricken? Sind die zugenommen Maschen für den Arm gedacht oder gehören die zwischen die A2-Maschen im Rumpf? Vielen Dank Für die Info. S. Butsch
01.04.2025 - 11:25DROPS Design answered:
Liebe Frau Butsch, bei der Aufteilung gehören die Maschen A.2 zum Rumfpteil, die neuen Maschen dazwischen werden glattrechts gestrickt. Kann Ihnen diese Lektion helfen? Wir zeigen die Aufteilung ab Bild 9 - dann ab Bild 18 wie man die Ärmel strickt. Viel Spaß beim Stricken!
01.04.2025 - 13:41
![]() Isabelle wrote:
Isabelle wrote:
Bonjour, je suis arrivée a la division des manches, je dois monter 6 nouvelles mailles pour les manches. Il faut monter 6 mailles au niveau du devant à droite et 6 au niveau du dos à gauche, ça ne va pas déséquilibrer le pull? Il ne faudrait pas faire toutes les nouvelles mailles sur le devant ou toutes sur le dos? Merci
08.01.2025 - 08:11DROPS Design answered:
Bonjour Isabelle, ces 6 mailles vont remplacer les mailles des manches et vont se trouver ensuite sur les côtés du pull - retrouvez cette étape dans cette leçon, à partir de la photo 9). Bon tricot!
08.01.2025 - 15:56
![]() Audrey De Roquefeuil wrote:
Audrey De Roquefeuil wrote:
Bonjour, pour le col : - tricoter 20 mailles en côtes - on finit donc avec 2 mailles envers - 2 mailles endroits - 16 mailles en côtes --> il faut commencer endroit ou envers ? car si endroit, ça fait 4 mailles endroit côte à côte - puis on refait la même chose sauf que 20+2+16+2+20+2+16+2=78 mailles au lieu de 116 --> pouvez vous m'expliquer ? Que signifie tricoter A2 au dessus de A1 ? Comment lire le diagramme ? Merci d'avance!
07.01.2025 - 10:56
![]() Eleni wrote:
Eleni wrote:
Liebes DROPS Design Team, Ich stricke diesen Pullover in Größe M. Habe die 6 und 16 Reihen Passe gestrickt und habe jetzt jeweils 98 Maschen vorne und hinten, 62 Maschen an den Schultern und 4x9 Maschen für das A2. In der Summe 356 Maschen, wie es in der Anleitung steht. Nun soll ich aber 66 Maschen für die Ärmel stilllegen ich habe aber 62. Außerdem soll der Rumpfteil mit 112 Maschen weitergeschickt werden und bei mir wären es (9+98+9=)116 Maschen. Wo ist mein Fehler?
21.11.2024 - 10:48DROPS Design answered:
Liebe Eleni, bei der Verteilung gehörten der Maschen von A.2 zum Vorder und Rückenteil, und nicht zu den Ärmeln, so hatten Sie am Anfang 22 M für die Ärmel + (6x2) + (16x2)= 66 Maschen für jeden Ärmel - beim Rumpf hatten Sie 18 M + (6x2) + (32x2) (insgesamt 38 Mal) = 94+ (2x9M A.2) = 112 Maschen. Viel Spaß beim Stricken!
21.11.2024 - 15:48
|
|||||||||||||
Under the Oak#undertheoaksweater |
|||||||||||||
 |
 |
||||||||||||
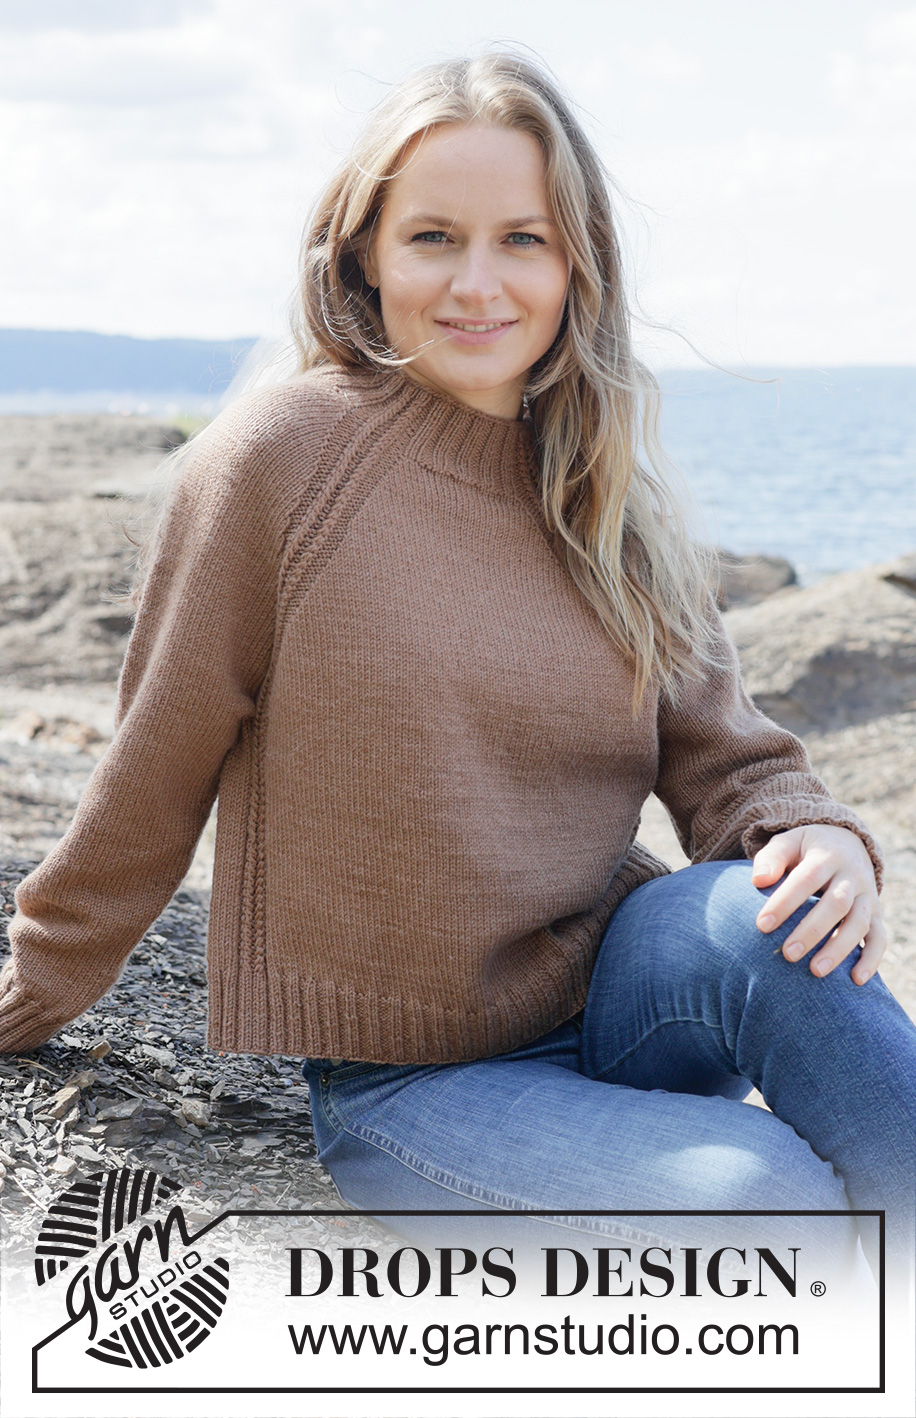
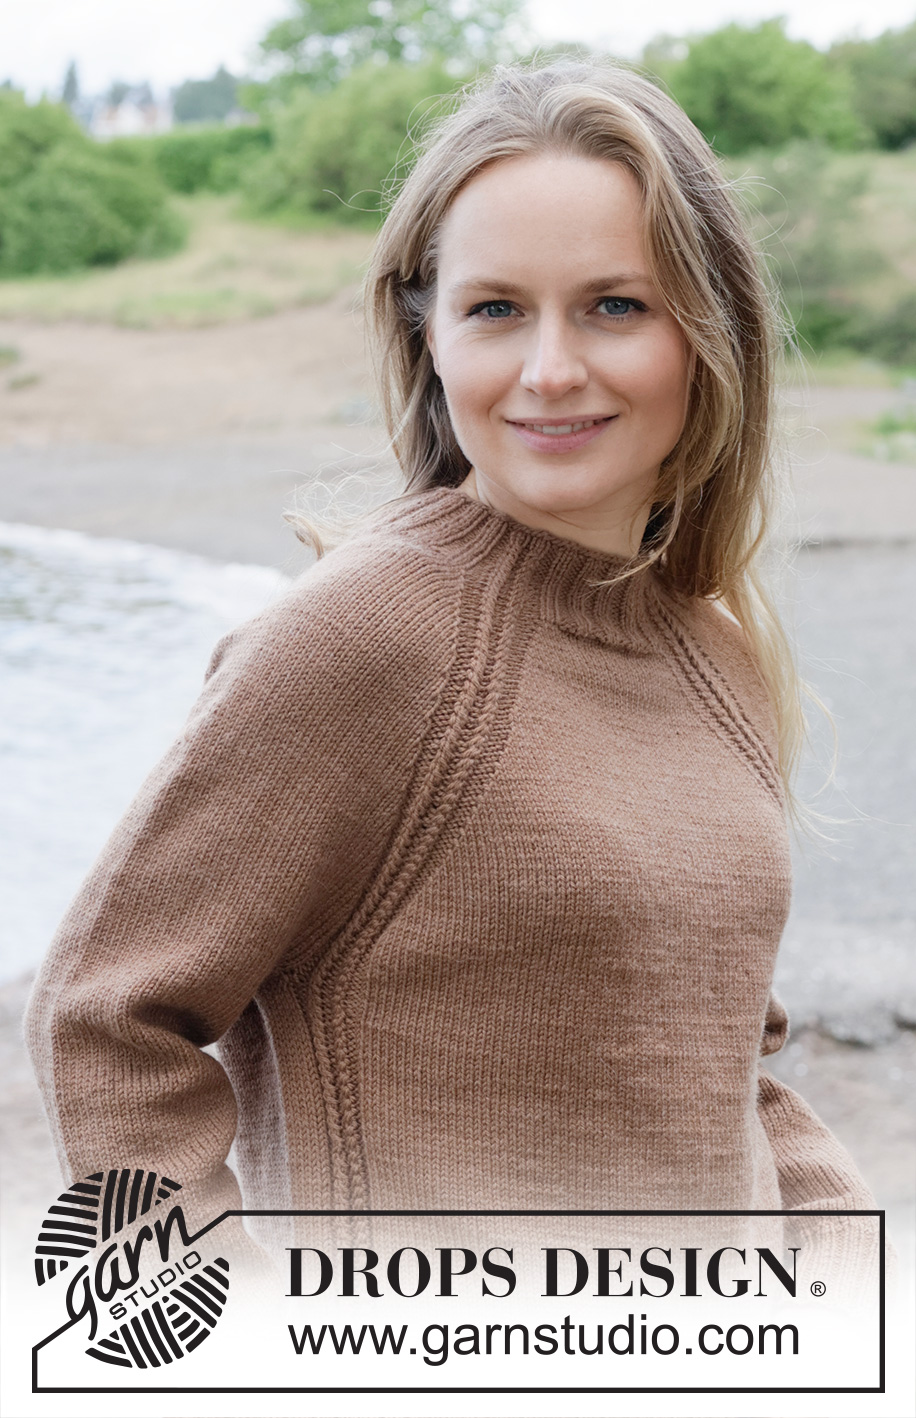
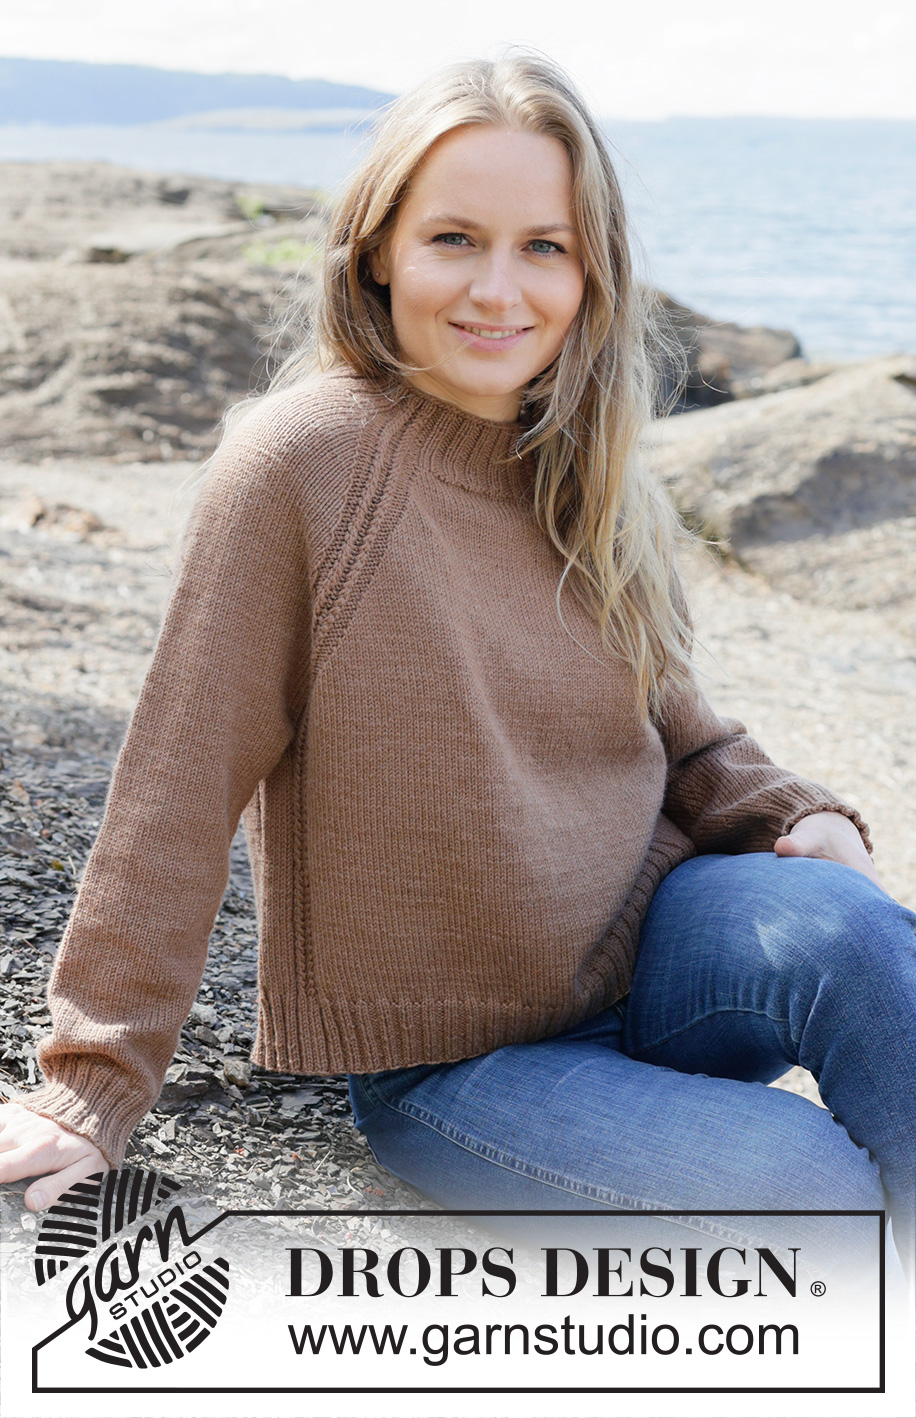
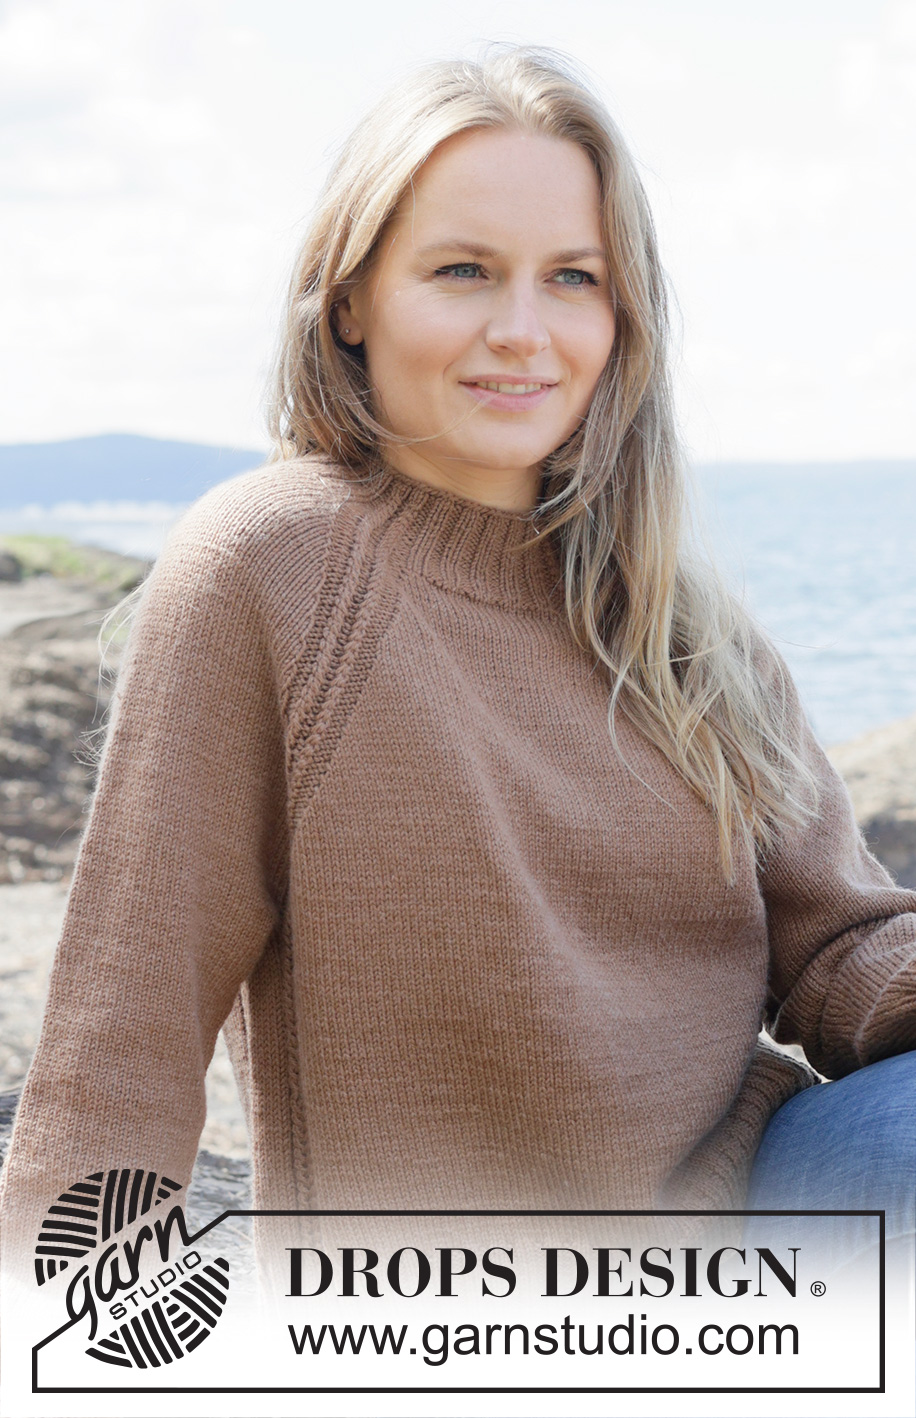
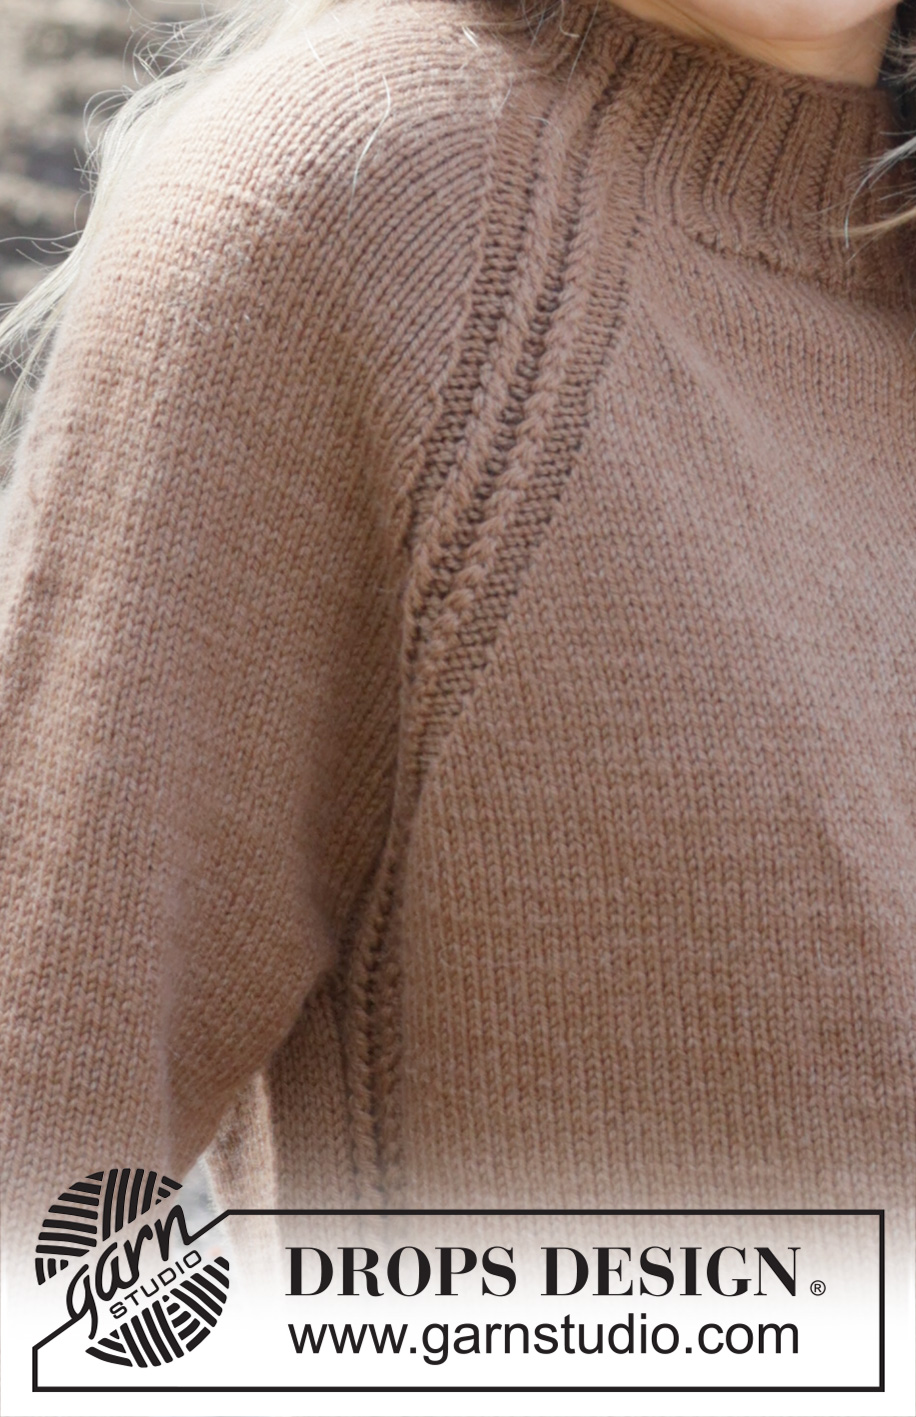
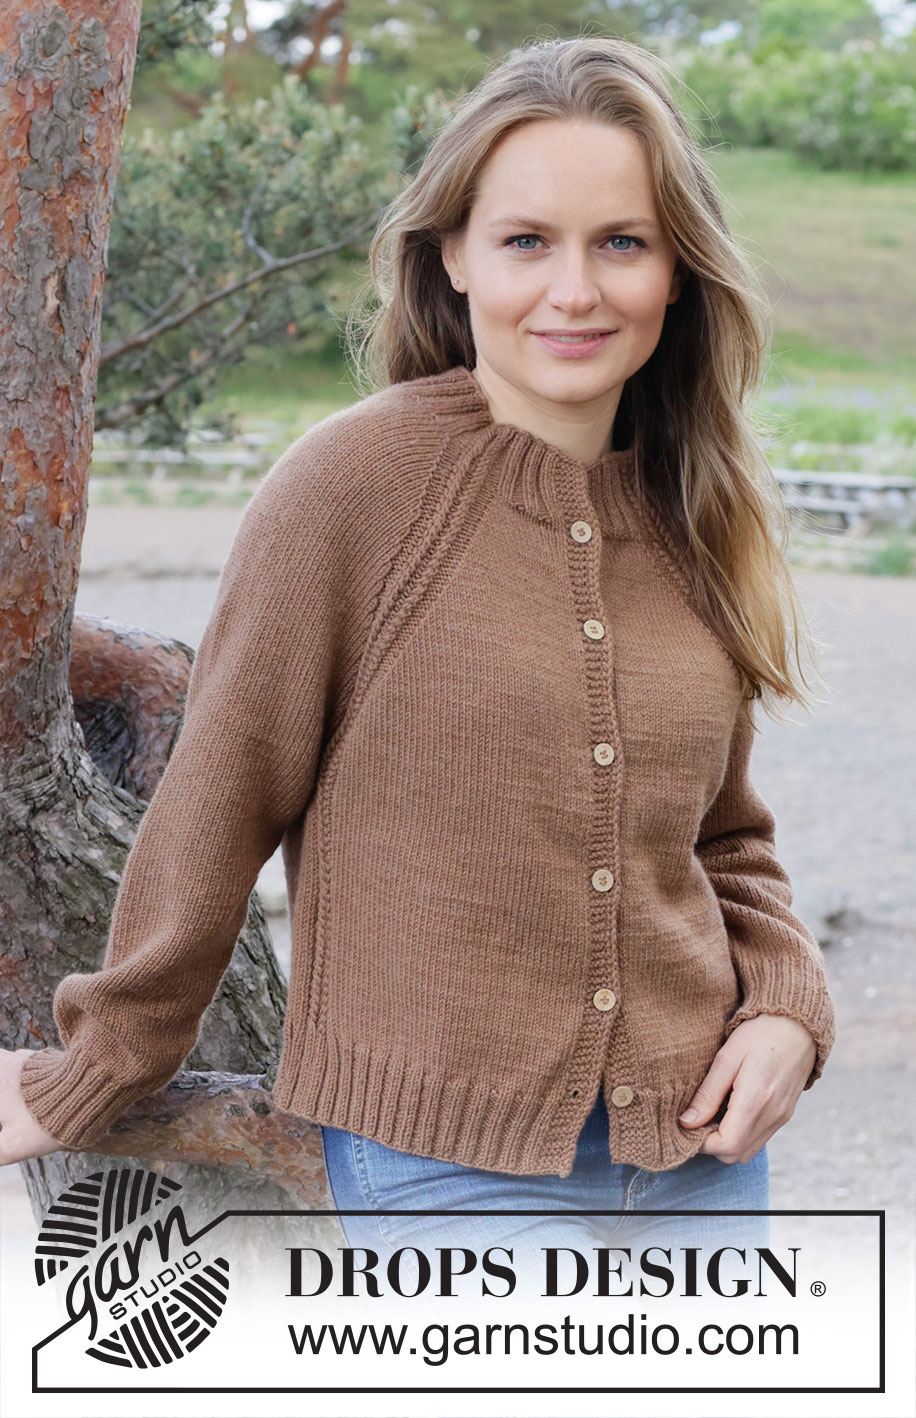
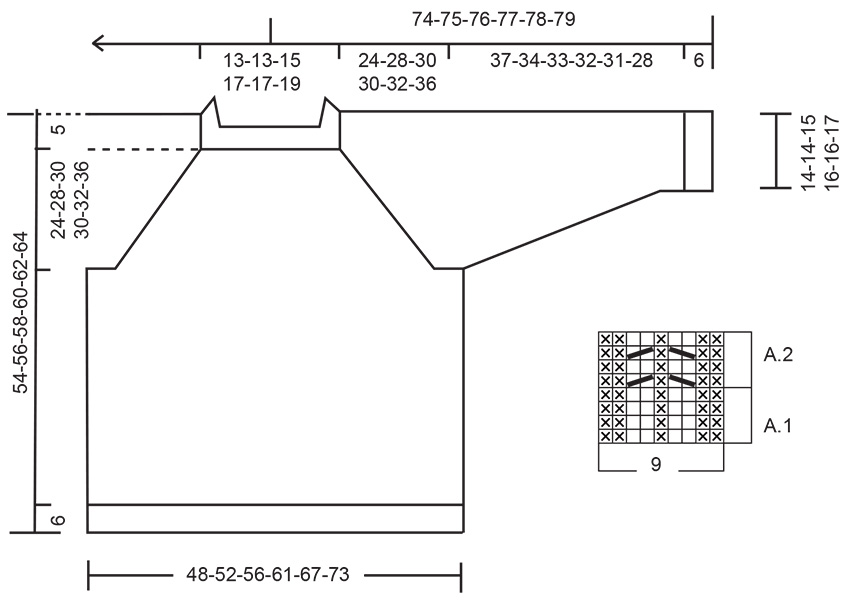
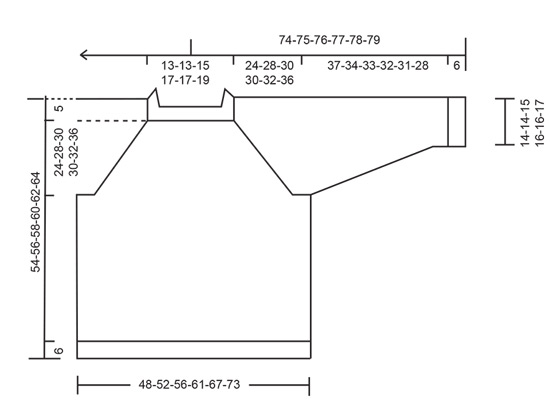
Knitted jumper in DROPS Daisy or DROPS Fiesta. Piece is knitted top down with raglan and cables. Size: S - XXXL
DROPS 255-21 |
|||||||||||||
|
---------------------------------------------------------- EXPLANATION FOR THE PATTERN: ---------------------------------------------------------- PATTERN: See diagrams A.1 and A.2. RAGLAN: Increase 1 stitch by making 1 yarn over, on next round knit yarns over as explained below: BEFORE A.2: Slip stitch off left needle and put it back on left needle but the opposite way (insert left needle in from behind when slipping it back on needle). Knit yarn overs in front loop of stitches to avoid holes. Then work the new stitches in stocking stitch. AFTER A.2: Knit yarn overs in back loop of stitches to avoid holes. Then work the new stitches in stocking stitch. DECREASE TIP: Decrease 1 stitch on each side of marker thread as follows: Work until 3 stitches remain before marker thread and knit 2 together, knit 2 (marker thread is in the middle of these 2 stitches), slip 1 stitch knitwise, knit 1, pass slipped stitch over stitch worked (= 2 stitches decreased). ---------------------------------------------------------- START THE PIECE HERE: ---------------------------------------------------------- JUMPER - SHORT OVERVIEW OF THE PIECE: In this pattern needles of different length have been used, begin with fitting length for number of stitches and switch as needed. Work neck edge and yoke in the round on circular needle from right shoulder back, and work top down. When yoke is done, divide piece for body and sleeves. Work body down wards in the round on circular needle while putting the sleeves aside. Then work sleeves downwards in the round on needle. NECK EDGE: Cast on 116-116-124-132-132-140 stitches on a short circular needle size 4 mm with DROPS Daisy or DROPS Fiesta. Switch to short circular needle size 3 mm (cast on on a larger needle to get an elastic cast-on edge). Work rib as follows: * Knit 2, purl 2 *, work from *-* over the next 20 stitches, knit 2 (= sleeve), A.1, * knit 2, purl 2 *, work from *-* over the next 16-16-20-24-24-28 stitches, knit 2, A.1 (= front piece), * knit 2, purl 2 *, work from *-* over the next 20 stitches, knit 2 (= sleeve), A.1, * knit 2, purl 2 *, work from *-* over the next 16-16-20-24-24-28 stitches, knit 2, A.1 ( = back piece). When A.1 has been worked 1 time vertically, continue with A.2 over stitches in A.1. Work rib for 7 cm in total. Beginning of round is at right shoulder at the back. Insert 1 marker after the first 40-40-42-44-44-46 stitches on round (= approx. mid front), measures piece from this marker. YOKE: Continue with circular needle size 4 mm. Continue A.2 as before, and in stocking stitch over the remaining stitches, AT THE SAME TIME on first round begin increases for RAGLAN – read explanation above. INCREASE AS FOLLOWS: ROUND 1: Increase by making a yarn over before and after every A.2 (= 8 stitches increased). ROUND 2: Work pattern as before, work the new stitches in stocking stitch. Work 1st and 2nd round 7-6-10-15-11-10 times (= 14-12-20-30-22-20 rounds worked) = 172-164-204-252-220-220 stitches on needle. Remember to follow the knitting tension! Continue with stocking stitch and A.2 as before, and increase for raglan as follows: ROUND 1: Increase by making a yarn over before and after every A.2 (= 8 stitches increased). ROUND 2: Work pattern as before, work the new stitches in stocking stitch (remember to twist yarn overs as explained above). ROUND 3: Increase by making a yarn over after 1st repetition of A.2, before 2nd repetition of A.2, after 3rd repetition of A.2 and before 4th repetition of A.2, i.e. increase only on front pieces and back piece, do not increase on sleeves (= 4 stitches increased). ROUND 4: Work pattern as before, work the new stitches in stocking stitch. Work 1st to 4th round 13-16-14-13-17-20 times (= 52-64-56-52-68-80 rounds worked) = 328-356-372-408-424-460 stitches on needle. All increases for raglan are done, you have increased 33-38-38-41-45-50 times on front piece/back piece and 20-22-24-28-28-30 times on sleeves. Work stocking stitch and A.2 as before, without increasing, until piece measures approx. 24-28-30-30-32-36 cm from marker mid front. Now divide yoke for body and sleeves. DIVIDING FOR BODY AND SLEEVES: AT THE SAME as next round is worked divide yoke for body and sleeves as follows: Slip the first 62-66-70-78-78-82 stitches on a thread for sleeve, cast on 6-6-10-10-14-14 new stitches on needle (= in the side mid under sleeve), work 102-112-116-126-134-148 stitches as before (= front piece), slip the next 62-66-70-78-78-82 stitches on a thread for sleeve, cast on 6-6-10-10-14-14 new stitches on needle (= in the side mid under sleeve), and work the last 102-112-116-126-134-148 stitches as before (= back piece). Work body and sleeves separately. BODY: = 216-236-252-272-296-324 stitches. Work stocking stitch and A.2 as before, until piece measures 43-45-47-49-51-53 cm from marker mid front. Switch to circular needle size 3 mm, work rib (= knit 2/purl 2 - NOTE! Work A.1 over stitches in A.2) while AT THE SAME TIME increasing 20-24-24-28-28-32 stitches evenly on 1st round. NOTE! Make sure that rib fits between A.1, increase 10-12-12-14-14-16 stitches between every A.1 on front piece and back piece, do not increase over the 6-6-10-10-14-14 between every A.1 in the sides = 236-260-276-300-324-356 stitches. Cast off when rib measures 6 cm. Jumper measures 49-51-53-55-57-59 cm from marker mid front and approx. 54-56-58-60-62-64 cm from the top of shoulder. SLEEVES: Slip 62-66-70-78-78-82 sleeve stitches from one thread on to circular needle size 4 mm and pick in addition up 1 stitch in each of the 6-6-10-10-14-14 stitches cast under sleeve = 68-72-80-88-92-96 stitches. Insert 1 marker thread in the middle of the 6-6-10-10-14-14 new stitches under sleeve - round begins at the marker thread. Work in stocking stitch in the round on needle - AT THE SAME TIME when sleeve measures 3 cm from division, decrease mid under sleeve – read DECREASE TIP and decrease as follows: Decrease 2 stitches every 6½-5-3½-2½-2-1½ cm 5-6-8-11-12-13 times in total = 58-60-64-66-68-70 stitches. Work until sleeve measures 37-34-33-32-31-28 cm from division. Switch to double pointed needles size 3 mm and work rib (= knit 2/purl 2) while AT THE SAME TIME increasing 6-8-4-6-4-6 stitches evenly on 1st round = 64-68-68-72-72-76 stitches. When piece measures 6 cm cast off. Sleeve measures approx. 43-40-39-38-37-34 cm from division. |
|||||||||||||
Diagram explanations |
|||||||||||||
|
|||||||||||||
 |
|||||||||||||
 |
|||||||||||||
Have you finished this pattern?Tag your pictures with #dropspattern #undertheoaksweater or submit them to the #dropsfan gallery. Do you need help with this pattern?You'll find 27 tutorial videos, a Comments/Questions area and more by visiting the pattern on garnstudio.com. © 1982-2026 DROPS Design A/S. We reserve all rights. This document, including all its sub-sections, has copyrights. Read more about what you can do with our patterns at the bottom of each pattern on our site. |
|||||||||||||


With over 40 years in knitting and crochet design, DROPS Design offers one of the most extensive collections of free patterns on the internet - translated to 17 languages. As of today we count 324 catalogues and 12290 patterns translated into English (UK/cm). 12290
We work hard to bring you the best knitting and crochet have to offer, inspiration and advice as well as great quality yarns at incredible prices! Would you like to use our patterns for other than personal use? You can read what you are allowed to do in the Copyright text at the bottom of all our patterns. Happy crafting!
Post a comment to pattern DROPS 255-21
We would love to hear what you have to say about this pattern!
If you want to leave a question, please make sure you select the correct category in the form below, to speed up the answering process. Required fields are marked *.