
Popular categories
Looking for a yarn?


Comments / Questions (40)
![]() Irina Fursman wrote:
Irina Fursman wrote:
Hello - could I replace kid-silk with Drops Alpaca silk? If so, would you recommend holding it double as well to obtain the same gauge? Or would you hold it single since it’s a thicker yarn? How well would it do with cables? Thank you in advance for your response. Wishing you a good weekend!
16.02.2025 - 02:05DROPS Design answered:
Dear Irina, DROPS Brushed Alpaca Silk is a group C yarn, so it's double the thickness and you only need 1 thread of this yarn to get the same gauge as 2 threads of DROPS Kid-Silk. The visual effect of the cables should be very similar to the 2 Kid-Silk threads worked together. Happy knitting!
17.02.2025 - 01:32
![]() Daria wrote:
Daria wrote:
Czyli razem 30 okrążeń dobrze rozumiem. Motyw ma 6 okrążeń ( czyli jeden warkocz) razy 5 powtórzeń?
29.01.2025 - 09:29DROPS Design answered:
Dokładnie. Miłej pracy!
29.01.2025 - 09:42
![]() Daria wrote:
Daria wrote:
Dzień dobry, czy robiąc karczek mam powtórzyć tylko okrążenie 1,2,3,4 schematu A2- 5 razy, czy przerabiać cały schemat A2 -5 razy. Czy jeden warkocz składa się z 6 okrążeń schematu A2?
29.01.2025 - 07:43DROPS Design answered:
Witaj Dario, wykonujesz CAŁY schemat A.2, tyle razy, aż 3-cie i 4-te okrążenie (przekładanie oczek na warkocze) zostanie wykonane 5-6-8-12-11-9 razy (wybierz swój rozmiar). Pozdrawiamy!
29.01.2025 - 09:13
![]() Monika wrote:
Monika wrote:
Dzień dobry, przy karczku mamy włożyć markery, które będą środkiem schematuA1/A2. Czwarty marker mamy włożyć w 26 oczko przy rozmiarze S, czyli ostatnie oczko w okrążeniu. Czy tak ma być bo to nie będzie środek schematuA1/A2? Wszystkiego trzy wcześniejsze markery są w środku schematu a czwarty nie. Pozdrawiam
26.01.2025 - 15:22DROPS Design answered:
Witaj Moniko, 4 markery będą na środku schematu A1/A2 (początek okrążenia znajduje się na wysokości prawego ramienia, od strony tyłu). 5-ty marker, najlepiej w innym kolorze jest włożony w oczko na środku przodu - od niego będzie później mierzona długość swetra. Pozdrawiamy!
27.01.2025 - 14:40
![]() Monika wrote:
Monika wrote:
Dzień dobry, Przerabiając w sumie 10 razy dla rozm.S okrążenia1-4, czy to znaczy że tyle razy cały schemat A.2 aż zostanie powtórzony 10 razy okrążenie 1-4. Jeżeli jest to tak to robótka będzie miała więcej niż 22 cm. Pozdrawiam
22.12.2024 - 17:19DROPS Design answered:
Witaj Moniko, zgadza się. Na zdjęciu też to widać (zwykle modelka nosi rozmiar S lub M). Jeżeli sweter jest za długi to znaczy, że w próbka mogła nie być zgodna na wysokość (mniej rzędów na 10 cm niż podane 24 we wzorze). Przy reglanie jest to bardzo istotne. Pozdrawiamy!
23.12.2024 - 09:27
![]() Monika wrote:
Monika wrote:
Bardzo dziękuję!🙂
16.12.2024 - 19:47
![]() Monika wrote:
Monika wrote:
Witam, czy dobrze rozumiem że mamy wykonać schemat A2 do końca i dopiero Przerobić 5 razy 3-cie i 4-te okrążenie?
15.12.2024 - 14:04DROPS Design answered:
Witaj Moniko, wykonujesz CAŁY schemat A.2, tyle razy, aż 3-cie i 4-te okrążenie (przekładanie oczek na warkocze) zostanie wykonane 5 razy w Twoim rozmiarze. Innymi słowy nie wykonujesz tylko 3-ciego i 4-tego okrążenia na przemian. Pozdrawiamy!
16.12.2024 - 08:56
![]() Mylène wrote:
Mylène wrote:
Vous devriez mettre la possibilité de voir les questions et les réponses que vous donnez dans la langue que l on peut choisir pour réaliser le pull. Pour moi en Français, ce serai encore plus complet et enrichissant pour tout le monde.
29.11.2024 - 10:48DROPS Design answered:
Bonjour Mylène, vous pouvez utiliser un traducteur en ligne/automatique pour avoir une idée des commentaires/questions/réponses, ou bien simplement poser votre question ici pour que nous puissions vous aider. Bon tricot!
29.11.2024 - 16:31
![]() Mamy Do wrote:
Mamy Do wrote:
Bonjour Je reviens sur les explications et commentaires concernant le départ du tricot après le col : - doit on comprendre au rang 1 que pour le dos après la série des augmentations du raglan il faut poursuivre en tricotant les mailles restantes ? - après le col faut -il tricoter les mailles jusqu’au marqueur 32 - il serait utile de préciser car on ne retrouve pas les 96 mailles du départ Merci pour ce joli modèle
24.10.2024 - 08:00DROPS Design answered:
Bonjour Mamy Do, le marqueur après 42 m sert de repère au milieu du devant pour mesurer l'ouvrage, on ne doit pas tricoter ces mailles. Le 1er tour commence par les mailles de la manche, puis A.1 (on doit avoir le 1er marqueur au milieu de A.1) et ainsi de suite; chacun des marqueurs placés (sans tricoter) au tout début de l'empiècement doivent être au milieu soit de A.1 soit de A.2 et on va augmenter pour le raglan comme indiqué pour votre taille avant/après A.1. Quand A.1 est terminé, on tricote et on répète A.2 en hauteur (A.1 ne se tricote qu'une seule fois = il permet d'augmenter les mailles nécessaires aux torsades). Bon tricot!
24.10.2024 - 10:19
![]() Aha wrote:
Aha wrote:
Witam serdecznie. Przymierzam się do zrobienia tego sweterka , dlatego przejrzałam opis. Na moje oko w rozdzielaniu oczek po zrobieniu stójki są błędy. Na jeden rękaw przypada 21 oczek na drugi natomiast 26 co oznacza że inne parametry też się rozjechały. Jeśli jestem w błędzie to proszę mnie poprawić. Ps. Szkoda że ten model sweterka nie ma zdjęcia pleców. Pozdrawiam. Fanka waszych wzorów. :)
06.10.2024 - 21:16DROPS Design answered:
Witaj, wszystko jest ok, 16 o. jest na rękaw, a 5 następnych o. należy do pierwszej części schematu A.1 > 21 o.; na 2-gim rękawie 26 o. jest przerabianych następująco: 5 o. na druga część schematu A.1, 16 o. na rękaw i 5 o. pierwsza część schematu A.1 > tak więc będzie 16 o. na każdy rękaw. Wszystkiego dobrego!
07.10.2024 - 08:27
|
|||||||||||||||||||||||||||||||
Sea Feather#seafeathersweater |
|||||||||||||||||||||||||||||||
 |
 |
||||||||||||||||||||||||||||||
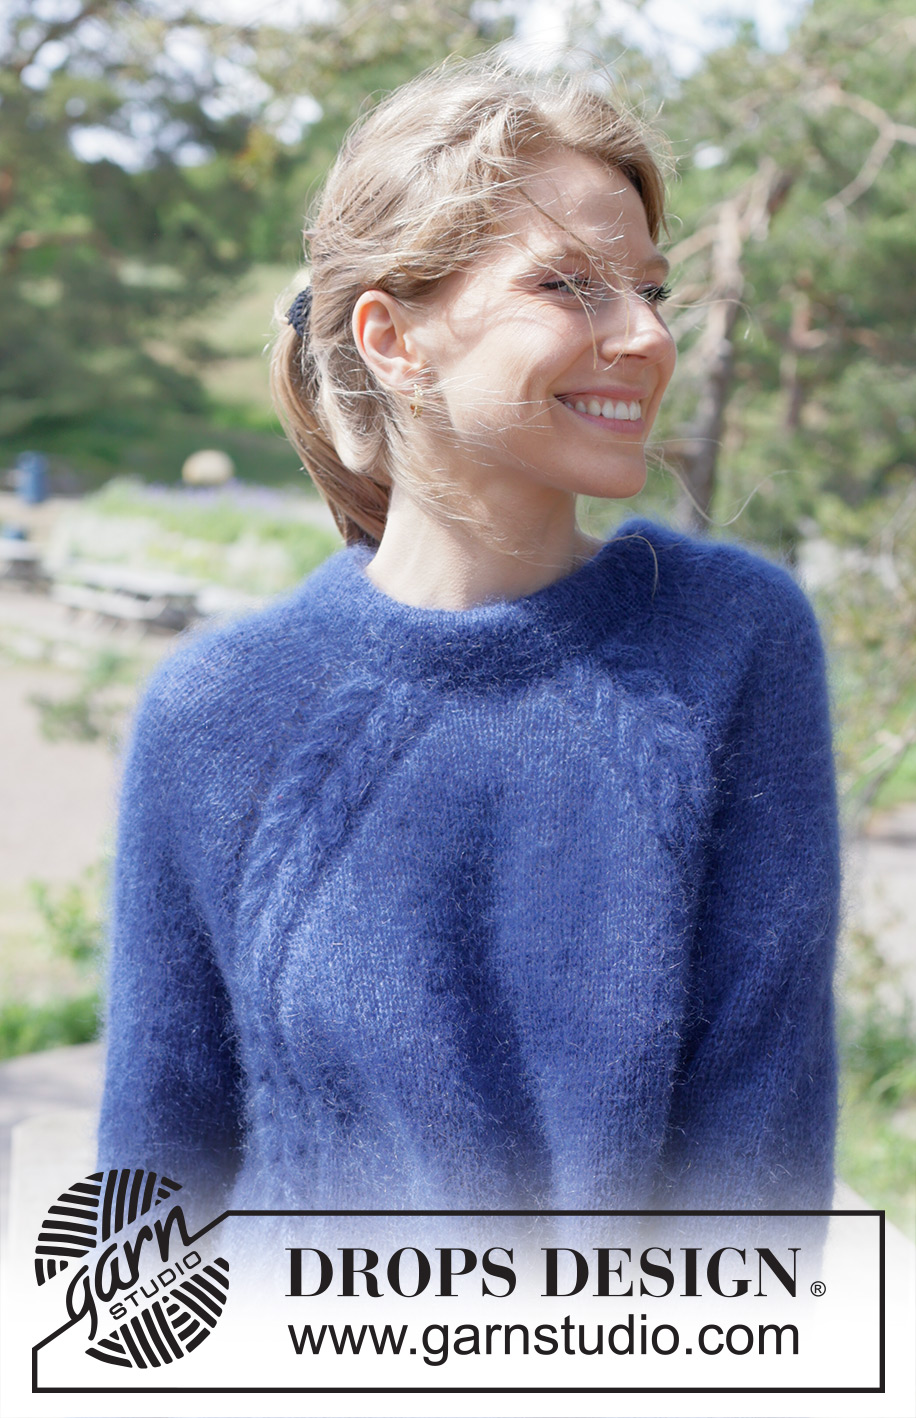
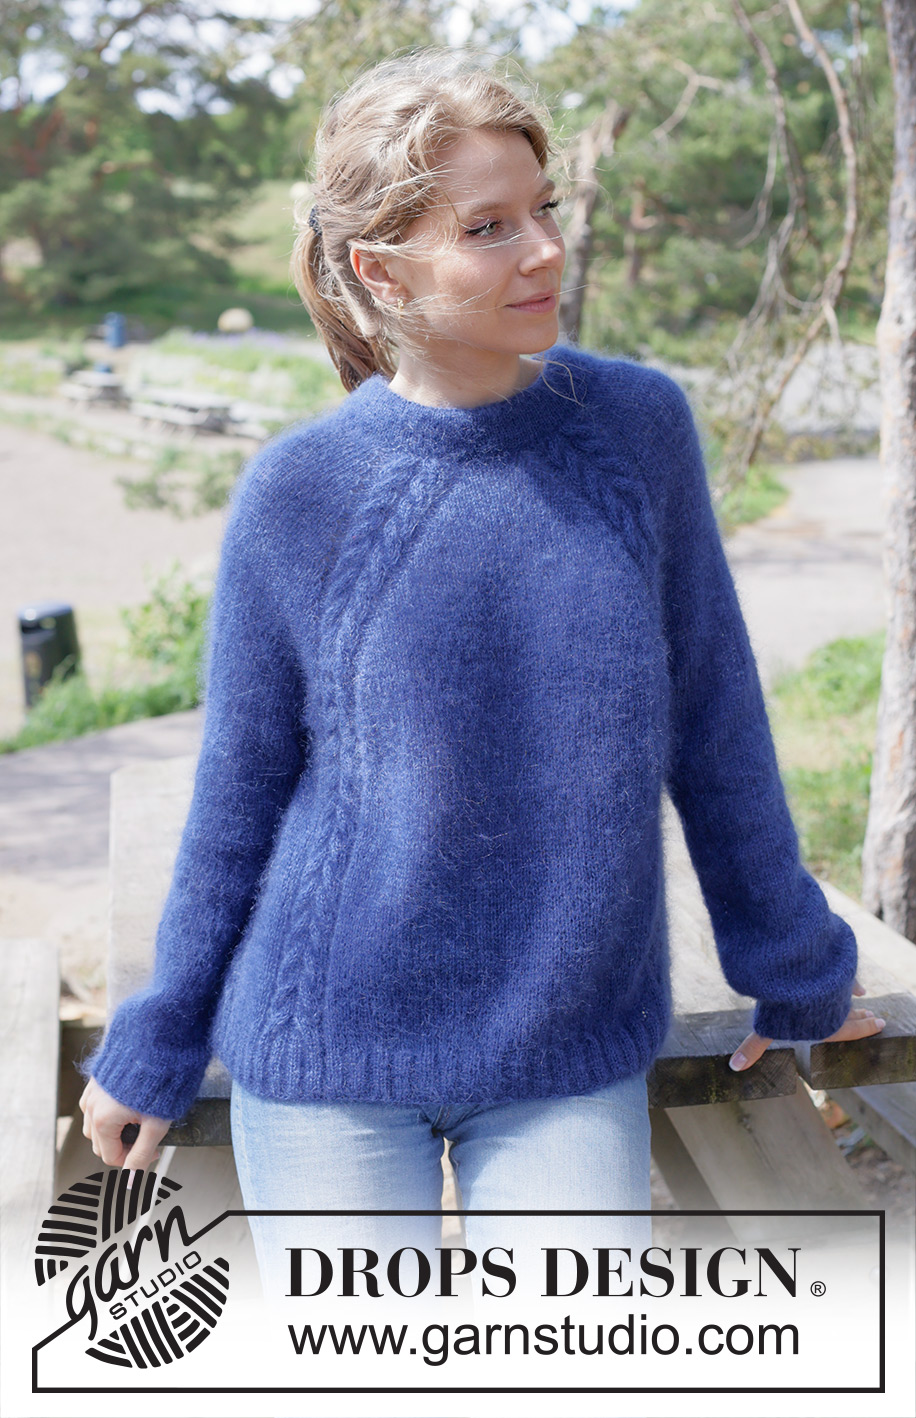
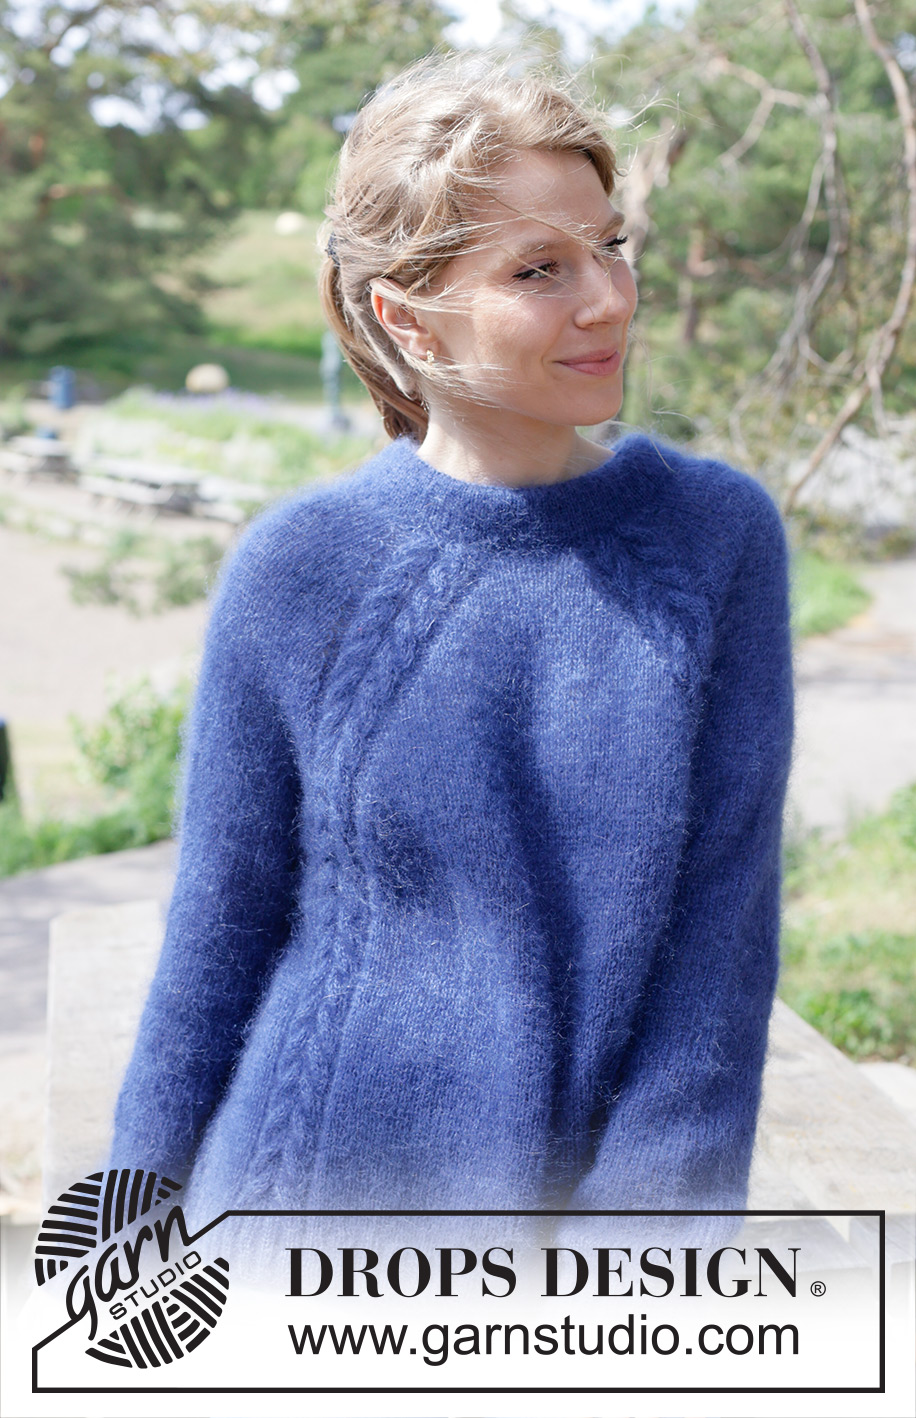
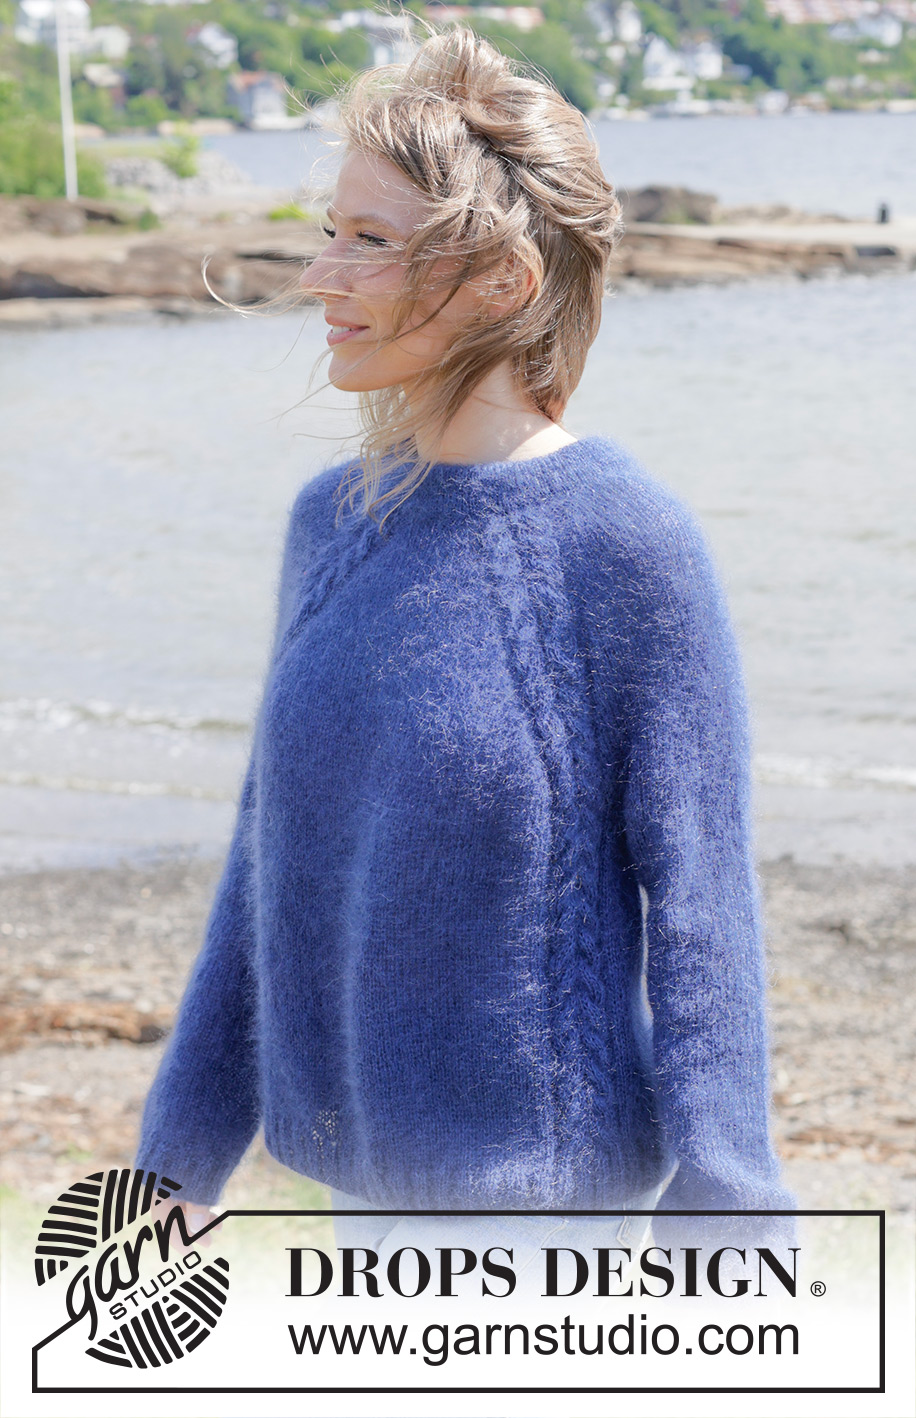
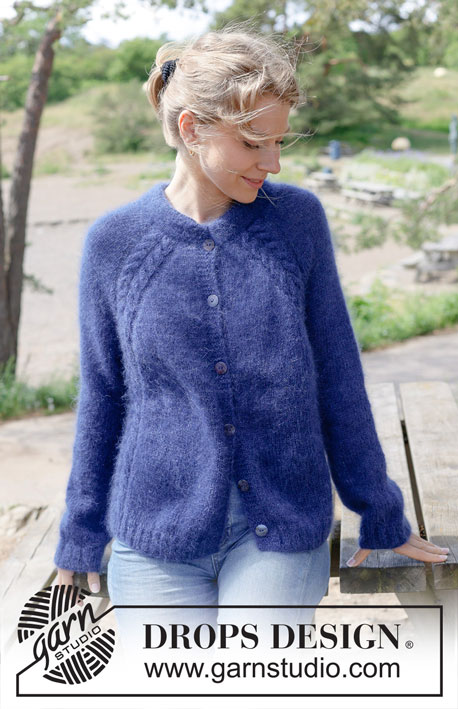
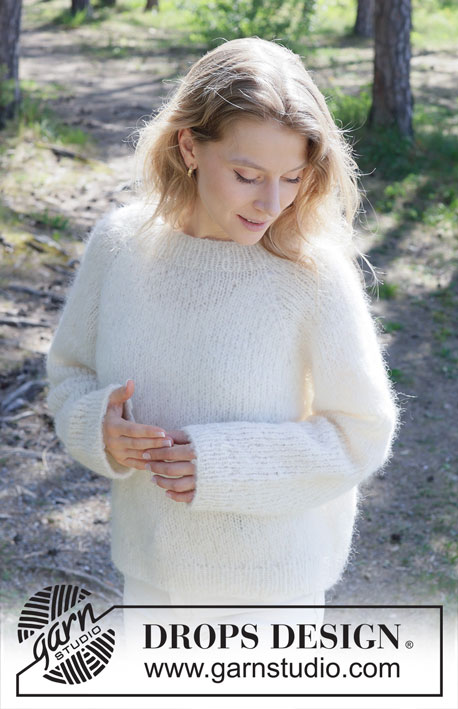
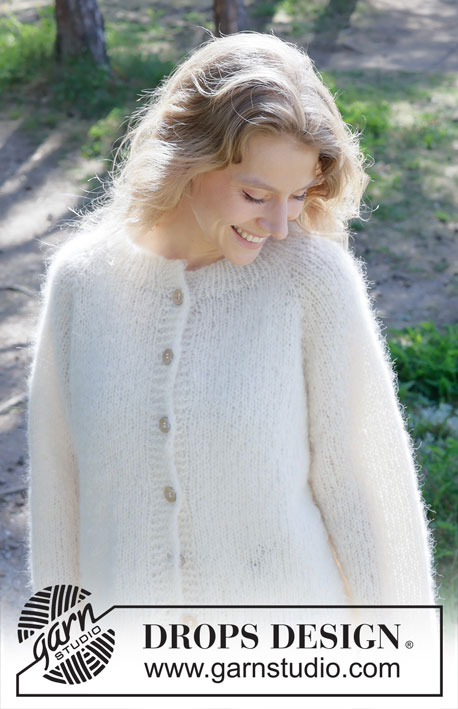
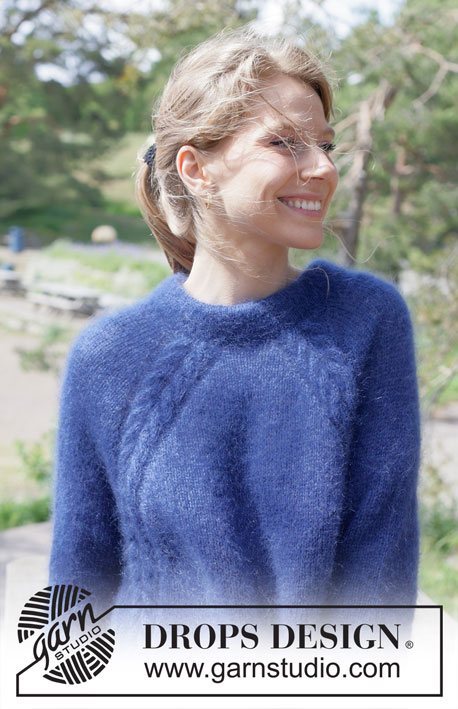
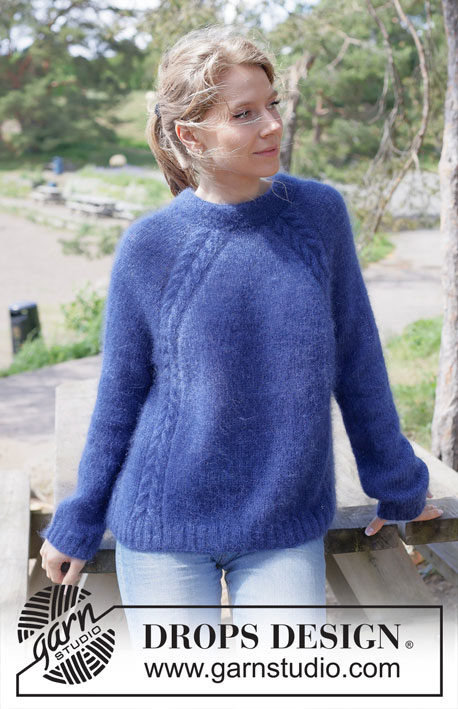
Knitted jumper in 2 strands DROPS Kid-Silk. Piece is knitted top down with raglan, cables and double neck edge. Size: S - XXXL
DROPS 254-5 |
|||||||||||||||||||||||||||||||
|
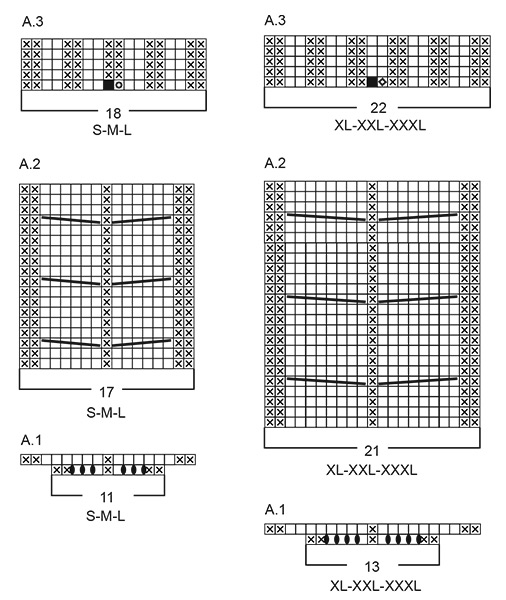
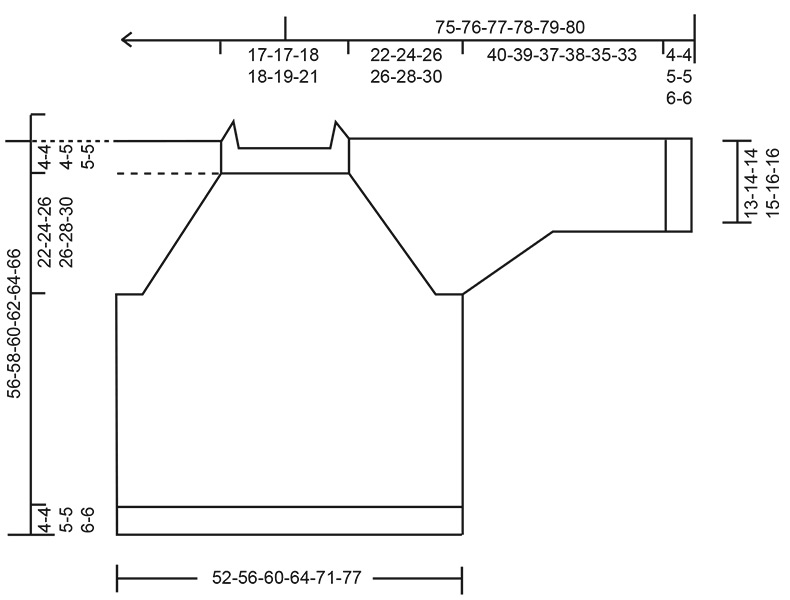
---------------------------------------------------------- EXPLANATION FOR THE PATTERN: ---------------------------------------------------------- PATTERN: See diagrams A.1 to A.3. Choose diagram for correct size. RAGLAN: Increase 1 stitch by making 1 yarn over, on next round knit yarns over as explained below: BEFORE A.1/A.2: Slip stitch off left needle and put it back on left needle but the opposite way (insert left needle in from behind when slipping it back on needle). Knit yarn overs in front loop of stitches to avoid holes. Then work the new stitches in stocking stitch. AFTER A.1/A.2: Knit yarn overs in back loop of stitches to avoid holes. Then work the new stitches in stocking stitch. INCREASE TIP: Increase 1 stitch by making 1 yarn over, on next round work yarn over twisted to avoid holes. DECREASE TIP: Decrease 1 stitch on each side of marker thread as follows: Work until 3 stitches remain before marker thread and knit 2 together, knit 2 (marker thread is in the middle of these 2 stitches), slip 1 stitch knitwise, knit 1, pass slipped stitch over stitch worked (= 2 stitches decreased). ---------------------------------------------------------- START THE PIECE HERE: ---------------------------------------------------------- JUMPER - SHORT OVERVIEW OF THE PIECE: In this pattern needles of different length have been used, begin with fitting length for number of stitches and switch as needed. Work neck edge and yoke in the round on circular needle from right shoulder back, and work top down. When yoke is done, divide piece for body and sleeves. Work body down wards in the round on circular needle while putting the sleeves aside. Then work sleeves downwards in the round on needle. Fold the neck edge double against the wrong side and fasten. If 0 is given for the chosen size, it means that you skip the information until next information. NECK EDGE: Cast on 96-96-100-108-112-116 stitches on circular needle size 4.5 mm with 2 strands DROPS Kid-Silk. Switch to circular needle size 3 mm (cast on on a larger needle to get an elastic cast-on edge). Work in stocking stitch for 4-4-4-5-5-5 cm. Then purl 1 round (= folding edge). Then work in stocking stitch until neck edge measures 8-8-8-10-10-10 cm from cast on edge AT THE SAME TIME increase 0-0-0-8-12-16 stitches evenly of last row= 96-96-100-116-124-132 stitches. Later the neck edge is folded in towards wrong side and assembled to form a neck edge of approx. 4-4-4-5-5-5 cm. Beginning of round is at right shoulder at the back. Insert 1 marker after the first 32-32-33-38-40-42 stitches on round (= approx. mid front), measures piece from this marker. YOKE: Switch to circular needle size 4.5 mm and insert 4 markers in piece without working the stitches, insert markers in a stitch, and markers should later fit middle stitch in A.1 and A.2. Count 21-21-21-24-24-24 stitches (= sleeve), insert 1 marker in next stitch, count 20-20-22-26-30-34 stitches (= front piece), insert 1 marker in next stitch, count 26-26-26-30-30-30 stitches (= sleeve), insert 1 marker in next stitch, count 25-25-27-32-36-40 stitches (= back piece), insert 1 marker in last stitch. Now work PATTERN and increase for RAGLAN - read explanation above and work as follows: ROUND 1: Increase 1 stitch for raglan, work 16-16-16-18-18-18 stitches in stocking stitch, increase 1 stitch for raglan, work A.1, increase 1 stitch for raglan, work 10-10-12-14-18-22 stitches in stocking stitch, increase 1 stitch for raglan, work A.1, increase 1 stitch for raglan, work 16-16-16-18-18-18 stitch in stocking stitch, increase 1 stitch for raglan, work A.1, increase 1 stitch for raglan, work 10-10-12-14-18-22 stitches in stocking stitch, increase 1 stitch for raglan, work A.1 (= 8 stitches increased for raglan and 24-24-24-32-32-32 stitches increased in A.1) = 128-128-132-156-164-172 stitches. ROUND 2: Work in stocking stitch and A.1 as before, work the new stitches in stocking stitch (remember to twist yarn overs as explained above). ROUND 3: Work in stocking stitch as before, work A.2 over stitches in A.1 and increase for raglan as follows: Increase 1 stitch after/before every A.2 (= 8 stitches increased). ROUND 4: Work in stocking stitch and A.2 as before, work the new stitches in stocking stitch (remember to twist yarn overs). Continue A.2 and work 3rd and 4th ROUND 5-6-8-12-11-9 times (= 10-12-16-24-22-18 rounds worked) = 168-176-196-252-252-244 stitches on needle. Remember to follow the knitting tension! Then work and increase as follows: ROUND 1: Work in stocking stitch and pattern as before and increase 1 stitch after and before every A.2 (= 8 stitches increased). ROUND 2: Work in stocking stitch and pattern as before, work the new stitches in stocking stitch. ROUND 3: Work in stocking stitch and pattern as before and increase 1 stitch over after 1st repetition of A.2, before 2nd repetition of A.2, after 3rd repetition of A.2 and before 4th repetition of A.2, i.e. increase only on front piece and back piece, do not increase on sleeves (= 4 stitches increased). ROUND 4: Work in stocking stitch and pattern as before, work the new stitches in stocking stitch. Work 1st to 4th ROUND 10-11-11-9-11-13 times (= 40-44-44-36-44-52 rounds worked). All increases for raglan are now done, you have increased 26-29-31-31-34-36 times in total have been done on front piece and back piece and 16-18-20-22-23-23 times on sleeve = 288-308-328-360-384-400 stitches on needle and piece measures approx. 22-24-26-26-28-30 cm from marker mid front. Now divide yoke for body and sleeves. DIVIDING FOR BODY AND SLEEVES: AT THE SAME TIME as next round is worked divide yoke for body and sleeves as follows: Slip the first 48-52-56-62-64-64 stitches on a thread for sleeve, cast on 10-10-12-14-16-18 new stitches on needle (= in the side mid under sleeve), work 96-102-108-118-128-136 stitches as before (= front piece), slip the next 48-52-56-62-64-64 stitches on a thread for sleeve, cast on 10-10-12-14-16-18 new stitches on needle (= in the side mid under sleeve) and work the last 96-102-108-118-128-136 stitches as before (= back piece). Work body and sleeves separately and beginning of round is in the transition between body and sleeve. BODY: = 212-224-240-264-288-308 stitches. Work in stocking stitch and A.2 as before (work the new stitches mid under sleeves in stocking stitch) until piece measures 48-50-51-52-53-55 cm from marker mid front. Work 1 round as before while increasing stitches evenly – read INCREASE TIP and increase as follows: Increase 0-0-2-0-2-0 stitches evenly in each side (between every A.2 in each side) and increase 12-10-12-14-16-16 stitches evenly on front piece and back piece (increase between every A.2 on front piece and back piece) = 236-244-268-292-324-340 stitches. Switch to circular needle size 3 mm and work rib as follows: * knit 2, purl 2 *, work from *-* over the first 8-8-12-12-16-16 stitches, knit 2, work A.3 over stitches in A.2, * knit 2, purl 2 *, work from *-* until 2 stitches remain before A.2, knit 2, work A.3 over stitches in A.2, * knit 2, purl 2 *, work from *-* over the next 8-8-12-12-16-16 stitches, knit 2, work A.3 over stitches in A.2, * knit 2, purl 2 *, work from *-* until 2 stitches remain before A.2, knit 2, work A.3 over stitches in A.2 = 240-248-272-296-328-344 stitches. Work rib like this for 4-4-5-5-6-6 cm. Loosely cast off. Jumper measures 52-54-56-57-59-61 cm from marker mid front and approx. 56-58-60-62-64-66 cm from the top of shoulder. SLEEVES: Slip 48-52-56-62-64-64 sleeve stitches from one thread on to circular needle size 4.5 mm and pick in addition up 1 stitch in each of the 10-10-12-14-16-18 stitches cast on under sleeve = 58-62-68-76-80-82 stitches. Insert 1 marker thread in the middle of the 10-10-12-14-16-18 new stitches under sleeve - round begins at the marker thread. Work in stocking stitch in the round on needle - AT THE SAME TIME when sleeve measures 1 cm from division, decrease mid under sleeve – read DECREASE TIP and decrease as follows: Decrease 2 stitches total 1-1-2-4-6-6 times on every other round, then decrease 2 stitches every 2½-2½-2-1½-1-1 cm 4-5-6-7-6-6 times in total = 48-50-52-54-56-58 stitches. Work until sleeve measures 40-39-37-38-35-33 cm from division. Switch to double pointed needles size 3 mm and work rib (= knit 2/purl 2) while AT THE SAME TIME increasing 8-10-8-10-8-10 stitches evenly on 1st round = 56-60-60-64-64-68 stitches. When rib measures 4-4-5-5-6-6 cm cast off somewhat loosely. Sleeve measures approx. 44-43-42-43-41-39 cm from division. ASSEMBLY: Fold edge at the top of neck down on the inside of garment. Fasten edge to get a double neck edge. To avoid a tight neck edge that sticks out it is important to keep the seam elastic. |
|||||||||||||||||||||||||||||||
Diagram explanations |
|||||||||||||||||||||||||||||||
|
|||||||||||||||||||||||||||||||
 |
|||||||||||||||||||||||||||||||
 |
|||||||||||||||||||||||||||||||
Have you finished this pattern?Tag your pictures with #dropspattern #seafeathersweater or submit them to the #dropsfan gallery. Do you need help with this pattern?You'll find 32 tutorial videos, a Comments/Questions area and more by visiting the pattern on garnstudio.com. © 1982-2026 DROPS Design A/S. We reserve all rights. This document, including all its sub-sections, has copyrights. Read more about what you can do with our patterns at the bottom of each pattern on our site. |
|||||||||||||||||||||||||||||||


With over 40 years in knitting and crochet design, DROPS Design offers one of the most extensive collections of free patterns on the internet - translated to 17 languages. As of today we count 324 catalogues and 12290 patterns translated into English (UK/cm). 12290
We work hard to bring you the best knitting and crochet have to offer, inspiration and advice as well as great quality yarns at incredible prices! Would you like to use our patterns for other than personal use? You can read what you are allowed to do in the Copyright text at the bottom of all our patterns. Happy crafting!
Post a comment to pattern DROPS 254-5
We would love to hear what you have to say about this pattern!
If you want to leave a question, please make sure you select the correct category in the form below, to speed up the answering process. Required fields are marked *.