
Popular categories
Looking for a yarn?


Comments / Questions (19)
![]() Janice Schuth wrote:
Janice Schuth wrote:
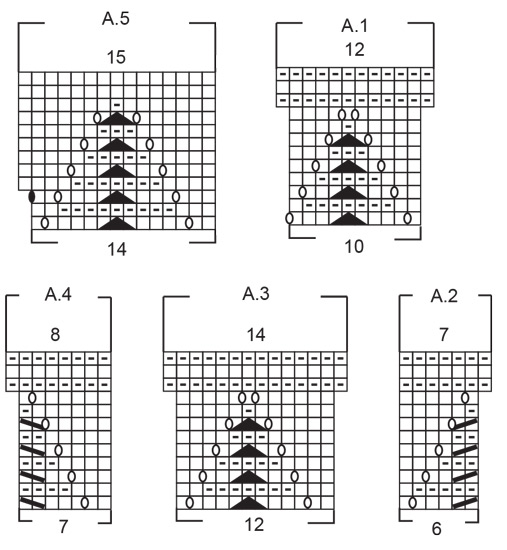
I am enjoying this pattern, and have come to working A.2, A.3 and A.4. In row 2 of A.2, should there be only 4 “-“ knit stitches (and thus 2 purl stitches). This would mirror A.4. Thank you!
11.06.2026 - 14:41DROPS Design answered:
Dear Mrs Smith, oh yes probably thanks for the tip, I'll send a notice to our designers so that they can check. Happy knitting!
11.06.2026 - 17:37
![]() Janice Schuth wrote:
Janice Schuth wrote:
In row 10 of the A.1 pattern, the graph shows all of the stitches to be “-“ (knit stitches as this is the wrong side of the sweater). When you come to the yarn over stitches from row 9, should they be purl stitches as the Diagram Explanation states, or are they knit stitches as the graph shows? Thank You!
10.06.2026 - 00:02DROPS Design answered:
Hi Janice, The yarn overs in row 9 are knitted in row 10. Regards, Drops Team.
10.06.2026 - 06:01
![]() Susie wrote:
Susie wrote:
Hi just wondering if it work to make this cardigan with long sleeves instead
02.04.2026 - 20:54DROPS Design answered:
Hi Susie, Yes, you can work the sleeves to your desired length before working the rib. Happy Easter! Regards, Drops Team.
03.04.2026 - 06:58
![]() Karin wrote:
Karin wrote:
Ich möchte meine Frage zu der Position der Knopflöcher zurück nehmen. Habe soeben meinen Überlegungsfehler gefunden… Da ja von oben nach unten gestrickt wird, dreht sich das Strickstück… :-)
30.03.2026 - 18:13
![]() Karin wrote:
Karin wrote:
Guten Tag Ich habe eine Frage zur Position der Knopflöcher: Wenn die Knopflöcher in die rechte Blende gestrickt werden sollen; warum wird in der Anleitung in der Hin-Reihe bei den letzten Maschen auf der Nadel das Knopfloch eingearbeitet - sind die Knopflöcher dadurch nicht auf der linken Blende des Cardigans? Besten Dank.
30.03.2026 - 17:08DROPS Design answered:
Liebe Karin, die Jacke wird von oben nach unten gestrickt, dh die Hinreihen beginnen mit dem linken Vorderteil und enden mit dem rechten Vorderteil, deshalb strickt man die Knopflöcher am Ende einer Hin-Reihe = damit sie bei dem rechten Vorderteil sind. Viel Spaß beim Stricken!
07.04.2026 - 14:13
![]() Magdaléna Pupíková wrote:
Magdaléna Pupíková wrote:
Vypadá skvěle
27.02.2026 - 14:10
![]() Hutin wrote:
Hutin wrote:
Bonjour. Après A1 j ai 251mailles et non 253 comme indiqué. Au premier rang de A1, je termine bien mon rang à 7mailles du bord, j ai tricoté 1maille endroit puis, 4mailles endroit et 2 en icord. Je ne comprends pas mon erreur. Cordialement
24.02.2026 - 22:26DROPS Design answered:
Bonjour Mme Hutin, vous aviez 213 m avant A.1 et vous avez tricoté ainsi 6 m de bordure devant, répétez 20 fois A.1 en largeur, (il reste 7 mailles), tricotez ensuite la 1ère maille de A.1 et 6 m de bordure devant soit: 6+(20x10)+1+6=213. Quand A.1 est terminé, vous avez 12 mailles dans chaque A.1 soit: 6+(20x12)+1+6=253. Bon tricot!
25.02.2026 - 07:36
![]() Bourrel Nathalie wrote:
Bourrel Nathalie wrote:
Je voulais savoir pourquoi il n'y a plus le calcul d'ogmentation et diminution. Je trouvais ça très pratique. Merci Cordialement
18.02.2026 - 11:41DROPS Design answered:
Bonjour Mme Bourrel, vous trouverez la calculette en bas de page, à droite, ainsi vous pourrez choisir augmentations/diminutions et faire le calcul. Bon tricot!
19.02.2026 - 08:24
![]() Gunilla wrote:
Gunilla wrote:
Hej! När jag börjar arbetet från halskant efter att ha lagt upp maskorna står det , nästa varv stickas från rätsidan etc. Men mitt första varv är ju från avigsidan efter att ha lagt upp maskorna. Hur stickar jag det? Helt avigt?
09.02.2026 - 21:39DROPS Design answered:
Hei Gunila. Man legger opp x antall masker og når man skal strikke 1. pinne i denne oppskriften er det fra retten (oppleggskanten er ikke 1. pinne, det er en oppleggskant). mvh DROPS Design
23.02.2026 - 08:43
![]() Veronica Tucker wrote:
Veronica Tucker wrote:
I've just noticed the increase/decrease calculator. What an absolute stroke of genius. Thank you so much.
30.05.2025 - 13:04
|
||||||||||||||||||||||
Blueberry Leaf Cardigan#blueberryleafcardigan |
||||||||||||||||||||||
 |
 |
|||||||||||||||||||||
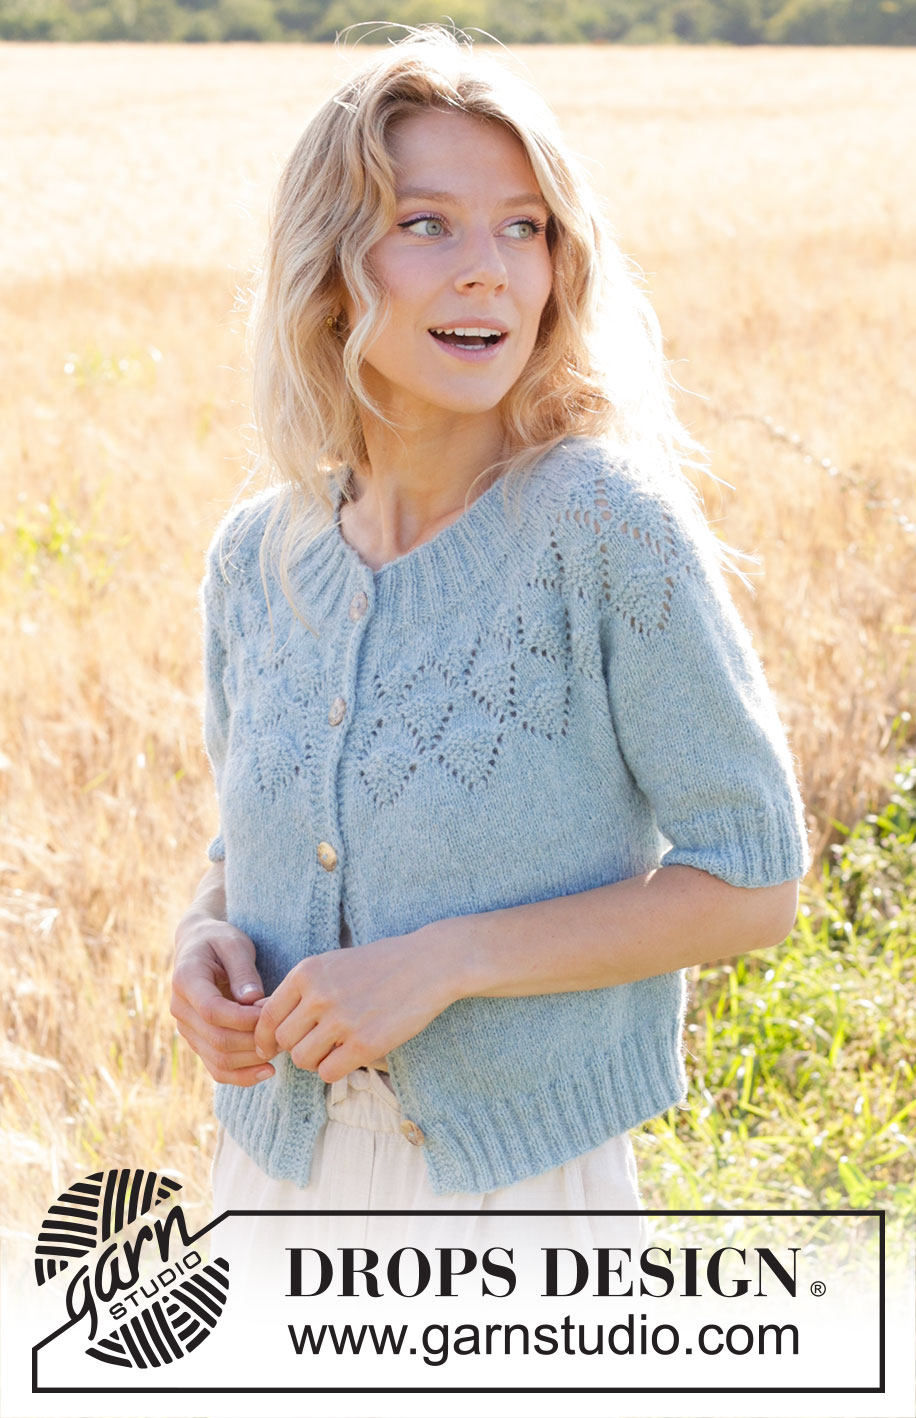
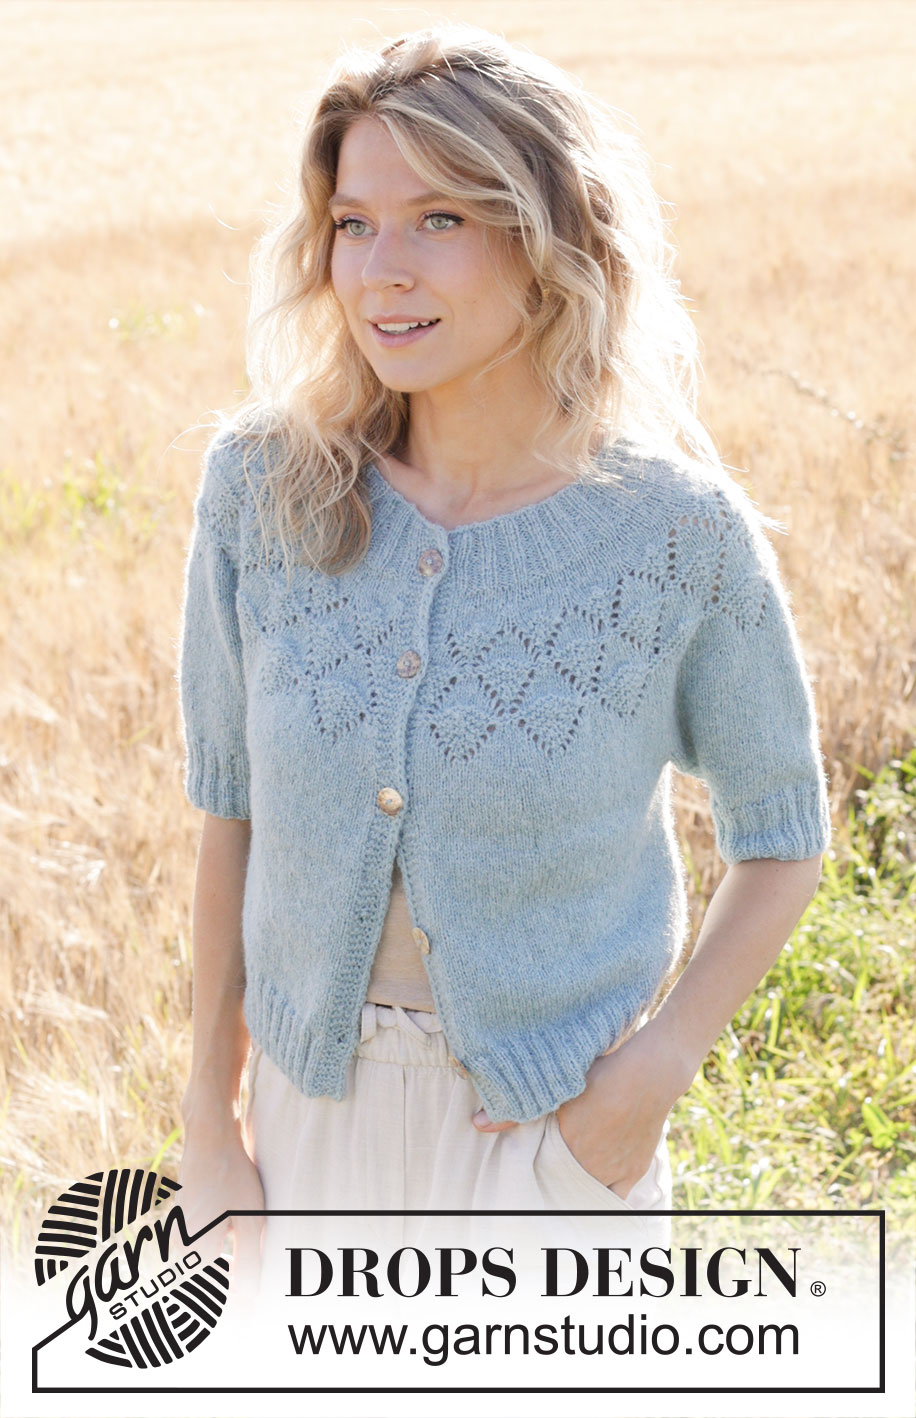
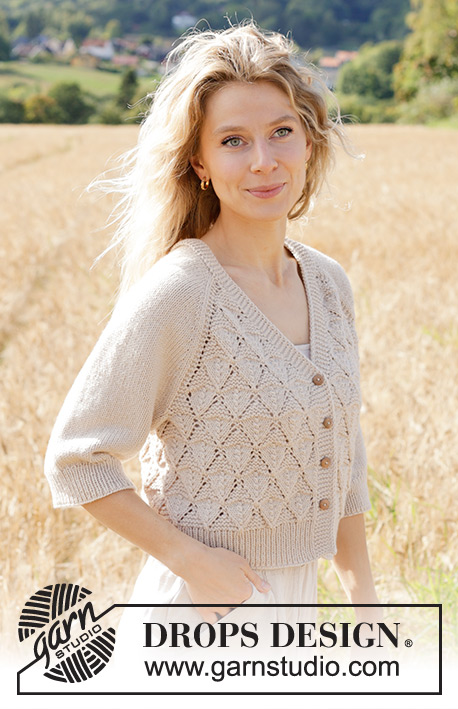
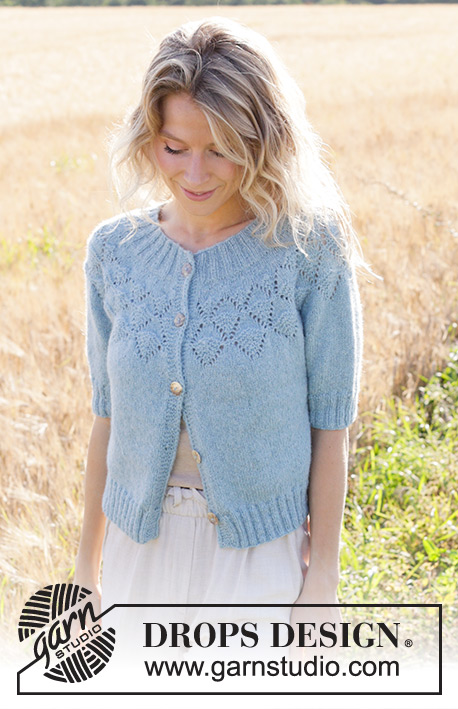
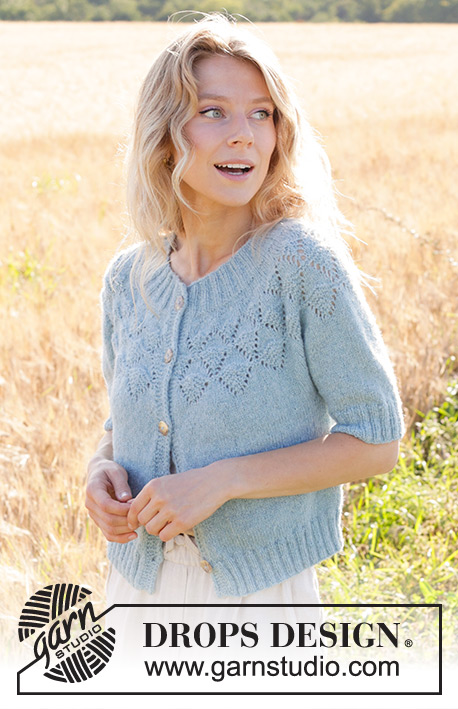
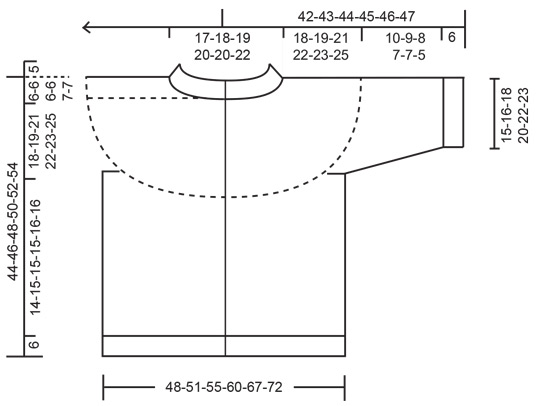
Knitted jacket in DROPS Sky or DROPS Merino Extra Fine. Piece is knitted top down with round yoke, lace pattern, I-cord and short sleeves. Size: S - XXXL
DROPS 249-10 |
||||||||||||||||||||||
|
---------------------------------------------------------- EXPLANATION FOR THE PATTERN: ---------------------------------------------------------- GARTER STITCH (back and forth): Knit all rows. 1 ridge vertically = knit 2 rows. PATTERN: See diagram A.1 to A.6. The diagrams show all the rows in the pattern, seen from the right side. BUTTONHOLES: Decrease for buttonholes on right band (when garment is worn). Decrease from right side when 5 stitches remain on row as follows: Make 1 yarn over, knit 2 together, knit 1, slip 1 stitch purlwise with strand in front of piece, knit 1. On next row (wrong side) knit the yarn over to make a hole. Decrease for first buttonhole when neck edge measures approx. 2 cm from cast-on edge. Then decrease the next 4-4-5-5-5-5 buttonholes approx. 9-9½-8-8½-9-9 cm apart - the bottom buttonhole is placed approx. in the transition between stocking stitch and rib. INCREASE TIP (applies to round yoke): To calculate how to increase evenly, use the total number of stitches on row minus band stitches (e.g. 122 stitches) and divide stitches by number of increases to be done (e.g. 29) = 4.2. In this example increase after approx. every 4th stitch by making 1 yarn over. On next row purl yarn overs twisted to avoid holes. BAND WITH I-CORD: BEGINNING OF ROW: Work band as follows: Slip 1 stitch purlwise with strand in front of piece, knit 1 and work 4 stitches in garter stitch. END OF ROW: Work band as follows: Work until 6 stitches remain on row, work 4 stitches in garter stitch, slip 1 stitch purlwise with strand in front of piece, knit 1. Work the same way both from right side and wrong side. DECREASE TIP (applies to sleeves): Decrease 1 stitch on each side of marker thread as follows: Work until 3 stitches remain before marker thread, knit 2 together, knit 2 (marker thread is between these 2 stitches), slip 1 stitch knitwise, knit 1, pass slipped stitch over stitch worked. ---------------------------------------------------------- START THE PIECE HERE: ---------------------------------------------------------- JACKET - SHORT OVERVIEW OF THE PIECE: In this pattern long and short needles have been used, begin with fitting length and switch as needed. Work neck edge and yoke back and forth on circular needle from mid front, work top down. When yoke is done, divide stitches for body and sleeves. Work body downwards back and forth on circular needle while putting the sleeves aside. Then work sleeves downwards in the round on needle. NECK EDGE: Cast on 134-138-142-146-154-162 stitches on circular needle size 3 mm with DROPS Sky or DROPS Merino Extra Fine. Piece is worked back and forth from mid front. Work next row from right side as follows: Work 6 stitches BAND WITH I-CORD - read explanation above, work rib (knit 2, purl 2) until 8 stitches remain, knit 2 and 6 stitches band with I-cord. Continue back and forth like this, when piece measures 2 cm cast off for BUTTONHOLES - read explanation above. Continue back and forth until rib measures 3 cm. On next row from right side increase all purl sections with 2 purl stitches to 3 purl stitches– increase with 1 yarn over between 2 purl stitches, knit yarn over twisted on next row = 164-169-174-179-189-199 stitches. Continue with band stitches as before and rib (knit 2/purl 3) until neck edge measures 5 cm in total and last row was worked from wrong side. Insert 1 marker mid back, measure yoke from this marker. YOKE: Switch to circular needle size 4 mm. Work back and forth in stocking stitch with bands as before, at the same time on first row (from right side) increase 29-34-39-44-44-54 stitches evenly (do not increase over bands) - read INCREASE TIP = 193-203-213-223-233-253 stitches. Work until piece measures 3 cm from marker mid back. REMEMBER THE KNITTING TENSION! Work next row as follows from right side: Work 6 band stitches as before, work A.1 until 7 stitches remain, knit 1 as 1st stitch in A.1 and 6 band stitches as before. When A.1 has been worked vertically, there are 229-241-253-265-277-301 stitches on needle. Work next row as follows from right side: 6 band stitches as before, A.2, work A.3 until 13 stitches remain, A.4 and 6 band stitches as before. When A.2 to A.4 have been worked vertically there are 265-279-293-307-321-349 stitches on needle. Work next row as follows from right side: 6 band stitches as before, work A.5 until 7 stitches remain, knit 1 as 1st stitch in A.5 and 6 band stitches as before. When A.5 has been worked vertically, there are 283-298-313-328-343-373 stitches on needle. Piece measures approx. 12 cm from marker mid back. Continue with bands as before and stocking stitch, at the same time on first row from right side increase 12-17-21-32-38-35 stitches evenly – remember INCREASE TIP = 295-315-334-360-381-408. Continue as before until piece measures 15-15-16-17-17-18 cm from marker, on next row from right side increase 13-17-22-32-39-36 stitches evenly = 308-332-356-392-420-444 stitches. Continue with bands and stocking stitch until piece measures 18-19-21-22-23-25 cm from marker. Now divide piece for body and sleeves as follows: Work the first 51-55-58-63-69-74 stitches as before (front piece), slip the next 58-62-68-76-78-80 stitches on a thread for sleeve, cast on 10-10-12-12-14-16 new stitches on needle (in the side under sleeve), work 90-98-104-114-126-136 stitches in stocking stitch (back piece), slip the next 58-62-68-76-78-80 stitches on a thread for sleeve, cast on 10-10-12-12-14-16 new stitches on needle (in the side under sleeve), and work the last 51-55-58-63-69-74 stitches as before (front piece). Finish body and sleeves separately. Now measure piece from here! BODY: = 212-228-244-264-292-316 stitches. Work stocking stitch and band as before until piece measures 14-15-15-15-16-16 cm from division. On next row from right side increase 38-42-46-50-54-58 stitches evenly (do not increase over bands) = 250-270-290-314-346-374 stitches. Switch to circular needle size 3 mm. Now work rib, first row is from wrong side: 6 band stitches as before, work rib (purl 2, knit 2) until 8 stitches remain, purl 2 and 6 band stitches as before. Continue like this until rib measures 6 cm. Cast off. Jacket measures approx. 44-46-48-50-52-54 cm from shoulder. SLEEVES: Slip the 58-62-68-76-78-80 stitches from thread in one side of piece on double pointed needles/a circular needle size 4 mm and pick in addition up 1 stitch in each of the 10-10-12-12-14-16 new stitches cast on under sleeve = 68-72-80-88-92-96 stitches. Insert 1 marker in the middle of the 10-10-12-12-14-16 new stitches under sleeve (mid under sleeve), use the marker when decreasing under sleeve. Begin round at the marker. Work in stocking stitch in the round, while AT THE SAME TIME when sleeve measures 3 cm from division, decrease 2 stitches mid under sleeve - read DECREASE TIP (do not decrease in XXL and XXXL). Decrease like this every 2-1-1-1½-0-0 cm 2-2-2-2-0-0 times in total = 64-68-76-84-92-96 stitches. Work until sleeve measures 10-9-8-8-7-5 cm from division. 6 cm remain until finished measurements. Try the jacket and work to desired length on sleeve. Knit 1 round while increasing 8-12-12-16-16-20 stitches evenly = 72-80-88-100-108-116 stitches. Switch to double pointed needles size 3 mm and work rib (knit 2/purl 2) for 6 cm. Cast off. Sleeve measures approx. 16-15-14-14-13-11 cm from division. ASSEMBLY: Sew the buttons on to the left band. |
||||||||||||||||||||||
Diagram explanations |
||||||||||||||||||||||
|
||||||||||||||||||||||
 |
||||||||||||||||||||||
 |
||||||||||||||||||||||
Have you finished this pattern?Tag your pictures with #dropspattern #blueberryleafcardigan or submit them to the #dropsfan gallery. Do you need help with this pattern?You'll find 32 tutorial videos, a Comments/Questions area and more by visiting the pattern on garnstudio.com. © 1982-2026 DROPS Design A/S. We reserve all rights. This document, including all its sub-sections, has copyrights. Read more about what you can do with our patterns at the bottom of each pattern on our site. |
||||||||||||||||||||||


With over 40 years in knitting and crochet design, DROPS Design offers one of the most extensive collections of free patterns on the internet - translated to 17 languages. As of today we count 325 catalogues and 12298 patterns translated into English (UK/cm). 12298
We work hard to bring you the best knitting and crochet have to offer, inspiration and advice as well as great quality yarns at incredible prices! Would you like to use our patterns for other than personal use? You can read what you are allowed to do in the Copyright text at the bottom of all our patterns. Happy crafting!
Post a comment to pattern DROPS 249-10
We would love to hear what you have to say about this pattern!
If you want to leave a question, please make sure you select the correct category in the form below, to speed up the answering process. Required fields are marked *.