
Popular categories
Looking for a yarn?


Comments / Questions (36)
![]() Herbelin wrote:
Herbelin wrote:
Bonjour, je ne comprends pas les explications de la partie "encolure" du modèle Green Hill sweater (244-7). Il y aurait une augmentation raglan sur le marqueur 1 et 2 aux rangs 1, 3,5, 7,(4fois) alors qu'il y a une augmentation sur les marqueurs 3 et 4 que aux rangs 3 et 5 (2fois). Merci de me préciser.
03.01.2026 - 16:15DROPS Design answered:
Bonjour Mme Herbelin, dans la partie encolure, vous tricotez des rangs raccourcis, en commençant au milieu dos, vous augmentez en même temps tous les rangs sur l'endroit; au 1er rang, vous augmentez 4 m, au 3ème et 5ème rang, vous augmentez 8 m et au 7ème rang, vous augmentez 4 m = vous avez ainsi augmenté 3 fois à tous les marqueurs. Bon tricot!
05.01.2026 - 10:48
![]() Karina wrote:
Karina wrote:
Hi! Instead of using short rows, can I start with the increasing for raglan after separation?
12.03.2025 - 18:29DROPS Design answered:
Dear Karina, sure you can, just note that you should then increase on every other round a total of 3 times (all sizes), then work as explained for YOKE. Happy knitting!
13.03.2025 - 15:30
![]() Grietje De Weerd wrote:
Grietje De Weerd wrote:
Waarom staat er in elk patroon: DENK OM DE STEKENVERHOUDING! Ik begrijp niet, waar ik dan op moet letten.
12.02.2025 - 15:14DROPS Design answered:
Dag Grietje,
Het is de bedoeling dat je tijdens het breien steeds in de gaten houdt of de stekenverhouding nog wel klopt. Bij ervaren breisters is dit vaak geen probleem, maar als je begint met breien, kan dit gaan de week wat strakker of losser worden, waardoor de verhoudingen niet meer kunnen kloppen. Vandaar steeds even nameten of het nog klopt.
15.02.2025 - 11:11
![]() Eva Rink wrote:
Eva Rink wrote:
Jeg kan ikke få det til at passe at størrelse s, skal få de løngste ærmer og xxxL de korteste? Tror det er fejl på opskriften.
02.01.2025 - 12:57
![]() Conny wrote:
Conny wrote:
Ik ben klaar met de pas maar begrijp het volgende stukje niet: (Ik heb nu 268 steken en brei maat M) MATEN S, M, en XXXL: Ga verder met tricotsteek en meerder voor de raglan maar meerder nu alleen op het lijf 2-1-4 keer iedere 2e naald (de mouwmeerderingen zijn klaar).
14.12.2024 - 21:48DROPS Design answered:
Dag Conny,
Je breit maat M, dus meerdert nu 1 keer iedere 2e naald alleen op het lijf, dus bij de raglanlijnen meerder je alleen aan de kant van het lijf. Daarna heb je 272 steken op de naald. Dat klopt precies.
08.01.2025 - 14:04
![]() Femke Heijma wrote:
Femke Heijma wrote:
Voor de halslijn moet het werk na naald 1 gekeerd worden "als u 3 steken voorbij de 2e markeerdraad heeft gebreid" klopt het dat ik dan 3 gebreide steken PLUS de extra omslag = 4 steken brei tot aan de markeerdraad aan het begin van naald 2 (verkeerde kant)?
12.12.2024 - 12:09DROPS Design answered:
Dag Femke,
Ja dat klopt, je breit 3 steken voorbij de markeerdraad en je rekent de omslag die je had gemaakt om te meerderen voor de raglan daarbij niet mee.
12.12.2024 - 15:33
![]() Lena wrote:
Lena wrote:
We wzorze po polsku jest błąd w sekcji rękaw, który nie pozwala zrozumieć jak właściwie przerabiać okrążenia. Brakuje informacji że oczka zamykamy co … centymetrów, we wzorze US jest już ta informacja i dlatego ją zauważyłam.
13.11.2024 - 19:43DROPS Design answered:
Witaj Leno, dziękuję bardzo za informację. Ten fragment już został poprawiony. Pozdrawiamy!
14.11.2024 - 15:46
![]() Lee wrote:
Lee wrote:
Thank you very much!!
08.11.2024 - 09:02
![]() Lee wrote:
Lee wrote:
Responding… I understand the 8 stitches are worked at the raglan sleeve markers as previously done. But when you say “increase 4 stitches at the beg of the front/back + at the end of the front/back”, is this AT the sleeve markers for the front and back or at a different location in the front/back? Correct? Sorry. This is very confusing as British English knitting instructions are written very differently from American English instructions.
07.11.2024 - 23:53DROPS Design answered:
Dear Lee, rounds start on mid back, this means you will increase for back piece before 1st marker and after 4th marker + increase for front piece after 2nd marker and before 3rd marker = 4 sts increased, when increasing 8 sts, increase as before on each side of each marker (sleeves are between 1st and 2nd + between 3rd and 4th marker). Happy knitting!
08.11.2024 - 08:21
![]() Lee wrote:
Lee wrote:
Hello, I am working on the Green Hill Sweater. I’m not new to knitting but I’m having difficulty understanding what is meant under the YOKE section stating “increase on the body every second round and on the sleeves every 4th round”. How? Does this mean you do not increase on the front side and back side of the sweater where the raglan increase would normally be placed? Your help would be greatly appreciated
06.11.2024 - 23:21DROPS Design answered:
Dear Lee, you increased before 8 sts: 2 sts on each front, back pieces and sleeves, now you will increase alternately 4 sts (at the beg of front/back piece + at the end of front/back piece but not on sleeves) and 8 sts (just as before at the beg and at the end of front/back pieces and sleeves). Happy knitting!
07.11.2024 - 09:16
|
|
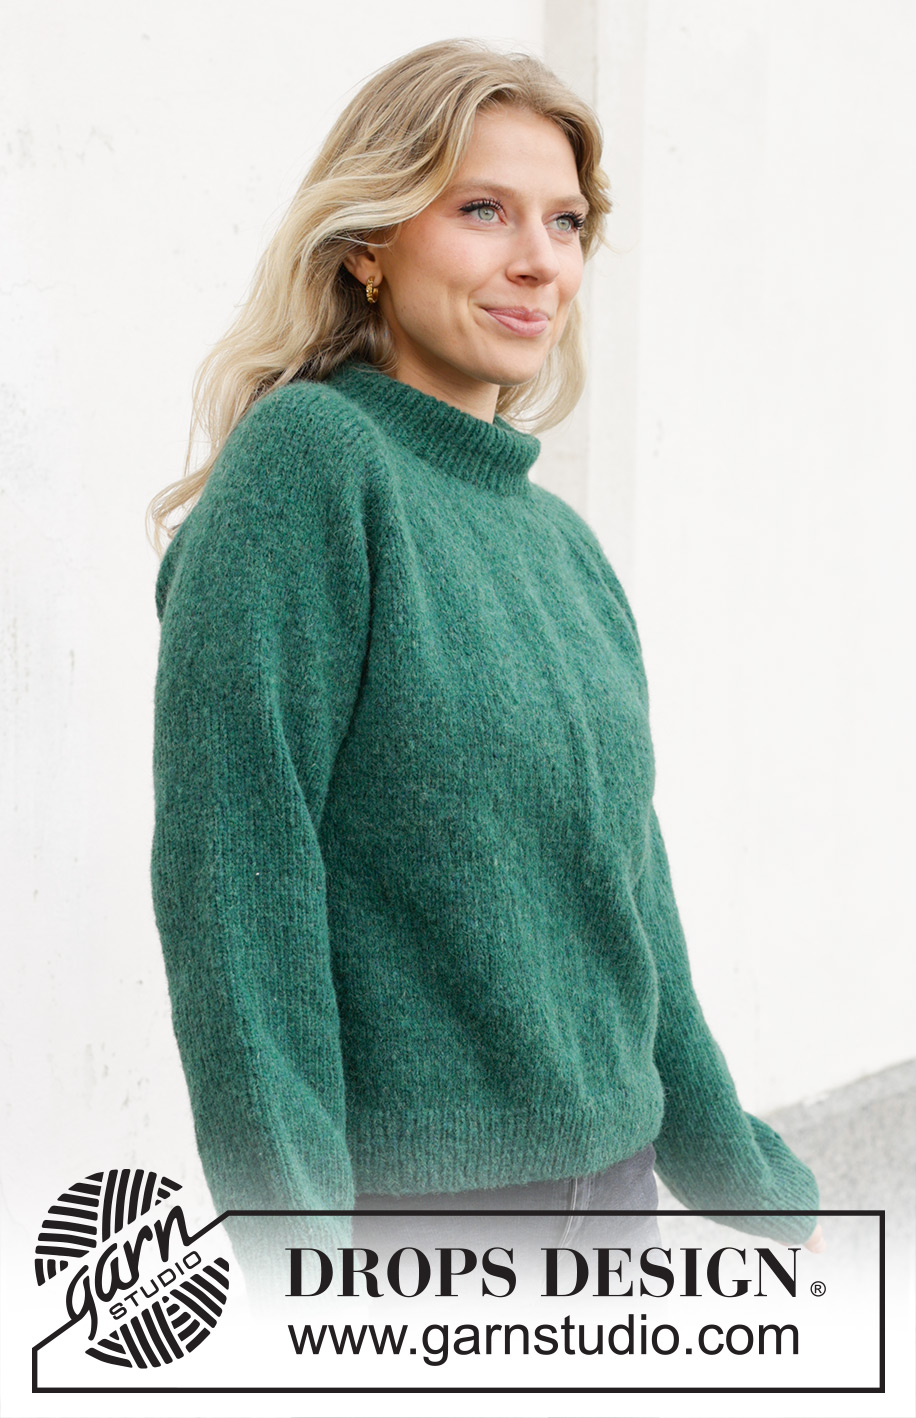
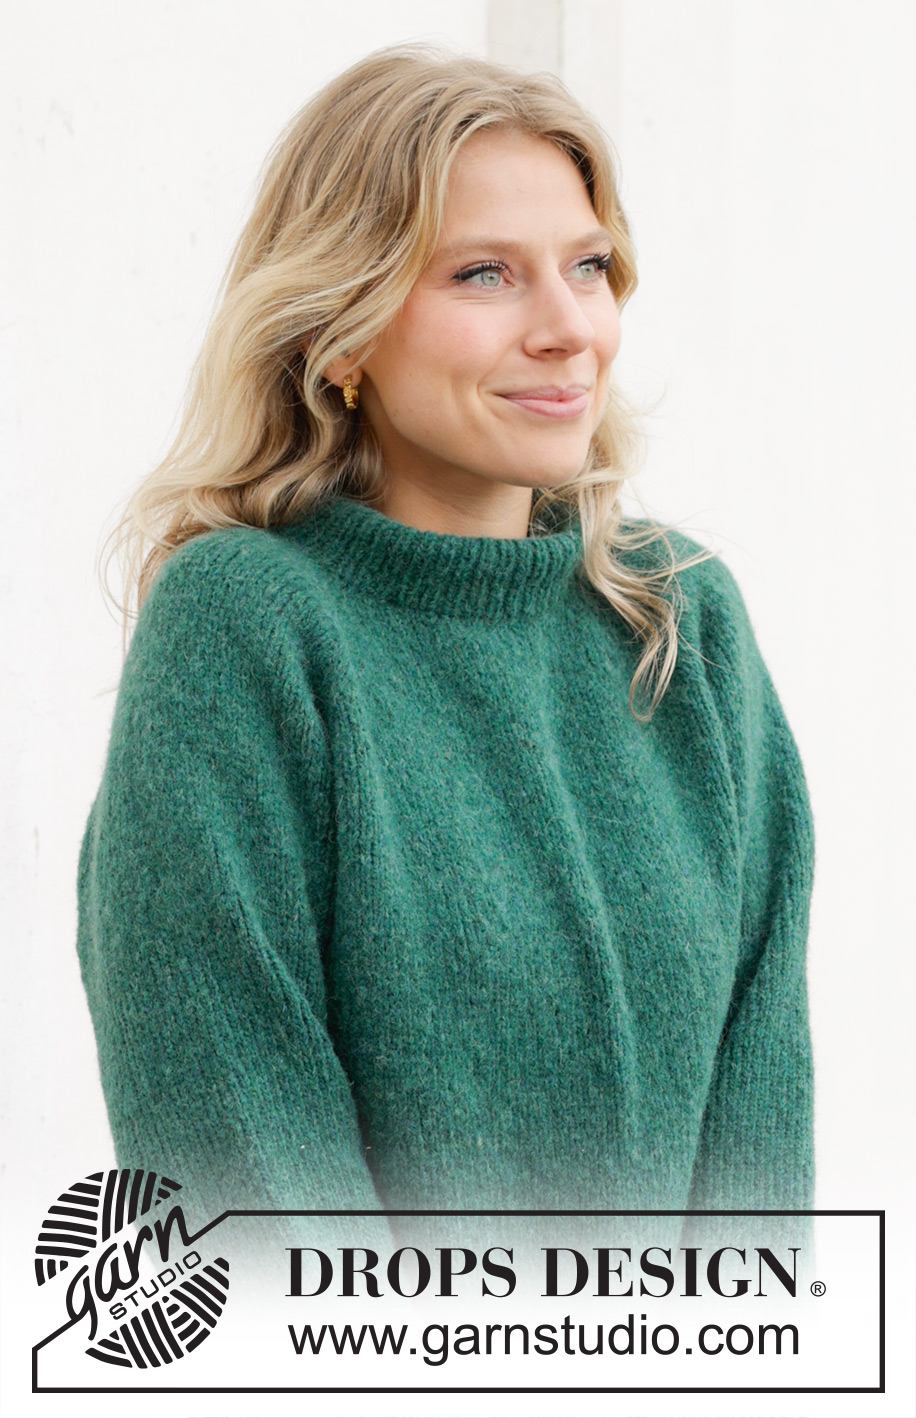
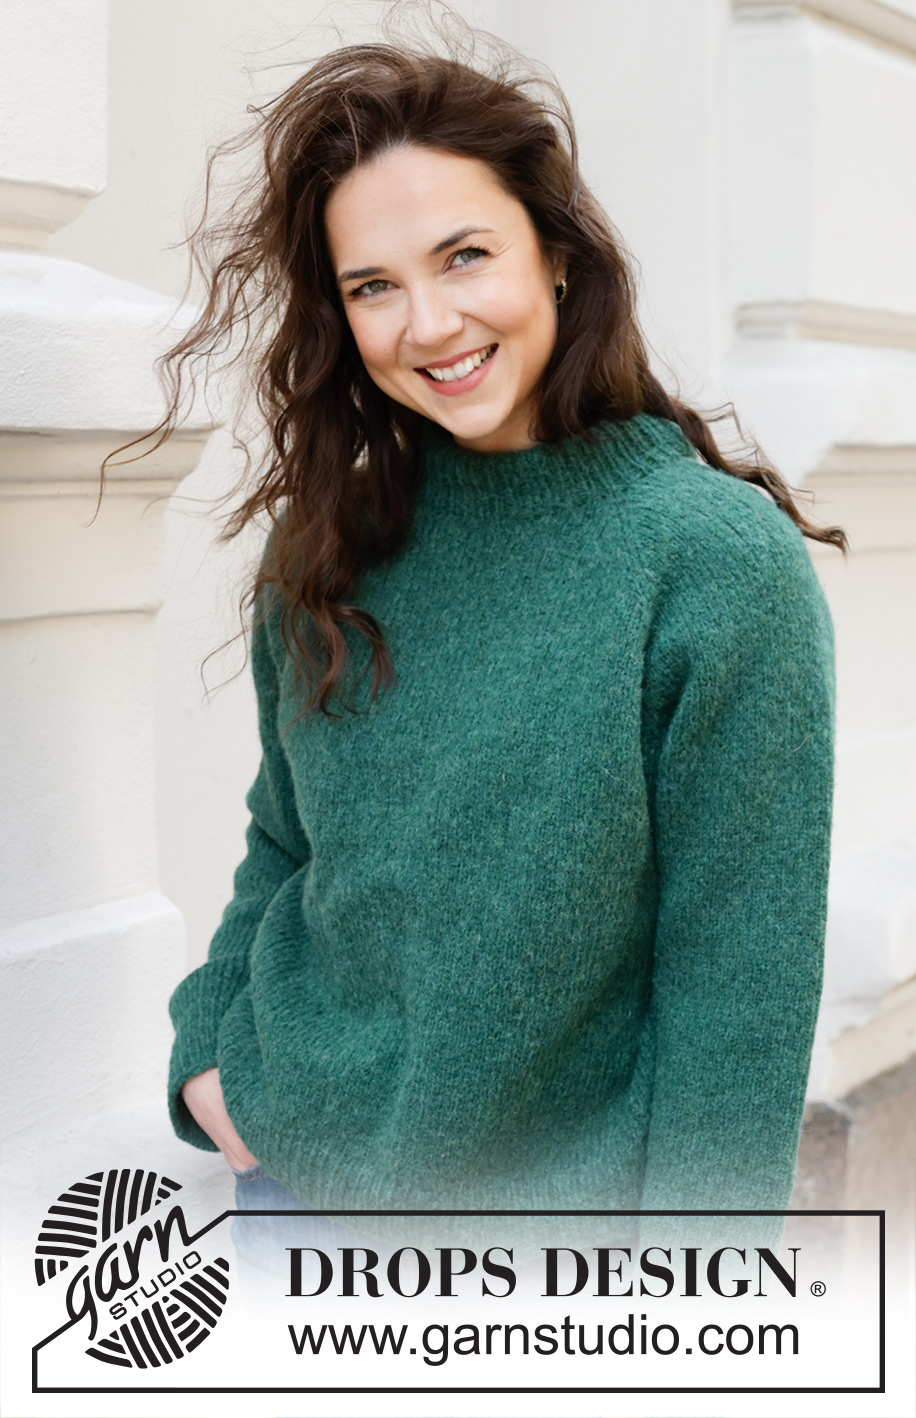
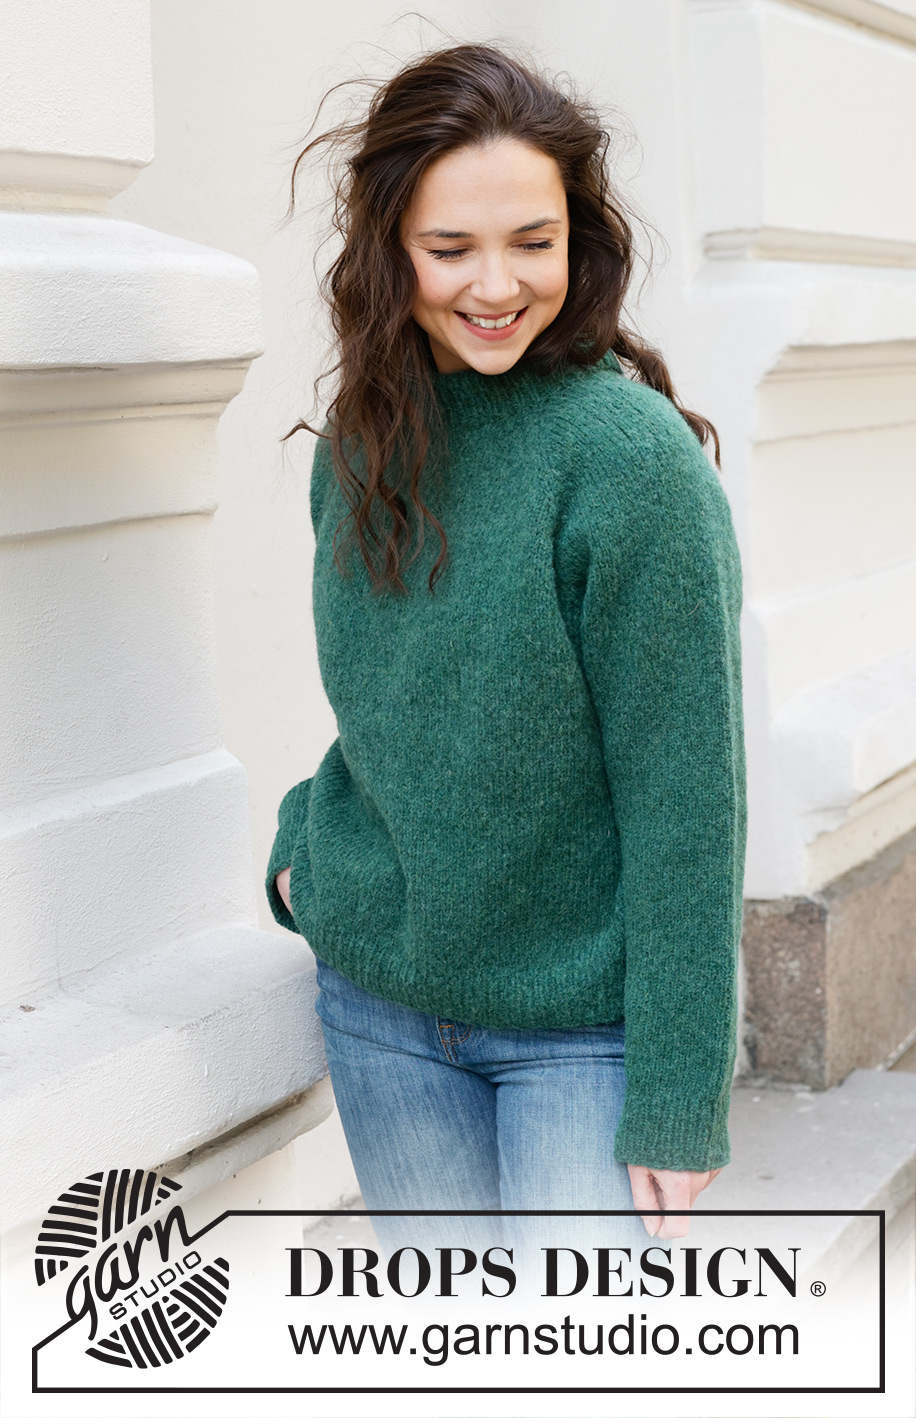
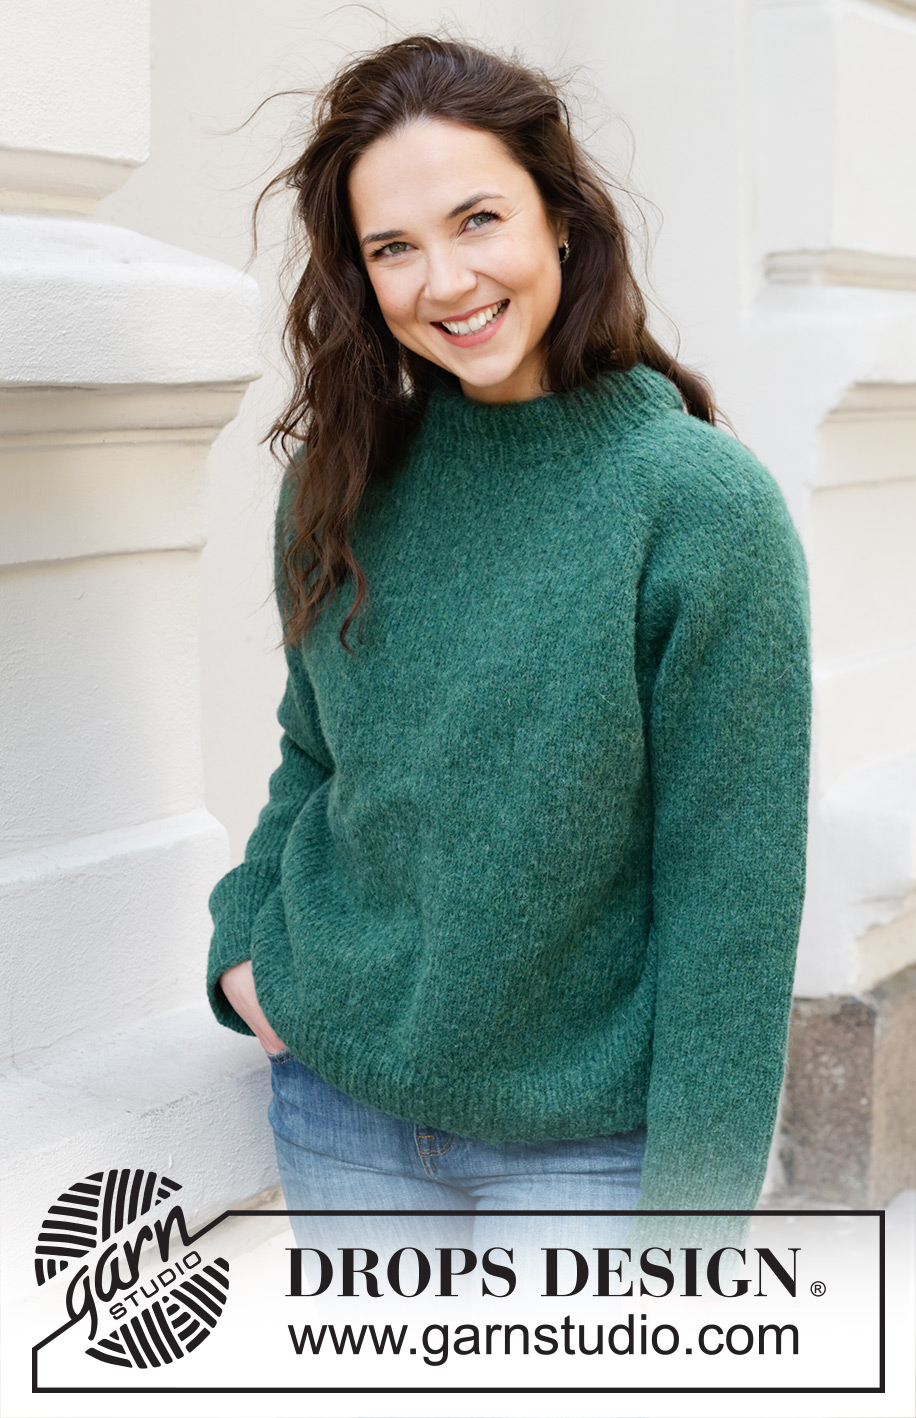
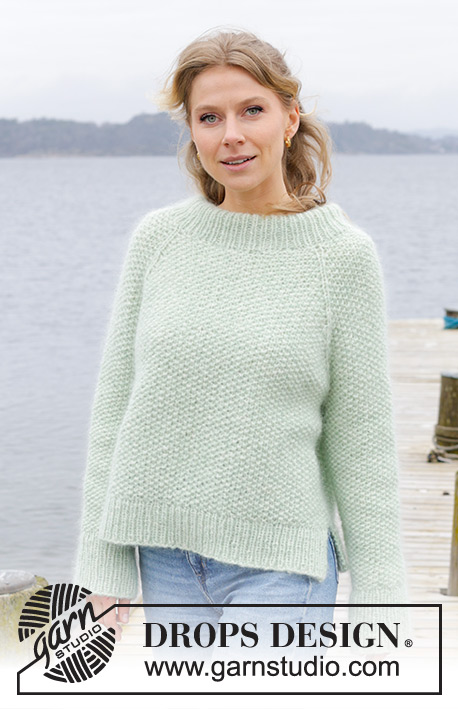
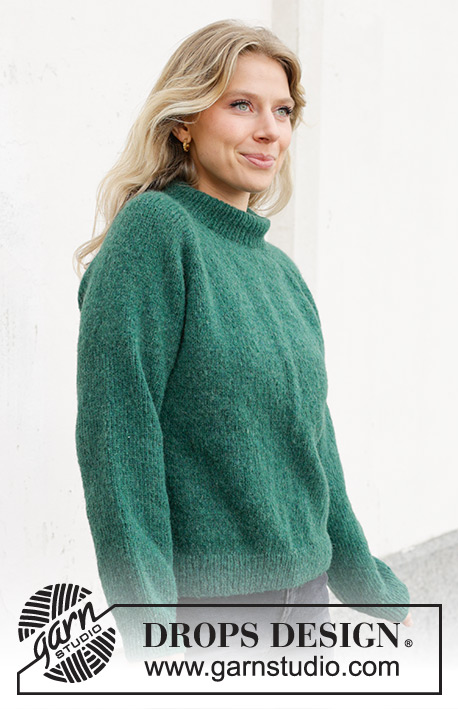
Green Hill Sweater#greenhillsweater |
|
 |
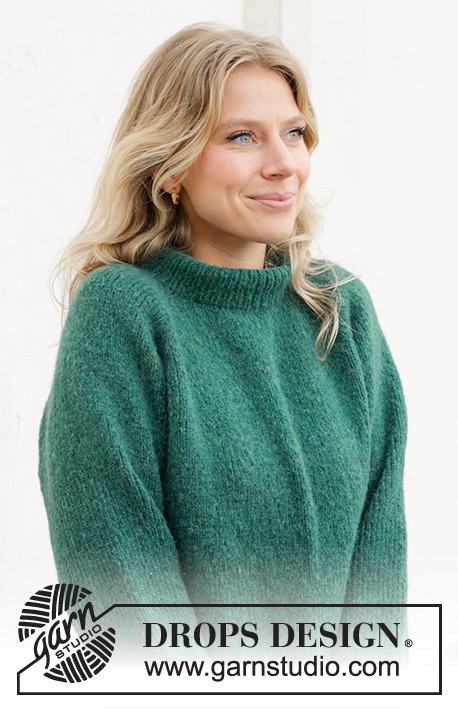 |
Knitted jumper in DROPS Air. The piece is worked top down with raglan and double neck. Sizes S - XXXL.
DROPS 244-7 |
|
|
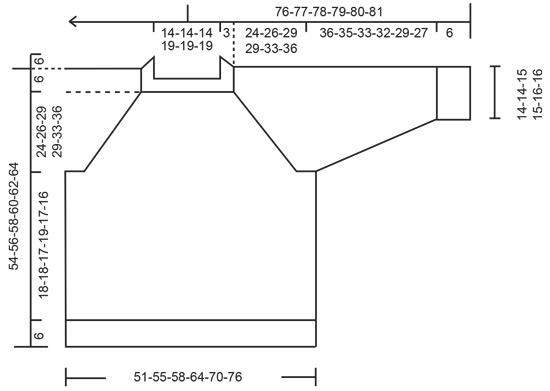
------------------------------------------------------- EXPLANATIONS FOR THE PATTERN: ------------------------------------------------------- RAGLAN: Increase 1 stitch before/after 2 stitches in each transition between the body and sleeves; the marker-thread sits between these 2 stitches. Increase 1 stitch by making 1 yarn over which is worked twisted on the next row/round to avoid a hole. The new stitches are then worked in stocking stitch. DECREASE TIP (for sleeves): Start 3 stitches before the marker-thread, knit 2 together, knit 2 (marker-thread sits between these 2 stitches), slip 1 stitch knit-wise, knit 1 and pass the slipped stitch over the knitted stitch. ------------------------------------------------------- START THE PIECE HERE: ------------------------------------------------------- JUMPER – SHORT OVERVIEW OF THE PIECE: The neck and yoke are worked in the round with circular needle, from mid back and top down. The yoke is divided for the body and sleeves and the body is continued in the round with circular needle. The sleeves are worked in the round with short circular needle/double pointed needles. DOUBLE NECK: Cast on 88-88-88-104-104-104 stitches with DROPS Air, using short circular needles size 4 and 5 mm held together. Remove the needle size 5 mm keeping the stitches with needle size 4 mm (this gives you an elastic cast-on edge). Knit 1 round, then work rib in the round (knit 1, purl 1) for 12 cm. Fold the neck double to the inside and work 1 more round of rib, working every 2nd stitch together with its corresponding stitch on the cast-on edge. You now have a double neck. The yoke is measured from here. Insert 4 marker-threads (used when increasing for raglan), without working the stitches and inserting them between 2 stitches as follows: Count 12-12-12-16-16-16 stitches (half back piece), insert 1 marker-thread, count 20 stitches (sleeve), insert 1 marker-thread, count 24-24-24-32-32-32 stitches (front piece), insert 1 marker-thread, count 20 stitches (sleeve), insert 1 marker-thread, there are 12-12-12-16-16-16 stitches left on the round (half back piece). NECKLINE: Change to circular needle size 5 mm and work short rows for the neckline, starting mid-back, as follows: ROW 1 (right side): Knit and increase for RAGLAN – read description above, on each side of the first 2 marker-threads (4 increased stitches), turn when you have worked 3 stitches past the 2nd marker-thread. ROW 2 (wrong side): Purl and turn when you have worked 3 stitches past the last marker-thread. ROW 3 (right side): Knit and increase for raglan on each side of all 4 marker-threads, (8 increased stitches) turn when you have worked 2 stitches past the previous turn. ROW 4 (wrong side): Purl and turn when you have worked 2 stitches past the previous turn. ROW 5 (right side): Knit and increase for raglan on each side of all 4 marker-threads, (8 increased stitches) turn when you have worked 2 stitches past the previous turn. ROW 6 (wrong side): Purl and turn when you have worked 2 stitches past the previous turn. ROW 7 (right side): Knit and increase for raglan on each side of the first 2 marker-threads (4 increased stitches), knit to mid-back. The short rows are finished and you have increased 3 times for raglan at each marker-thread = 112-112-112-128-128-128 stitches. YOKE: REMEMBER THE KNITTING TENSION! Work stocking stitch in the round from mid-back and increase for raglan every 2nd round 3 more times = 136-136-136-152-152-152 stitches. Continue to increase for raglan every 2nd round but every 2nd increase is only on the body, i.e., increase on the body every 2nd round and on the sleeves every 4th round, alternately 4 and 8 increased stitches. Increase like this 18-22-26-26-30-30 times on the body (9-11-13-13-15-15 times on the sleeves). SIZES S, M, and XXXL: Continue with stocking stitch and increase for raglan but now only increase on the body every 2nd round (the sleeve increases are finished) 2-1-4 times. ALL SIZES: You have increased a total of 26-29-32-32-36-40 times on the body and 15-17-19-19-21-21 times on the sleeves (including the increases on the short rows). After the last increase there are 252-272-292-308-332-348 stitches. Continue with stocking stitch until the yoke measures 24-26-29-29-33-36 cm, measured mid-back after the neck. Divide for the body and sleeves as follows: Work the first 38-41-44-48-52-56 stitches (half back piece), place the next 50-54-58-58-62-62 stitches on a thread for the sleeve, cast on 10-10-10-12-14-16 stitches (in side under sleeve), work 76-82-88-96-104-112 stitches (front piece), place the next 50-54-58-58-62-62 stitches on a thread for the sleeve, cast on 10-10-10-12-14-16 stitches (in side under sleeve), work the last 38-41-44-48-52-56 stitches (half back piece). BODY: = 172-184-196-216-236-256 stitches. Work stocking stitch in the round for a further 18-18-17-19-17-16 cm. Knit 1 round and increase 36-40-44-48-52-56 stitches evenly spaced = 208-224-240-264-288-312 stitches. Change to circular needle size 4 mm. Work rib (knit 1, purl 1) for 6 cm. Cast off. The jumper measures approx. 54-56-58-60-62-64 cm from the shoulder. SLEEVES: Place the 50-54-58-58-62-62 stitches from the thread on the one side of the piece on short circular needle/double pointed needles size 5 mm and knit up 1 stitch in each of the 10-10-10-12-14-16 stitches cast on under the sleeve = 60-64-68-70-76-78 stitches. Insert a marker-thread in the middle of the new stitches under the sleeve. Work stocking stitch in the round. When the sleeve measures 4 cm, decrease 2 stitches under the sleeve – read DECREASE TIP. Decrease like this every 5-3½-2½-2½-2-1½ cm a total of 6-8-9-10-11-11 times = 48-48-50-50-54-56 stitches. Continue working until the sleeve measures 36-35-33-32-29-27 cm from the division. Knit 1 round and increase 8-8-10-10-10-12 stitches evenly spaced = 56-56-60-60-64-68 stitches. Change to double pointed needles size 4 mm and work rib (knit 1, purl 1) for 6 cm. Cast off. The sleeve measures approx. 42-41-39-38-35-33 cm from the division. Work the other sleeve in the same way. |
|
 |
|
Have you finished this pattern?Tag your pictures with #dropspattern #greenhillsweater or submit them to the #dropsfan gallery. Do you need help with this pattern?You'll find 28 tutorial videos, a Comments/Questions area and more by visiting the pattern on garnstudio.com. © 1982-2026 DROPS Design A/S. We reserve all rights. This document, including all its sub-sections, has copyrights. Read more about what you can do with our patterns at the bottom of each pattern on our site. |
|


With over 40 years in knitting and crochet design, DROPS Design offers one of the most extensive collections of free patterns on the internet - translated to 17 languages. As of today we count 324 catalogues and 12290 patterns translated into English (UK/cm). 12290
We work hard to bring you the best knitting and crochet have to offer, inspiration and advice as well as great quality yarns at incredible prices! Would you like to use our patterns for other than personal use? You can read what you are allowed to do in the Copyright text at the bottom of all our patterns. Happy crafting!
Post a comment to pattern DROPS 244-7
We would love to hear what you have to say about this pattern!
If you want to leave a question, please make sure you select the correct category in the form below, to speed up the answering process. Required fields are marked *.