
Popular categories
Looking for a yarn?


Comments / Questions (54)
![]() Lena Gustavsson wrote:
Lena Gustavsson wrote:
Snygg väst som min dotter Jeanette vill jag ska sticka den till henne
21.08.2025 - 17:16
![]() Pirjo wrote:
Pirjo wrote:
Tämä kohta, jos en käytä apulankaa, vaan apupuikkoa: OLAN VIISTOTUS: mitä tarkoittaa 2 kertaa? ja mitkä viimeiset? Siirrä 7-7-8-9-9-11 silmukkaa apulangalle 2 kertaa, ja siirrä sitten viimeiset 6-7-7-8-10-10 silmukkaa apulangalle. Ota apulangalla odottavat 20-21-23-26-28-32 silmukkaa takaisin pyöröpuikolle nro 6.
10.07.2025 - 14:17DROPS Design answered:
Hei, tämä tarkoittaa, että kädentien reunasta siirretään aluksi 7-7-8-9-9-11 silmukkaa apulangalle/apupuikolle. Tämän jälkeen neulotaan kerros loppuun, työ käännetään ja sitten neulotaan takaisin. Seuraavalla kädentien reunasta alkavalla kerroksella siirretään taas 7-7-8-9-9-11 silmukkaa apulangalle/apupuikolle. Seuraavalla kädentien reunasta alkavalla kerroksella työn loput 6-7-7-8-10-10 silmukkaa siirretään apulangalle/apupuikolle.
11.07.2025 - 17:29
![]() Heidi wrote:
Heidi wrote:
Ik begrijp de uitleg niet voor de diagonale schouders Plaats twee keer 7-7-8-9-9-11 steken op een hulpdraad, dan de laatste 6-7-7-8-10-10 steken. Alle steken zijn nu afkant of op de hulpdraad gezet. Zijn er dan 3 hulpdraden?
30.12.2024 - 00:40DROPS Design answered:
Dag Heidi,
Nee, de tweede keer schuif je de steken erbij op de hulpdraad waar je eerst ook al steken op had gezet. De derde keer komen de laatste steken erbij.
01.01.2025 - 15:57
![]() Felicia wrote:
Felicia wrote:
Bra med gratis mönster, men det är tyvärr obegripligt vissa bitar. Hur man stickar axeln är extremt otydligt beskrivet.
20.11.2024 - 11:17
![]() Marianne Kristoffersen wrote:
Marianne Kristoffersen wrote:
Jag kommer att repa upp den här västen som jag har påbörjat. Rörig beskrivning tyvärr. Jag kanske hittar något annat......
08.11.2024 - 12:03
![]() Marianne Kristoffersen wrote:
Marianne Kristoffersen wrote:
SNED AXEL: Varför är det olika på fram och bakstycket?
07.11.2024 - 20:17DROPS Design answered:
Hej Marianne. Du ska sätt maskor mot ärmhålet på en tråd till sned axel på samma sätt som du gjorde på bakstycket enligt beskrivningen. Mvh DROPS Design
08.11.2024 - 11:54
![]() Marianne Krissttoffersen wrote:
Marianne Krissttoffersen wrote:
Fråga: det här är rörigt beskrivet, finns det någon video på detta? SNED AXEL: Varför olika? Sätt de med, stickas maskorna innan de sätts på tråd. Sätt 7-7-7-7-8-10-10 maskorna på tråd. Alla maskor har nu maskats av eller satts på tråd. Sätt tillbaka de 20-21-23-26-28-32 maskorna från tråden på rundsticka 6. Sticka 1 ...
07.11.2024 - 20:15
![]() Ann wrote:
Ann wrote:
Instruksjonene kan være ufullstendige eller feil for kragen: Hvis du bruker pinne 6 per 1 cm = 1,4 masker, vil halsen ha en diameter på mindre enn 50 cm på 60-68 masker. I veiledningen står det til og med at man skal bruke pinne 4,5. Jeg tror ikke dette vil passe over hodet på en voksen kvinne på noen som helst måte. Kan du vennligst oppdatere instruksjonen for 50-52-54-58-60-62 cm overskrift?
22.10.2024 - 00:27
![]() Ann wrote:
Ann wrote:
Hi Jette, Her har den en omkreds på 2 x for- eller bagside. For at sikre, at den sidder behageligt, skal du lægge en margin til den faktiske omkreds. Tag et målebånd, og find ud af, hvor meget plads du har brug for. Jeg ville altid gå mindst en størrelse op. Det er muligt at strikke en anden størrelse forneden end foroven. Inden du går i gang, bør du tjekke din individuelle 10 x 10 cm for at se, om det angivne antal masker faktisk er korrekt, afhængigt af hvor stramt du strikker.
22.10.2024 - 00:00
![]() Jette Nielsen wrote:
Jette Nielsen wrote:
Hvad svarer de enkelte størrelser til i brystmål?
21.10.2024 - 08:02DROPS Design answered:
Hej Jette, du finder målene på vesten i måleskitsen nederst i opskriften. Brystmål i den mindste størrelse bliver da 50x2=100 cm i omkreds :)
22.10.2024 - 15:47
|
|
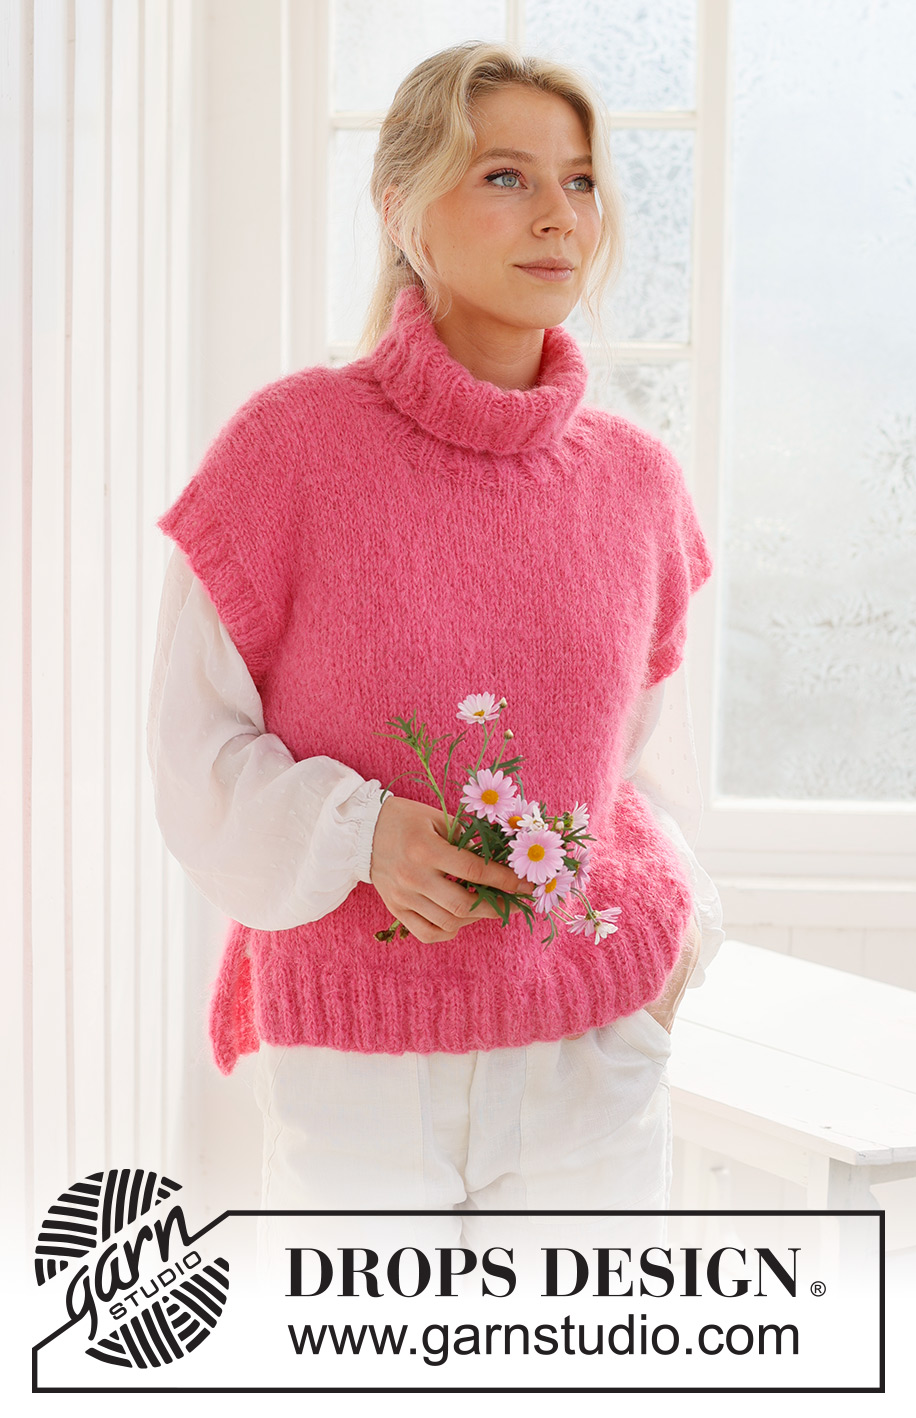
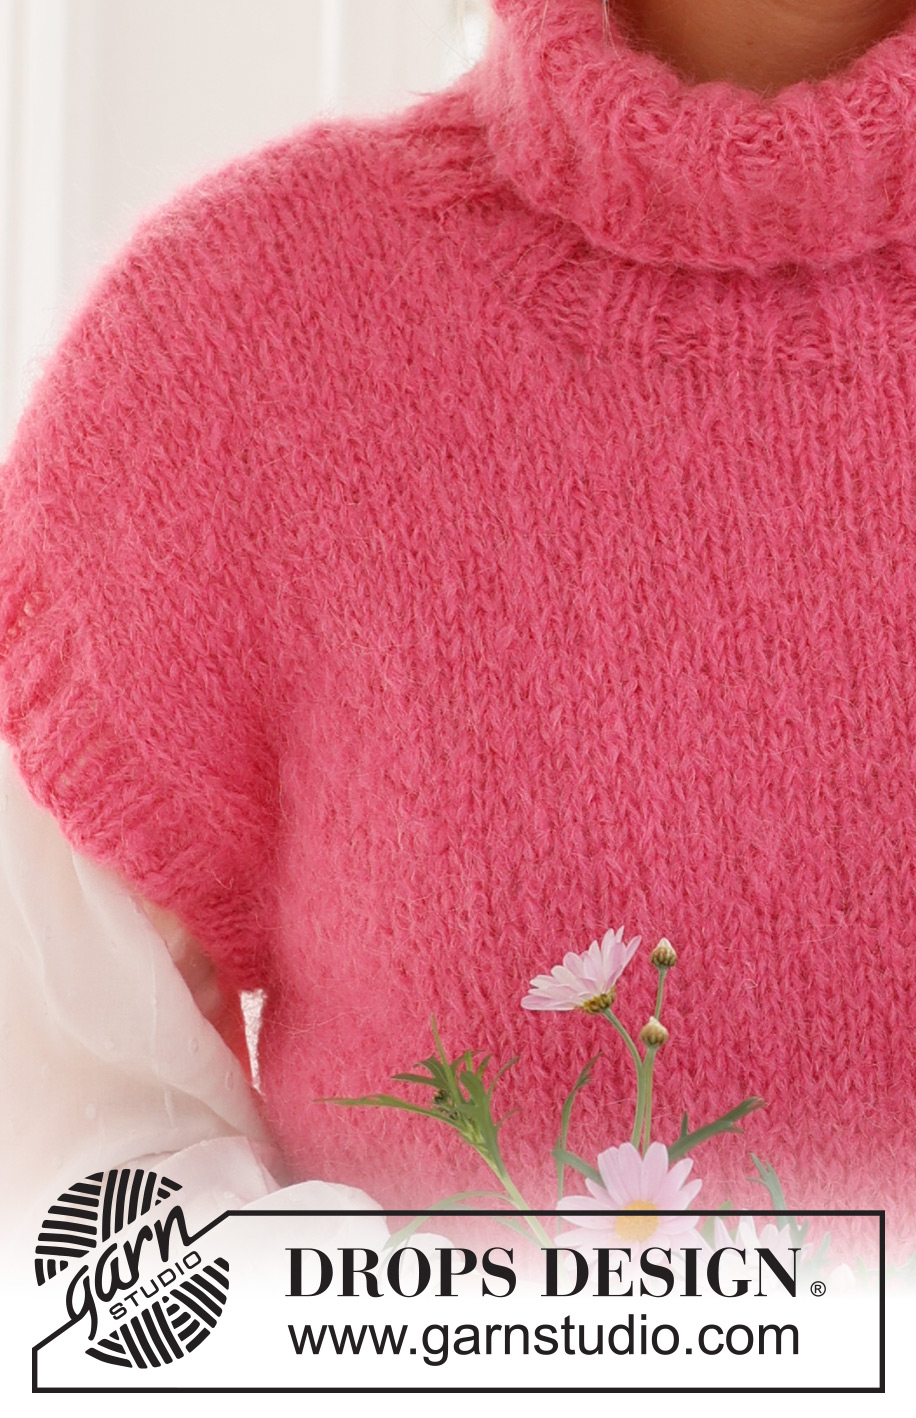
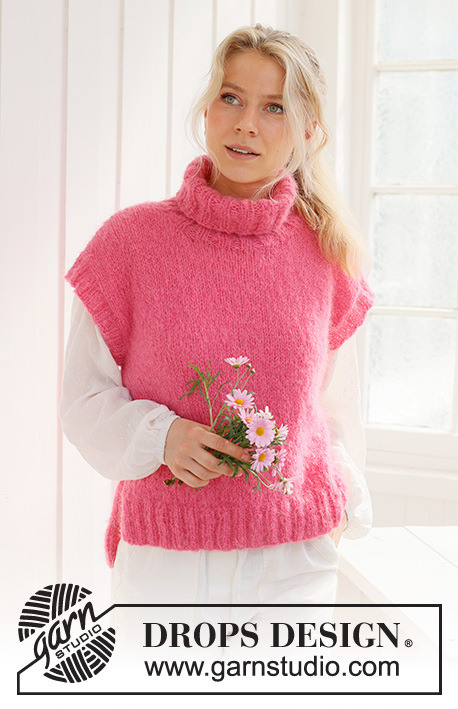
Cherry Sorbet Vest#cherrysorbetvest |
|
 |
 |
Knitted vest in DROPS Melody. The piece is worked bottom up, in stocking stitch, with high neck and split in the sides. Sizes S – XXXL.
DROPS 231-59 |
|
|
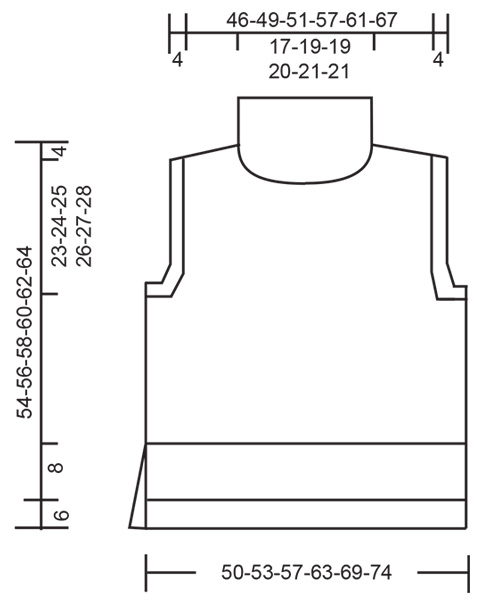
------------------------------------------------------- EXPLANATIONS FOR THE PATTERN: ------------------------------------------------------- RIDGE/GARTER STITCH (worked back and forth): Knit all rows. 1 ridge = knit 2 rows. ------------------------------------------------------- START THE PIECE HERE: ------------------------------------------------------- VEST - SHORT OVERVIEW OF THE PIECE: The front and back pieces are worked separately, back and forth and bottom up. The sleeve-edges and neck are worked to finish. The back piece is 6 cm longer than the front piece. BACK PIECE: Cast on 82-86-94-102-110-118 stitches with circular needle size 4.5 mm and DROPS Melody. Work as follows from the right side: 2 stitches in GARTER STITCH – read description above, work rib (knit 2, purl 2) until there are 4 stitches left, knit 2 and 2 stitches in garter stitch. Continue this rib for 8 cm, with the next row from the right side. Work as follows: 1 stitch in garter stitch, knit 80-84-92-100-108-116 and decrease 12-12-14-14-14-14 stitches evenly over these stitches, 1 edge stitch in garter stitch = 70-74-80-88-96-104 stitches. Change to circular needle size 6 mm and work stocking stitch with 1 stitch in garter stitch on each side. REMEMBER THE KNITTING TENSION! When the piece measures 33-34-35-36-37-38 cm, cast off 3-3-4-4-5-5 stitches at the beginning of the next 2 rows for the armholes = 64-68-72-80-86-94 stitches. Continue with stocking stitch. When the piece measures 56-58-60-62-64-66 cm, cast off the middle 24-26-26-28-30-30 stitches for the neck and finish each shoulder separately. DIAGONAL SHOULDERS: Place the outermost stitches towards armhole on a thread for the diagonal shoulders, but to avoid cutting the strand work them first. Place 7-7-8-9-9-11 stitches on a thread two times, then the last 6-7-7-8-10-10 stitches. All stitches have now been cast off or placed on the thread. Place the 20-21-23-26-28-32 stitches from the thread back on circular needle size 6 mm. Purl 1 row from the wrong side; to avoid holes where you turned in the middle of the row, pick up the strand between 2 stitches and purl it twisted together with the first stitch on the left needle. Then cast off with knit a little loosely from the right side. The piece measures approx. 60-62-64-66-68-70 cm from the cast-on edge to the highest point on the shoulder. Work the other shoulder in the same way. FRONT PIECE: Cast on and work in the same way as the back until the front piece measures 27-28-29-30-31-32 cm. Now cast off 3-3-4-4-5-5 stitches at the beginning of the next 2 rows for the armholes = 64-68-72-80-86-94 stitches. Continue working until the piece measures 48-50-52-53-55-57 cm. Place the middle 16-18-18-20-22-22 stitches on a thread for the neck and finish each shoulder separately. OVERVIEW OF THE NEXT SECTION: Work the neck and the diagonal shoulders as described below. Read NECK and DIAGONAL SHOULDERS before continuing. NECK: Cast off 1 stitch 4 times. DIAGONAL SHOULDERS: AT THE SAME TIME when the piece measures 50-52-54-56-58-60 cm, place the outermost stitches towards armhole on a thread for the diagonal shoulder in the same way as on the back piece. When all the stitches are cast off or placed on a thread, place the 20-21-23-26-28-32 stitches from the thread back on circular needle size 6 mm. Purl 1 row from the wrong side in the same way as on the back piece. Cast off with knit a little loosely from the right side. The piece measures approx. 54-56-58-60-62-64 cm from the cast-on edge to the highest point on the shoulder. Work the other shoulder in the same way. ASSEMBLY: Sew the shoulder seams. Sew the side seams in the outermost loop of the outermost stitch so the seams are flat, leaving 14 cm at the bottom (= split). SLEEVE-EDGES: Using short circular needle size 4.5 mm, start at the bottom of the armhole and knit up from the right side (inside 1 stitch) 64 to 80 stitches around the armhole (the number of stitches must be divisible by 4). Work rib in the round (knit 2, purl 2) for 4 cm. Cast off with knit over knit and purl over purl. Work a similar edge around the other armhole. NECK: Using short circular needle size 4.5 mm, start on the top of one shoulder and knit up from the right side (inside 1 stitch) 60 to 68 stitches around the neck (including the stitches from the thread and with the number of stitches divisible by 4). Work rib in the round (knit 2, purl 2) for 20-20-22-22-24-24 cm. Cast off with knit over knit and purl over purl. |
|
 |
|
Have you finished this pattern?Tag your pictures with #dropspattern #cherrysorbetvest or submit them to the #dropsfan gallery. Do you need help with this pattern?You'll find 25 tutorial videos, a Comments/Questions area and more by visiting the pattern on garnstudio.com. © 1982-2026 DROPS Design A/S. We reserve all rights. This document, including all its sub-sections, has copyrights. Read more about what you can do with our patterns at the bottom of each pattern on our site. |
|


With over 40 years in knitting and crochet design, DROPS Design offers one of the most extensive collections of free patterns on the internet - translated to 17 languages. As of today we count 324 catalogues and 12290 patterns translated into English (UK/cm). 12290
We work hard to bring you the best knitting and crochet have to offer, inspiration and advice as well as great quality yarns at incredible prices! Would you like to use our patterns for other than personal use? You can read what you are allowed to do in the Copyright text at the bottom of all our patterns. Happy crafting!
Post a comment to pattern DROPS 231-59
We would love to hear what you have to say about this pattern!
If you want to leave a question, please make sure you select the correct category in the form below, to speed up the answering process. Required fields are marked *.