
Popular categories
Looking for a yarn?


Comments / Questions (53)
![]() Camilla Kilhof wrote:
Camilla Kilhof wrote:
Hvor ender omgangen (i hvilken maske) i diagrammet til Drops 221-2?
03.03.2023 - 11:13DROPS Design answered:
Hei Camilla. Hvilken omgange? eller les beskrivelsen til diagramikonene under Diagram og du vi da se hvor den omgangen du lurer på skal ende. mvh DROPS Design
06.03.2023 - 14:21
![]() Alida wrote:
Alida wrote:
Dit is zo'n mooi patroon. Ik heb het nu bijna af en ik wordt er zo blij van 🥰.
27.11.2022 - 23:42
![]() Janice wrote:
Janice wrote:
How do I start the rows which contains 4 treble crochets worked together (rows 5, 8 and 14)? I have tried with 3 chains + 1 but not sure this is correct. Thank you.
06.11.2022 - 17:33DROPS Design answered:
Dear Janice, all rows start with 3 chain stitches. In the rows with 4 treble crochets worked together, work the 3 initial chain stitches, an extra chain stitch, skip 1 Relief-treble crochet of the previous row, and work the 4 treble stitches together in the next stitch. Happy crocheting!
06.11.2022 - 23:27
![]() Ellen wrote:
Ellen wrote:
This is my first time crocheting from a diagram, and I think I'm understanding, but I have no idea how to start. I understand the chain 4 then slip stitch to make a ring, but then I don't have anything to crochet the first (bottom) row into. Do I chain 18+1 after the slip stitch and then turn my work to go backwards (left to right) across the bottom row? Or am I missing something obvious? Kind regards, Ellen
09.06.2022 - 23:24DROPS Design answered:
Dear Ellen, this lesson explains how to read a diagram showing a fraction of a circle or of a square in that case: you will start with the ring of chains then read every row from the right towards the left and here you will work this a total of 4 times to get for ex at the end of 1st round: *3 dc (US-English), 5 chains* a total of 4 times + the first 3 chains at the beg of the round. Happy crocheting!
10.06.2022 - 09:01
![]() Raelyn Sullivan wrote:
Raelyn Sullivan wrote:
Is there written instructions? I don't know how to read a chart
26.03.2022 - 16:30DROPS Design answered:
Dear Raelyn, all of our patterns are written in a mixed format, with both charts and written instructions, as you can see in the published version, there are no full written instructions available. You can check our lesson on how to read crochet charts here: https://www.garnstudio.com/lesson.php?id=69&cid=19 Happy crochetting!
26.03.2022 - 19:31
![]() Danielle wrote:
Danielle wrote:
The Relief Double Crochet on this pattern is the same as a back post double crochet (BPdc) in US terms. The video posted with the pattern shows a front post double crochet (FPdc) is a little confusing since the chart/instructions say from the back of the work. I'm new to working from a chart so I wanted to post a comment to help others who struggle like me with charts.
29.01.2022 - 17:52
![]() Martina wrote:
Martina wrote:
Hi! Is it possible to read this Instruction in German anywhere??
17.01.2022 - 14:33DROPS Design answered:
Hi Martina, sure, it's just to "choose your language" right below the pictures :)
17.01.2022 - 15:09
![]() Marian Van Leuven wrote:
Marian Van Leuven wrote:
Het telpatroon is aan het begin niet helemaal duidelijk. Ik begin met een ring en 3 lossen (=1 stokje) en dan nog 3 stokjes. Dan heb ik dus 4 x 4 stokjes in de ring (afgezien van de losse-hoeken? Hoe zit het dan met toer 2? Klopt het dat ik dan boven de 4 stokjes steeds 2 stokjes-1 losse-1 stokje haak?
17.01.2022 - 14:03DROPS Design answered:
Dag Marian,
De 3 lossen brei je in plaats van het eerste stokje. Dus in de lossen ring brei je 3 lossen, 2 stokjes en daarna de hoek van 5 lossen. A.1 laat dus zien hoe je de eerste of laatste (afhankelijk van op welke toer je bent) haakt. Zie ook de beschrijving van het symbool van de drie lossen.
21.01.2022 - 09:50
![]() Nathalie Libert wrote:
Nathalie Libert wrote:
Bonjour, puis-je faire une vidéo YouTube ? Dans la positive quelles sont les conditions ? Merci à vous.
31.08.2021 - 02:56DROPS Design answered:
Bonjour Mme Libert, vous pouvez effectivement faire un tutoriel vidéo pour nos modèles, nous vous demandons juste de créditer DROPS Design pour le modèle et les explications et de citer le modèle original avec le lien sur notre site. Retrouvez les autres infos sur le copyright en bas de page. Bon crochet!
31.08.2021 - 08:15
![]() Annie FARNER wrote:
Annie FARNER wrote:
Bonjour, Pouvez-vous me confirmer les dimensions de la couverture ? L'indication de 110 x 83 cm ne semble pas juste avec 4 x 3 carrés de 31 cm de côté (= 124 x 93 cm). Merci beaucoup. Salutations
21.06.2021 - 10:28DROPS Design answered:
Bonjour Mme Farner, les mesures de la couverture ont été corrigées (= 95x126 cm), merci pour votre retour. Bon crochet!
24.06.2021 - 13:51
|
||||||||||||||||||||||||||||
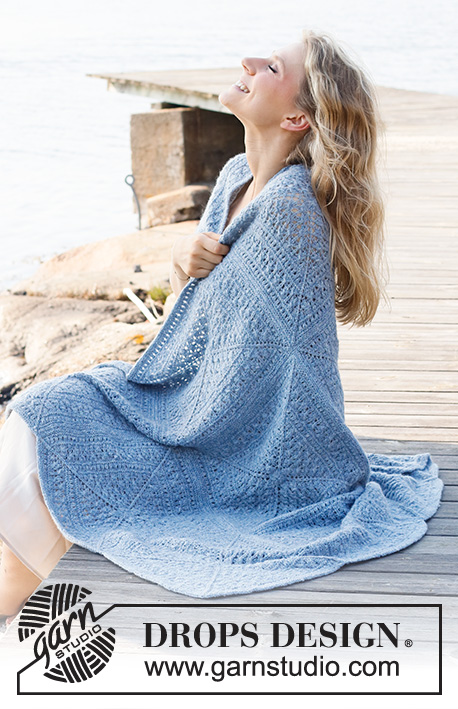
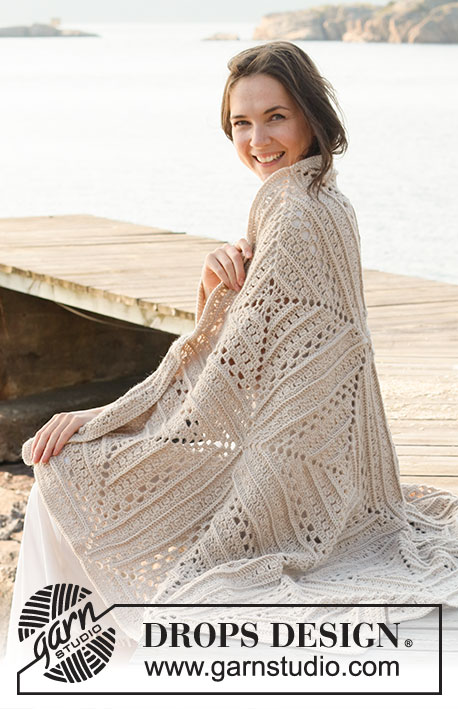
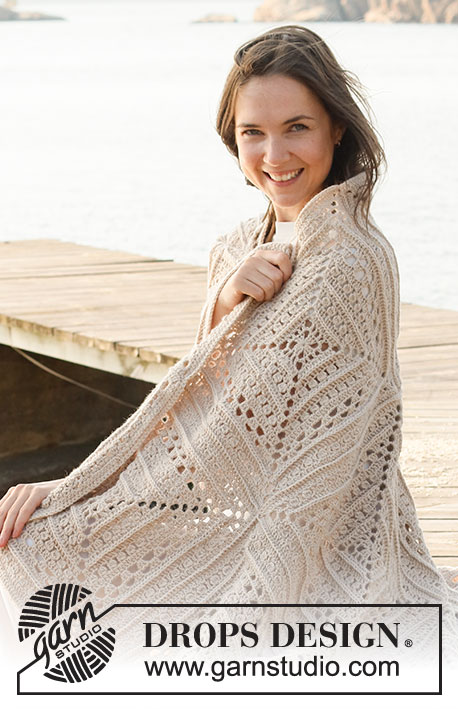
Day By The Sea#daybytheseablanket |
||||||||||||||||||||||||||||
 |
 |
|||||||||||||||||||||||||||
Crocheted blanket in DROPS Lima.
DROPS 221-2 |
||||||||||||||||||||||||||||
|
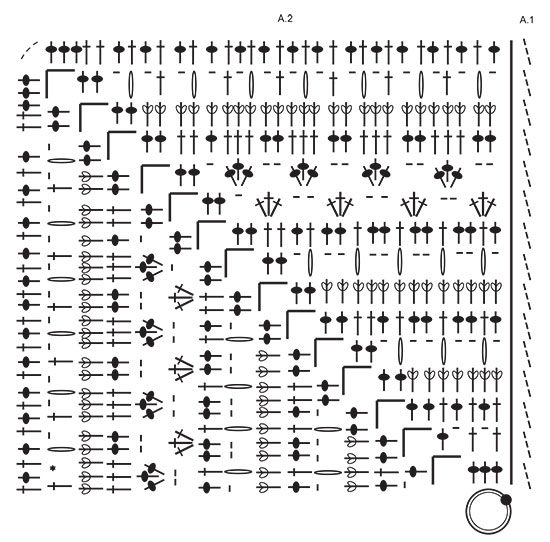
------------------------------------------------------- EXPLANATIONS FOR THE PATTERN: ------------------------------------------------------- PATTERN: See diagrams A.1 and A.2. Diagram A.1 shows how the rounds start and finish. CHAIN STITCH: If you work outermost on the hook the chain stitch will often be too tight; 1 chain stitch should be as long as 1 treble crochet is wide. ------------------------------------------------------- START THE PIECE HERE: ------------------------------------------------------- BLANKET – SHORT OVERVIEW OF THE PIECE: The blanket consists of 12 squares worked according to the diagrams. The squares are crocheted together and an edge is crocheted around the blanket to finish. SQUARE: Use crochet hook size 4 mm and Lima. Read CHAIN STITCH in explanations above. Work diagram A.2 a total of 4 times around the chain-stitch ring - A.1 shows how the round begins and ends. REMEMBER THE CROCHET TENSION! Work a total of 12 squares. ASSEMBLY: Lay the squares out, with 3 in width and 4 in length. Make sure all the squares have the right side up. Use Lima and work the squares together, first in width then in length. Lay 2 squares together, wrong side to wrong side, and work through both layers from the right side as follows: Fasten the strand with 1 double crochet around the chain-spaces in the corner, * work 1 double crochet in each stitch as far as the next corner (= 3 chain stitches), work 1 double crochet around the corner, 2 chain stitches and 1 double crochet around the next corner (= 3 chain stitches). Work from *-* until all the squares have been worked together, but on the last square finish with 1 double crochet in the last corner (= 3 chain stitches). Repeat along the other strips in width. Work the strips together lengthwise in the same way. EDGE: Use Lima and crochet hook size 4 mm. Start by fastening the strand with 1 slip stitch in the first corner, then work as follows: Work 3 chain stitches and 2 treble crochets around the first corner. * Work 1 treble crochet in each stitch as far as the corners between squares, work 1 treble crochet around each corner *, work from *-* to the last corner on this side of the blanket. Around corner 2 work 3 treble crochets, work from *-* to the last corner on this side of the blanket. Around corner 3 work 3 treble crochets, work from *-* to the last corner on this side of the blanket. Around corner 4 work 3 treble crochets, work from *-* as far as the first corner and finish with 1 slip stitch in the 3rd chain stitch at the beginning of the round. Cut and fasten the strand. |
||||||||||||||||||||||||||||
Diagram explanations |
||||||||||||||||||||||||||||
|
||||||||||||||||||||||||||||
 |
||||||||||||||||||||||||||||
Have you finished this pattern?Tag your pictures with #dropspattern #daybytheseablanket or submit them to the #dropsfan gallery. Do you need help with this pattern?You'll find 9 tutorial videos, a Comments/Questions area and more by visiting the pattern on garnstudio.com. © 1982-2026 DROPS Design A/S. We reserve all rights. This document, including all its sub-sections, has copyrights. Read more about what you can do with our patterns at the bottom of each pattern on our site. |
||||||||||||||||||||||||||||


With over 40 years in knitting and crochet design, DROPS Design offers one of the most extensive collections of free patterns on the internet - translated to 17 languages. As of today we count 324 catalogues and 12290 patterns translated into English (UK/cm). 12290
We work hard to bring you the best knitting and crochet have to offer, inspiration and advice as well as great quality yarns at incredible prices! Would you like to use our patterns for other than personal use? You can read what you are allowed to do in the Copyright text at the bottom of all our patterns. Happy crafting!
Post a comment to pattern DROPS 221-2
We would love to hear what you have to say about this pattern!
If you want to leave a question, please make sure you select the correct category in the form below, to speed up the answering process. Required fields are marked *.