
Popular categories
Looking for a yarn?


Comments / Questions (28)
![]() Malin wrote:
Malin wrote:
Hej! Jag får inte ihop det med antalet maskor. Väldigt otydligt när man ska räkna med framkantsmaskorna. Jag stickar M och la upp 87st maskor, efter resåren ska jag öka 20 maskor - ÖKNINGS-/MINSKNINGSTIPS = 107 maskor. Sedan skall jag fästa mina markörer efter 5, 21, 16, 33, 16, 21 & 5 maskor men det blir 117 maskor och skulle ju enligt mönstret endast ha 107 efter ökning. Tänker jag fel?
11.11.2020 - 23:40DROPS Design answered:
Hej Malin. Du ska inte först räkna bort de 5 framkantmaskorna när du sätter markörerna, utan du räknar direkt från första maskan. Dvs 21+16+33+16+21=107 m. Mvh DROPS Design
12.11.2020 - 08:35
![]() CLAUDIA NOEMI wrote:
CLAUDIA NOEMI wrote:
Hay algo que me confunde en las indicaciones. En la sección AUMENTO MANGAS, hacia el al final dice: "Aumentar así en cada hilera por el lado derecho un total de 9-10-9-12-12-13 veces = 195-211-219-247-265-283 puntos. La pieza mide aprox. 16-18-17-21-22-24 cm" Pero luego dice: "Continuar tejiendo punto jersey con 5 puntos del borde delantero en punto musgo a cada lado hasta que la pieza mida 16-18-18-21-22-24 cm." ¿Continuar tejiendo hasta que mida lo mismo que ya media antes?
11.11.2020 - 19:31DROPS Design answered:
Hola Claudia. El patrón está correcto. Quiere decir que si después de completar los aumentos para las mangas todavía no has alcanzando las medidas (16-18-18 ....), tienes que continuar recto, sin aumentos hasta que la labor tenga la medida correcta.
19.11.2020 - 20:03
![]() Karin wrote:
Karin wrote:
Bij dit model is maat M 52 cm breed, terwijl bij andere modellen Maat L 52 breed is. Is het model echt zo wijd?
23.10.2020 - 10:42
![]() Ely Ramirez wrote:
Ely Ramirez wrote:
Ya termine el frozen líke cardigan, y quedo precioso y fue muy fácil de hacer gracias
02.10.2020 - 09:36
![]() Marie Moureau wrote:
Marie Moureau wrote:
Oui pour le modèle , mais pas pour le laine AIR , je l'ai tricoté plusieurs fois avec toujours le même résultat: après lavage du 12 ans on passe à la taille 46!!!!!
11.07.2020 - 11:08
![]() Susana wrote:
Susana wrote:
Lindo cardigan!
11.06.2020 - 14:18
![]() Véronique wrote:
Véronique wrote:
New shape for cardigan with saddle sleeves. Looks very nice and cozy on everybody. Neck looks a bit retro and make it realy cool for a cardigan
10.06.2020 - 08:32
![]() Elisa wrote:
Elisa wrote:
Un bel cappotto per la mezza stagione, bello come un cielo ventoso.
09.06.2020 - 10:30
|
|||||||||||||
Frozen Lake Cardigan#frozenlakecardigan |
|||||||||||||
 |
 |
||||||||||||
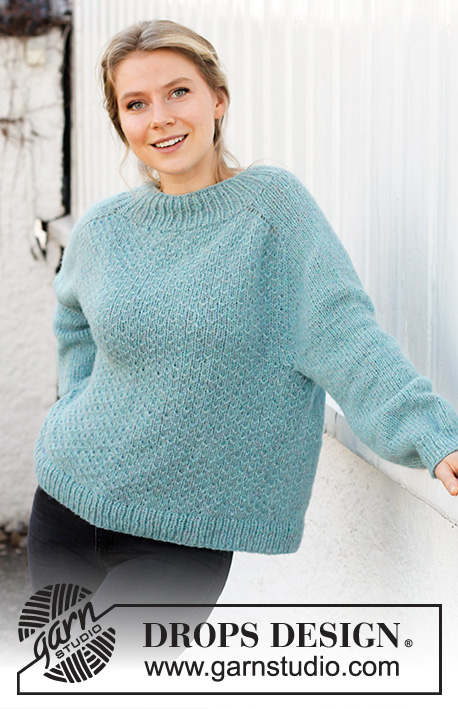
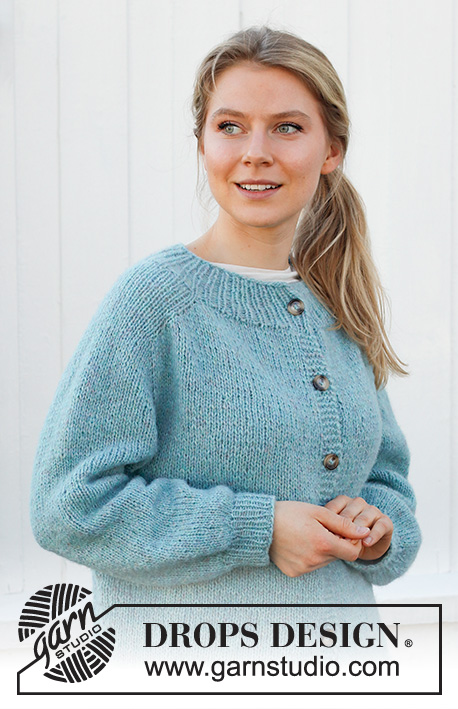
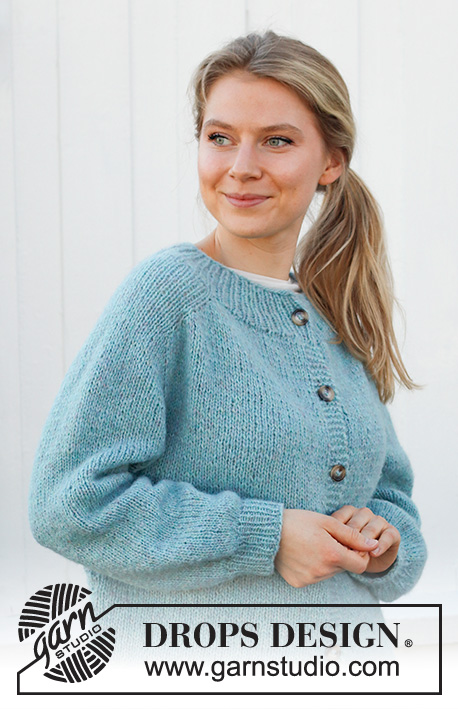
Knitted jacket with saddle shoulders in DROPS Air. The piece is worked top down. Sizes S - XXXL.
DROPS 215-30 |
|||||||||||||
|
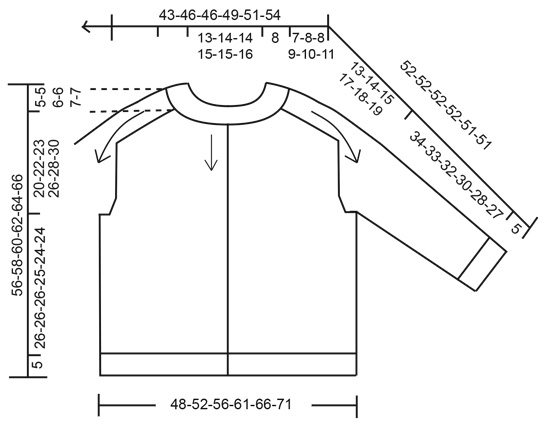
------------------------------------------------------- EXPLANATIONS FOR THE PATTERN: ------------------------------------------------------- RIDGE/GARTER STITCH (worked back and forth): Knit all rows. 1 ridge in height = Knit 2 rows. INCREASE/DECREASE TIP (evenly spaced): To work out how to increase/decrease evenly, count the total number of stitches on needle (e.g. 87 stitches), minus the bands (e.g. 10 stitches) and divide the remaining stitches with number of increases/decreases to be made (e.g. 20) = 3.85. In this example, increase by making 1 yarn over after approx. each 4th stitch. On the next row work the yarn overs twisted to avoid holes. When decreasing, knit together approx. each 3rd and 4th stitch. INCREASE TIP (for saddle shoulder increase): FROM RIGHT SIDE: BEFORE MARKER: The new stitch will be twisted, leaning towards the right. Use left needle to pick up strand between 2 stitches from the row below, pick up strand from behind and knit stitch in front loop. AFTER MARKER: The new stitch will be twisted, leaning towards the left. Use left needle to pick up strand between 2 stitches from the row below, pick up strand from the front and knit stitch in back loop. FROM WRONG SIDE: BEFORE MARKER: The new stitch will be twisted, leaning towards the right. Use left needle to pick up strand between 2 stitches from the row below, pick up strand from the front and purl stitch in back loop. AFTER MARKER: The new stitch will be twisted, leaning towards the left. Use left needle to pick up strand between 2 stitches from the row below, pick up strand from behind and purl stitch in front loop. DECREASE TIP (for mid under sleeve): Decrease 1 stitch on either side of the marker thread as follows: Work until there are 3 stitches left before the marker thread, knit 2 together, knit 2 (marker thread sits between these 2 stitches), slip 1 stitch as if to knit, knit 1 and pass the slipped stitch over the knitted stitch. BUTTONHOLES: Work buttonholes on the right band (when the garment is worn). Work from the right side when there are 3 stitches left on the row as follows: Make 1 yarn over, knit 2 together and knit 1. On the next row (wrong side), knit the yarn over to leave a hole. The first buttonhole is worked when the rib on the neck measures 3 cm. Then work the other 5-5-6-6-6-6 buttonholes with approx. 9½-10-8½-9-8-8 cm between each one. CASTING-OFF TIP: To avoid the cast-off edge being tight you can cast off with a larger size needle. If the edge is still tight, make 1 yarn over after approx. each 4th stitch at the same time as casting off; the yarn overs are cast off as normal stitches. ------------------------------------------------------- START THE PIECE HERE: ------------------------------------------------------- JACKET – SHORT OVERVIEW OF THE PIECE: The neck and yoke are worked back and forth with circular needle from mid front and top down. Stitches are increased for the shoulders, then for the sleeves. The yoke is divided for body and sleeves and the body continued back and forth. The sleeves are worked in the round with double pointed needles, top down. NECK: Cast on 83-87-91-95-101-105 stitches (including 5 band stitches on each side) with circular needle size 4.5 mm and Air. Purl 1 row (= wrong side). The next row is worked as follows from the right side: Work 1 stitch in GARTER STITCH – read description above, * knit 1, purl 1 *, work from *-* until there are 2 stitches left on the row, knit 1 and finish with 1 stitch in garter stitch. Continue this rib for 8 cm. When the rib is finished, knit 1 row from the right side where you increase 20-20-28-32-36-38 stitches evenly spaced – read INCREASE/DECREASE TIP = 103-107-119-127-137-143 stitches. Purl 1 row from the wrong side with 5 band stitches in garter stitch on each side. Change to circular needle size 5.5 mm and insert 1 marker after the band at the beginning of the row; the yoke is measured from this marker! YOKE: Now insert 4 markers in the piece, without working the stitches, as follows: Insert marker 1 after 20-21-22-24-26-27 stitches (= front piece), skip the next 16-16-20-20-22-22 stitches, insert marker 2 here (= shoulder stitches), skip the next 31-33-35-39-41-45 stitches, insert marker 3 here (= back piece), skip the next 16-16-20-20-22-22 stitches, insert marker 4 here (= shoulder stitches), there are 20-21-22-24-26-27 stitches left after the last marker (= front piece). Allow the markers to follow your work onwards; they will be used when increasing. SHOULDER INCREASE: Continue working stocking stitch with 5 band stitches in garter stitch on each side. On the next row from the right side increase for saddle shoulders as follows: Increase 1 stitch BEFORE markers 1 and 3 and AFTER markers 2 and 4 – read INCREASE TIP (= 4 stitches increased); I.e. there are increases on back piece and front piece, number of shoulder stitches remain the same. On the next row from the wrong side increase for saddle shoulder as follows: Increase 1 stitch BEFORE markers 4 and 2 and increase 1 stitch AFTER markers 3 and 1. I.e. the increases are different from right side and wrong side. REMEMBER THE KNITTING TENSION! Increase like this every row a total of 14-16-16-18-20-22 times = 159-171-183-199-217-231 stitches. The piece measures approx. 7-8-8-9-10-11 cm from the marker on the neck. SLEEVE INCREASE: Continue working stocking stitch with 5 band stitches in garter stitch on each side. On the next row from the right side increase for the sleeves as follows: Increase 1 stitch AFTER markers 1 and 3 and BEFORE markers 2 and 4 (= 4 stitches increased) i.e. increase in shoulder stitches, number of stitches in back piece and front pieces remains the same. Increase like this on every row from the right side a total of 9-10-9-12-12-13 times = 195-211-219-247-265-283 stitches. The piece measures approx. 16-18-17-21-22-24 cm. Continue working stocking stitch with 5 band stitches in garter stitch on each side until the piece measures 16-18-18-21-22-24 cm. YOKE INCREASE: On the next row from the right side increase 1 stitch on each side of all markers as follows: Work until there is 1 stitch left before markers 1 and 3, increase 1 stitch BEFORE markers, work 1 stitch, move the marker onto the right needle and increase 1 stitch AFTER markers. Work to markers 2 and 4, increase 1 stitch BEFORE markers, move the marker onto the right needle, work 1 stitch and increase 1 stitch AFTER markers (= a total of 8 stitches increased). Increase like this on every row from the right side a total of 4-4-5-5-6-6 times = 227-243-259-287-313-331 stitches. When the increases are finished, the piece measures approx. 20-22-23-26-28-30 cm from the marker on the neck. Now divide the piece for body and sleeves on the next row as follows: Work the first 38-41-43-47-53-55 stitches as before (= front piece), place the next 42-44-48-54-56-60 stitches on a thread for the sleeve, cast on 10-10-12-12-12-12 new stitches on the needle (= in side under sleeve), work 67-73-77-85-95-101 stitches in stocking stitch (= back piece), place the next 42-44-48-54-56-60 stitches on a thread for the sleeve, cast on 10-10-12-12-12-12 new stitches on the needle (= in side under sleeve) and work the last 38-41-43-47-53-55 stitches as before (= front piece). Body and sleeves are finished separately. THE PIECE IS NOW MEASURED FROM HERE. BODY: = 163-175-187-203-225-235 stitches. Continue 5 band stitches in garter stitch on each side and stocking stitch over the other stitches. When the piece measures 26-26-26-25-24-24 cm from the division, increase 20 stitches evenly spaced on the next row from the right side (do not increase on the bands) = 183-195-207-223-245-255 stitches. Change to circular needle size 4.5 mm. The next row is worked as follows from the wrong side: 5 band stitches in garter stitch, * purl 1, knit 1 *, work from *-* until there are 6 stitches left on the row, purl 1 and finish with 5 band stitches in garter stitch. When the rib measures 5 cm, cast off with knit over knit and purl over purl, and cast off with knit over the garter stitches - read CASTING-OFF TIP. The jacket measures approx. 56-58-60-62-64-66 cm from the shoulder down. SLEEVE: Place the 42-44-48-54-56-60 stitches from the thread on the one side of the piece on double pointed needles/short circular needle size 5.5 mm and knit up 1 stitch in each of the 10-10-12-12-12-12 stitches cast on under the sleeve = 52-54-60-66-68-72 stitches. Insert a marker thread in the middle of the 10-10-12-12-12-12 stitches under the sleeve. Work stocking stitch in the round. When the piece measures 3 cm from the division, decrease 0-0-1-1-1-1 stitch on each side of the marker thread - read DECREASE TIP. Decrease like this every 0-0-10-7-6-4 cm a total of 0-0-2-4-4-5 times = 52-54-56-58-60-62 stitches. Continue working until the sleeve measures 34-33-32-30-28-27 cm from the division. Knit 1 round where you decrease 18 stitches evenly spaced = 34-36-38-40-42-44 stitches. Change to double pointed needles size 4.5 mm and work rib (= knit 1, purl 1) for 5 cm. Cast off with knit over knit and purl over purl – remember CASTING-OFF TIP. Work the other sleeve in the same way. ASSEMBLY: Sew the buttons onto the left band. |
|||||||||||||
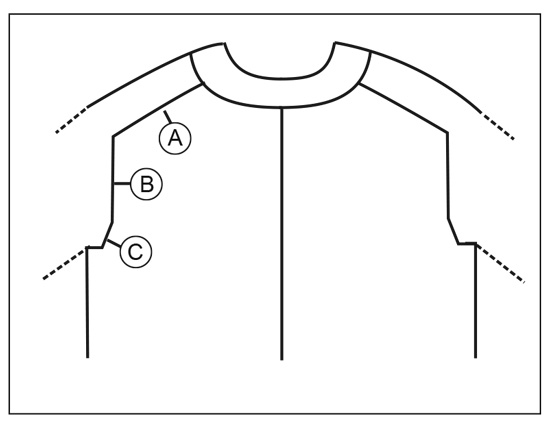
Diagram explanations |
|||||||||||||
|
|||||||||||||
 |
|||||||||||||
 |
|||||||||||||
Have you finished this pattern?Tag your pictures with #dropspattern #frozenlakecardigan or submit them to the #dropsfan gallery. Do you need help with this pattern?You'll find 32 tutorial videos, a Comments/Questions area and more by visiting the pattern on garnstudio.com. © 1982-2026 DROPS Design A/S. We reserve all rights. This document, including all its sub-sections, has copyrights. Read more about what you can do with our patterns at the bottom of each pattern on our site. |
|||||||||||||


With over 40 years in knitting and crochet design, DROPS Design offers one of the most extensive collections of free patterns on the internet - translated to 17 languages. As of today we count 324 catalogues and 12290 patterns translated into English (UK/cm). 12290
We work hard to bring you the best knitting and crochet have to offer, inspiration and advice as well as great quality yarns at incredible prices! Would you like to use our patterns for other than personal use? You can read what you are allowed to do in the Copyright text at the bottom of all our patterns. Happy crafting!
Post a comment to pattern DROPS 215-30
We would love to hear what you have to say about this pattern!
If you want to leave a question, please make sure you select the correct category in the form below, to speed up the answering process. Required fields are marked *.