
Popular categories
Looking for a yarn?


|
|||||||||||||
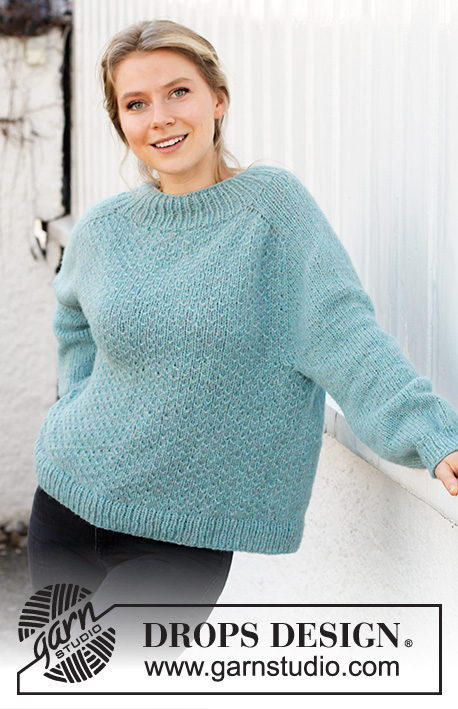
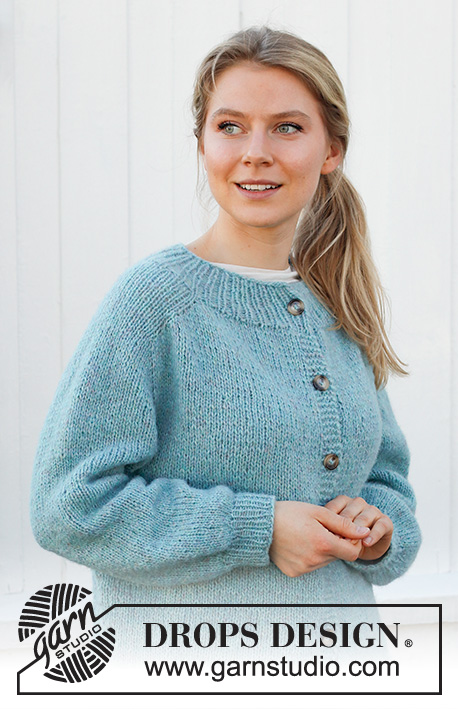
Frozen Lake Cardigan |
|||||||||||||
 |
 |
||||||||||||
Knitted jacket with saddle shoulders in DROPS Air. The piece is worked top down. Sizes S - XXXL.
DROPS 215-30 |
|||||||||||||
|
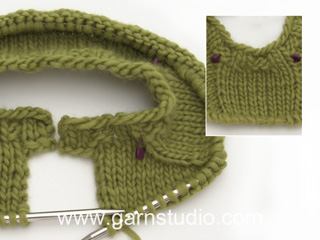
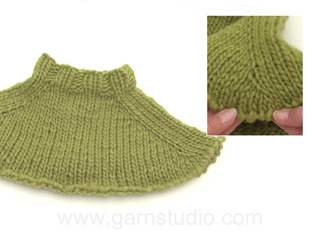
------------------------------------------------------- EXPLANATIONS FOR THE PATTERN: ------------------------------------------------------- RIDGE/GARTER STITCH (worked back and forth): Knit all rows. 1 ridge in height = Knit 2 rows. INCREASE/DECREASE TIP (evenly spaced): To work out how to increase/decrease evenly, count the total number of stitches on needle (e.g. 87 stitches), minus the bands (e.g. 10 stitches) and divide the remaining stitches with number of increases/decreases to be made (e.g. 20) = 3.85. In this example, increase by making 1 yarn over after approx. each 4th stitch. On the next row work the yarn overs twisted to avoid holes. When decreasing, knit together approx. each 3rd and 4th stitch. INCREASE TIP (for saddle shoulder increase): FROM RIGHT SIDE: BEFORE MARKER: The new stitch will be twisted, leaning towards the right. Use left needle to pick up strand between 2 stitches from the row below, pick up strand from behind and knit stitch in front loop. AFTER MARKER: The new stitch will be twisted, leaning towards the left. Use left needle to pick up strand between 2 stitches from the row below, pick up strand from the front and knit stitch in back loop. FROM WRONG SIDE: BEFORE MARKER: The new stitch will be twisted, leaning towards the right. Use left needle to pick up strand between 2 stitches from the row below, pick up strand from the front and purl stitch in back loop. AFTER MARKER: The new stitch will be twisted, leaning towards the left. Use left needle to pick up strand between 2 stitches from the row below, pick up strand from behind and purl stitch in front loop. DECREASE TIP (for mid under sleeve): Decrease 1 stitch on either side of the marker thread as follows: Work until there are 3 stitches left before the marker thread, knit 2 together, knit 2 (marker thread sits between these 2 stitches), slip 1 stitch as if to knit, knit 1 and pass the slipped stitch over the knitted stitch. BUTTONHOLES: Work buttonholes on the right band (when the garment is worn). Work from the right side when there are 3 stitches left on the row as follows: Make 1 yarn over, knit 2 together and knit 1. On the next row (wrong side), knit the yarn over to leave a hole. The first buttonhole is worked when the rib on the neck measures 3 cm. Then work the other 5-5-6-6-6-6 buttonholes with approx. 9½-10-8½-9-8-8 cm between each one. CASTING-OFF TIP: To avoid the cast-off edge being tight you can cast off with a larger size needle. If the edge is still tight, make 1 yarn over after approx. each 4th stitch at the same time as casting off; the yarn overs are cast off as normal stitches. ------------------------------------------------------- START THE PIECE HERE: ------------------------------------------------------- JACKET – SHORT OVERVIEW OF THE PIECE: The neck and yoke are worked back and forth with circular needle from mid front and top down. Stitches are increased for the shoulders, then for the sleeves. The yoke is divided for body and sleeves and the body continued back and forth. The sleeves are worked in the round with double pointed needles, top down. NECK: Cast on 83-87-91-95-101-105 stitches (including 5 band stitches on each side) with circular needle size 4.5 mm and Air. Purl 1 row (= wrong side). The next row is worked as follows from the right side: Work 1 stitch in GARTER STITCH – read description above, * knit 1, purl 1 *, work from *-* until there are 2 stitches left on the row, knit 1 and finish with 1 stitch in garter stitch. Continue this rib for 8 cm. When the rib is finished, knit 1 row from the right side where you increase 20-20-28-32-36-38 stitches evenly spaced – read INCREASE/DECREASE TIP = 103-107-119-127-137-143 stitches. Purl 1 row from the wrong side with 5 band stitches in garter stitch on each side. Change to circular needle size 5.5 mm and insert 1 marker after the band at the beginning of the row; the yoke is measured from this marker! YOKE: Now insert 4 markers in the piece, without working the stitches, as follows: Insert marker 1 after 20-21-22-24-26-27 stitches (= front piece), skip the next 16-16-20-20-22-22 stitches, insert marker 2 here (= shoulder stitches), skip the next 31-33-35-39-41-45 stitches, insert marker 3 here (= back piece), skip the next 16-16-20-20-22-22 stitches, insert marker 4 here (= shoulder stitches), there are 20-21-22-24-26-27 stitches left after the last marker (= front piece). Allow the markers to follow your work onwards; they will be used when increasing. SHOULDER INCREASE: Continue working stocking stitch with 5 band stitches in garter stitch on each side. On the next row from the right side increase for saddle shoulders as follows: Increase 1 stitch BEFORE markers 1 and 3 and AFTER markers 2 and 4 – read INCREASE TIP (= 4 stitches increased); I.e. there are increases on back piece and front piece, number of shoulder stitches remain the same. On the next row from the wrong side increase for saddle shoulder as follows: Increase 1 stitch BEFORE markers 4 and 2 and increase 1 stitch AFTER markers 3 and 1. I.e. the increases are different from right side and wrong side. REMEMBER THE KNITTING TENSION! Increase like this every row a total of 14-16-16-18-20-22 times = 159-171-183-199-217-231 stitches. The piece measures approx. 7-8-8-9-10-11 cm from the marker on the neck. SLEEVE INCREASE: Continue working stocking stitch with 5 band stitches in garter stitch on each side. On the next row from the right side increase for the sleeves as follows: Increase 1 stitch AFTER markers 1 and 3 and BEFORE markers 2 and 4 (= 4 stitches increased) i.e. increase in shoulder stitches, number of stitches in back piece and front pieces remains the same. Increase like this on every row from the right side a total of 9-10-9-12-12-13 times = 195-211-219-247-265-283 stitches. The piece measures approx. 16-18-17-21-22-24 cm. Continue working stocking stitch with 5 band stitches in garter stitch on each side until the piece measures 16-18-18-21-22-24 cm. YOKE INCREASE: On the next row from the right side increase 1 stitch on each side of all markers as follows: Work until there is 1 stitch left before markers 1 and 3, increase 1 stitch BEFORE markers, work 1 stitch, move the marker onto the right needle and increase 1 stitch AFTER markers. Work to markers 2 and 4, increase 1 stitch BEFORE markers, move the marker onto the right needle, work 1 stitch and increase 1 stitch AFTER markers (= a total of 8 stitches increased). Increase like this on every row from the right side a total of 4-4-5-5-6-6 times = 227-243-259-287-313-331 stitches. When the increases are finished, the piece measures approx. 20-22-23-26-28-30 cm from the marker on the neck. Now divide the piece for body and sleeves on the next row as follows: Work the first 38-41-43-47-53-55 stitches as before (= front piece), place the next 42-44-48-54-56-60 stitches on a thread for the sleeve, cast on 10-10-12-12-12-12 new stitches on the needle (= in side under sleeve), work 67-73-77-85-95-101 stitches in stocking stitch (= back piece), place the next 42-44-48-54-56-60 stitches on a thread for the sleeve, cast on 10-10-12-12-12-12 new stitches on the needle (= in side under sleeve) and work the last 38-41-43-47-53-55 stitches as before (= front piece). Body and sleeves are finished separately. THE PIECE IS NOW MEASURED FROM HERE. BODY: = 163-175-187-203-225-235 stitches. Continue 5 band stitches in garter stitch on each side and stocking stitch over the other stitches. When the piece measures 26-26-26-25-24-24 cm from the division, increase 20 stitches evenly spaced on the next row from the right side (do not increase on the bands) = 183-195-207-223-245-255 stitches. Change to circular needle size 4.5 mm. The next row is worked as follows from the wrong side: 5 band stitches in garter stitch, * purl 1, knit 1 *, work from *-* until there are 6 stitches left on the row, purl 1 and finish with 5 band stitches in garter stitch. When the rib measures 5 cm, cast off with knit over knit and purl over purl, and cast off with knit over the garter stitches - read CASTING-OFF TIP. The jacket measures approx. 56-58-60-62-64-66 cm from the shoulder down. SLEEVE: Place the 42-44-48-54-56-60 stitches from the thread on the one side of the piece on double pointed needles/short circular needle size 5.5 mm and knit up 1 stitch in each of the 10-10-12-12-12-12 stitches cast on under the sleeve = 52-54-60-66-68-72 stitches. Insert a marker thread in the middle of the 10-10-12-12-12-12 stitches under the sleeve. Work stocking stitch in the round. When the piece measures 3 cm from the division, decrease 0-0-1-1-1-1 stitch on each side of the marker thread - read DECREASE TIP. Decrease like this every 0-0-10-7-6-4 cm a total of 0-0-2-4-4-5 times = 52-54-56-58-60-62 stitches. Continue working until the sleeve measures 34-33-32-30-28-27 cm from the division. Knit 1 round where you decrease 18 stitches evenly spaced = 34-36-38-40-42-44 stitches. Change to double pointed needles size 4.5 mm and work rib (= knit 1, purl 1) for 5 cm. Cast off with knit over knit and purl over purl – remember CASTING-OFF TIP. Work the other sleeve in the same way. ASSEMBLY: Sew the buttons onto the left band. |
|||||||||||||
Diagram explanations |
|||||||||||||
|
|||||||||||||

|
|||||||||||||

|
|||||||||||||
|
Have you made this or any other of our designs? Tag your pictures in social media with #dropsdesign so we can see them! Do you need help with this pattern?You'll find tutorial videos, a Comments/Questions area and more by visiting the pattern on garnstudio.com. © 1982-2024 DROPS Design A/S. We reserve all rights. This document, including all its sub-sections, has copyrights. Read more about what you can do with our patterns at the bottom of each pattern on our site. |
|||||||||||||


With over 40 years in knitting and crochet design, DROPS Design offers one of the most extensive collections of free patterns on the internet - translated to 17 languages. As of today we count 304 catalogues and 11422 patterns - 11422 of which are translated into English (UK/cm).
We work hard to bring you the best knitting and crochet have to offer, inspiration and advice as well as great quality yarns at incredible prices! Would you like to use our patterns for other than personal use? You can read what you are allowed to do in the Copyright text at the bottom of all our patterns. Happy crafting!
Comments / Questions (26)
Hello Where do I find the actual size measurements for Frozen Lake 215-30, I am looking at the diagram but I am not sure which series of numbers is the size list.. I read the info about how to use the size chart but the sample diagram shows the pattern sizes printed in the center of the diagram. There are no numbers printed within the center of this diagram. Please help. Thx
29.09.2023 - 07:35DROPS Design answered:
Dear Martha, the measurements schematics show different measurements in cm for each size. The first number of the sequence is for the smallest size (S in this case) while the last number is for the largest. The sizes are indicated in the materials section, the same as in the lesson. In this case, the chest measurements would be in the lower part of the schematic, since the jacket is straight from the armholes down, so it would be, for the smallest size, 48cm for half the chest circunference and 96 for the full chest circunference. Please remember that these are the garment measurements, so you need to compare it to your own and choose your size accordingly. Happy knitting!
30.09.2023 - 23:52Bonjour 👋 merci pour votre réponse à ma précédente question. J'ai pensé à une autre solution, faire 5 cm de côtes, puis faire la partie en côtes, en Jersey. Puis suivre les instructions du modèle. Ainsi ça remonterai l'encolure près du cou, comme je le souhaite... Modèle Frozen Lake,Drops 215-30 Merci de me donner votre avis. Ou bien une proposition de marché à suivre... Cordialement. Mme SANSANO Mariannick
06.09.2023 - 12:52Bonjour 👋 merci pour votre réponse à ma précédente question. J'ai pensé à une autre solution, faire 5 cm de côtes, puis faire la partie en côtes, en Jersey. Puis suivre les instructions du modèle. Ainsi ça remonterai l'encolure près du cou, comme je le souhaite... Modèle Frozen Lake,Drops 215-30 Merci de me donner votre avis. Ou bien une proposition de marché à suivre... Cordialement. Mme SANSANO Mariannick
06.09.2023 - 12:49DROPS Design answered:
Bonjour Mme Sansano, nous ne sommes malheureusement pas en mesure de pouvoir ajuster chacun de nos modèles à chaque demande, si vous avez besoin d'aide ou de conseils pour vos ajustements, je vous invite à contacter votre magasin (même par mail ou téléphone) ou à demander conseil à d'autres tricoteuses, via, par ex notre DROPS Workshop. Merci pour votre compréhension. Bon tricot!
06.09.2023 - 15:59Bonjour, J'ai commandé ma laine Drops Air coloris 10brouillard( mix). J'envisage de faire le modèle, Frozen Lake Cardigan. Drops 215-30. Voici ma question ❓️ Je voudrai faire l'encolure plus haute (" c'est à dire plus près du cou"). Donc comment puis-je faire,??? Je vous remercie d'avance pour m'indiquer comment procéder, puis ,ensuite je suivrai les instructions du modèle . Merci et à bientôt. 🥰
01.09.2023 - 15:45Bonjour, J'ai commandé ma laine Drops Air coloris 10brouillard( mix). J'envisage de faire le modèle, Frozen Lake Cardigan. Drops 215-30. Voici ma question ❓️ Je voudrai faire l'encolure plus haute (" c'est à dire plus près du cou"). Donc comment puis-je faire,??? Je vous remercie d'avance pour m'indiquer comment procéder, puis ,ensuite je suivrai les instructions du modèle . Merci et à bientôt. 🥰
01.09.2023 - 15:43DROPS Design answered:
Bonjour Mme Sansano, vous pouvez probablement tricoter davantage de hauteur de côtes pour le col, mais notez bien qu'il vous faudra également davantage de laine. Bon tricot!
01.09.2023 - 15:45Bonjour madame, frozenlake cardigan. Au moment ce diviser l ouvrage j'ai 287 mailles ( gradeur xl ). Je tricote 47 m je glisse 54 m sur fil puis tricote 85 m je glisse 54 m sur fil et tricote 47 derniere m.pour un total de 287m. Pour dos et devant 179 m. Je tricote 25 cm puis je dois aug de 20 m = 199 m .le patron dit que je devrais avoir 223 m. Il me manque 24 m .qu'est ce que je dois faire ? Merci pour votre aide precieuse
12.04.2023 - 01:39DROPS Design answered:
Bonjour Mme Bernard, ce sont les 12 mailles que vous devez monter à la place des manches, autrement dit, lorsque vous glissez les 54 mailles des manches en attente, montez 12 mailles - nous montrons comment faire à partir de la photo 10 dans cette leçon. Bon tricot!
12.04.2023 - 08:39Modele frozenlake cardigan. Je suis rendue augmentation manche. Une fois augmentations terminees je dois avoir une longueur aplx 21 cm il me reste 4 augmentatios a faire et je suis deja a 22 cm. Que faire? Grandeur xl. Merci de bjen vouloir m'aider. Noter j'ai bien fait mon echantillon.
26.03.2023 - 21:00DROPS Design answered:
Bonjour Mme Bernard, votre tension en hauteur doit être différente (vous avez probablement plus de 20 rangs pour 10 cm), Vous pouvez ajuster en augmentant plus souvent. Sinon vous devez avoir (épaules = 18 x tous les rangs = 9 cm) + (manches= 12 x tous les 2 rangs = 12 cm) (soit 21 cm) + (empiècement = 5 x tous les 2 rangs = 5 cm) = 26 cm au total. Bon tricot!
27.03.2023 - 09:58Allô, je suis rendue à augmentation épaule et je me demande quand on fait le rang envers est ce que le premier marqueur sur mon chemin qui était le 1 au rang endroit devient le 4 au rang envers?
19.02.2023 - 18:26DROPS Design answered:
Bonjour Mme Lemay, le 1er marqueur que l'on rencontre sur l'endroit est le 4ème marqueur sur l'endroit etc autrement dit, les numéros des marqueurs indiqués sont ceux que l'on compte sur l'endroit . Bon tricot!
20.02.2023 - 10:11Bei „Zunahmen für die Passe“ - wie gerichtet muss jeweils vor und nach den Markierern zugenommen werden, oder reicht es, zwei Maschen aus einer zuzunehmen?
05.02.2023 - 21:28DROPS Design answered:
Liebe Annette, unter "Zunahmen für die Passe" werden 8 Maschen zugenommen: 1 Masche vor + 1 Masche nach jeder Markierung - nehmen Sie am besten wie zuvor zu: 1 Masche vor der Masche mit der Markierung + 1 Masche nach der Masche mit der Markierung auffassen - siehe auch dieses Video. Viel Spaß beim stricken!
06.02.2023 - 10:18Puis-je réaliser ce modèle en "Brushed alpaca silk "?
17.10.2022 - 14:20DROPS Design answered:
Bonjour Viviane, effectivement, Air et Brushed Alpaca Silk sont du même groupe, notez juste que la texture sera différente car les laines sont différentes; utilisez notre convertisseur pour connaître la nouvelle quantité correspondante, et rappelez-vous de bien vérifier votre échantillon. Bon tricot!
17.10.2022 - 17:06