
Popular categories
Looking for a yarn?


Comments / Questions (10)
![]() Giovanna wrote:
Giovanna wrote:
Allora per favore mi potete indicare un modello adatto al filato cotone drops you 9? 24 maglie x 32 ferri in 10x 10 cm Cardigan con sprone . Grazie mille
09.10.2025 - 22:06DROPS Design answered:
Buonasera Giovanna, a questo link può trovare degli spunti di modelli, ma sulla sinistra può scegliere i filtri da applicare alla sua ricerca. Buon lavoro!
11.10.2025 - 19:19
![]() Giovanna wrote:
Giovanna wrote:
Dovrei adattare questo modello ad un filato di cotone drops you 9. In 10 cm = 24 Maglie e 32 ferri Come faccio a fare il calcolo taglia L. ? GRAZIE MILLE
07.10.2025 - 21:29DROPS Design answered:
Buonasera Giovanna, sono filati totalmente diversi e il risultato sicuramente non sarebbe lo stesso. Le consigliamo di cercare un modello più adatto al suo campione. Buon lavoro!
09.10.2025 - 17:16
![]() Giovanna wrote:
Giovanna wrote:
Perché dopo aver trasferito le maglie per ks manica bisogna avviare 8 nuove maglie? A cosa serve? Grazie
22.09.2025 - 10:42DROPS Design answered:
Buonasera Giovanna, le nuove maglie avviate sono quelle del sottomanica. Buon lavoro!
03.10.2025 - 00:49
![]() Vittoria Enimmi wrote:
Vittoria Enimmi wrote:
Buongiorno, non capisco il calcolo della misura di questo cardigan.Lo schema dice che per la taglia S la misura finale del corpo è 44 cm ,quindi 88 cm ( davanti e dietro),la spiegazione dice che si hanno 188 maglie . La mia domanda è:\\r\\nIl campione dice 17 maglie sono 10 cm quindi 188 Maglie saranno 110cm .Perché dunque 88 cm? Cosa sbaglio? Ho fatto un ragionamento corretto?Grazie, Vittoria
12.04.2025 - 14:34DROPS Design answered:
Buonasera Vittoria, come anticipato, per la lavorazione del bordo si aumentano le maglie perchè la lavorazione a coste stringe il lavoro. Buon lavoro!
12.04.2025 - 18:04
![]() Vittoria Enimmi wrote:
Vittoria Enimmi wrote:
Buongiorno, non capisco il calcolo della misura di questo cardigan.Lo schema dice che per la taglia S la misura finale del corpo è 44 cm ,quindi 88 cm ( davanti e dietro),la spiegazione dice che si hanno 188 maglie . La mia domanda è:\\r\\nIl campione dice 17 maglie sono 10 cm quindi 188 Maglie saranno 110cm .Perché dunque 88 cm? Cosa sbaglio? Ho fatto un ragionamento corretto?Grazie, Vittoria
03.04.2025 - 14:31DROPS Design answered:
Buonasera Vittoria, nell'ultima parte del corpo si aumentano le maglie perchè il bordo a coste tende a stringere il lavoro. Buon lavoro!
12.04.2025 - 17:47
![]() Anne Grethe wrote:
Anne Grethe wrote:
Hvordan finner jeg riktig str . Med antall masker og mål
03.03.2025 - 17:51DROPS Design answered:
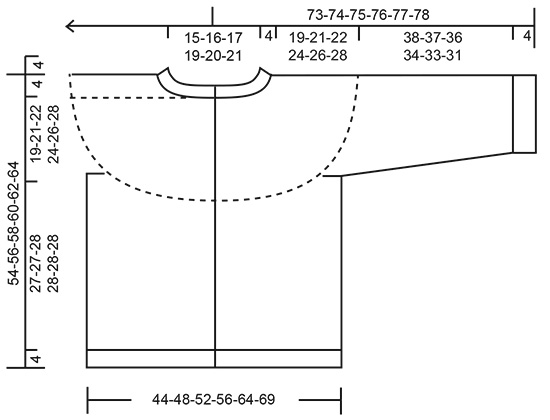
Hei Anne Grethe, Du finner en målskisse på bunnen av oppskriften, med alle mål til de forskjellige størrelsene. God fornøyelse!
04.03.2025 - 06:44
![]() GIOTA wrote:
GIOTA wrote:
Hello! I am fond of the pattern above (Endless Possibilities Knitted jacket in DROPS Sky and DROPS Kid-Silk) but i have a difficulty to find the same yarns. I would like to ask you if it is possible to use instead of these yarns a single yarn from the group yarn - Aran Worsted with a gauge of 17 stitches and 22 rows ... Thank you in advance
16.01.2022 - 23:06DROPS Design answered:
Dear GIOTA, yes, as long as the gauge in the swatch matches the one in the pattern, you can substitute these yarns with one of Aran Worsted. Happy knitting!
16.01.2022 - 23:31
![]() Marilyn wrote:
Marilyn wrote:
Could I use one strand of yarn Wish instead of one Sky and one Kid-Silk?
19.10.2021 - 00:11DROPS Design answered:
Dear Marylin, if you can achieve the given gauge, why not. However, the final result will be somewhat different looking. Happy Stitching!
19.10.2021 - 01:46
![]() Emma Sundin wrote:
Emma Sundin wrote:
Hej! Min svärmor har lovat att sticka denna fantastiskt fina kofta till mig. Jag bor i Stockholm och skulle gärna vilja veta var jag kan kolla på garnet? Köper jag mönster i butik också eller här via nätet. Tack! Emma
22.02.2021 - 21:40DROPS Design answered:
Hej Emma, Mønsteret skriver du ud gratis her fra siden. Garnet kan du også bestille fra mønsteret, klik på Beställ-knappen här i mönstret eller klicka på "hitta en butik". :)
23.02.2021 - 14:40
![]() Francine wrote:
Francine wrote:
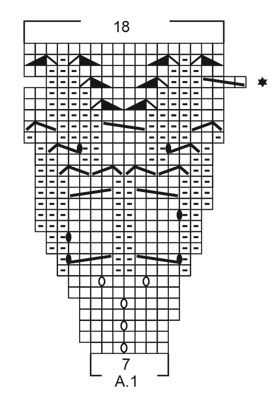
Bonjour,je ne comprends pas le diagramme A.1 à la ligne 25*. Je fais quoi après et avant la bordure? après: 2 mailles endroit-3 envers..... avant: 3 envers-2 endroit? Merci
30.08.2020 - 16:33DROPS Design answered:
Bonjour Francine, au début du rang = 1er A.1 du rang, tricotez 2 mailles endroit (= les 2 premières mailles du diagramme comme avant), et, quand il reste 2 m du 1er A.1, tricotez la torsade avec les 2 m du A.1 suivant, et continuez ainsi jusqu'à la fin du rang, terminez le dernier A.1 par 2 m endroit. Bon tricot!
31.08.2020 - 09:54
|
||||||||||||||||||||||||||||||||||
Endless Possibilities#endlesspossibilitiescardigan |
||||||||||||||||||||||||||||||||||
 |
 |
|||||||||||||||||||||||||||||||||
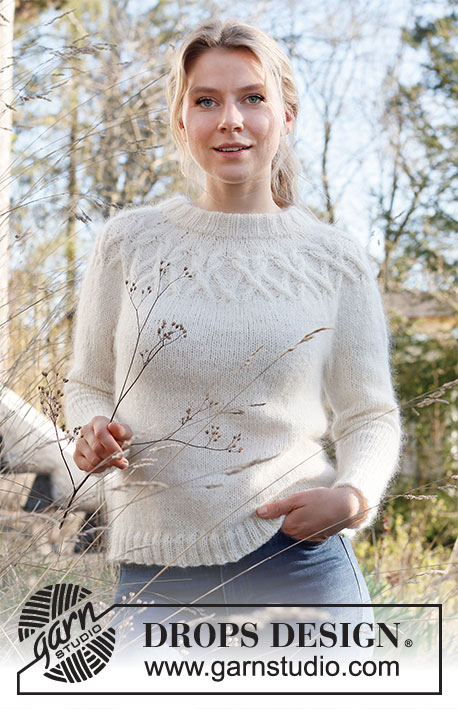
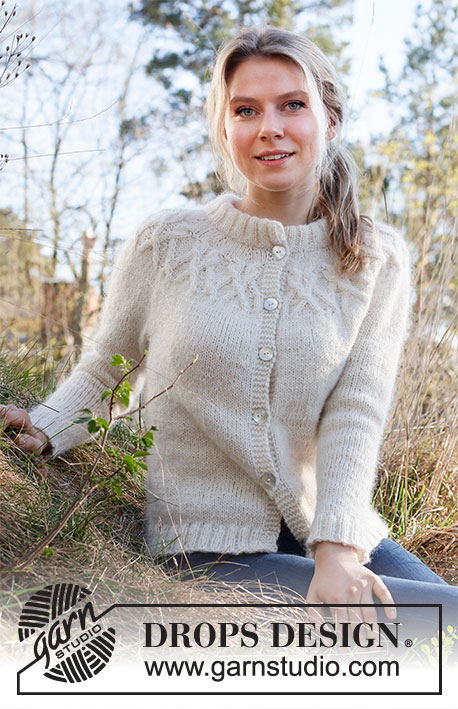
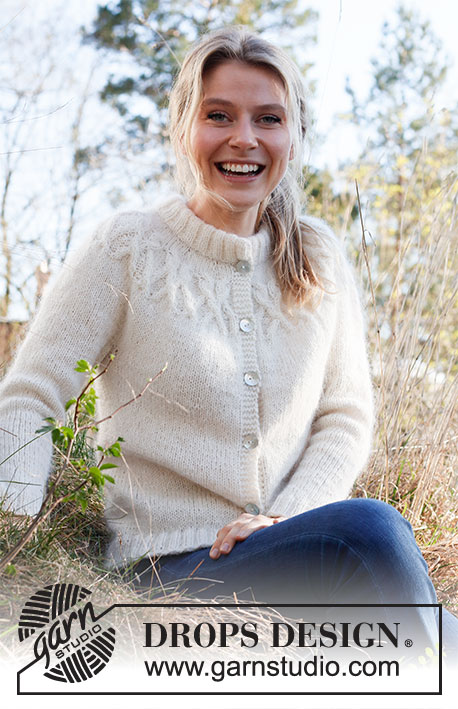
Knitted jacket in DROPS Sky and DROPS Kid-Silk. Piece is knitted top down with round yoke, cables and double neck edge. Size: S - XXXL
DROPS 216-2 |
||||||||||||||||||||||||||||||||||
|
------------------------------------------------------- EXPLANATION FOR THE PATTERN: ------------------------------------------------------- GARTER STITCH (back and forth): Knit all rows. 1 ridge vertically = knit 2 rows. PATTERN: See diagram A.1. Diagrams show all rows in pattern seen from the right side. INCREASE TIP (evenly): To calculate how to increase evenly, count the stitches to be increased (e.g. 78 stitches) and divide by stitches of increases to be done (e.g. 6) = 13. In this example increase by making 1 yarn over after every 13th stitch. On next row work yarn overs twisted to avoid holes DECREASE TIP (applies to sleeves): Decrease 1 stitch on each side of marker thread as follows: Work until 3 stitches remain before marker thread and knit 2 together, knit 2 (marker thread is between these stitches), slip 1 stitch knitwise, knit 1, pass slipped stitch over stitch worked. BUTTONHOLES: Decrease for buttonholes on right band (when garment is worn). Decrease from right side when 3 stitches remain on row as follows: Make 1 yarn over, knit the next 2 stitches together, knit last stitch. On next row (wrong side) knit the yarn over to make a hole. Decrease first buttonhole on first row on yoke. Then decrease the next 5-5-5-6-6-6, approx. 8-8½-9-8-8-8½ cm apart. CAST-OFF TIP: To avoid a tight cast-off edge you may use a larger needle size. If this also is too tight, work a 1 yarn over after approx. every 4th stitch while casting off (cast off yarn overs as regular stitches). ------------------------------------------------------- START THE PIECE HERE: ------------------------------------------------------- JACKET - SHORT OVERVIEW OF THE PIECE: Work neck edge and yoke back and forth on circular needle from mid front, top down. Now divide yoke for body and sleeves. Work body back and forth on circular needle, top down. Work sleeves in the round on double pointed needles/short circular needle, top down. DOUBLE NECK EDGE: Cast on 92-96-100-108-112-116 stitches (including 1 edge stitch in garter stitch in each side) on circular needle size 4 mm with 1 strand Sky and 1 strand Kid-Silk (= 2 strands). Purl 1 row (= wrong side). Work next row as follows from right side: Work 1 edge stitch in GARTER STITCH - read explanation above, * knit 2, purl 2 *, work from *-* until 3 stitches remain on needle, knit 2 and finish with 1 edge stitch in garter stitch. Continue rib like this for 9 cm. When rib is done, work next row as follows from right side: Knit 2, knit 2 together, knit 1, knit 2 together (= 5 stitches for band), knit the next 78-82-86-94-98-102 stitches and increase AT THE SAME TIME 6-9-12-11-14-17 stitches evenly – read INCREASE TIP, knit 2 together, knit 1, knit 2 together, knit 2 (= 5 stitches for band) = 94-101-108-115-122-129 stitches. Switch to circular needle size 5 mm. Purl 1 row from wrong side (knit the 5 band stitches in each side from wrong side). Insert 1 marker after band at the beginning of row mid front, measure yoke from this marker! YOKE: Now work pattern as follows: 5 band stitches in garter stitch, A.1 until 5 stitches remain (= 12-13-14-15-16-17 repetitions of 7 stitches), 5 band stitches in garter stitch - remember BUTTONHOLES on right band - read explanation above. REMEMBER THE KNITTING TENSION! When A.1 has been worked vertically, there is 226-244-262-280-298-316 stitches on needle. Continue in stocking stitch with 5 band stitches in garter stitch in each side. When piece measures 16-17-18-18-18-18 cm, increase 16-20-20-15-18-23 stitches evenly = 242-264-282-295-316-339 stitches. Increase in size S, M and L is now done - continue as explained below. Continue in size XL, XXL and XXXL with stocking stitch until piece measures 22-24-26 cm. Now increase 15-18-23 stitches evenly = 310-334-362 stitches. All sizes: Continue back and forth in stocking stitch and band stitches as before until piece measures 19-21-22-24-26-28 cm. Now divide piece for body and sleeves. Work next row from wrong side as follows: Work 5 band stitches in garter stitch, stocking stitch over the next 33-37-39-43-48-53 stitches (= right front piece), slip the next 50-53-58-64-66-70 stitches on a stitch holder for sleeve and cast on 8-8-10-10-12-12 new stitches on needle (= in the side under sleeves), work the next 66-74-78-86-96-106 stitches (= back piece), slip the next 50-53-58-64-66-70 stitches on a stitch holder for sleeve and cast on 8-8-10-10-12-12 new stitches on needle (= in the side under sleeves), work the next 33-37-39-43-48-53 stitches, 5 band stitches in garter stitch (= left front piece). Then finish body and sleeves separately. NOW MEASURE PIECE FROM HERE! BODY: = 158-174-186-202-226-246 stitches. Work in stocking stitch with 5 band stitches in garter stitch in each side as before. When piece measures 27-27-28-28-28-28 cm from division, increase 30-34-34-42-46-50 stitches evenly (but not over band stitches) = 188-208-220-244-272-296 stitches. Switch to circular needle size 4 mm. Work rib from right side as follows: 5 band stitches in garter stitch, * knit 2, purl 2 *, repeat from *-* until 7 stitches remain on needle, knit 2, 5 band stitches in garter stitch. When rib measures 4 cm, cast off with knit over knit and purl over purl stitch - read CAST-OFF TIP. Jacket measures approx. 54-56-58-60-62-64 cm from shoulder and down. SLEEVES: Slip the 50-53-58-64-66-70 stitches from stitch holder in one side back on a short circular needle/double pointed needles size 5 mm and pick in addition up 1 stitch in each of the new 8-8-10-10-12-12 stitches cast on in the side under sleeve = 58-61-68-74-78-82 stitches. Insert a marker thread in the middle of the new stitches (= 4-4-5-5-6-6 new stitches on each side of marker thread). Work in stocking stitch in the round. When sleeve measures 4-4-5-5-5-3 cm from division, decrease 2 stitches under sleeve - READ DECREASE TIP. Decrease like this every 3½-3-2-1½-1½-1½ cm a total of 9-10-13-15-16-17 times = 40-41-42-44-46-48 stitches. When sleeve measures 38-37-36-34-33-31 cm, increase 8-7-10-8-10-8 stitches evenly = 48-48-52-52-56-56 stitches. Switch to double pointed needles size 4 mm. Work rib (knit 2/purl 2) in the round for 4 cm. Cast off with knit over knit and purl over purl - remember CAST-OFF TIP. Sleeve measures 42-41-40-38-37-35 cm in total from division. Work the other sleeve the same way. ASSEMBLY: Fold rib at the top of neck down on the inside of garment. Fasten rib to form a double neck edge. To avoid a tight neck edge and avoiding the edge to tip outwards, it is important to make the seam elastic. Sew together opening on short side of neck edge towards mid front with neat little stitches sin outermost loop of edge stitch. Sew the buttons on to left band. |
||||||||||||||||||||||||||||||||||
Diagram explanations |
||||||||||||||||||||||||||||||||||
|
||||||||||||||||||||||||||||||||||
 |
||||||||||||||||||||||||||||||||||
 |
||||||||||||||||||||||||||||||||||
Have you finished this pattern?Tag your pictures with #dropspattern #endlesspossibilitiescardigan or submit them to the #dropsfan gallery. Do you need help with this pattern?You'll find 31 tutorial videos, a Comments/Questions area and more by visiting the pattern on garnstudio.com. © 1982-2026 DROPS Design A/S. We reserve all rights. This document, including all its sub-sections, has copyrights. Read more about what you can do with our patterns at the bottom of each pattern on our site. |
||||||||||||||||||||||||||||||||||


With over 40 years in knitting and crochet design, DROPS Design offers one of the most extensive collections of free patterns on the internet - translated to 17 languages. As of today we count 324 catalogues and 12290 patterns translated into English (UK/cm). 12290
We work hard to bring you the best knitting and crochet have to offer, inspiration and advice as well as great quality yarns at incredible prices! Would you like to use our patterns for other than personal use? You can read what you are allowed to do in the Copyright text at the bottom of all our patterns. Happy crafting!
Post a comment to pattern DROPS 216-2
We would love to hear what you have to say about this pattern!
If you want to leave a question, please make sure you select the correct category in the form below, to speed up the answering process. Required fields are marked *.