
Popular categories
Looking for a yarn?


Comments / Questions (12)
![]() Stephanie wrote:
Stephanie wrote:
Guten Tag! Ich stricke gerade die ersten Rapporte (A1 und A2). Mir scheint anhand des Bildes, dass vor dem Wechsel auf die nächsten Rapporte (A3 und A4) jeweils eine Reihe linke Maschen gestrickt wurde, um die Rapporte voneinander abzugrenzen. In der Beschreibung taucht diese Reihe aber nur ganz am Ende der Passe auf. Was ist nun richtig? Beste Grüße und vielen Dank!
07.03.2026 - 16:02DROPS Design answered:
Liebe Stephanie, diese Reihe linken Maschen finden Sie in A.3 (und A.4), wenn mann die 4. Reihe A.3 und A.4 rechts strickt, sieht es wie linken Maschen bei der Aussenseite aus - gleichfalls bei der 4. Reihe A.5 und A.6. Viel Spaß beim Stricken!
09.03.2026 - 08:23
![]() Angela wrote:
Angela wrote:
Hallo, warum sind nach der Anleitung 9 Knopflöcher und 9 Knöpfe nötig, wenn die Jacke auf dem Bild aber nur 8 Knöpfe und Knopflöcher besitzt?
13.09.2024 - 15:36DROPS Design answered:
Liebe Angela, danke für den Hinweis, eine Korrektur erfolgt, es wird hier nur 8 Knöpfe benutzt. Viel Spaß beim Stricken!
06.01.2025 - 14:45
![]() Cristina wrote:
Cristina wrote:
Sticka så i 4½-5-5½-6-7- 7½ cm, avsluta efter ett varv från avigsidan. Sticka vidare tills arbetet mäter 21-22-24-26-28-30 cm från uppläggningskanten mitt fram. Är det slätstickning mellan det avslutande rätt och aviga, tills det mäter 30 cm?
17.04.2023 - 13:20DROPS Design answered:
Hej Cristina, når du har strikket de 3 rapporter, så måler bærestykket 21 cm oppefra øverst på skulderen :)
18.04.2023 - 11:10
![]() Florence wrote:
Florence wrote:
I am following size L. From using the A1 and A2 charts, where the pattern says , ‘Work like this for 5.5 cm’, does the 5.5cm include the rows worked from the charts or is it an additional 5.5cm? I’m asking the same question for the other increases and whether the 5.5 cm is included in charts A3 to A6. Thank you for your help.
02.04.2022 - 19:00DROPS Design answered:
Dear Florence, measure the 5,5 cm after the last row in A.1/A.2 - and same after the next diagrams. Happy knitting!
04.04.2022 - 09:07
![]() Claire Kernin wrote:
Claire Kernin wrote:
Bonjour, je veux tricoter le gilet avec des aiguilles doubles pointes . Je vais tricoter chaque empiècement un là la fois. En lisant les explications j’ai vraiment du mal à comprendre comment commencer. Commencer la moitié du devant, le dos,... Pouvez-vous m’en dire plus ?
25.11.2021 - 02:01DROPS Design answered:
Bonjour Mme Kernin, l'empiècement du gilet se tricote en une seule pièce jusqu'à la division pour les manches: vous montez les mailes du col et tricotez ensuite les diagrammes en augmentant comme indiqué pour créer la forme souhaitée et obtenir le bon nombre de mailles. Vous divisez ensuite l'empiècement pour continuer les devants et le dos en une seule partie et les manches séparément. Cette leçon pourra vous aider à visualiser comment on procède pour un pull (en rond, avec un raglan). Bon tricot!
25.11.2021 - 09:14
![]() Berbett wrote:
Berbett wrote:
Bonjour, Y aurait-il un moyen de "rigidifier" les bords au niveau des boutonnières : comme sur la photo sur le site Drops le modèle présente ces mêmes vagues qui ne sont pas esthétiques.. Merci à vous. Pia.
15.12.2020 - 14:21DROPS Design answered:
Bonjour Pia, vous pouvez peut-être bloquer votre gilet, ajouter une bordure au crochet ou bien contacter votre magasin, même par mail ou téléphone, il aura peut-être une autre suggestion pour vous. Bonne continuation!
15.12.2020 - 14:58
![]() Anne Marie Aarseth wrote:
Anne Marie Aarseth wrote:
På bildet ser det ut som det er en omgang med vrangmasker ved hver økning på bærestykket. . Finner ikke noe om det i oppskriften. Er det noe som mangler i oppskriften?
24.09.2020 - 09:48DROPS Design answered:
Hej Anne Marie. Jag tror det är de pinnarna mitt i diagram A.3 och A.5 du ser. Den 3:e pinnen står det om i BÆRESTYKKE där det står "Strik 1 pind ret fra vrangen." Mvh DROPS Design
24.09.2020 - 10:44
![]() Berbett wrote:
Berbett wrote:
Bonjour, Empiècement : 339 m puis tricoter 7 mailles endroit 7 mailles envers pendant 5 cm. Tricoter jusqu'à ce que l'ouvrage mesure 22 cm depuis le rang de montage. Mon ouvrage mesure 20 cm après les 7 m endroit et 7 m envers dois-je continuer en jersey ? Puis ajuster de 339 m à 330 m comment fait-on ? Je vous remercie pour votre précédente aide. Cordialement. Berbett
12.09.2020 - 14:08DROPS Design answered:
Bonjour Mme Berbett, vous tricotez en côtes 7 m end/7 m env avec 5 m point mousse de chaque côté jusqu'à ce que l'ouvrage mesure 22 cm depuis le rang de montage, alors seulement vous tricotez 1 rang endroit sur l'endroit en ajustant le nombre de mailles à 330 (cette leçon explique comment diminuer à intervalles réguliers), vous tricotez ensuite 1 rang endroit sur l'enver (= 1 côte mousse), puis tricotez le rang de séparation des manches (on continue alors en jersey). Bon tricot!
14.09.2020 - 08:27
![]() Berbettt wrote:
Berbettt wrote:
Lecture diagramme : A1 A2 c'est bien sur l'endroit pour commencer puis retour sur l'envers. Le retour à l'envers correspond-il à la deuxième ligne du diagramme ? Si oui la 5 eim ligne se fait-elle à l'endroit donc je me retrouve à l'envers pour pour continuer ? Merci d'avance pour vos explications.
01.09.2020 - 17:39DROPS Design answered:
Bonjour Mme Berbett, nos stylistes vont vérifier ce point, vous pouvez en attendant tricoter le rang suivant (après A.5) sur l'envers en côtes 3 m end/3 m env (sur l'envers, vous commencerez et terminerez par 3 m env). Bon tricot!
02.09.2020 - 08:30
![]() Jane Ellegaard wrote:
Jane Ellegaard wrote:
Nej der er ikke symbol til mønsteret.
11.02.2020 - 12:21
|
||||||||||
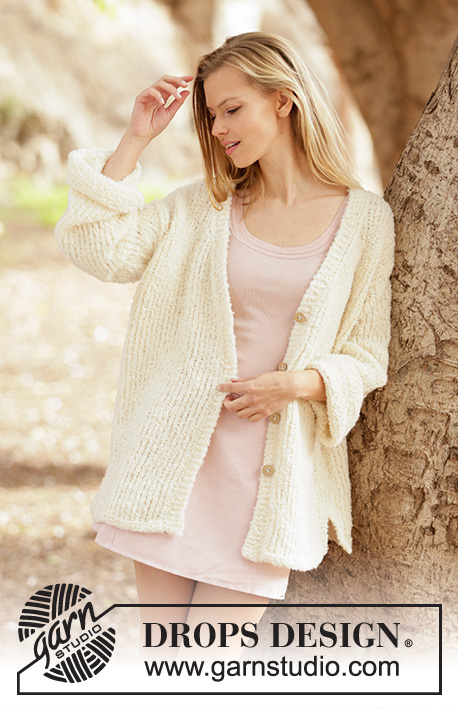
Mayan Sun Jacket#mayansunjacket |
||||||||||
 |
 |
|||||||||
Knitted jacket with round yoke in DROPS Sky. Piece is knitted top down with rib in round yoke. Size: S - XXXL
DROPS 213-12 |
||||||||||
|
---------------------------------------------------------- EXPLANATION FOR THE PATTERN: ---------------------------------------------------------- GARTER STITCH (back and forth): Knit all rows. 1 ridge vertically = knit 2 rows. GARTER STITCH (worked in the round): 1 ridge in height = 2 rounds; Knit 1 round and purl 1 round. PATTERN: See diagrams A.1 to A.6. BUTTONHOLES: Decrease for buttonholes on right band (when garment is worn). Decrease from right side when 3 stitches remain on row as follows: Make 1 yarn over, knit the next 2 stitches together, knit last stitch. On next row knit yarn over to make holes. Decrease first buttonhole when ridges in neck measures approx. 1½ cm. Then decrease the next 7 buttonholes, approx. 7½-8-8-8½-8½-9 cm between each. INCREASE TIP (applies to sides of body): Work until 2 stitches remain before marker thread, 1 yarn over, knit 4 (marker thread is in the middle of these stitches), 1 yarn over. On next round purl yarn overs twisted to avoid holes. Then work the new stitches in stocking stitch. DECREASE TIP (applies to sleeves): Decrease 1 stitch on each side of marker thread as follows: Work until 3 stitches remain before marker thread and knit 2 together, knit 2 (marker thread is between these stitches), slip 1 stitch knitwise, knit 1, pass slipped stitch over stitch worked. ---------------------------------------------------------- START THE PIECE HERE: ---------------------------------------------------------- JACKET - SHORT OVERVIEW OF THE PIECE: Work back and forth on circular needle from mid front, work top down. Work sleeves in the round on double pointed needles/a short circular needle. YOKE: Cast on 100-104-112-120-124-132 stitches (including 5 band stitches in each side towards mid front) on circular needle size 4 mm with Sky. Work 4 ridges in GARTER STITCH - read explanation above. Remember decrease for BUTTONHOLES - see explanation above. Now work as follows from the right side: 5 band stitches in garter stitch, * A.1 (= 2 stitches), A.2 (= 2 stitches) *, work from *-* until 7 stitches remain, A.1 and finish with 5 band stitches in garter stitch. When A.1 and A.2 have been worked 1 time vertically, there are 145-151-163-175-181-193 stitches on needle. Work as follows seen from right side: 5 stitches in garter stitch, * knit 3, purl 3 *, work from *-* until 8 stitches remain, knit 3 and 5 stitches in garter stitch. Work like this for 4½-5-5½-6-7-7½ cm, finish after a row from wrong side. Now work as follows from the right side: 5 band stitches in garter stitch, * A.3 (= 3 stitches), A.4 (= 3 stitches) *, work from *-* until 8 stitches remain, A.3 and finish with 5 band stitches in garter stitch. When A.3 and A.4 have been worked 1 time vertically, there are 235-245-265-285-295-315 stitches on needle. Work as follows from right side: 5 stitches in garter stitch, * knit 5, purl 5 *, work from *-* until 10 stitches remain, knit 5 and 5 stitches in garter stitch. Work like this for 4½-5-5½-6-7-7½ cm, finish after a row from wrong side. Now work as follows from the right side: 5 band stitches in garter stitch, * A.5 (= 5 stitches), A.6 (= 5 stitches) *, work from *-* until 10 stitches remain, work A.5 and finish with 5 band stitches in garter stitch. When A.5 and A.6 have been worked 1 time vertically, there are 325-339-367-395-409-437 stitches on needle. Work as follows from right side: 5 stitches in garter stitch, * knit 7, purl 7 *, work from *-* until 12 stitches remain, knit 7 and 5 stitches in garter stitch. Work like this for 4½-5-5½-6-7-7½ cm, finish after a row from wrong side. Work until piece measures 21-22-24-26-28-30 cm from cast-on edge mid front. Knit 1 row from right side while adjusting number of stitches to 314-330-358-394-418-442. Knit 1 row from wrong side. Work next row from right side as follows: Knit 49-52-56-61-66-71 (= front piece), slip the next 64-66-72-80-82-84 stitches on 1 stitch holder for sleeve, cast on 6-6-8-8-10-12 new stitches on row (= in the side under sleeve), knit the next 88-94-102-112-122-132 (= back piece), slip the next 64-66-72-80-82-84 on 1 stitch holder for sleeve, cast on 6-6-8-8-10-12 new stitches on row (= in the side under sleeve) and knit the last 49-52-56-61-66-71 stitches as before (= front piece). Finish body and sleeves separately. NOW MEASURE THE PIECE FROM HERE! BODY: = 198-210-230-250-274-298 stitches. Insert 1 marker thread in each side, in the middle of the 6-6-8-8-10-12 stitches that were cast on under each sleeve. Move the marker threads upwards when working; they should be used for increase later. Work in stocking stitch, continue band stitches as before. When piece measures 4 cm from division increase 1 stitch on each side of both marker threads - read INCREASE TIP = 4 stitches increased. Increase like this every 8 cm 4 times in total = 214-226-246-266-290-314 stitches. When piece measures 33-34-34-34-34-34 cm from division, work 4 ridges in garter stitch over all stitches, then cast off. Jacket measures approx. 60-62-64-66-68-70 cm from shoulder and down. SLEEVE: Slip the 64-66-72-80-82-84 stitches from stitch holder in one side of piece on a short circular needle/double pointed needles size 4 mm and pick in addition up 1 stitch in each of the 6-6-8-8-10-12 stitches cast on under sleeve = 70-72-80-88-92-96 stitches. Insert 1 marker thread in the middle of the 6-6-8-8-10-12 stitches under sleeve and move the marker thread upwards when working, it is used for decreasing later. Begin round at the marker thread and work stocking stitch in the round. When piece measures 3 cm from division, decrease 2 stitches mid under sleeve - read DECREASE TIP. Decrease like this every 3-3-2½-2-1½-1½ cm 11-11-14-17-18-19 times in total = 48-50-52-54-56-58 stitches. When sleeve measures 41-40-39-37-36-34 cm, work 4 ridges in GARTER STITCH (read explanation above) over all stitches, then cast off. Sleeve measures approx. 43-42-41-39-38-36 cm from division. Work the other sleeve the same way. ASSEMBLY: Sew the buttons on to the left band. |
||||||||||
Diagram explanations |
||||||||||
|
||||||||||
 |
||||||||||
Have you finished this pattern?Tag your pictures with #dropspattern #mayansunjacket or submit them to the #dropsfan gallery. Do you need help with this pattern?You'll find 25 tutorial videos, a Comments/Questions area and more by visiting the pattern on garnstudio.com. © 1982-2026 DROPS Design A/S. We reserve all rights. This document, including all its sub-sections, has copyrights. Read more about what you can do with our patterns at the bottom of each pattern on our site. |
||||||||||


With over 40 years in knitting and crochet design, DROPS Design offers one of the most extensive collections of free patterns on the internet - translated to 17 languages. As of today we count 324 catalogues and 12290 patterns translated into English (UK/cm). 12290
We work hard to bring you the best knitting and crochet have to offer, inspiration and advice as well as great quality yarns at incredible prices! Would you like to use our patterns for other than personal use? You can read what you are allowed to do in the Copyright text at the bottom of all our patterns. Happy crafting!
Post a comment to pattern DROPS 213-12
We would love to hear what you have to say about this pattern!
If you want to leave a question, please make sure you select the correct category in the form below, to speed up the answering process. Required fields are marked *.